Raspberry Pi Connect for Organisations
Introduction
Edit this on GitHub
Connect for Organisations lets multiple users share access to devices using Raspberry Pi Connect.
Devices in an organisation support all of Connect’s features, including screen sharing, remote shell access, and remote updates.
Creating your first organisation automatically starts a free, four-week trial for that organisation.
Create an organisation
To create a new organisation:
-
Sign in to your Raspberry Pi Connect account.
-
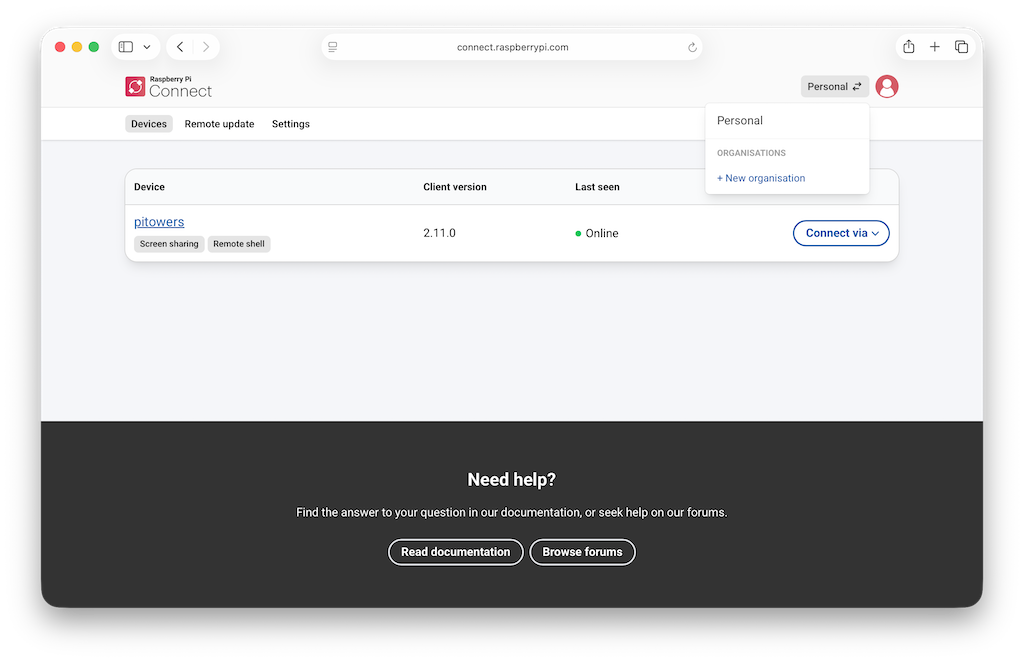
Select the account switcher icon (the two opposing arrows) at the top right of the navigation menu.
-
Select +New organisation, then type the organisation name.
-
If this is the first organisation you have created, Start your free trial displays. If you have previously created an organisation, Create organisation displays. Select whichever is displayed to you.
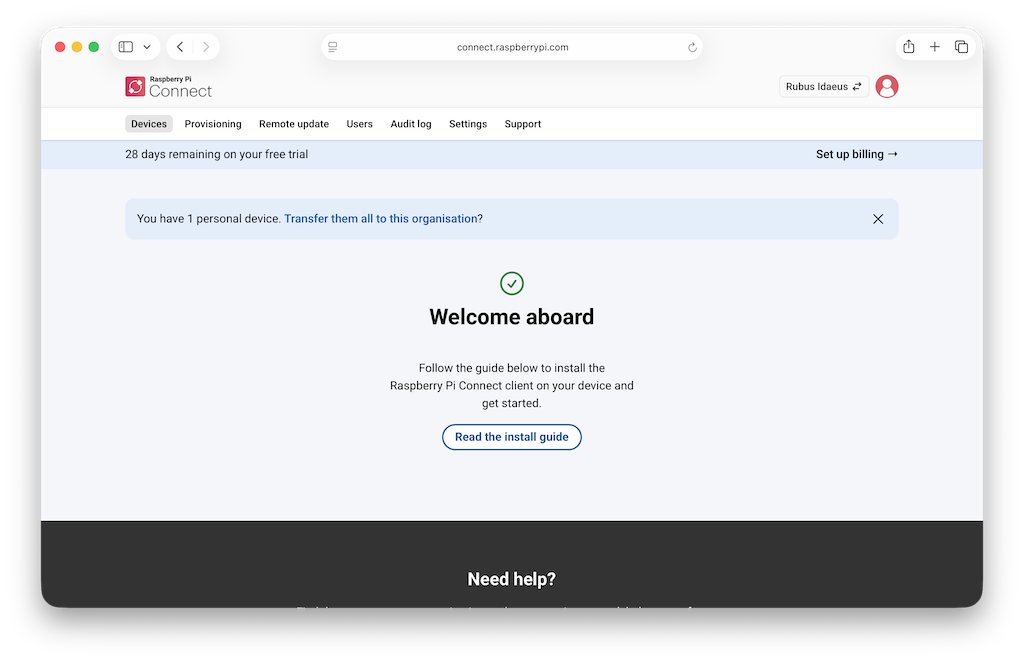
The organisation is created and your Connect account is automatically added to it as an administrator.
If there are devices associated with your personal Connect account, you’re presented with an option to transfer them to the new organisation now.
To transfer your devices:
-
Follow the Transfer them all to this organisation? link.
The Transfer personal devices page displays.
If you have personal devices that can be transferred to your new organisation, you’re asked to confirm the transfer before it takes place:

-
Review the personal devices by selecting the personal devices link, or confirm that you want to add the billable devices to your organisation’s account by selecting Transfer x devices (where "x" is the number of devices).
If you don’t want to add the devices now, you can always do so later. See Transfer a device.
Manage users
You must be an administrator to invite users to, remove users from, or change a user’s role in your organisation.
To invite a user:
-
Sign in to your Raspberry Pi Connect account.
-
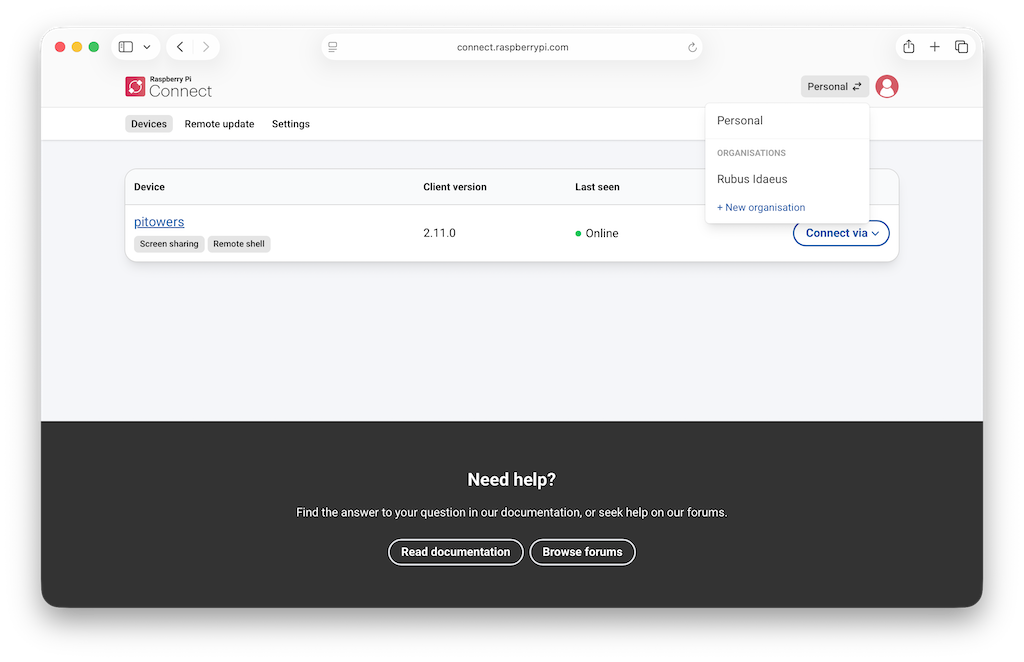
Select the account switcher icon (the two opposing arrows) at the top right of the navigation menu, then select your organisation from the list.
-
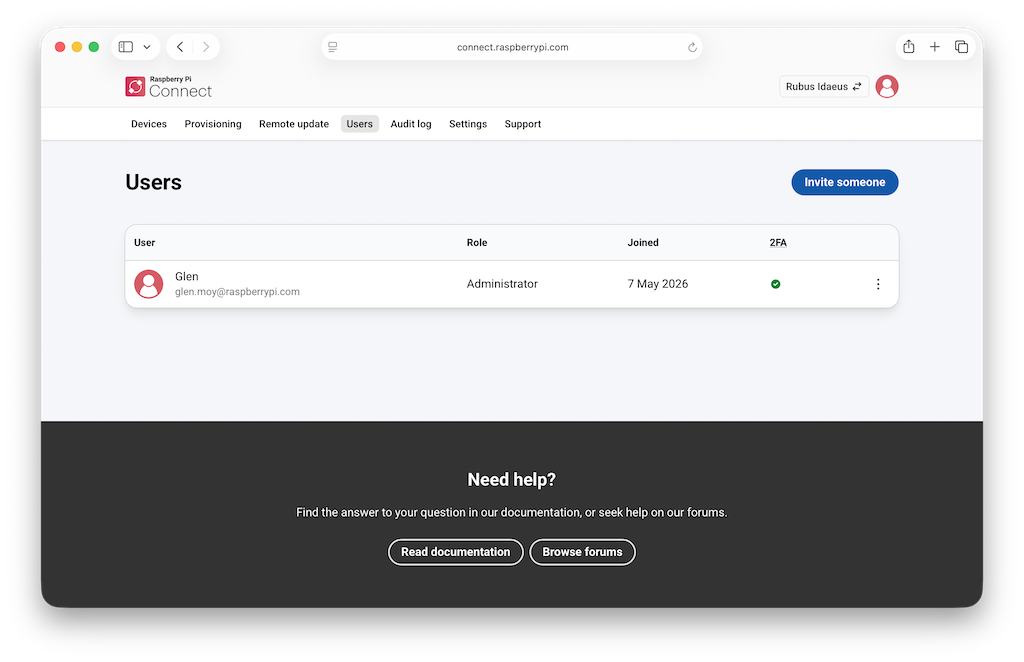
Select the Users tab at the top of the page, then select Invite someone.
-
Choose a Role from the dropdown menu.
There are two roles available for members of an organisation:
-
Member. A user who can remotely access all devices within an organisation but can’t make any changes to the organisation.
-
Administrator. A user who can remotely access all devices within an organisation and make changes to the organisation. They also receive organisation-wide notification emails for sensitive actions, such as the addition of new devices and new management API access tokens.
-
-
Enter the email address where you want to send the invitation.
-
Select Send invitation.

An invitation is sent to the email address you provided in Step 5. The user can follow the invitation link in the email, and can sign in using either the same email address or any valid Raspberry Pi ID.
To remove a user:
-
Sign in to your Raspberry Pi Connect account.
-
Select the account switcher icon (the two opposing arrows) at the top right of the navigation menu, then select your organisation from the list.
-
Select the Users tab at the top of the page.
This shows all members of your organisation.
-
Next to the user to remove, select the more options icon (three vertical dots), then select Remove….
A confirmation pop-up window appears.
-
If you are sure you want to remove this user, select Remove user.
The user is immediately removed from the organisation, and their shell and screen sharing sessions with your organisation are terminated within a few minutes.
To change a user’s role:
-
Sign in to your Raspberry Pi Connect account.
-
Select the account switcher icon (the two opposing arrows) at the top right of the navigation menu, then select your organisation from the list.
-
Select the Users tab at the top of the page.
This shows all members of your organisation.
-
Next to the user to remove, select the more options icon (three vertical dots), then select Change role….
-
From the dropdown, select the role to assign to the user, then select Change role.
The user’s role is changed and a confirmation screen appears.
Link a Raspberry Pi device with an organisation
You must be an administrator to link a device to an organisation.
To link a device to an organisation:
-
If the device isn’t linked to a Connect account, see Link a Raspberry Pi device with a Connect account.
-
If the device is already linked to a Connect account, see Transfer a device.
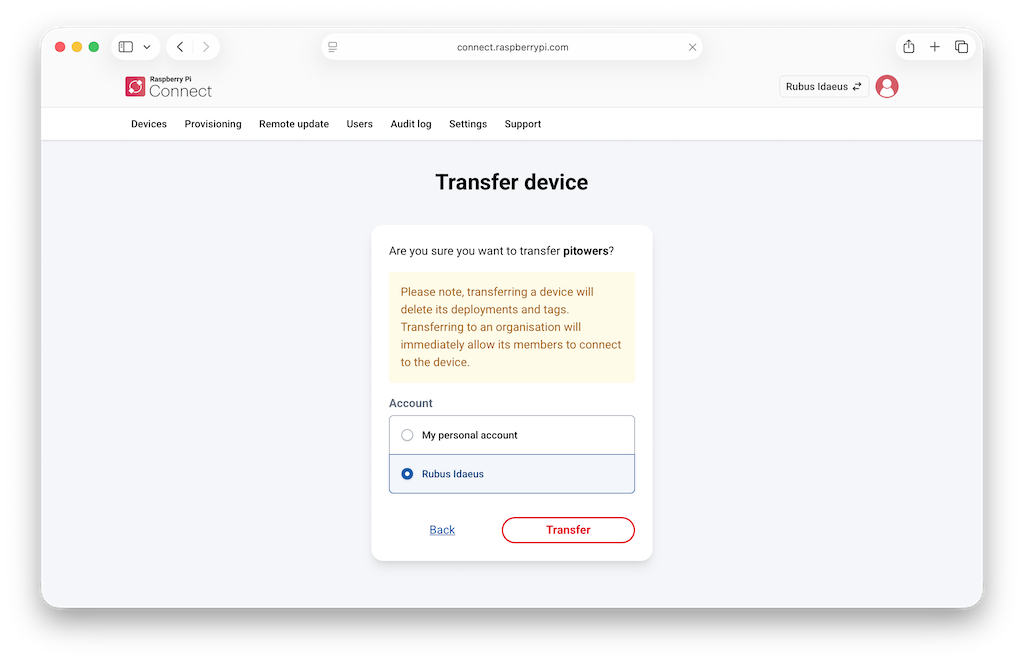
Transfer a device
You must be an administrator to transfer a device between accounts.
To transfer a device:
-
Sign in to your Raspberry Pi Connect account.
-
Select the account switcher icon in the top right of the navigation menu.
-
Switch to the account that currently owns the device (your personal account or an organisation).
-
Select the device you want to transfer.
-
Select Settings on the device page.
-
Under Danger zone, select Transfer device…
-
Select the account you want to transfer the device to.
-
Select Transfer.
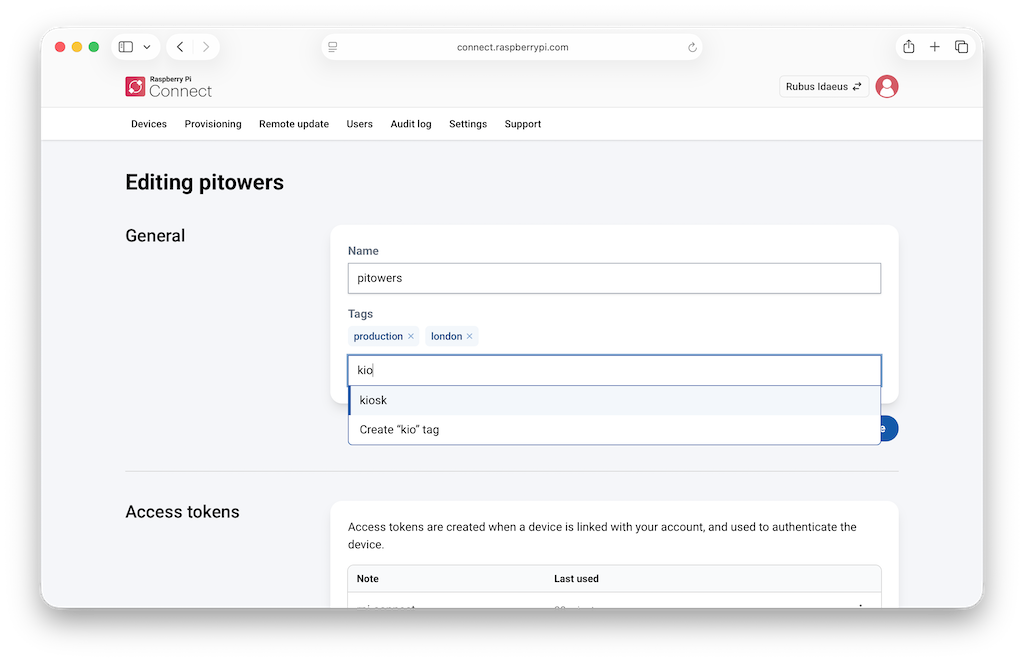
Tag devices
Tags help you categorise and find devices in your organisation. For example, you could tag devices by location (london, leeds), environment (production, staging), or function (point-of-sale, kiosk).
Tags appear beneath the device name on both the device page and the device list.
You must be an administrator to add or remove tags.
To add or remove tags on a device:
-
Select the device from the device list.
-
Select Settings on the device page.
-
Under the Tags field in the General section:
-
To add a tag, type in the text field. You can select an existing tag from the dropdown, or type a new tag name and select the Create option.
-
To remove a tag, select the x next to the tag you want to remove.
-
-
Select Update Device to save your changes.
Each device supports up to 10 tags. Tag names must be 30 characters or fewer and can only contain lowercase letters, numbers, hyphens, and underscores.
Search and filter devices
The search bar at the top of the device list lets you find devices by combining free-text search with structured filters.
To search by device name or serial number, type any text into the search bar. Results update automatically as you type.
To filter by a specific attribute, type a qualifier followed by a colon and a value. The available qualifiers are:
| Qualifier | Description |
|---|---|
|
Filter by Raspberry Pi model (for example, |
|
Filter by RAM size (for example, |
|
Filter by operating system (for example, |
|
Filter by tag (for example, |
|
Note
|
The model:, memory:, and os: qualifiers only find devices running Connect client version 2.9.0 or later. To update Connect on your devices, see Update.
|
You can combine multiple filters and free text in a single query. For example, model:5 tag:production dashboard finds Raspberry Pi 5 devices tagged production with "dashboard" in their name.
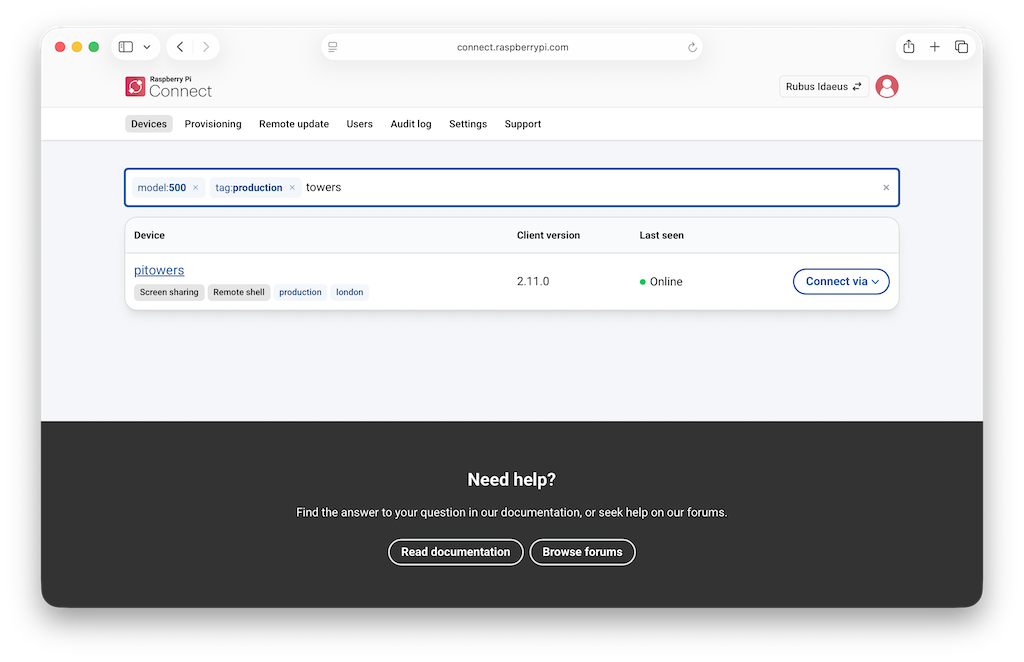
When you start typing in the search bar, a dropdown suggests available qualifiers and values. Select a qualifier from the dropdown to see its available values, then select a value to add it as a filter. Applied filters appear in the search bar.
Remove a filter by selecting the x next to it or by pressing Backspace.
Use the tag: qualifier multiple times to find devices that have all of the specified tags. For example, tag:production tag:kiosk only returns devices that have both the production and kiosk tags.
|
Tip
|
Select a tag on any device in the list to quickly add it as a filter. |
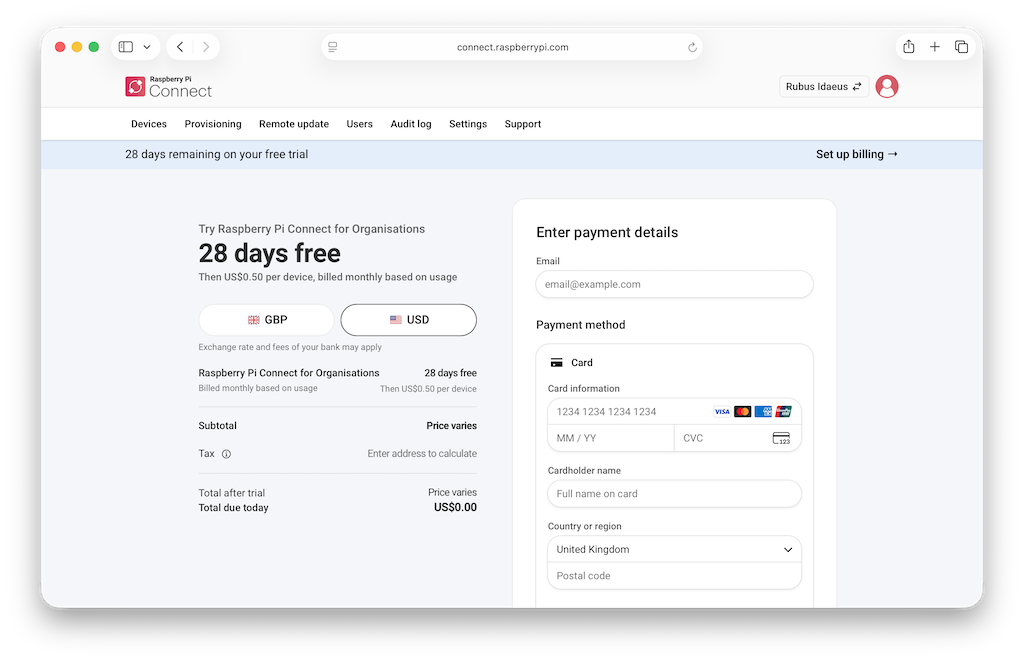
Set up your subscription
A subscription to Connect for Organisations starts when your four-week trial period ends, after which, you’re billed in arrears every month.
You must be an administrator to set up a subscription.
To set up a subscription:
-
Select Set up billing from the trial banner underneath the tabs at the top of the page.
-
Enter the email address to which you want to receive billing-related notifications such as invoices.
-
Enter your payment method details and submit them.
-
If you still have trial days left, the button says Start trial. Your trial continues, then you’ll be billed monthly.
-
If your trial has ended, the button says Pay and subscribe. This starts your monthly subscription.
-
Once your free trial ends, you won’t be able to remotely access the devices in your organisation until you set up a subscription.
View the audit log
The audit log shows all activity from the past 90 days ordered chronologically, with the most recent events first. Events include things like changes to devices, organisation members, API access tokens, and remote access sessions. Events that took place over 90 days ago are automatically deleted.
You must be an administrator to view the activity in your organisation from the past 90 days. To view the audit log, open the Audit log tab at the top of the page.
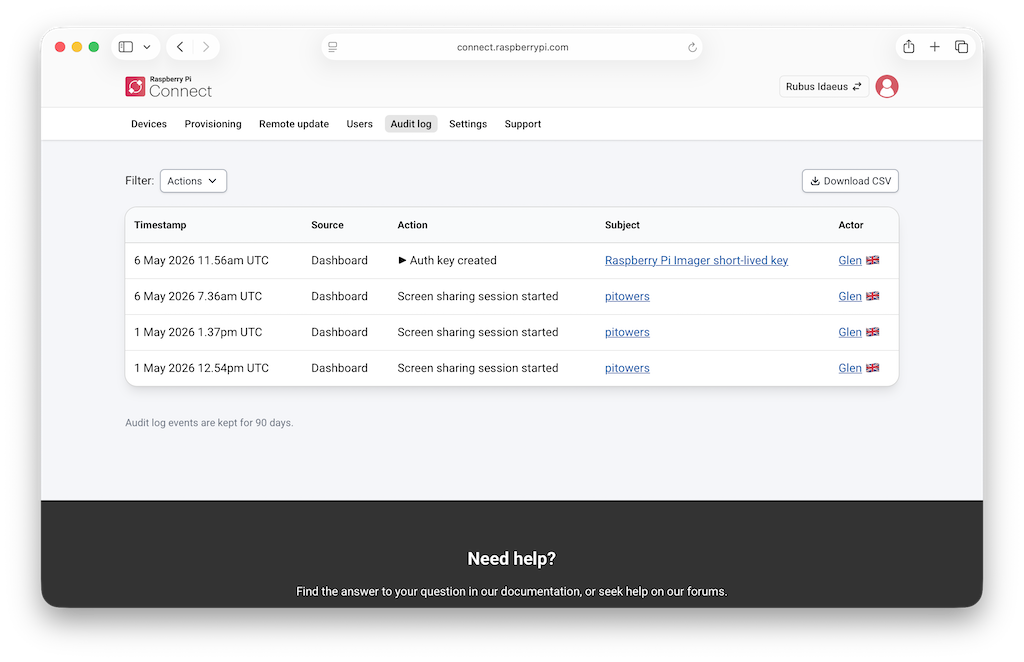
Each event in the list includes the following information:
-
Timestamp. The time of the event.
-
Source. Whether the event occurred in the dashboard or through the API.
-
Action. The action (for example, API access token created) and associated details.
-
Subject. The subject of the action, such as a specific device, organisation, or access token.
-
Actor. The user that performed the event, including the country in which the event happened.
You can filter events by types of action (such as Remote shell session started). To filter the list, select the Actions dropdown menu next to Filters above the top-left corner of the list.
Select Download CSV above the top-right corner of the list to download it in CSV format.
Change organisation settings
Administrators of an organisation can configure the following from the Settings tab at the top of the page.
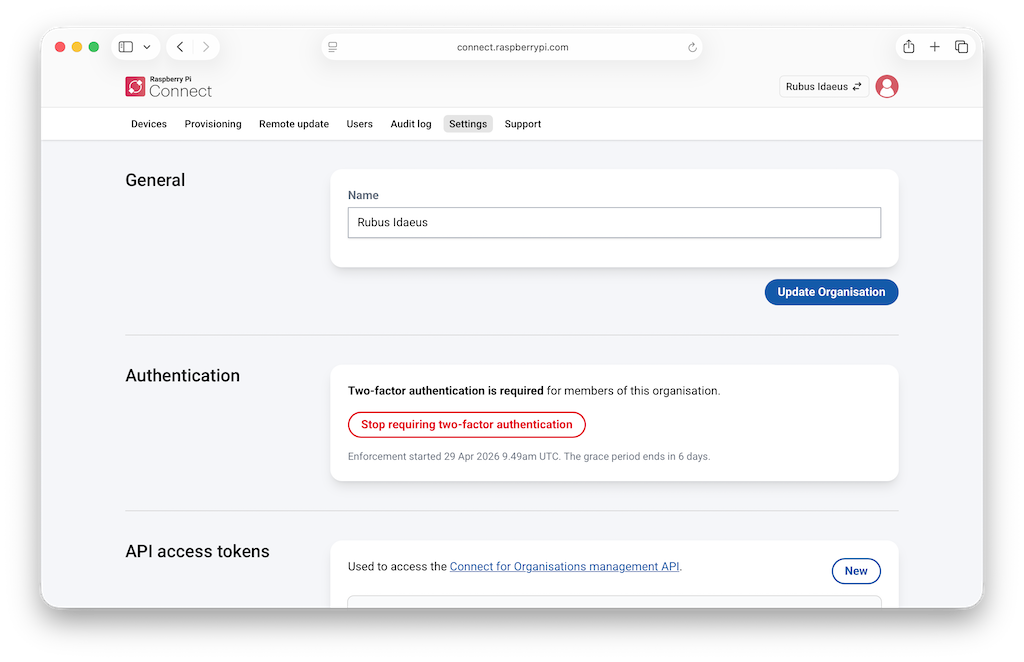
Rename the organisation
To change the name of the organisation, enter a new name in the General section. This won’t affect your devices or the members of your organisation.
Require two-factor authentication
You can require all members of your organisation to have two-factor authentication (2FA) enabled on their Raspberry Pi ID. This adds a layer of protection against compromised member accounts being used to access your organisation’s devices.
To enable the requirement for 2FA:
-
Sign in to Raspberry Pi Connect.
-
From the account switcher icon at the top right, select your organisation account.
-
Select the Settings tab, then select Require two-factor authentication. A notice displays confirming that your organisation’s settings were successfully updated.
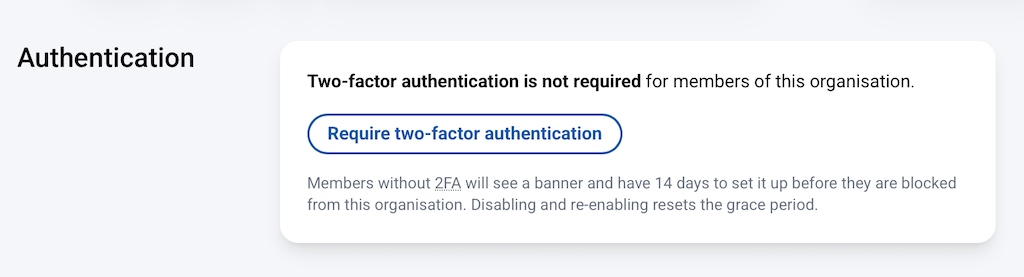
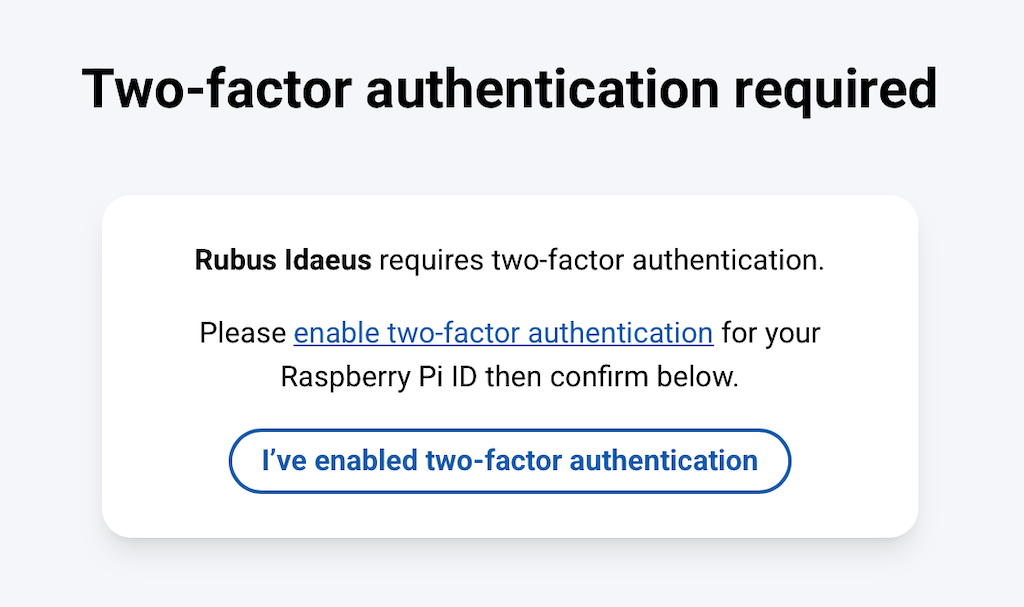
This starts a 14-day grace period. During the grace period, we display a banner to the members of your organisation who have not yet set up 2FA.
When the grace period ends, members who still have not set up 2FA are blocked from your organisation. They can no longer access your organisation’s devices or other resources until they enable 2FA on their Raspberry Pi ID.
To disable the requirement for 2FA:
-
Sign in to Raspberry Pi Connect.
-
From the account switcher icon at the top right, select your organisation account.
-
Select the Settings tab, then select Stop requiring two-factor authentication. A notice displays confirming that your organisation’s settings were successfully updated.
|
Note
|
Disabling and then re-enabling the 2FA requirement resets the 14-day grace period. |
Create auth keys
To link a device with Connect automatically (without using the web interface), create an auth key. Select New from the Auth keys section and enter a description and expiry time (between 1 and 90 days).
Your new auth key appears. Select the clipboard icon next to it to copy it. Copy this auth key now because it can’t be viewed again later.
|
Important
|
Your auth key is only shown once. Copy it now, because you won’t be able to see it again later. |
Create management API access tokens
To create auth keys automatically (without using the web interface) to link a device with Connect, you can create an API access token for the Connect for Organisations management API. Select New from the API access tokens section and enter a description for the access token.
|
Warning
|
A management API access token is equivalent to an administrator’s username and password for your organisation. It can manage every device, auth key, and device identity in the organisation. Keep it on the machine that calls the Management API (such as a provisioning workstation or CI system); never embed it in a Raspberry Pi OS image or copy it onto a device. To authenticate devices themselves, generate per-device credentials with device identities or auth keys and ship those instead. |
Your new access token appears. Select the clipboard icon next to it to copy it. Copy this access token now because it can’t be viewed again later.
|
Important
|
Your access token is only shown once. Copy it now, because you won’t be able to see it again later. |
Management API
The Management API lets you manage your organisation automatically, without using the Connect web interface. Requests to the Management API must be authenticated using a valid management API access token. The base URL is https://api.connect.raspberrypi.com.
Create a device identity
Device identities let you pre-authenticate a Raspberry Pi device with an organisation without interactive sign-in. Unlike auth keys, device identities are multi-use and rely on a private key stored in the device’s one-time programmable memory.
Creating device identities is free. You’re only billed for a device from the time that it first authenticates to your organisation’s Connect account, making device identities useful for organisations preconfiguring Raspberry Pi devices with Connect before deploying them.
The request must include an X-Connect-Identity-Signature header. To generate it, construct a newline-separated payload containing, in this order:
-
The HTTP request method (for example,
POST) -
The full request URL
-
Authorization: <value> -
Content-Type: <value> -
Accept: <value>(if your HTTP client sends one) -
The SHA256 hexadecimal digest of the HTTP request body (the JSON body of the
POSTshown below)
Sign this payload with the device’s private key using ECDSA with SHA256, then Base64-encode the result.
For example, a request to register a device identity produces the following payload:
POST
https://api.connect.raspberrypi.com/organisation/device-identities
Authorization: Bearer rporg_accesstokenhere
Content-Type: application/json
Accept: */*
<SHA256 hex digest of the HTTP request body>
On the device, use rpi-fw-crypto to sign the payload. For example, with the payload written to payload.txt:
$ rpi-fw-crypto sign --in payload.txt --key-id 1 --alg ec | base64 -w 0The output is the X-Connect-Identity-Signature header value.
To create a device identity for your organisation, use a management API access token to make the following HTTP request.
Replace these values in the code below:
-
rporg_accesstokenhere: your management API access token. -
signaturehere: theX-Connect-Identity-Signaturevalue for this request. -
-----BEGIN PUBLIC KEY-----...: the device’s PEM-encoded public key. -
my-device-identity: a description for the device identity, visible in the organisation’s audit log. -
pi5-001: the name assigned to the device when the identity is exchanged (optional, defaults to the device’s hostname). -
production,kiosk: (optional) tags applied to the device when the identity is exchanged. Each tag must contain only lowercase letters, numbers, hyphens, and underscores, with a maximum length of 30 characters. You can apply up to ten tags per device identity.
-
JSON
-
curl
POST /organisation/device-identities HTTP/1.1
Host: api.connect.raspberrypi.com
Authorization: Bearer rporg_accesstokenhere
Content-Type: application/json
X-Connect-Identity-Signature: signaturehere

{
    "public_key": "-----BEGIN PUBLIC KEY-----...",
    "description": "my-device-identity",
    "device_name": "pi5-001",
    "tags": ["production", "kiosk"]
}$ curl --header 'Authorization: Bearer rporg_accesstokenhere' --header 'X-Connect-Identity-Signature: signaturehere' --header 'Content-Type: application/json' --data '{"public_key":"-----BEGIN PUBLIC KEY-----...","description":"my-device-identity","device_name":"pi5-001","tags":["production","kiosk"]}' https://api.connect.raspberrypi.com/organisation/device-identitiesIf successful, you get a 201 Created response with the device identity in JSON format. For example:
HTTP/2 201
Content-Type: application/json; charset=utf-8

{
    "id": "096ce472-2cbd-412a-8295-6c03a1a07ba4",
    "description": "my-device-identity",
    "device_name": "pi5-001",
    "tags": ["production", "kiosk"],
    "created_at": "2026-02-25T16:09:52Z",
    "public_key": "-----BEGIN PUBLIC KEY-----..."
}
The response contains the following fields:
- id
-
A unique identifier for the device identity.
- description
-
The description used to create the device identity.
- device_name
-
The name that is assigned to the device when the identity is exchanged.
- tags
-
The tags that are applied to the device when the identity is exchanged.
- created_at
-
The date and time when the device identity was created (in ISO 8601 format).
- public_key
-
The PEM-encoded public key for the device identity.
Otherwise, you get one of the following responses:
| Response | Description | Example |
|---|---|---|
401 Unauthorized |
The management API access token is invalid. |
|
422 Unprocessable Content |
The device identity can’t be created. |
|
List device identities
To list all device identities in your organisation, use a management API access token to make the following HTTP request.
Replace these values in the code below:
-
rporg_accesstokenhere: your management API access token.
-
HTTP
-
curl
GET /organisation/device-identities HTTP/1.1
Host: api.connect.raspberrypi.com
Authorization: Bearer rporg_accesstokenhere$ curl --header 'Authorization: Bearer rporg_accesstokenhere' https://api.connect.raspberrypi.com/organisation/device-identitiesIf successful, you get a 200 OK response with up to 100 of the organisation’s device identities sorted alphabetically by description in JSON format. For example:
HTTP/2 200
Content-Type: application/json; charset=utf-8

{
    "device_identities": [
        {
            "id": "096ce472-2cbd-412a-8295-6c03a1a07ba4",
            "description": "my-device-identity",
            "device_name": "pi5-001",
            "tags": [],
            "created_at": "2026-02-25T16:09:52Z",
            "public_key": "-----BEGIN PUBLIC KEY-----..."
        }
    ],
    "meta": {
        "page": 1,
        "per_page": 100,
        "total_count": 1,
        "total_pages": 1
    }
}
The response contains the following fields:
- device_identities
-
List of device identities in the organisation (up to 100 for each page).
- meta
-
Pagination details.
Each item in the device_identities list contains the following fields:
- id
-
A unique identifier for the device identity.
- description
-
The description used to create the device identity.
- device_name
-
The name that is assigned to the device when the identity is exchanged.
- tags
-
The tags that are applied to the device when the identity is exchanged.
- created_at
-
The date and time when the device identity was created (in ISO 8601 format).
- public_key
-
The PEM-encoded public key for the device identity.
The meta object contains the following fields:
- page
-
The current page number of the response.
- per_page
-
The number of device identities for each page (maximum 100).
- total_count
-
The total number of device identities in the organisation.
- total_pages
-
The total number of pages of device identities for the organisation.
If the management API access token is invalid, you get a 401 Unauthorized response.
The page and per_page query parameters work the same way as for listing devices.
Show a device identity
To show a single device identity in your organisation, use a management API access token to make the following HTTP request.
Replace these values in the code below:
-
rporg_accesstokenhere: your management API access token. -
device-identity-id: the unique identifier for the device identity.
-
HTTP
-
curl
GET /organisation/device-identities/device-identity-id HTTP/1.1
Host: api.connect.raspberrypi.com
Authorization: Bearer rporg_accesstokenhere$ curl --header 'Authorization: Bearer rporg_accesstokenhere' https://api.connect.raspberrypi.com/organisation/device-identities/device-identity-idIf successful, you get a 200 OK response with the device identity’s details in JSON format. For example:
HTTP/2 200
Content-Type: application/json; charset=utf-8

{
    "id": "096ce472-2cbd-412a-8295-6c03a1a07ba4",
    "description": "my-device-identity",
    "device_name": "pi5-001",
    "tags": [],
    "created_at": "2026-02-25T16:09:52Z",
    "public_key": "-----BEGIN PUBLIC KEY-----..."
}
Otherwise, you get one of the following responses:
| Response | Description |
|---|---|
401 Unauthorized |
The management API access token is invalid. |
404 Not Found |
The device identity isn’t found in the organisation. |
Update a device identity
To update an existing device identity in your organisation, use a management API access token to make the following HTTP request.
Replace these values in the code below:
-
rporg_accesstokenhere: your management API access token. -
device-identity-id: the unique identifier for the device identity. -
my-renamed-device-identity: the new description for the device identity. -
pi5-001: the new name that is assigned to the device when the identity is exchanged (optional). -
production,kiosk: tags applied to the device when the identity is exchanged (optional).
-
JSON
-
curl
PATCH /organisation/device-identities/device-identity-id HTTP/1.1
Host: api.connect.raspberrypi.com
Authorization: Bearer rporg_accesstokenhere
Content-Type: application/json

{
    "description": "my-renamed-device-identity",
    "device_name": "pi5-001",
    "tags": ["production", "kiosk"]
}$ curl --request PATCH --header 'Authorization: Bearer rporg_accesstokenhere' --header 'Content-Type: application/json' --data '{"description":"my-renamed-device-identity","device_name":"pi5-001","tags":["production","kiosk"]}' https://api.connect.raspberrypi.com/organisation/device-identities/device-identity-idIf successful, you get a 200 OK response with the updated device identity in JSON format:
HTTP/2 200
Content-Type: application/json; charset=utf-8

{
    "id": "096ce472-2cbd-412a-8295-6c03a1a07ba4",
    "description": "my-renamed-device-identity",
    "device_name": "pi5-001",
    "tags": ["production", "kiosk"],
    "created_at": "2026-02-25T16:09:52Z",
    "public_key": "-----BEGIN PUBLIC KEY-----..."
}|
Note
|
Once a device identity has been exchanged for a device, only the description can be updated. Any device_name or tags values in the request body are ignored, because those fields are only applied when the identity is first exchanged.
|
Otherwise, you get one of the following responses:
| Response | Description | Example |
|---|---|---|
401 Unauthorized |
The management API access token is invalid. |
|
404 Not Found |
The device identity isn’t found in the organisation. |
|
422 Unprocessable Content |
The device identity can’t be updated. |
|
Delete a device identity
To delete a device identity in your organisation, use a management API access token to make the following HTTP request.
Replace these values in the code below:
-
rporg_accesstokenhere: your management API access token. -
device-identity-id: the unique identifier for the device identity.
-
HTTP
-
curl
DELETE /organisation/device-identities/device-identity-id HTTP/1.1
Host: api.connect.raspberrypi.com
Authorization: Bearer rporg_accesstokenhere$ curl --request DELETE --header 'Authorization: Bearer rporg_accesstokenhere' https://api.connect.raspberrypi.com/organisation/device-identities/device-identity-idIf the device identity has already been exchanged for a device, the linked device is also deleted and signed out of Raspberry Pi Connect.
If successful, you get a 204 No Content response with an empty response body.
Otherwise, you get one of the following responses:
| Response | Description |
|---|---|
401 Unauthorized |
The management API access token is invalid. |
404 Not Found |
The device identity isn’t found in the organisation. |
Create an auth key
To create an auth key to link a device with Connect, use a management API access token to make the following HTTP request.
Replace these values in the code below:
-
rporg_accesstokenhere: your management API access token. -
my-auth-key: a description for your auth key. -
1: how many days until the auth key expires, between 1 and 90 (optional, defaults to 1 day). -
pi5-001: name used when adding devices with this key (optional, defaults to the device’s hostname). -
production,kiosk: tags applied to the device when the auth key is exchanged (optional). Each tag must contain only lowercase letters, numbers, hyphens, and underscores, with a maximum length of 30 characters. You can apply up to 10 tags per auth key.
-
JSON
-
HTTP
-
curl
POST /organisation/auth-keys HTTP/1.1
Host: api.connect.raspberrypi.com
Authorization: Bearer rporg_accesstokenhere
Content-Type: application/json

{
    "description": "my-auth-key",
    "ttl_days": 1,
    "device_name": "pi5-001",
    "tags": ["production", "kiosk"]
}POST /organisation/auth-keys HTTP/1.1
Host: api.connect.raspberrypi.com
Authorization: Bearer rporg_accesstokenhere
Content-Type: application/x-www-form-urlencoded
description=my-auth-key&ttl_days=1&device_name=pi5-001&tags[]=production&tags[]=kiosk$ curl --header 'Authorization: Bearer rporg_accesstokenhere' --data-urlencode 'description=my-auth-key' --data-urlencode 'ttl_days=1' --data-urlencode 'device_name=pi5-001' --data-urlencode 'tags[]=production' --data-urlencode 'tags[]=kiosk' https://api.connect.raspberrypi.com/organisation/auth-keysIf successful, you get a 201 Created response with your auth key in JSON format. For example:
HTTP/2 201
Content-Type: application/json; charset=utf-8

{
    "id": "12345",
    "description": "my-auth-key",
    "device_name": "pi5-001",
    "tags": ["production", "kiosk"],
    "secret": "rpoak_123456",
    "expires_at": "2025-01-01T00:00:30Z",
    "exchanged_at": null,
    "created_at": "2024-12-31T00:00:30Z"
}
The response contains the following fields:
- id
-
A unique identifier for the auth key.
- description
-
The description used to create the auth key.
- device_name
-
The name that is assigned to the device when the auth key is exchanged.
- tags
-
The tags that are applied to the device when the auth key is exchanged.
- secret
-
A random token prefixed with
rpoak_. - expires_at
-
The date and time when the key expires (in ISO 8601 format).
- exchanged_at
-
The date and time when the auth key was exchanged to link a device (in ISO 8601 format), or
nullif it hasn’t been exchanged yet. - created_at
-
The date and time when the auth key was created (in ISO 8601 format).
The secret can then be used to link a device with Connect before it expires.
Otherwise, you get one of the following responses:
| Response | Description | Example |
|---|---|---|
401 Unauthorized |
The management API access token is invalid. |
|
422 Unprocessable Content |
The auth key can’t be created. |
|
|
Note
|
You can also manually create an auth key on your organisation’s Settings page. |
List auth keys
To list all auth keys in your organisation, use a management API access token to make the following HTTP request.
Replace these values in the code below:
-
rporg_accesstokenhere: your management API access token.
-
HTTP
-
curl
GET /organisation/auth-keys HTTP/1.1
Host: api.connect.raspberrypi.com
Authorization: Bearer rporg_accesstokenhere$ curl --header 'Authorization: Bearer rporg_accesstokenhere' https://api.connect.raspberrypi.com/organisation/auth-keysIf successful, you get a 200 OK response with up to 100 of the organisation’s auth keys in JSON format, sorted with usable auth keys first, followed by expired and then exchanged auth keys, with the most recent first in each group. For example:
HTTP/2 200
Content-Type: application/json; charset=utf-8

{
    "auth_keys": [
        {
            "id": "096ce472-2cbd-412a-8295-6c03a1a07ba4",
            "description": "my-auth-key",
            "device_name": "pi5-001",
            "tags": ["production", "kiosk"],
            "expires_at": "2026-02-26T16:09:52Z",
            "exchanged_at": null,
            "created_at": "2026-02-25T16:09:52Z"
        }
    ],
    "meta": {
        "page": 1,
        "per_page": 100,
        "total_count": 1,
        "total_pages": 1
    }
}
The response contains the following fields:
- auth_keys
-
List of auth keys in the organisation (up to 100 for each page).
- meta
-
Pagination details.
Each item in the auth_keys list contains the following fields:
- id
-
A unique identifier for the auth key.
- description
-
The description used to create the auth key.
- device_name
-
The name that is assigned to the device when the auth key is exchanged.
- tags
-
The tags that are applied to the device when the auth key is exchanged.
- expires_at
-
The date and time when the key expires (in ISO 8601 format).
- exchanged_at
-
The date and time when the auth key was exchanged to link a device (in ISO 8601 format), or
nullif it hasn’t been exchanged yet. - created_at
-
The date and time when the auth key was created (in ISO 8601 format).
|
Note
|
The secret is only included in the response when an auth key is first created and can’t be viewed again later.
|
The meta object contains the following fields:
- page
-
The current page number of the response.
- per_page
-
The number of auth keys for each page (maximum 100).
- total_count
-
The total number of auth keys in the organisation.
- total_pages
-
The total number of pages of auth keys for the organisation.
If the management API access token is invalid, you get a 401 Unauthorized response.
The page and per_page query parameters work the same way as for listing devices.
Show an auth key
To show a single auth key in your organisation, use a management API access token to make the following HTTP request.
Replace these values in the code below:
-
rporg_accesstokenhere: your management API access token. -
auth-key-id: the unique identifier for the auth key.
-
HTTP
-
curl
GET /organisation/auth-keys/auth-key-id HTTP/1.1
Host: api.connect.raspberrypi.com
Authorization: Bearer rporg_accesstokenhere$ curl --header 'Authorization: Bearer rporg_accesstokenhere' https://api.connect.raspberrypi.com/organisation/auth-keys/auth-key-idIf successful, you get a 200 OK response with the auth key’s details in JSON format. For example:
HTTP/2 200
Content-Type: application/json; charset=utf-8

{
    "id": "096ce472-2cbd-412a-8295-6c03a1a07ba4",
    "description": "my-auth-key",
    "device_name": "pi5-001",
    "tags": ["production", "kiosk"],
    "expires_at": "2026-02-26T16:09:52Z",
    "exchanged_at": null,
    "created_at": "2026-02-25T16:09:52Z"
}
Otherwise, you get one of the following responses:
| Response | Description |
|---|---|
401 Unauthorized |
The management API access token is invalid. |
404 Not Found |
The auth key isn’t found in the organisation. |
Update an auth key
To update an existing auth key in your organisation, use a management API access token to make the following HTTP request.
Replace these values in the code below:
-
rporg_accesstokenhere: your management API access token. -
auth-key-id: the unique identifier for the auth key. -
my-renamed-auth-key: the new description for the auth key. -
pi5-001: the new name that is assigned to the device when the auth key is exchanged (optional). -
production,kiosk: tags applied to the device when the auth key is exchanged (optional).
-
JSON
-
curl
PATCH /organisation/auth-keys/auth-key-id HTTP/1.1
Host: api.connect.raspberrypi.com
Authorization: Bearer rporg_accesstokenhere
Content-Type: application/json

{
    "description": "my-renamed-auth-key",
    "device_name": "pi5-001",
    "tags": ["production", "kiosk"]
}$ curl --request PATCH --header 'Authorization: Bearer rporg_accesstokenhere' --header 'Content-Type: application/json' --data '{"description":"my-renamed-auth-key","device_name":"pi5-001","tags":["production","kiosk"]}' https://api.connect.raspberrypi.com/organisation/auth-keys/auth-key-idIf successful, you get a 200 OK response with the updated auth key in JSON format:
HTTP/2 200
Content-Type: application/json; charset=utf-8

{
    "id": "096ce472-2cbd-412a-8295-6c03a1a07ba4",
    "description": "my-renamed-auth-key",
    "device_name": "pi5-001",
    "tags": ["production", "kiosk"],
    "expires_at": "2026-02-26T16:09:52Z",
    "exchanged_at": null,
    "created_at": "2026-02-25T16:09:52Z"
}
Otherwise, you get one of the following responses:
| Response | Description | Example |
|---|---|---|
401 Unauthorized |
The management API access token is invalid. |
|
404 Not Found |
The auth key isn’t found in the organisation. |
|
422 Unprocessable Content |
The auth key has expired or has already been exchanged. |
|
422 Unprocessable Content |
The auth key can’t be updated for any other reason. |
|
Delete an auth key
To delete an auth key in your organisation, use a management API access token to make the following HTTP request.
Replace these values in the code below:
-
rporg_accesstokenhere: your management API access token. -
auth-key-id: the unique identifier for the auth key.
-
HTTP
-
curl
DELETE /organisation/auth-keys/auth-key-id HTTP/1.1
Host: api.connect.raspberrypi.com
Authorization: Bearer rporg_accesstokenhere$ curl --request DELETE --header 'Authorization: Bearer rporg_accesstokenhere' https://api.connect.raspberrypi.com/organisation/auth-keys/auth-key-idYou can delete any auth key, including ones that have expired or have already been exchanged. Deleting an auth key that has been exchanged doesn’t affect the linked device.
If successful, you get a 204 No Content response with an empty response body.
Otherwise, you get one of the following responses:
| Response | Description |
|---|---|
401 Unauthorized |
The management API access token is invalid. |
404 Not Found |
The auth key isn’t found in the organisation. |
List devices
To list all devices in your organisation, use a management API access token to make the following HTTP request.
Replace these values in the code below:
-
rporg_accesstokenhere: your management API access token.
-
HTTP
-
curl
GET /organisation/devices HTTP/1.1
Host: api.connect.raspberrypi.com
Authorization: Bearer rporg_accesstokenhere$ curl --header 'Authorization: Bearer rporg_accesstokenhere' https://api.connect.raspberrypi.com/organisation/devicesIf successful, you get a 200 OK response with up to 100 of the organisation’s devices sorted alphabetically by name in JSON format. For example:
HTTP/2 200
Content-Type: application/json; charset=utf-8

{
    "devices": [
        {
            "id": "69739b44-ebb2-468e-9e24-08126dec4925",
            "name": "raspberrypi5",
            "serial_number": "ea636879c4d47a37",
            "tags": ["production", "kiosk"],
            "board": {
                "model": "Raspberry Pi 5",
                "revision": "1.0",
                "memory": "8 GB"
            },
            "os": {
                "name": "Raspberry Pi OS",
                "version": "13 (Trixie)"
            },
            "kernel_architecture": "aarch64",
            "filters": {
                "model": "5",
                "memory": "8gb",
                "os": "raspios-13"
            }
        }
    ],
    "meta": {
        "page": 1,
        "per_page": 100,
        "total_count": 1,
        "total_pages": 1
    }
}
The response contains the following fields:
- devices
-
List of devices in the organisation (up to 100 for each page).
- meta
-
Pagination details.
Each item in the devices list contains the following fields:
- id
-
A unique identifier for the device.
- name
-
The name of the device.
- serial_number
-
The serial number of the device.
- tags
-
The tags applied to the device.
- board
-
The device’s board model, revision, and memory.
nullif unknown. - os
-
The operating system name and version running on the device.
nullif unknown. - kernel_architecture
-
The kernel architecture reported by the device (for example,
aarch64).nullif unknown. - filters
-
The qualifiers that match this device, for use with the
queryparameter (see below). Only includes attributes that are known for the device, so this object may be empty.
The board, os, kernel_architecture, and filters fields are only populated for devices running Connect client version 2.9.0 or later.
The meta object contains the following fields:
- page
-
The current page number of the response.
- per_page
-
The number of devices for each page (maximum 100).
- total_count
-
The total number of devices in the organisation.
- total_pages
-
The total number of pages of devices for the organisation.
If the management API access token is invalid, you get a 401 Unauthorized response.
To fetch subsequent pages of devices, use the page parameter in the query string:
-
HTTP
-
curl
GET /organisation/devices?page=2 HTTP/1.1
Host: api.connect.raspberrypi.com
Authorization: Bearer rporg_accesstokenhere$ curl --header 'Authorization: Bearer rporg_accesstokenhere' 'https://api.connect.raspberrypi.com/organisation/devices?page=2'To change the number of devices returned for each page, use the per_page parameter in the query string (with a maximum of 100):
-
HTTP
-
curl
GET /organisation/devices?per_page=10 HTTP/1.1
Host: api.connect.raspberrypi.com
Authorization: Bearer rporg_accesstokenhere$ curl --header 'Authorization: Bearer rporg_accesstokenhere' 'https://api.connect.raspberrypi.com/organisation/devices?per_page=10'To filter the devices returned, use the query parameter in the query string. This accepts the same syntax as the search bar in the web interface, combining free-text search with structured filters:
-
Free text matches against device name and serial number.
-
The
model:,memory:,os:, andtag:qualifiers filter by a specific attribute (for example,model:5ortag:production).
You can combine multiple filters and free text in a single query. The value must be URL-encoded, including the spaces between terms.
For example, to find Raspberry Pi 5 devices tagged production:
-
HTTP
-
curl
GET /organisation/devices?query=model%3A5%20tag%3Aproduction HTTP/1.1
Host: api.connect.raspberrypi.com
Authorization: Bearer rporg_accesstokenhere$ curl --header 'Authorization: Bearer rporg_accesstokenhere' --get --data-urlencode 'query=model:5 tag:production' https://api.connect.raspberrypi.com/organisation/devicesThe query parameter composes with the page and per_page parameters, so you can paginate through a filtered list.
The filters object returned for each device lists the exact qualifier values that match it, so you can use those values to build a query. For example, a device with "os": "raspios-13" in its filters matches the query os:raspios-13.
The model: qualifier accepts the following values:
| Value | Model |
|---|---|
|
Raspberry Pi A |
|
Raspberry Pi B |
|
Raspberry Pi A+ |
|
Raspberry Pi B+ |
|
Raspberry Pi 2B |
|
Raspberry Pi CM1 |
|
Raspberry Pi 3B |
|
Raspberry Pi Zero |
|
Raspberry Pi CM3 |
|
Raspberry Pi Zero W |
|
Raspberry Pi 3B+ |
|
Raspberry Pi 3A+ |
|
Raspberry Pi CM3+ |
|
Raspberry Pi 4B |
|
Raspberry Pi Zero 2 W |
|
Raspberry Pi 400 |
|
Raspberry Pi CM4 |
|
Raspberry Pi CM4S |
|
Raspberry Pi 5 |
|
Raspberry Pi CM5 |
|
Raspberry Pi 500 |
|
Raspberry Pi CM5 Lite |
|
Raspberry Pi CM0 |
The memory: qualifier accepts the following values:
| Value | Memory |
|---|---|
|
256 MB |
|
512 MB |
|
1 GB |
|
2 GB |
|
4 GB |
|
8 GB |
|
16 GB |
|
Note
|
As with the web interface, the model:, memory:, and os: qualifiers only match devices running Connect client version 2.9.0 or later.
|
Delete a device
To delete a device in your organisation and sign it out of Raspberry Pi Connect, use a management API access token to make the following HTTP request.
Replace these values in the code below:
-
rporg_accesstokenhere: your management API access token. -
device-id: the unique identifier for your device.
-
HTTP
-
curl
DELETE /organisation/devices/device-id HTTP/1.1
Host: api.connect.raspberrypi.com
Authorization: Bearer rporg_accesstokenhere$ curl --request DELETE --header 'Authorization: Bearer rporg_accesstokenhere' https://api.connect.raspberrypi.com/organisation/devices/device-idIf successful, you get a 204 No Content response with an empty response body.
Otherwise, you get one of the following responses:
| Response | Description |
|---|---|
401 Unauthorized |
The management API access token is invalid. |
404 Not Found |
The given device ID is not found in the organisation. |
List artefacts
To list all remote update artefacts in your organisation, use a management API access token to make the following HTTP request.
Replace these values in the code below:
-
rporg_accesstokenhere: your management API access token.
-
HTTP
-
curl
GET /organisation/artefacts HTTP/1.1
Host: api.connect.raspberrypi.com
Authorization: Bearer rporg_accesstokenhere$ curl --header 'Authorization: Bearer rporg_accesstokenhere' https://api.connect.raspberrypi.com/organisation/artefactsIf successful, you get a 200 OK response with up to 100 of the organisation’s artefacts sorted alphabetically by name in JSON format. For example:
HTTP/2 200
Content-Type: application/json; charset=utf-8

{
    "artefacts": [
        {
            "id": "ee92e7e6-2c2c-4e7d-9d80-2cce8a6c7e8a",
            "name": "kiosk-v1.0",
            "uri": "https://example.com/kiosk-v1.0.tar.zst",
            "checksum": "d39fc02ad7878db7f6803f54dfce89346a763a603cb8e62221ba893fee9c5cc6"
        }
    ],
    "meta": {
        "page": 1,
        "per_page": 100,
        "total_count": 1,
        "total_pages": 1
    }
}
To filter the artefacts returned, use the name parameter in the query string. This performs a case-insensitive prefix match against the artefact name:
-
HTTP
-
curl
GET /organisation/artefacts?name=kiosk HTTP/1.1
Host: api.connect.raspberrypi.com
Authorization: Bearer rporg_accesstokenhere$ curl --header 'Authorization: Bearer rporg_accesstokenhere' --get --data-urlencode 'name=kiosk' https://api.connect.raspberrypi.com/organisation/artefactsThe page and per_page query parameters work the same way as for listing devices, and compose with the name parameter so you can paginate through a filtered list.
If the management API access token is invalid, you get a 401 Unauthorized response.
Create an artefact
To create a remote update artefact for your organisation, use a management API access token to make the following HTTP request.
Replace these values in the code below:
-
rporg_accesstokenhere: your management API access token. -
kiosk-v1.0: a unique name for the artefact within the organisation. -
https://example.com/kiosk-v1.0.tar.zst: the URI from which devices download the artefact. -
d39fc02ad7878db7f6803f54dfce89346a763a603cb8e62221ba893fee9c5cc6: the hex-encoded SHA-256 checksum of the artefact.
-
JSON
-
curl
POST /organisation/artefacts HTTP/1.1
Host: api.connect.raspberrypi.com
Authorization: Bearer rporg_accesstokenhere
Content-Type: application/json

{
    "name": "kiosk-v1.0",
    "uri": "https://example.com/kiosk-v1.0.tar.zst",
    "checksum": "d39fc02ad7878db7f6803f54dfce89346a763a603cb8e62221ba893fee9c5cc6"
}$ curl --header 'Authorization: Bearer rporg_accesstokenhere' --data-urlencode 'name=kiosk-v1.0' --data-urlencode 'uri=https://example.com/kiosk-v1.0.tar.zst' --data-urlencode 'checksum=d39fc02ad7878db7f6803f54dfce89346a763a603cb8e62221ba893fee9c5cc6' https://api.connect.raspberrypi.com/organisation/artefactsIf successful, you get a 201 Created response with the artefact’s details in JSON format. For example:
HTTP/2 201
Content-Type: application/json; charset=utf-8

{
    "id": "ee92e7e6-2c2c-4e7d-9d80-2cce8a6c7e8a",
    "name": "kiosk-v1.0",
    "uri": "https://example.com/kiosk-v1.0.tar.zst",
    "checksum": "d39fc02ad7878db7f6803f54dfce89346a763a603cb8e62221ba893fee9c5cc6"
}
Otherwise, you get one of the following responses:
| Response | Description | Example |
|---|---|---|
401 Unauthorized |
The management API access token is invalid. |
|
422 Unprocessable Content |
The artefact can’t be created. |
|
Delete an artefact
To delete an artefact in your organisation, use a management API access token to make the following HTTP request.
Replace these values in the code below:
-
rporg_accesstokenhere: your management API access token. -
artefact-id: the artefact’sid(as returned by Create an artefact).
-
HTTP
-
curl
DELETE /organisation/artefacts/artefact-id HTTP/1.1
Host: api.connect.raspberrypi.com
Authorization: Bearer rporg_accesstokenhere$ curl --request DELETE --header 'Authorization: Bearer rporg_accesstokenhere' https://api.connect.raspberrypi.com/organisation/artefacts/artefact-idIf successful, you get a 204 No Content response with an empty response body.
Otherwise, you get one of the following responses:
| Response | Description | Example |
|---|---|---|
401 Unauthorized |
The management API access token is invalid. |
|
404 Not Found |
The given artefact ID is not found in the organisation. |
|
422 Unprocessable Content |
The artefact has been deployed to a device. |
|
List deployments
To list remote update deployments for a device in your organisation, use a management API access token to make the following HTTP request.
Replace these values in the code below:
-
rporg_accesstokenhere: your management API access token. -
device-id: the unique identifier for the device.
-
HTTP
-
curl
GET /organisation/devices/device-id/deployments HTTP/1.1
Host: api.connect.raspberrypi.com
Authorization: Bearer rporg_accesstokenhere$ curl --header 'Authorization: Bearer rporg_accesstokenhere' https://api.connect.raspberrypi.com/organisation/devices/device-id/deploymentsIf successful, you get a 200 OK response with up to 100 of the device’s deployments in JSON format, ordered most recent first. For example:
HTTP/2 200
Content-Type: application/json; charset=utf-8

{
    "deployments": [
        {
            "id": "fdf45c44-2c0e-4f12-9b04-3a6a1c0d3b8d",
            "state": "failed",
            "state_reason": "Checksum mismatch",
            "device_id": "69739b44-ebb2-468e-9e24-08126dec4925",
            "artefact_id": "ee92e7e6-2c2c-4e7d-9d80-2cce8a6c7e8a",
            "created_at": "2026-02-25T16:09:52Z",
            "updated_at": "2026-02-25T16:10:30Z"
        }
    ],
    "meta": {
        "page": 1,
        "per_page": 100,
        "total_count": 1,
        "total_pages": 1
    }
}
The state of each deployment is one of pending, in_progress, succeeded, failed, or cancelled. For failed deployments, state_reason contains a human-readable explanation of why the deployment failed (for example, when a checksum mismatch occurs or the deployment is superseded by a newer one); for other states it is null.
To filter the deployments returned, use the state parameter in the query string with one of the states listed above:
-
HTTP
-
curl
GET /organisation/devices/device-id/deployments?state=pending HTTP/1.1
Host: api.connect.raspberrypi.com
Authorization: Bearer rporg_accesstokenhere$ curl --header 'Authorization: Bearer rporg_accesstokenhere' 'https://api.connect.raspberrypi.com/organisation/devices/device-id/deployments?state=pending'The page and per_page query parameters work the same way as for listing devices.
Otherwise, you get one of the following responses:
| Response | Description | Example |
|---|---|---|
400 Bad Request |
The |
|
401 Unauthorized |
The management API access token is invalid. |
|
404 Not Found |
The given device ID is not found in the organisation. |
Show a deployment
To show a single deployment in your organisation, use a management API access token to make the following HTTP request.
Replace these values in the code below:
-
rporg_accesstokenhere: your management API access token. -
deployment-id: the unique identifier for the deployment.
-
HTTP
-
curl
GET /organisation/deployments/deployment-id HTTP/1.1
Host: api.connect.raspberrypi.com
Authorization: Bearer rporg_accesstokenhere$ curl --header 'Authorization: Bearer rporg_accesstokenhere' https://api.connect.raspberrypi.com/organisation/deployments/deployment-idIf successful, you get a 200 OK response with the deployment’s details in JSON format. For example:
HTTP/2 200
Content-Type: application/json; charset=utf-8

{
    "id": "fdf45c44-2c0e-4f12-9b04-3a6a1c0d3b8d",
    "state": "succeeded",
    "state_reason": null,
    "device_id": "69739b44-ebb2-468e-9e24-08126dec4925",
    "artefact_id": "ee92e7e6-2c2c-4e7d-9d80-2cce8a6c7e8a",
    "created_at": "2026-02-25T16:09:52Z",
    "updated_at": "2026-02-25T16:10:30Z"
}
Otherwise, you get one of the following responses:
| Response | Description |
|---|---|
401 Unauthorized |
The management API access token is invalid. |
404 Not Found |
The deployment isn’t found in the organisation. |
Create a deployment
To deploy an artefact to a device, use a management API access token to make the following HTTP request. The new deployment supersedes any pending deployment already queued for the device.
Replace these values in the code below:
-
rporg_accesstokenhere: your management API access token. -
device-id: the unique identifier for the recipient device. -
artefact-id: the artefact’sid(as returned by Create an artefact.
-
JSON
-
curl
POST /organisation/devices/device-id/deployments HTTP/1.1
Host: api.connect.raspberrypi.com
Authorization: Bearer rporg_accesstokenhere
Content-Type: application/json

{
    "artefact_id": "artefact-id"
}$ curl --header 'Authorization: Bearer rporg_accesstokenhere' --data-urlencode 'artefact_id=artefact-id' https://api.connect.raspberrypi.com/organisation/devices/device-id/deploymentsIf successful, you get a 201 Created response with the deployment’s details in JSON format. For example:
HTTP/2 201
Content-Type: application/json; charset=utf-8

{
    "id": "fdf45c44-2c0e-4f12-9b04-3a6a1c0d3b8d",
    "state": "pending",
    "state_reason": null,
    "device_id": "69739b44-ebb2-468e-9e24-08126dec4925",
    "artefact_id": "ee92e7e6-2c2c-4e7d-9d80-2cce8a6c7e8a",
    "created_at": "2026-02-25T16:09:52Z",
    "updated_at": "2026-02-25T16:09:52Z"
}
Otherwise, you get one of the following responses:
| Response | Description | Example |
|---|---|---|
400 Bad Request |
|
|
401 Unauthorized |
The management API access token is invalid. |
|
404 Not Found |
The device or artefact is not found in the organisation. |
|
403 Forbidden |
Your organisation’s free trial has ended and billing has not been set up. |
|
Cancel a deployment
To cancel a pending deployment, use a management API access token to make the following HTTP request.
Replace these values in the code below:
-
rporg_accesstokenhere: your management API access token. -
deployment-id: the unique identifier for the deployment.
-
HTTP
-
curl
PUT /organisation/deployments/deployment-id/cancel HTTP/1.1
Host: api.connect.raspberrypi.com
Authorization: Bearer rporg_accesstokenhere$ curl --request PUT --header 'Authorization: Bearer rporg_accesstokenhere' https://api.connect.raspberrypi.com/organisation/deployments/deployment-id/cancelIf successful, you get a 200 OK response with the updated deployment’s details in JSON format:
HTTP/2 200
Content-Type: application/json; charset=utf-8

{
    "id": "fdf45c44-2c0e-4f12-9b04-3a6a1c0d3b8d",
    "state": "cancelled",
    "state_reason": null,
    "device_id": "69739b44-ebb2-468e-9e24-08126dec4925",
    "artefact_id": "ee92e7e6-2c2c-4e7d-9d80-2cce8a6c7e8a",
    "created_at": "2026-02-25T16:09:52Z",
    "updated_at": "2026-02-25T16:10:30Z"
}
Otherwise, you get one of the following responses:
| Response | Description | Example |
|---|---|---|
401 Unauthorized |
The management API access token is invalid. |
|
404 Not Found |
The deployment isn’t found in the organisation. |
|
422 Unprocessable Content |
The deployment can’t be cancelled because it’s already cancelled, succeeded, or failed. |
|
Bulk provisioning
You can provision multiple Raspberry Pi 5 family devices (Raspberry Pi 5, Raspberry Pi 500, and Raspberry Pi 500+) in succession by setting up a single Raspberry Pi 5 family device to act as a provisioning host.
Requirements
To bulk provision using device identities, you must have the following:
-
Two Raspberry Pi 5 family devices (one as the host, one as the recipient).
-
A Raspberry Pi Connect organisation account.
-
An Ethernet cable (this workflow does not yet support Wi-Fi).
-
A short, high-quality USB-A to USB-C cable to carry power and data during provisioning. Do not use a flimsy, charge-only, or long cable because these can cause provisioning failures.
-
For the recipient device boot media: a 32 GB or larger microSD card.
-
For the host device: a 32 GB or larger microSD card. For faster provisioning, use a 32 GB or larger SSD.
Step 1: Prepare the devices
-
Disconnect or remove external USB devices or HATs from the recipient and host devices.
USB devices and HATs create additional power draw that can interfere with the provisioning process.
Step 2: Install rpi-sb-provisioner on the host device
|
Tip
|
Image generation consumes significant disk space (multiple gigabytes per build or more), and the build process is noticeably faster on an SSD than on a microSD card. A Raspberry Pi 500+ or a Raspberry Pi 5 with an M.2 HAT+ are good choices for the host. |
-
Download the latest firmware to the host device by entering the following into the command line:
sudo apt update sudo apt upgrade -
Install Raspberry Pi Secure Boot Provisioner (
rpi-sb-provisioner) on the host device by entering the following into the command line:sudo apt update sudo apt install rpi-sb-provisioner=2.3.0 -
Once installed, access the Raspberry Pi Secure Boot web provisioner UI from the host device’s web browser: http://localhost:3142.
 The web provisioner UI provides confirmation that
rpi-sb-provisionerhas been successfully installed.
Step 3: Install rpi-image-gen
rpi-image-gen builds the OS image that is flashed to recipient devices.
-
On the host device, from the command line, run the following command to clone the
rpi-image-genrepository from GitHub:$ git clone https://github.com/raspberrypi/rpi-image-gen.git -
Navigate to the cloned directory, then install the dependencies by running the following commands:
$ cd rpi-image-gen
$ sudo ./install_deps.sh
Step 4: Prepare and configure the image on the host device
|
Tip
|
rpi-image-gen contains an example application with layers and configuration. For more information, see remote update.. |
To prepare the image on the host device:
-
Navigate to the
rpi-image-geninstallation folder. -
Define additional packages to install at build time. For more information, see Packages.
-
Add wireless networking credentials. For more information, see Wireless Networking.
-
Set a user account and password from the command line, and generate the build:
./rpi-image-gen build -S ./examples/ota/ -c ota.yaml -- \ IGconf_device_user1=admin \ IGconf_device_user1pass='R@spb3rry*pi'rpi-image-gencreates a.tar.zstimage file in therpi-image-gen/work/deployfolder.
Step 5: Import the image into provisioner and configure the device
-
On the host device, either open the provisioner web UI at http://localhost:3142/options/get, or select Get from the tab at the top of the UI.
-
In the Gold Master OS Image box, select Upload New Image, then drag and drop the
.tar.zstfile you just created (for example,rpi-image-gen/work/deploy-1.0.0/myapp-1.0.0.tar.zst) into the box.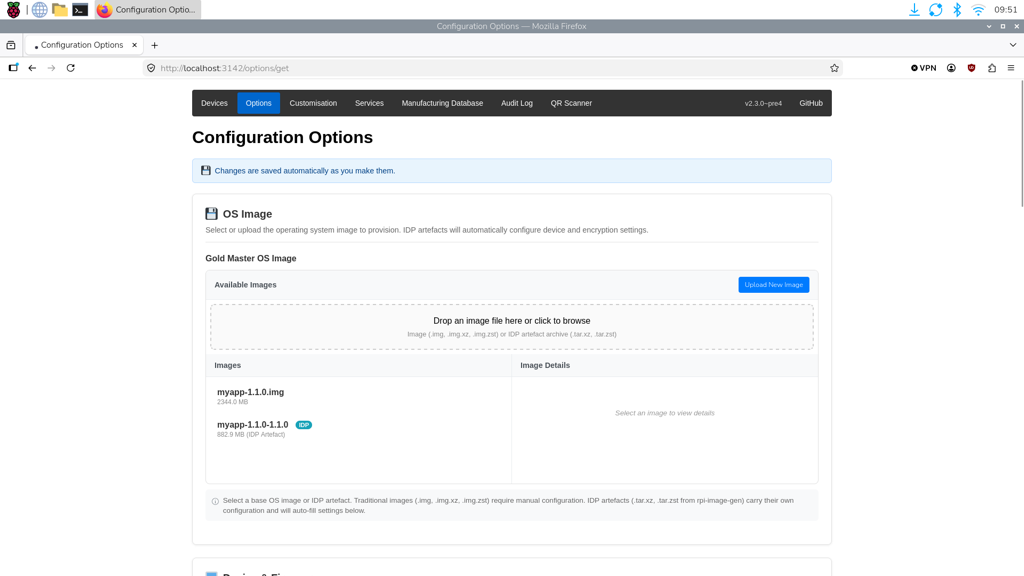 The image you created is shown in the Available Images table of the provisioner’s web interface.
 -
Select the image in the Available Images table.
-
Scroll down to the Device & Firmware table, then selected the following:
-
Device Family: Raspberry Pi 5.
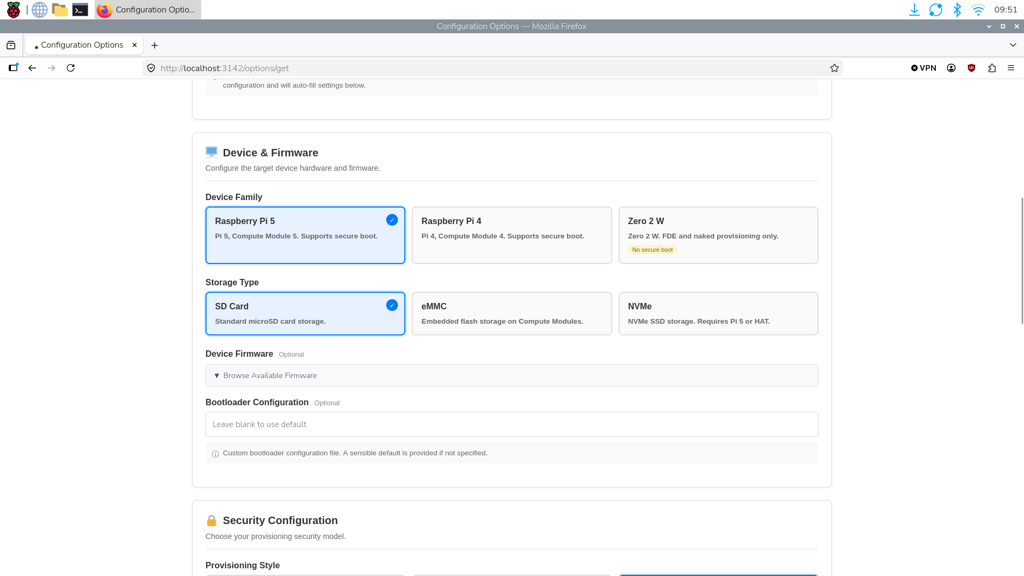 Set the recipient device type, storage and firmware in the Device & Firmware table.
 -
Storage Type: SD Card.
-
Device Firmware: 2026-05-26.
-
-
Scroll down to the Security Configuration table, then select Naked.
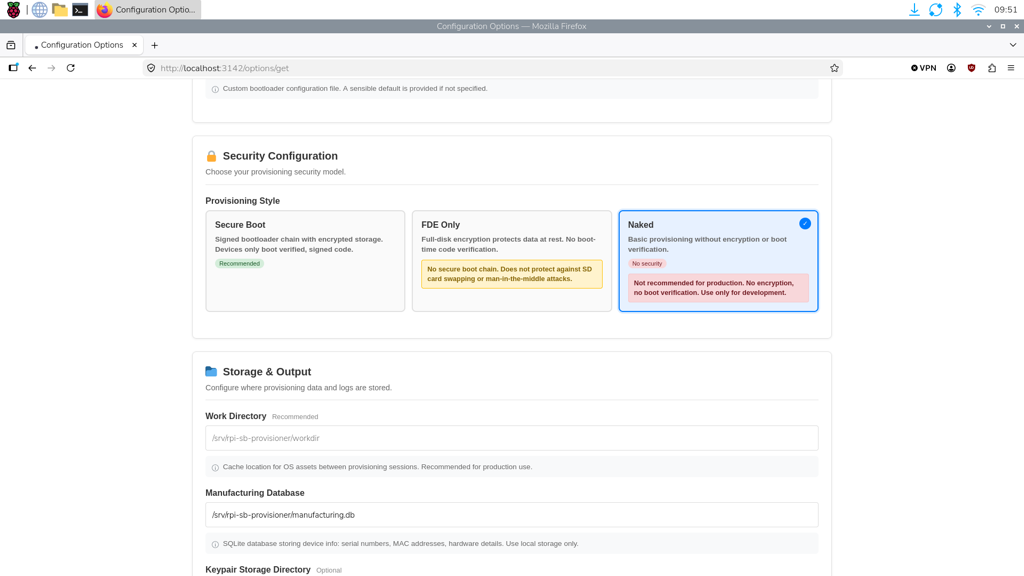 The Naked security configuration provides a basic provisioning configuration without encryption.
Your changes are automatically saved.
Step 6: Create a management API token
To allow provisioner to automatically register device identities with your Connect organisation during provisioning, create a management API access token.
-
Open Raspberry Pi Connect, then select your organisation.
-
Navigate to the API access tokens section, then select the Provisioning tab.
-
Select New in the Auth keys section, follow the on-screen prompts to configure the key, then select Create Auth key.
-
Copy the key.
-
Open the provisioner web UI at http://localhost:3142/options/get.
-
Scroll down to the Cloud Services section, then paste the key into the Connect Management API Access Token field.
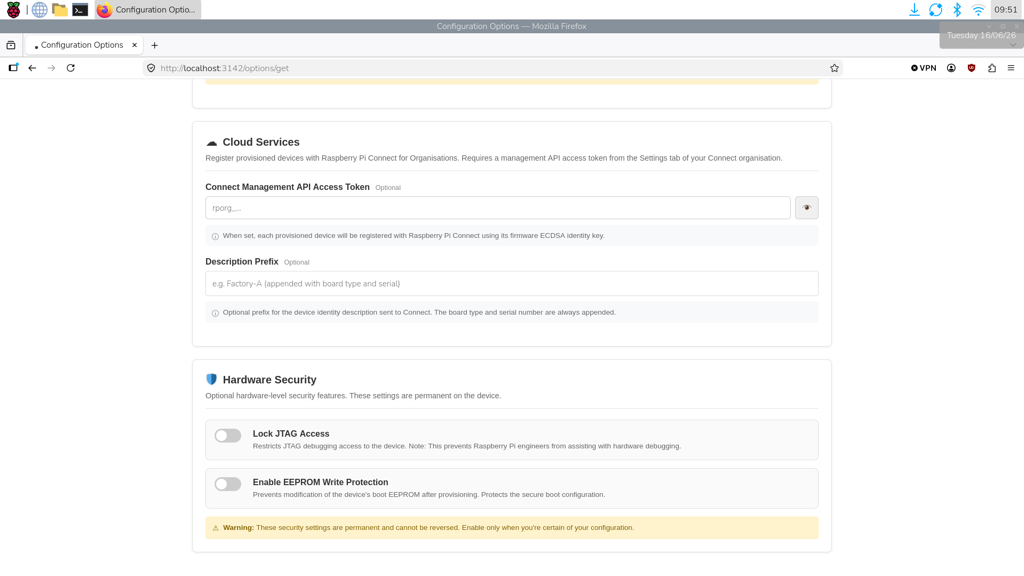 Enter the API access token in the Cloud Services table.
Step 7: Connect the recipient device to the host device
Next, put the recipient device into USB boot mode so the host device can take over.
-
Plug the USB-A end of the cable into the host device.
-
Hold down the power button on the recipient device while plugging in the USB-C end of the cable. Release the power button when power is applied.
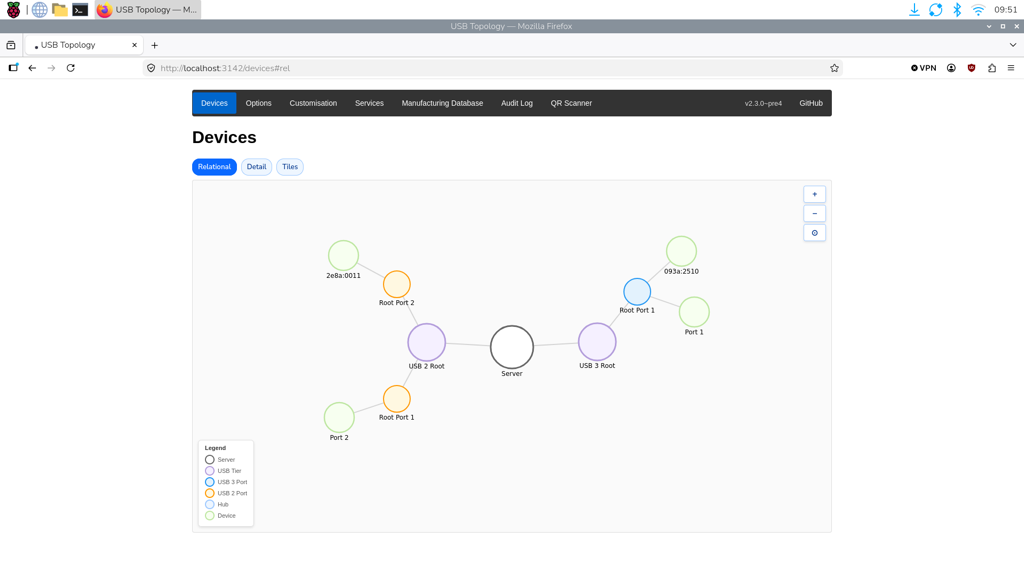
The recipient device appears in the provisioner UI on the host device. Provisioning starts automatically.
Step 8: Boot the recipient device
When provisioning is complete:
-
Unplug the recipient device from the host device.
-
Connect the recipient device to its own power supply.
-
Connect an Ethernet cable.
-
Turn on the recipient device.
After the recipient device has booted, it appears in the Raspberry Pi Connect Devices tab.