Camera software
This documentation describes how to use supported camera modules with our software tools. All Raspberry Pi cameras can record high-resolution photographs and full HD 1080p video (or better) with our software tools.
Raspberry Pi produces several official camera modules, including:
-
the original 5-megapixel Camera Module 1 (discontinued)
-
the 8-megapixel Camera Module 2, with or without an infrared filter
-
the 12-megapixel Camera Module 3, with both standard and wide lenses, with or without an infrared filter
-
the 12-megapixel High Quality Camera with CS and M12 mount variants for use with external lenses
-
the 1.6-megapixel Global Shutter Camera for fast motion photography
-
the 12-megapixel AI Camera uses the Sony IMX500 imaging sensor to provide low-latency, high-performance AI capabilities to any camera application
For more information about camera hardware, see the camera hardware documentation.
First, install your camera module. Then, follow the guides in this section to put your camera module to use.
|
Warning
|
This guide no longer covers the legacy camera stack which was available in Bullseye and earlier Raspberry Pi OS releases. The legacy camera stack, using applications like |
rpicam-apps
Edit this on GitHub
|
Note
|
From Raspberry Pi OS Bookworm onwards, the camera capture applications are named |
Raspberry Pi supplies a small set of example rpicam-apps. These CLI applications, built on top of libcamera, capture images and video from a camera.
These applications include:
-
rpicam-hello: A "hello world"-equivalent for cameras, which starts a camera preview stream and displays it on the screen. -
rpicam-jpeg: Runs a preview window, then captures high-resolution still images. -
rpicam-still: Emulates many of the features of the originalraspistillapplication. -
rpicam-vid: Captures video. -
rpicam-raw: Captures raw (unprocessed Bayer) frames directly from the sensor. -
rpicam-detect: Not built by default, but users can build it if they have TensorFlow Lite installed on their Raspberry Pi. Captures JPEG images when certain objects are detected.
Raspberry Pi OS includes the five basic rpicam-apps, so you can record images and videos using a camera even on a fresh Raspberry Pi OS installation.
You can create your own rpicam-based applications with custom functionality to suit your own requirements. The rpicam-apps source code is freely available under a BSD-2-Clause licence.
libcamera
libcamera is an open-source software library aimed at supporting camera systems directly from the Linux operating system on Arm processors. Proprietary code running on the Broadcom GPU is minimised. For more information about libcamera see the libcamera website.
libcamera provides a C++ API that configures the camera, then allows applications to request image frames. These image buffers reside in system memory and can be passed directly to still image encoders (such as JPEG) or to video encoders (such as H.264). libcamera doesn’t encode or display images itself: that that functionality, use rpicam-apps.
You can find the source code in the official libcamera repository. The Raspberry Pi OS distribution uses a fork to control updates.
Underneath the libcamera core, we provide a custom pipeline handler. libcamera uses this layer to drive the sensor and image signal processor (ISP) on the Raspberry Pi. libcamera contains a collection of image-processing algorithms (IPAs) including auto exposure/gain control (AEC/AGC), auto white balance (AWB), and auto lens-shading correction (ALSC).
Raspberry Pi’s implementation of libcamera supports the following cameras:
-
Official cameras:
-
OV5647 (V1)
-
IMX219 (V2)
-
IMX708 (V3)
-
IMX477 (HQ)
-
IMX500 (AI)
-
IMX296 (GS)
-
-
Third-party sensors:
-
IMX290
-
IMX327
-
IMX378
-
IMX519
-
OV9281
-
To extend support to a new sensor, contribute to libcamera.
rpicam-hello
Edit this on GitHub
rpicam-hello briefly displays a preview window containing the video feed from a connected camera. To use rpicam-hello to display a preview window for five seconds, run the following command in a terminal:
$ rpicam-helloYou can pass an optional duration (in milliseconds) with the timeout option. A value of 0 runs the preview indefinitely:
$ rpicam-hello --timeout 0Use Ctrl+C in the terminal or the close button on the preview window to stop rpicam-hello.
Display an image sensor preview
Most of the rpicam-apps display a preview image in a window. If there is no active desktop environment, the preview draws directly to the display using the Linux Direct Rendering Manager (DRM). Otherwise, rpicam-apps attempt to use the desktop environment. Both paths use zero-copy GPU buffer sharing: as a result, X forwarding is not supported.
If you run the X window server and want to use X forwarding, pass the qt-preview flag to render the preview window in a Qt window. The Qt preview window uses more resources than the alternatives.
|
Note
|
Older systems using Gtk2 may, when linked with OpenCV, produce Glib-GObject errors and fail to show the Qt preview window. In this case edit the file /etc/xdg/qt5ct/qt5ct.conf as root and replace the line containing style=gtk2 with style=gtk3.
|
To suppress the preview window entirely, pass the nopreview flag:
$ rpicam-hello -nThe info-text option displays image information on the window title bar using % directives. For example, the following command displays the current red and blue gain values:
$ rpicam-hello --info-text "red gain %rg, blue gain %bg"For a full list of directives, see the info-text reference.
rpicam-jpeg
Edit this on GitHub
rpicam-jpeg helps you capture images on Raspberry Pi devices.
To capture a full resolution JPEG image and save it to a file named test.jpg, run the following command:
$ rpicam-jpeg --output test.jpgYou should see a preview window for five seconds. Then, rpicam-jpeg captures a full resolution JPEG image and saves it.
Use the timeout option to alter display time of the preview window. The width and height options change the resolution of the saved image. For example, the following command displays the preview window for 2 seconds, then captures and saves an image with a resolution of 640×480 pixels:
$ rpicam-jpeg --output test.jpg --timeout 2000 --width 640 --height 480
rpicam-still
Edit this on GitHub
rpicam-still, like rpicam-jpeg, helps you capture images on Raspberry Pi devices.
Unlike rpicam-jpeg, rpicam-still supports many options provided in the legacy raspistill application.
To capture a full resolution JPEG image and save it to a file named test.jpg, run the following command:
$ rpicam-still --output test.jpgEncoders
rpicam-still can save images in multiple formats, including png, bmp, and both RGB and YUV binary pixel dumps. To read these binary dumps, any application reading the files must understand the pixel arrangement.
Use the encoding option to specify an output format. The file name passed to output has no impact on the output file type.
To capture a full resolution PNG image and save it to a file named test.png, run the following command:
$ rpicam-still --encoding png --output test.pngFor more information about specifying an image format, see the encoding option reference.
Capture raw images
Raw images are the images produced directly by the image sensor, before any processing is applied to them either by the Image Signal Processor (ISP) or CPU. Colour image sensors usually use the Bayer format. Use the raw option to capture raw images.
To capture an image, save it to a file named test.jpg, and also save a raw version of the image to a file named test.dng, run the following command:
$ rpicam-still --raw --output test.jpgrpicam-still saves raw images in the DNG (Adobe Digital Negative) format. To determine the filename of the raw images, rpicam-still uses the same name as the output file, with the extension changed to .dng. To work with DNG images, use an application like Dcraw or RawTherapee.
DNG files contain metadata about the image capture, including black levels, white balance information and the colour matrix used by the ISP to produce the JPEG. Use ExifTool to view DNG metadata. The following output shows typical metadata stored in a raw image captured by a Raspberry Pi using the HQ camera:
File Name                       : test.dng
Directory                       : .
File Size                       : 24 MB
File Modification Date/Time     : 2021:08:17 16:36:18+01:00
File Access Date/Time           : 2021:08:17 16:36:18+01:00
File Inode Change Date/Time     : 2021:08:17 16:36:18+01:00
File Permissions                : rw-r--r--
File Type                       : DNG
File Type Extension             : dng
MIME Type                       : image/x-adobe-dng
Exif Byte Order                 : Little-endian (Intel, II)
Make                            : Raspberry Pi
Camera Model Name               : /base/soc/i2c0mux/i2c@1/imx477@1a
Orientation                     : Horizontal (normal)
Software                        : rpicam-still
Subfile Type                    : Full-resolution Image
Image Width                     : 4056
Image Height                    : 3040
Bits Per Sample                 : 16
Compression                     : Uncompressed
Photometric Interpretation      : Color Filter Array
Samples Per Pixel               : 1
Planar Configuration            : Chunky
CFA Repeat Pattern Dim          : 2 2
CFA Pattern 2                   : 2 1 1 0
Black Level Repeat Dim          : 2 2
Black Level                     : 256 256 256 256
White Level                     : 4095
DNG Version                     : 1.1.0.0
DNG Backward Version            : 1.0.0.0
Unique Camera Model             : /base/soc/i2c0mux/i2c@1/imx477@1a
Color Matrix 1                  : 0.8545269369 -0.2382823821 -0.09044229197 -0.1890484985 1.063961506 0.1062747385 -0.01334283455 0.1440163847 0.2593136724
As Shot Neutral                 : 0.4754476844 1 0.413686484
Calibration Illuminant 1        : D65
Strip Offsets                   : 0
Strip Byte Counts               : 0
Exposure Time                   : 1/20
ISO                             : 400
CFA Pattern                     : [Blue,Green][Green,Red]
Image Size                      : 4056x3040
Megapixels                      : 12.3
Shutter Speed                   : 1/20
To find the analogue gain, divide the ISO number by 100.
The Auto White Balance (AWB) algorithm determines a single calibrated illuminant, which is always labelled D65.
Capture long exposures
To capture very long exposure images, disable the Automatic Exposure/Gain Control (AEC/AGC) and Auto White Balance (AWB). These algorithms will otherwise force the user to wait for a number of frames while they converge.
To disable these algorithms, supply explicit values for gain and AWB. Because long exposures take plenty of time already, it often makes sense to skip the preview phase entirely with the immediate option.
To perform a 100 second exposure capture, run the following command:
$ rpicam-still -o long_exposure.jpg --shutter 100000000 --gain 1 --awbgains 1,1 --immediateTo find the maximum exposure times of official Raspberry Pi cameras, see the camera hardware specification.
Create a time lapse video
To create a time lapse video, capture a still image at a regular interval, such as once a minute, then use an application to stitch the pictures together into a video.
-
rpicam-stilltime lapse mode -
cron
To use the built-in time lapse mode of rpicam-still, use the timelapse option. This option accepts a value representing the period of time you want your Raspberry Pi to wait between captures, in milliseconds.
First, create a directory where you can store your time lapse photos:
$ mkdir timelapseRun the following command to create a time lapse over 30 seconds, recording a photo every two seconds, saving output into image0000.jpg through image0013.jpg:
$ rpicam-still --timeout 30000 --timelapse 2000 -o timelapse/image%04d.jpgYou can also automate time lapses with cron. First, create the script, named timelapse.sh containing the following commands. Replace the <username> placeholder with the name of your user account on your Raspberry Pi:
#!/bin/bash
DATE=$(date +"%Y-%m-%d_%H%M")
rpicam-still -o /home/<username>/timelapse/$DATE.jpg
Then, make the script executable:
$ chmod +x timelapse.shCreate the timelapse directory into which you’ll save time lapse pictures:
$ mkdir timelapseOpen your crontab for editing:
$ crontab -eWhen you have the file open in an editor, add the following line to schedule an image capture every minute, replacing the <username> placeholder with the username of your primary user account:
* * * * * /home/<username>/timelapse.sh 2>&1
Save and exit, and you should see this message:
crontab: installing new crontab
To stop recording images for the time lapse, run crontab -e again and remove the above line from your crontab.
Stitch images together
When you have a series of time lapse photos, you probably want to combine them into a video. Use ffmpeg to do this on a Raspberry Pi.
First, install ffmpeg:
$ sudo apt install ffmpegRun the following command from the directory that contains the timelapse directory to convert your JPEG files into an mp4 video:
$ ffmpeg -r 10 -f image2 -pattern_type glob -i 'timelapse/*.jpg' -s 1280x720 -vcodec libx264 timelapse.mp4The command above uses the following parameters:
-
-r 10: sets the frame rate (Hz value) to ten frames per second in the output video -
-f image2: setsffmpegto read from a list of image files specified by a pattern -
-pattern_type glob: use wildcard patterns (globbing) to interpret filename input with-i -
-i 'timelapse/*.jpg': specifies input files to match JPG files in thetimelapsedirectory -
-s 1280x720: scales to 720p -
-vcodec libx264use the software x264 encoder. -
timelapse.mp4The name of the output video file.
For more information about ffmpeg options, run ffmpeg --help in a terminal.
rpicam-vid
Edit this on GitHub
rpicam-vid helps you capture video on Raspberry Pi devices. rpicam-vid displays a preview window and writes an encoded bitstream to the specified output. This produces an unpackaged video bitstream that is not wrapped in any kind of container (such as an mp4 file) format.
|
Note
|
When available, rpicam-vid uses hardware H.264 encoding.
|
For example, the following command writes a ten-second video to a file named test.h264:
$ rpicam-vid -t 10s -o test.h264You can play the resulting file with ffplay and other video players:
$ ffplay test.h264|
Warning
|
Older versions of VLC were able to play H.264 files correctly, but recent versions don’t – displaying only a few, or possibly garbled, frames. Either use a different media player, or save your files in a more widely supported container format – such as MP4 (see below). |
On Raspberry Pi 5, you can output to the MP4 container format directly by specifying the mp4 file extension for your output file:
$ rpicam-vid -t 10s -o test.mp4On Raspberry Pi 4, or earlier devices, you can save MP4 files using:
$ rpicam-vid -t 10s --codec libav -o test.mp4Encoders
rpicam-vid supports motion JPEG as well as both uncompressed and unformatted YUV420:
$ rpicam-vid -t 10000 --codec mjpeg -o test.mjpeg$ rpicam-vid -t 10000 --codec yuv420 -o test.dataThe codec option determines the output format, not the extension of the output file.
The segment option breaks output files up into chunks of the segment size (given in milliseconds). This is handy for breaking a motion JPEG stream up into individual JPEG files by specifying very short (1 millisecond) segments. For example, the following command combines segments of 1 millisecond with a counter in the output file name to generate a new filename for each segment:
$ rpicam-vid -t 10000 --codec mjpeg --segment 1 -o test%05d.jpegCapture high framerate video
To minimise frame drops for high framerate (> 60fps) video, try the following configuration tweaks:
-
Set the H.264 target level to 4.2 with
--level 4.2. -
Disable software colour denoise processing by setting the
denoiseoption tocdn_off. -
Disable the display window with
nopreviewto free up some additional CPU cycles. -
Set
force_turbo=1in/boot/firmware/config.txtto ensure that the CPU clock does not throttle during video capture. For more information, see theforce_turbodocumentation. -
Adjust the ISP output resolution with
--width 1280 --height 720or something even lower to achieve your framerate target. -
On Raspberry Pi 4, you can overclock the GPU to improve performance by adding
gpu_freq=550or higher in/boot/firmware/config.txt. See the overclocking documentation for further details.
The following command demonstrates how you might achieve 1280×720 120fps video:
$ rpicam-vid --level 4.2 --framerate 120 --width 1280 --height 720 --save-pts timestamp.pts -o video.264 -t 10000 --denoise cdn_off -n
libav integration with rpicam-vid
rpicam-vid can use the ffmpeg/libav codec backend to encode audio and video streams. You can either save these streams to a file or stream them over the network. libav uses hardware H.264 video encoding when present.
To enable the libav backend, pass libav to the codec option:
$ rpicam-vid --codec libav --libav-format avi --libav-audio --output example.aviLow latency video with Raspberry Pi 5
Raspberry Pi 5 uses software video encoders. These generally output frames with a longer latency than the old hardware encoders, and this can sometimes be an issue for real-time streaming applications.
In this case, please add the option --low-latency to the rpicam-vid command. This will alter certain encoder options to output the encoded frame more quickly.
The downside is that coding efficiency is (slightly) less good, and that the processor’s multiple cores may be used (slightly) less efficiently. The maximum framerate that can be encoded may be slightly reduced (though it will still easily achieve 1080p30).
rpicam-raw
Edit this on GitHub
rpicam-raw records video as raw Bayer frames directly from the sensor. It does not show a preview window. To record a two second raw clip to a file named test.raw, run the following command:
$ rpicam-raw -t 2000 -o test.rawrpicam-raw outputs raw frames with no formatting information at all, one directly after another. The application prints the pixel format and image dimensions to the terminal window to help the user interpret the pixel data.
By default, rpicam-raw outputs raw frames in a single, potentially very large, file. Use the segment option to direct each raw frame to a separate file, using the %05d directive to make each frame filename unique:
$ rpicam-raw -t 2000 --segment 1 -o test%05d.rawWith a fast storage device, rpicam-raw can write 18 MB 12-megapixel HQ camera frames to disk at 10fps. rpicam-raw has no capability to format output frames as DNG files; for that functionality, use rpicam-still. Use the framerate option at a level beneath 10 to avoid dropping frames:
$ rpicam-raw -t 5000 --width 4056 --height 3040 -o test.raw --framerate 8For more information on the raw formats, see the mode documentation.
rpicam-detect
Edit this on GitHub
|
Note
|
Raspberry Pi OS does not include rpicam-detect. However, you can build rpicam-detect if you have installed TensorFlow Lite. For more information, see the rpicam-apps build instructions. Don’t forget to pass -Denable_tflite=enabled when you run meson.
|
rpicam-detect displays a preview window and monitors the contents using a Google MobileNet v1 SSD (Single Shot Detector) neural network trained to identify about 80 classes of objects using the Coco dataset. rpicam-detect recognises people, cars, cats and many other objects.
Whenever rpicam-detect detects a target object, it captures a full-resolution JPEG. Then it returns to monitoring preview mode.
See the TensorFlow Lite object detector section for general information on model usage. For example, you might spy secretly on your cats while you are away with:
$ rpicam-detect -t 0 -o cat%04d.jpg --lores-width 400 --lores-height 300 --post-process-file object_detect_tf.json --object catConfiguration
Edit this on GitHub
Most use cases work automatically with no need to alter the camera configuration. However, some common use cases do require configuration tweaks, including:
-
Third-party cameras (the manufacturer’s instructions should explain necessary configuration changes, if any)
-
Using a non-standard driver or overlay with an official Raspberry Pi camera
Raspberry Pi OS recognises the following overlays in /boot/firmware/config.txt.
| Camera Module | In /boot/firmware/config.txt
|
|---|---|
V1 camera (OV5647) |
|
V2 camera (IMX219) |
|
HQ camera (IMX477) |
|
GS camera (IMX296) |
|
Camera Module 3 (IMX708) |
|
IMX290 and IMX327 |
|
IMX378 |
|
OV9281 |
|
To use one of these overlays, you must disable automatic camera detection. To disable automatic detection, set camera_auto_detect=0 in /boot/firmware/config.txt. If config.txt already contains a line assigning an camera_auto_detect value, change the value to 0. Reboot your Raspberry Pi with sudo reboot to load your changes.
If your Raspberry Pi has two camera connectors (Raspberry Pi 5 or one of the Compute Modules, for example), then you can specify the use of camera connector 0 by adding ,cam0 to the dtoverlay that you used from the table above. If you do not add this, it will default to checking camera connector 1. Note that for official Raspberry Pi camera modules connected to SBCs (not Compute Modules), auto-detection will correctly identify all the cameras connected to your device.
Tweak camera behaviour with tuning files
Raspberry Pi’s libcamera implementation includes a tuning file for each camera. This file controls algorithms and hardware to produce the best image quality. libcamera can only determine the sensor in use, not the module. As a result, some modules require a tuning file override. Use the tuning-file option to specify an override. You can also copy and alter existing tuning files to customise camera behaviour.
For example, the no-IR-filter (NoIR) versions of sensors use Auto White Balance (AWB) settings different from the standard versions. On a Raspberry Pi 5 or later, you can specify the the NoIR tuning file for the IMX219 sensor with the following command:
$ rpicam-hello --tuning-file /usr/share/libcamera/ipa/rpi/pisp/imx219_noir.json|
Note
|
Raspberry Pi models prior to Raspberry Pi 5 use different tuning files. On those devices, use the files stored in /usr/share/libcamera/ipa/rpi/vc4/ instead.
|
libcamera maintains tuning files for a number of cameras, including third-party models. For instance, you can find the tuning file for the Soho Enterprises SE327M12 in se327m12.json.
Use multiple cameras
Edit this on GitHub
rpicam-apps has basic support for multiple cameras. You can attach multiple cameras to a Raspberry Pi in the following ways:
-
For Raspberry Pi Compute Modules, you can connect two cameras directly to a Raspberry Pi Compute Module I/O board. See the Compute Module documentation for further details. With this method, you can use both cameras simultaneously.
-
For Raspberry Pi 5, you can connect two cameras directly to the board using the dual MIPI connectors.
-
For other Raspberry Pi devices with a camera port, you can attach two or more cameras with a Video Mux board such as this third-party product. Since both cameras are attached to a single Unicam port, only one camera may be used at a time.
To list all the cameras available on your platform, use the list-cameras option. To choose which camera to use, pass the camera index to the camera option.
|
Note
|
libcamera does not yet provide stereoscopic camera support. When running two cameras simultaneously, they must be run in separate processes, meaning there is no way to synchronise 3A operation between them. As a workaround, you could synchronise the cameras through an external sync signal for the HQ (IMX477) camera or use the software camera synchronisation support that is described below, switching the 3A to manual mode if necessary.
|
Software Camera Synchronisation
Raspberry Pi’s libcamera implementation has the ability to synchronise the frames of different cameras using only software. This will cause one camera to adjust it’s frame timing so as to coincide as closely as possible with the frames of another camera. No soldering or hardware connections are required, and it will work with all of Raspberry Pi’s camera modules, and even third party ones so long as their drivers implement frame duration control correctly.
How it works
The scheme works by designating one camera to be the server. The server will broadcast timing messages onto the network at regular intervals, such as once a second. Meanwhile other cameras, known as clients, can listen to these messages whereupon they may lengthen or shorten frame times slightly so as to pull them into sync with the server. This process is continual, though after the first adjustment, subsequent adjustments are normally small.
The client cameras may be attached to the same Raspberry Pi device as the server, or they may be attached to different Raspberry Pis on the same network. The camera model on the clients may match the server, or they may be different.
Clients and servers need to be set running at the same nominal framerate (such as 30fps). Note that there is no back-channel from the clients back to the server. It is solely the clients' responsibility to be up and running in time to match the server, and the server is completely unaware whether clients have synchronised successfully, or indeed whether there are any clients at all.
In normal operation, running the same make of camera on the same Raspberry Pi, we would expect the frame start times of the camera images to match within "several tens of microseconds". When the camera models are different this could be significantly larger as the cameras will probably not be able to match framerates exactly and will therefore be continually drifting apart (and brought back together with every timing message).
When cameras are on different devices, the system clocks should be synchronised using NTP (normally the case by default for Raspberry Pi OS), or if this is insufficiently precise, another protocol like PTP might be used. Any discrepancy between system clocks will feed directly into extra error in frame start times – even though the advertised timestamps on the frames will not tell you.
The Server
The server, as previously explained, broadcasts timing messages onto the network, by default every second. The server will run for a fixed number of frames, by default 100, after which it will inform the camera application on the device that the "synchronisation point" has been reached. At this moment, the application will start using the frames, so in the case of rpicam-vid, they will start being encoded and recorded. Recall that the behaviour and even existence of clients has no bearing on this.
If required, there can be several servers on the same network so long as they are broadcasting timing messages to different network addresses. Clients, of course, will have to be configured to listen for the correct address.
Clients
Clients listen out for server timing messages and, when they receive one, will shorten or lengthen a camera frame duration by the required amount so that subsequent frames will start, as far as possible, at the same moment as the server’s.
The clients learn the correct "synchronisation point" from the server’s messages, and just like the server, will signal the camera application at the same moment that it should start using the frames. So in the case of rpicam-vid, this is once again the moment at which frames will start being recorded.
Normally it makes sense to start clients before the server, as the clients will simply wait (the "synchronisation point" has not been reached) until a server is seen broadcasting onto the network. This obviously avoids timing problems where a server might reach its "synchronisation point" even before all the clients have been started!
Usage in rpicam-vid
We can use software camera synchronisation with rpicam-vid to record videos that are synchronised frame-by-frame. We’re going to assume we have two cameras attached, and we’re going to use camera 0 as the server, and camera 1 as the client. rpicam-vid defaults to a fixed 30 frames per second, which will be fine for us.
First we should start the client:
$ rpicam-vid -n -t 20s --camera 1 --codec libav -o client.mp4 --sync clientNote the --sync client parameter. This will record for 20 seconds but only after the synchronisation point has been reached. If necessary, it will wait indefinitely for the first server message.
To start the server:
$ rpicam-vid -n -t 20s --camera 0 --codec libav -o server.mp4 --sync serverThis too will run for 20 seconds counting from when the synchronisation point is reached and the recording starts. With the default synchronisation settings (100 frames at 30fps) this means there will be just over 3 seconds for clients to get synchronised.
The server’s broadcast address and port, the frequency of the timing messages and the number of frames to wait for clients to synchronise, can all be changed in the camera tuning file. Clients only pay attention to the broadcast address here which should match the server’s; the other information will be ignored. Please refer to the Raspberry Pi Camera tuning guide for more information.
In practical operation there are a few final points to be aware of:
-
The fixed framerate needs to be below the maximum framerate at which the camera can operate (in the camera mode that is being used). This is because the synchronisation algorithm may need to shorten camera frames so that clients can catch up with the server, and this will fail if it is already running as fast as it can.
-
Whilst camera frames should be correctly synchronised, at higher framerates or depending on system load, it is possible for frames, either on the clients or server, to be dropped. In these cases the frame timestamps will help an application to work out what has happened, though it’s usually simpler to try and avoid frame drops – perhaps by lowering the framerate, increasing the number of buffers being allocated to the camera queues (see the
--buffer-countoption), or reducing system load.
Install libcamera and rpicam-apps
Edit this on GitHub
Raspberry Pi provides two rpicam-apps packages:
-
rpicam-appscontains full applications with support for previews using a desktop environment. This package is pre-installed in Raspberry Pi OS. -
rpicam-apps-liteomits desktop environment support, and only makes the DRM preview available. This package is pre-installed in Raspberry Pi OS Lite.
Dependencies
rpicam-apps depends on library packages named library-name<n>, where <n> is the ABI version. Your package manager should install these automatically.
Dev packages
You can rebuild rpicam-apps without building libcamera and libepoxy from scratch. For more information, see Building rpicam-apps without rebuilding libcamera.
Stream video over a network with rpicam-apps
Edit this on GitHub
This section describes how to stream video over a network using rpicam-vid. Whilst it’s possible to stream very simple formats without using libav, for most applications we recommend using the libav backend.
UDP
To stream video over UDP using a Raspberry Pi as a server, use the following command, replacing the <ip-addr> placeholder with the IP address of the client or multicast address and replacing the <port> placeholder with the port you would like to use for streaming:
$ rpicam-vid -t 0 -n --inline -o udp://<ip-addr>:<port>To view video streamed over UDP using a Raspberry Pi as a client, use the following command, replacing the <port> placeholder with the port you would like to stream from:
$ ffplay udp://@:<port> -fflags nobuffer -flags low_delay -framedropAs noted previously, vlc no longer handles unencapsulated H.264 streams.
In fact, support for unencapsulated H.264 can generally be quite poor so it is often better to send an MPEG-2 Transport Stream instead. Making use of libav, this can be accomplished with:
$ rpicam-vid -t 0 -n --codec libav --libav-format mpegts -o udp://<ip-addr>:<port>In this case, we can also play the stream successfully with vlc:
$ vlc udp://@:<port>TCP
You can also stream video over TCP. As before, we can send an unencapsulated H.264 stream over the network. To use a Raspberry Pi as a server:
$ rpicam-vid -t 0 -n --inline --listen -o tcp://0.0.0.0:<port>To view video streamed over TCP using a Raspberry Pi as a client, assuming the server is running at 30 frames per second, use the following command:
$ ffplay tcp://<ip-addr-of-server>:<port> -vf "setpts=N/30" -fflags nobuffer -flags low_delay -framedropBut as with the UDP examples, it is often preferable to send an MPEG-2 Transport Stream as this is generally better supported. To do this, use:
$ rpicam-vid -t 0 -n --codec libav --libav-format mpegts -o tcp://0.0.0.0:<port>?listen=1We can now play this back using a variety of media players, including vlc:
$ vlc tcp://<ip-addr-of-server>:<port>RTSP
We can use VLC as an RTSP server, however, we must send it an MPEG-2 Transport Stream as it no longer understands unencapsulated H.264:
$ rpicam-vid -t 0 -n --codec libav --libav-format mpegts -o - | cvlc stream:///dev/stdin --sout '#rtp{sdp=rtsp://:8554/stream1}'To view video streamed over RTSP using a Raspberry Pi as a client, use the following command:
$ ffplay rtsp://<ip-addr-of-server>:8554/stream1 -fflags nobuffer -flags low_delay -framedropAlternatively, use the following command on a client to stream using VLC:
$ vlc rtsp://<ip-addr-of-server>:8554/stream1If you want to see a preview window on the server, just drop the -n option (see nopreview).
libav and Audio
We have already been using libav as the backend for network streaming. libav allows us to add an audio stream, so long as we’re using a format – like the MPEG-2 Transport Stream – that permits audio data.
We can take one of our previous commands, like the one for streaming an MPEG-2 Transport Stream over TCP, and simply add the --libav-audio option:
$ rpicam-vid -t 0 --codec libav --libav-format mpegts --libav-audio -o "tcp://<ip-addr>:<port>?listen=1"You can stream over UDP with a similar command:
$ rpicam-vid -t 0 --codec libav --libav-format mpegts --libav-audio -o "udp://<ip-addr>:<port>"GStreamer
GStreamer is a Linux framework for reading, processing and playing multimedia files. We can also use it in conjunction with rpicam-vid for network streaming.
This setup uses rpicam-vid to output an H.264 bitstream to stdout, though as we’ve done previously, we’re going to encapsulate it in an MPEG-2 Transport Stream for better downstream compatibility.
Then, we use the GStreamer fdsrc element to receive the bitstream, and extra GStreamer elements to send it over the network. On the server, run the following command to start the stream, replacing the <ip-addr> placeholder with the IP address of the client or multicast address and replacing the <port> placeholder with the port you would like to use for streaming:
$ rpicam-vid -t 0 -n --codec libav --libav-format mpegts -o - | gst-launch-1.0 fdsrc fd=0 ! udpsink host=<ip-addr> port=<port>You can use anything (such as VLC) as the client; the best GStreamer clients for playback are beyond the scope of this document. However, the following pipeline (with the obvious substitutions) works on a Raspberry Pi 4B or earlier device:
$ gst-launch-1.0 udpsrc address=<ip-addr> port=<port> ! tsparse ! tsdemux ! h264parse ! queue ! v4l2h264dec ! autovideosinkFor a Raspberry Pi 5 device, replace v4l2h264dec by avdec_h264.
|
Tip
|
To test this configuration, run the server and client commands in separate terminals on the same device, using localhost as the address.
|
libcamerasrc GStreamer element
libcamera provides a libcamerasrc GStreamer element which can be used directly instead of rpicam-vid. To use this element, run the following command on the server, replacing the <ip-addr> placeholder with the IP address of the client or multicast address and replacing the <port> placeholder with the port you would like to use for streaming. On a Raspberry Pi 4B or earlier device, use:
$ gst-launch-1.0 libcamerasrc ! capsfilter caps=video/x-raw,width=640,height=360,format=NV12,interlace-mode=progressive ! v4l2h264enc extra-controls="controls,repeat_sequence_header=1" ! 'video/x-h264,level=(string)4' ! h264parse ! mpegtsmux ! udpsink host=<ip-addr> port=<port>On a Raspberry Pi 5 device, replace v4l2h264enc extra-controls="controls,repeat_sequence_header=1" by x264enc speed-preset=1 threads=1.
On the client we could use the same playback pipeline as we did just above, or other streaming media players.
Third-party streaming servers
There are a number of third-party streaming servers available and, while Raspberry Pi doesn’t specifically recommend any particular one, we give some introductory guidance on using a number of popular ones.
All of these streaming servers can ingest Raspberry Pi camera streams created by rpicam-vid, and re-stream them to RTSP clients, or to web browsers using WebRTC, or using many other formats. MediaMTX supports Raspberry Pi cameras as a native option through libcamera, by-passing the need for external executables (like rpicam-vid).
The list above is not exhaustive; however, we have confirmed that these applications work correctly together with the Raspberry Pi camera system.
Streaming with MediaMTX
MediaMTX accepts an input stream from the Raspberry Pi’s camera system (for example, created by rpicam-vid), and re-streams it to other clients. Additionally, it supports Raspberry Pi cameras as a built-in source.
Installation and configuration
To install MediaMTX:
-
Download the latest version from the releases page.
-
If you’re using Raspberry Pi OS 64-bit, choose the
linux_arm64compressed tar file (ending.tar.gz). -
If you’re using Raspberry Pi OS 32-bit, choose the
armv7compressed tar file.
-
-
Unpack the compressed tar file by running the command
tar -xvzf <filename.tar.gz>. The file contains amediamtxexecutable and a configuration file calledmediamtx.yml. -
Back up the original
mediamtx.ymlfile (recommended). For example, you can runcp mediamtx.yml mediamtx.yml.original. We recommend this because the original file documents many Raspberry Pi camera options that you might want to explore later, so keeping a copy can be useful for reference.
Adding a camera stream
To stream the camera, replace the contents of mediamtx.yml with the following:
paths:
  cam:
    source: rpiCamera
The parameter source: rpiCamera tells MediaMTX to start and control the Raspberry Pi camera system for itself.
Start the mediamtx executable by typing its name at a command prompt, qualifying the full path if necessary.
If you want MediaMTX to acquire the camera only when the stream is requested, add the following line to the updated mediamtx.yml:
sourceOnDemand: yes
Consult the original mediamtx.yml for additional configuration parameters that let you select the image size, the camera mode, the bitrate, and so on. Find the relevant settings, by searching the file for rpi.
Alternatively, you can run rpicam-vid externally to MediaMTX by setting up mediamtx.yml as follows:
paths:
  cam:
    source: udp://127.0.0.1:1234
You can run any external program to output an MPEG-TS stream to this address. In the case of rpicam-vid, it might look like:
$ rpicam-vid -t 0 -n --codec libav --low-latency --libav-format mpegts -o udp://127.0.0.1:1234?pkt_size=1316|
Note
|
This provides the opportunity to alter the images in some way, perhaps using the rpicam-apps post-processing features, or the Picamera2 Python module. The --low-latency option suppresses B-frames (on a Raspberry Pi 5 or later; earlier Raspberry Pi devices don’t generate any B-frames), which is often advisable because some streaming formats that clients request don’t support them.
|
Viewing with a client
You can view the stream in a media player or web browser. The following examples assume the stream name is 'cam':
-
To view the stream using a media player application with the RTSP protocol, use the address
rtsp://<ip-address-of-MediaMTX-server>:8554/cam. -
To view the stream in a web browser, use the address
http://<ip-addr-of-MediaMTX-server>:8889/cam.
Troubleshooting
Occasional pauses in the video stream might be caused by insufficient space in the UDP receive buffers on your Raspberry Pi. If the buffers are too small, data can be dropped, causing visible pauses. To increase these buffers permanently, create a file called /etc/sysctl.d/99-network-tuning.conf` containing the following lines:
net.core.rmem_default=1000000
net.core.rmem_max=1000000
Reboot or run sudo sysctl -p /etc/sysctl.d/99-network-tuning.conf.
On Raspberry Pi OS Bookworm, you must instead add these lines to /etc/sysctl.conf (and then either reboot or run sudo sysctl -p).
For more information about MediaMTX and its capabilities, see the MediaMTX documentation.
Streaming with MistServer
MistServer is a popular free media server that you can use in conjunction with the Raspberry Pi camera system. Unlike MediaMTX, there’s no built-in camera support; however, you can configure MistServer to ingest a stream from rpicam-vid and serve it to clients in a variety of formats.
Installation and configuration
You can install MistServer on your Raspberry Pi by following the instructions in the MistServer documentation:
-
For 64-bit OSes, follow the instructions in Armv8 64-bits Linux.
-
For 32-bit OSes, follow the instructions in Armv7 Linux.
Ensure that you run the commands as root. This process sets up a system MistServer service that runs automatically.
To configure MistServer, go to the Management Interface (MI) webpage on your Raspberry Pi at http://localhost:4242/; you can also visit the page from another computer if you substitute your Raspberry Pi’s IP address. The first time you use the Management Interface, it asks you to create an admin account. In the steps that follow, you can accept the defaults.
|
Note
|
You can instead run MistServer on a different computer from the Raspberry Pi with the camera. |
Adding a camera stream
To add a camera stream, go to the Management Interface webpage and complete the following steps:
-
In the left pane, select Streams.
-
In the right pane, select Create Stream.
-
Fill in the required information:
-
A stream name, such as 'cam'. This is how clients identify this stream.
-
A source. To configure MistServer to start
rpicam-vidautomatically, enter the following command:$ ts-exec: rpicam-vid -n -t 0 --width 1920 --height 1080 --codec libav --libav-format mpegts -o -The parameters in this command configure the following things:
-
ts-execconfigures the command to output an MPEG-TS stream tostdout. This prefix requires MistServer to be running on the Raspberry Pi with the camera. -
rpicam-vidis the video command. -
-nconfigures no preview. -
-tconfigures the command to run indefinitely. -
--widthand--heightspecify your chosen dimensions.
-
-
Alternatively, if you run rpicam-vid externally, outputting to a UDP socket, use tsudp in place of ts-exec and follow it with the incoming stream’s IP address.
Viewing with a client
You can view the stream in a media player or web browser. The following examples assume the stream name is 'cam':
-
To view the stream using a media player application using the RTSP protocol, use the address:
rtsp://<ip-address-of-MistServer-server>:8554/cam. -
To view the stream in a web page, use MistServer’s built-in media player pages. In your web browser, enter:
http://<ip-address-of-MistServer-server>:8080/cam.html.
For more information about MistServer use cases and options, see the MistServer documentation.
Streaming with go2rtc
go2rtc is a media server platform that, while not offering direct integration like MediaMTX, allows for inter-operation in the same way as MistServer.
Installation and configuration
To install go2rtc:
-
Download the binary from the releases page:
-
If you’re running a 64-bit OS, choose the
go2rtc_linux_arm64binary. -
If you’re running a 32-bit OS, choose the
go2rtc_linux_armbinary. -
If your device is a Raspberry Pi 1 or Zero, choose the
go2rtc_linux_armv6binary.
-
-
Change the file permissions to make the downloaded binary executable.
-
Run the binary.
You can run this application with the default configuration. When go2rtc is running, the management page is located at http://localhost:1984/.
|
Note
|
As with MediaMTX, you can run go2rtc on a different system to the Raspberry Pi with the camera. |
Adding a camera stream
You can add a camera stream by creating a file go2rtc.yaml in the same folder where you run the executable. When go2rtc starts, it outputs a message to the console indicating where it expects to find its configuration file.
Add the following text to the file, substituting your required width and height:
streams:
  cam:
    - exec:rpicam-vid -n -t 0 --width 1280 --height 720 --codec libav --libav-format mpegts --low-latency -o -
This configuration starts rpicam-vid when any client requests the 'cam' stream. The parameter --low-latency suppresses B-frames on Raspberry Pi 5 or later models. In this case, go2rtc must be running on the Raspberry Pi with the camera.
Alternatively, you can run rpicam-vid externally and have it output an MPEG-TS stream to the address, for example, udp://127.0.0.1:1234. To configure this, ensure that the go2rtc.yaml file contains the following text:
  cam:
    - ffmpeg:udp://127.0.0.1:1234
If go2rtc is running on a different computer from the camera, adjust the IP address.
Viewing with a client
To view the stream using a media player application using the RTSP protocol, and assuming a stream name of 'cam', use the address: rtsp://<ip-address-of-go2rtc-server>:8554/cam.
To view the stream in a web page, use go2rtc’s built-in pages. Enter http://<ip-address-of-go2rtc-server>:1984/stream.html?src=cam.
For more information about go2rtc use cases and options, see the go2rtc README documentation.
rpicam-apps options reference
Edit this on GitHub
Common options
The following options apply across all the rpicam-apps with similar or identical semantics, unless otherwise noted.
To pass one of the following options to an application, prefix the option name with --. If the option requires a value, pass the value immediately after the option name, separated by a single space. If the value contains a space, surround the value in quotes.
Some options have shorthand aliases, for example -h instead of --help. Use these shorthand aliases instead of the full option name to save space and time at the expense of readability.
help
Alias: -h
Prints the full set of options, along with a brief synopsis of each option. Does not accept a value.
version
Prints out version strings for libcamera and rpicam-apps. Does not accept a value.
Example output:
rpicam-apps build: ca559f46a97a 27-09-2021 (14:10:24)
libcamera build: v0.0.0+3058-c29143f7
list-cameras
Lists the detected cameras attached to your Raspberry Pi and their available sensor modes. Does not accept a value.
Sensor mode identifiers have the following form: S<Bayer order><Bit-depth>_<Optional packing> : <Resolution list>
Crop is specified in native sensor pixels (even in pixel binning mode) as (<x>, <y>)/<Width>×<Height>. (x, y) specifies the location of the crop window of size width × height in the sensor array.
For example, the following output displays information about an IMX219 sensor at index 0 and an IMX477 sensor at index 1:
Available cameras
-----------------
0 : imx219 [3280x2464] (/base/soc/i2c0mux/i2c@1/imx219@10)
    Modes: 'SRGGB10_CSI2P' : 640x480 [206.65 fps - (1000, 752)/1280x960 crop]
                             1640x1232 [41.85 fps - (0, 0)/3280x2464 crop]
                             1920x1080 [47.57 fps - (680, 692)/1920x1080 crop]
                             3280x2464 [21.19 fps - (0, 0)/3280x2464 crop]
           'SRGGB8' : 640x480 [206.65 fps - (1000, 752)/1280x960 crop]
                      1640x1232 [41.85 fps - (0, 0)/3280x2464 crop]
                      1920x1080 [47.57 fps - (680, 692)/1920x1080 crop]
                      3280x2464 [21.19 fps - (0, 0)/3280x2464 crop]
1 : imx477 [4056x3040] (/base/soc/i2c0mux/i2c@1/imx477@1a)
    Modes: 'SRGGB10_CSI2P' : 1332x990 [120.05 fps - (696, 528)/2664x1980 crop]
           'SRGGB12_CSI2P' : 2028x1080 [50.03 fps - (0, 440)/4056x2160 crop]
                             2028x1520 [40.01 fps - (0, 0)/4056x3040 crop]
                             4056x3040 [10.00 fps - (0, 0)/4056x3040 crop]
For the IMX219 sensor in the above example:
-
all modes have an
RGGBBayer ordering -
all modes provide either 8-bit or 10-bit CSI2 packed readout at the listed resolutions
camera
Selects the camera to use. Specify an index from the list of available cameras.
config
Alias: -c
Specify a file containing CLI options and values. Consider a file named example_configuration.txt that contains the following text, specifying options and values as key-value pairs, one option per line, long (non-alias) option names only:
timeout=99000
verbose=
|
Tip
|
Omit the leading -- that you normally pass on the command line. For flags that lack a value, such as verbose in the above example, you must include a trailing =.
|
You could then run the following command to specify a timeout of 99000 milliseconds and verbose output:
$ rpicam-hello --config example_configuration.txt
timeout
Alias: -t
Default value: 5000 milliseconds (5 seconds)
Specify how long the application runs before closing. This value is interpreted as a number of milliseconds unless an optional suffix is used to change the unit. The suffix may be one of:
-
min– minutes -
sorsec– seconds -
ms– milliseconds (the default if no suffix used) -
us– microseconds -
ns– nanoseconds.
This time applies to both video recording and preview windows. When capturing a still image, the application shows a preview window for the length of time specified by the timeout parameter before capturing the output image.
To run the application indefinitely, specify a value of 0. Floating point values are also permitted.
Example: rpicam-hello -t 0.5min would run for 30 seconds.
preview
Alias: -p
Sets the location (x,y coordinates) and size (w,h dimensions) of the desktop or DRM preview window. Does not affect the resolution or aspect ratio of images requested from the camera. Scales image size and pillar or letterboxes image aspect ratio to fit within the preview window.
Pass the preview window dimensions in the following comma-separated form: x,y,w,h
Example: rpicam-hello --preview 100,100,500,500
fullscreen
Alias: -f
Forces the preview window to use the entire screen with no border or title bar. Scales image size and pillar or letterboxes image aspect ratio to fit within the entire screen. Does not accept a value.
qt-preview
Uses the Qt preview window, which consumes more resources than the alternatives, but supports X window forwarding. Incompatible with the fullscreen flag. Does not accept a value.
nopreview
Alias: -n
Causes the application to not display a preview window at all. Does not accept a value.
info-text
Default value: "#%frame (%fps fps) exp %exp ag %ag dg %dg"
Sets the supplied string as the title of the preview window when running in a desktop environment. Supports the following image metadata substitutions:
| Directive | Substitution |
|---|---|
|
Sequence number of the frame. |
|
Instantaneous frame rate. |
|
Shutter speed used to capture the image, in microseconds. |
|
Analogue gain applied to the image in the sensor. |
|
Digital gain applied to the image by the ISP. |
|
Gain applied to the red component of each pixel. |
|
Gain applied to the blue component of each pixel. |
|
Focus metric for the image, where a larger value implies a sharper image. |
|
Current lens position in dioptres (1 / distance in metres). |
|
Autofocus algorithm state ( |
width and height
Each accepts a single number defining the dimensions, in pixels, of the captured image.
For rpicam-still, rpicam-jpeg and rpicam-vid, specifies output resolution.
For rpicam-raw, specifies raw frame resolution. For cameras with a 2×2 binned readout mode, specifying a resolution equal to or smaller than the binned mode captures 2×2 binned raw frames.
For rpicam-hello, has no effect.
Examples:
-
rpicam-vid -o test.h264 --width 1920 --height 1080captures 1080p video. -
rpicam-still -r -o test.jpg --width 2028 --height 1520captures a 2028×1520 resolution JPEG. If used with the HQ camera, uses 2×2 binned mode, so the raw file (test.dng) contains a 2028×1520 raw Bayer image.
viewfinder-width and viewfinder-height
Each accepts a single number defining the dimensions, in pixels, of the image displayed in the preview window. Does not effect the preview window dimensions, since images are resized to fit. Does not affect captured still images or videos.
mode
Allows you to specify a camera mode in the following colon-separated format: <width>:<height>:<bit-depth>:<packing>. The system selects the closest available option for the sensor if there is not an exact match for a provided value. You can use the packed (P) or unpacked (U) packing formats. Impacts the format of stored videos and stills, but not the format of frames passed to the preview window.
Bit-depth and packing are optional.
Bit-depth defaults to 12.
Packing defaults to P (packed).
For information about the bit-depth, resolution, and packing options available for your sensor, see list-cameras.
Examples:
-
4056:3040:12:P– 4056×3040 resolution, 12 bits per pixel, packed. -
1632:1224:10– 1632×1224 resolution, 10 bits per pixel. -
2592:1944:10:U– 2592×1944 resolution, 10 bits per pixel, unpacked. -
3264:2448– 3264×2448 resolution.
Packed format details
The packed format uses less storage for pixel data.
On Raspberry Pi 4 and earlier devices, the packed format packs pixels using the MIPI CSI-2 standard. This means:
-
10-bit camera modes pack 4 pixels into 5 bytes. The first 4 bytes contain the 8 most significant bits (MSBs) of each pixel, and the final byte contains the 4 pairs of least significant bits (LSBs).
-
12-bit camera modes pack 2 pixels into 3 bytes. The first 2 bytes contain the 8 most significant bits (MSBs) of each pixel, and the final byte contains the 4 least significant bits (LSBs) of both pixels.
On Raspberry Pi 5 and later devices, the packed format compresses pixel values with a visually lossless compression scheme into 8 bits (1 byte) per pixel.
Unpacked format details
The unpacked format provides pixel values that are much easier to manually manipulate, at the expense of using more storage for pixel data.
On all devices, the unpacked format uses 2 bytes per pixel.
On Raspberry Pi 4 and earlier devices, applications apply zero padding at the most significant end. In the unpacked format, a pixel from a 10-bit camera mode cannot exceed the value 1023.
On Raspberry Pi 5 and later devices, applications apply zero padding at the least significant end, so images use the full 16-bit dynamic range of the pixel depth delivered by the sensor.
viewfinder-mode
Identical to the mode option, but it applies to the data passed to the preview window. For more information, see the mode documentation.
lores-width and lores-height
Delivers a second, lower-resolution image stream from the camera, scaled down to the specified dimensions.
Each accepts a single number defining the dimensions, in pixels, of the lower-resolution stream.
Available for preview and video modes. Not available for still captures. If you specify a aspect ratio different from the normal resolution stream, generates non-square pixels.
For rpicam-vid, disables extra colour-denoise processing.
Useful for image analysis when combined with image post-processing.
roi
Crops the image extracted from the full field of the sensor. Accepts four decimal values, ranged 0 to 1, in the following format: <x>,<y>,<w>,h>. Each of these values represents a percentage of the available width and heights as a decimal between 0 and 1.
These values define the following proportions:
-
<x>: X coordinates to skip before extracting an image -
<y>: Y coordinates to skip before extracting an image -
<w>: image width to extract -
<h>: image height to extract
Defaults to 0,0,1,1 (starts at the first X coordinate and the first Y coordinate, uses 100% of the image width, uses 100% of the image height).
Examples:
-
rpicam-hello --roi 0.25,0.25,0.5,0.5selects exactly a half of the total number of pixels cropped from the centre of the image (skips the first 25% of X coordinates, skips the first 25% of Y coordinates, uses 50% of the total image width, uses 50% of the total image height). -
rpicam-hello --roi 0,0,0.25,0.25selects exactly a quarter of the total number of pixels cropped from the top left of the image (skips the first 0% of X coordinates, skips the first 0% of Y coordinates, uses 25% of the image width, uses 25% of the image height).
hdr
Default value: off
Runs the camera in HDR mode. If passed without a value, assumes auto. Accepts one of the following values:
-
off– Disables HDR. -
auto– Enables HDR on supported devices. Uses the sensor’s built-in HDR mode if available. If the sensor lacks a built-in HDR mode, uses on-board HDR mode, if available. -
single-exp– Uses on-board HDR mode, if available, even if the sensor has a built-in HDR mode. If on-board HDR mode is not available, disables HDR.
Raspberry Pi 5 and later devices have an on-board HDR mode.
To check for built-in HDR modes in a sensor, pass this option in addition to list-cameras.
Camera control options
The following options control image processing and algorithms that affect camera image quality.
sharpness
Sets image sharpness. Accepts a numeric value along the following spectrum:
-
0.0applies no sharpening -
values greater than
0.0, but less than1.0apply less than the default amount of sharpening -
1.0applies the default amount of sharpening -
values greater than
1.0apply extra sharpening
contrast
Specifies the image contrast. Accepts a numeric value along the following spectrum:
-
0.0applies minimum contrast -
values greater than
0.0, but less than1.0apply less than the default amount of contrast -
1.0applies the default amount of contrast -
values greater than
1.0apply extra contrast
brightness
Specifies the image brightness, added as an offset to all pixels in the output image. Accepts a numeric value along the following spectrum:
-
-1.0applies minimum brightness (black) -
0.0applies standard brightness -
1.0applies maximum brightness (white)
For many use cases, prefer ev.
saturation
Specifies the image colour saturation. Accepts a numeric value along the following spectrum:
-
0.0applies minimum saturation (gray scale) -
values greater than
0.0, but less than1.0apply less than the default amount of saturation -
1.0applies the default amount of saturation -
values greater than
1.0apply extra saturation
ev
Specifies the exposure value (EV) compensation of the image in stops. Accepts a numeric value that controls target values passed to the Automatic Exposure/Gain Control (AEC/AGC) processing algorithm along the following spectrum:
-
-10.0applies minimum target values -
0.0applies standard target values -
10.0applies maximum target values
shutter
Specifies the exposure time, using the shutter, in microseconds. Gain can still vary when you use this option. If the camera runs at a framerate so fast it does not allow for the specified exposure time (for instance, a framerate of 1fps and an exposure time of 10000 microseconds), the sensor will use the maximum exposure time allowed by the framerate.
For a list of minimum and maximum shutter times for official cameras, see the camera hardware documentation. Values above the maximum result in undefined behaviour.
gain
Alias: --analoggain
Sets the combined analogue and digital gain. When the sensor driver can provide the requested gain, only uses analogue gain. When analogue gain reaches the maximum value, the ISP applies digital gain. Accepts a numeric value.
For a list of analogue gain limits, for official cameras, see the camera hardware documentation.
Sometimes, digital gain can exceed 1.0 even when the analogue gain limit is not exceeded. This can occur in the following situations:
-
Either of the colour gains drops below 1.0, which will cause the digital gain to settle to 1.0/min(red_gain,blue_gain). This keeps the total digital gain applied to any colour channel above 1.0 to avoid discolouration artefacts.
-
Slight variances during Automatic Exposure/Gain Control (AEC/AGC) changes.
metering
Default value: centre
Sets the metering mode of the Automatic Exposure/Gain Control (AEC/AGC) algorithm. Accepts the following values:
-
centre– centre weighted metering -
spot– spot metering -
average– average or whole frame metering -
custom– custom metering mode defined in the camera tuning file
For more information on defining a custom metering mode, and adjusting region weights in existing metering modes, see the Tuning guide for the Raspberry Pi cameras and libcamera.
exposure
Sets the exposure profile. Changing the exposure profile should not affect the image exposure. Instead, different modes adjust gain settings to achieve the same net result. Accepts the following values:
-
sport: short exposure, larger gains -
normal: normal exposure, normal gains -
long: long exposure, smaller gains
You can edit exposure profiles using tuning files. For more information, see the Tuning guide for the Raspberry Pi cameras and libcamera.
awb
Sets the Auto White Balance (AWB) mode. Accepts the following values:
| Mode name | Colour temperature range |
|---|---|
|
2500K to 8000K |
|
2500K to 3000K |
|
3000K to 3500K |
|
4000K to 4700K |
|
3000K to 5000K |
|
5500K to 6500K |
|
7000K to 8500K |
|
A custom range defined in the tuning file. |
These values are only approximate: values could vary according to the camera tuning.
No mode fully disables AWB. Instead, you can fix colour gains with awbgains.
For more information on AWB modes, including how to define a custom one, see the Tuning guide for the Raspberry Pi cameras and libcamera.
awbgains
Sets a fixed red and blue gain value to be used instead of an Auto White Balance (AWB) algorithm. Set non-zero values to disable AWB. Accepts comma-separated numeric input in the following format: <red_gain>,<blue_gain>
denoise
Default value: auto
Sets the denoising mode. Accepts the following values:
-
auto: Enables standard spatial denoise. Uses extra-fast colour denoise for video, and high-quality colour denoise for images. Enables no extra colour denoise in the preview window. -
off: Disables spatial and colour denoise. -
cdn_off: Disables colour denoise. -
cdn_fast: Uses fast colour denoise. -
cdn_hq: Uses high-quality colour denoise. Not appropriate for video/viewfinder due to reduced throughput.
Even fast colour denoise can lower framerates. High quality colour denoise significantly lowers framerates.
tuning-file
Specifies the camera tuning file. The tuning file allows you to control many aspects of image processing, including the Automatic Exposure/Gain Control (AEC/AGC), Auto White Balance (AWB), colour shading correction, colour processing, denoising and more. Accepts a tuning file path as input.
For more information about tuning files, see Tuning Files.
autofocus-mode
Default value: default
Specifies the autofocus mode. Accepts the following values:
-
default: puts the camera into continuous autofocus mode unlesslens-positionorautofocus-on-captureoverride the mode to manual -
manual: does not move the lens at all unless manually configured withlens-position -
auto: only moves the lens for an autofocus sweep when the camera starts or just before capture ifautofocus-on-captureis also used -
continuous: adjusts the lens position automatically as the scene changes
This option is only supported for certain camera modules.
autofocus-range
Default value: normal
Specifies the autofocus range. Accepts the following values:
-
normal: focuses from reasonably close to infinity -
macro: focuses only on close objects, including the closest focal distances supported by the camera -
full: focus on the entire range, from the very closest objects to infinity
This option is only supported for certain camera modules.
autofocus-speed
Default value: normal
Specifies the autofocus speed. Accepts the following values:
-
normal: changes the lens position at normal speed -
fast: changes the lens position quickly
This option is only supported for certain camera modules.
autofocus-window
Specifies the autofocus window within the full field of the sensor. Accepts four decimal values, ranged 0 to 1, in the following format: <x>,<y>,<w>,h>. Each of these values represents a percentage of the available width and heights as a decimal between 0 and 1.
These values define the following proportions:
-
<x>: X coordinates to skip before applying autofocus -
<y>: Y coordinates to skip before applying autofocus -
<w>: autofocus area width -
<h>: autofocus area height
The default value uses the middle third of the output image in both dimensions (1/9 of the total image area).
Examples:
-
rpicam-hello --autofocus-window 0.25,0.25,0.5,0.5selects exactly half of the total number of pixels cropped from the centre of the image (skips the first 25% of X coordinates, skips the first 25% of Y coordinates, uses 50% of the total image width, uses 50% of the total image height). -
rpicam-hello --autofocus-window 0,0,0.25,0.25selects exactly a quarter of the total number of pixels cropped from the top left of the image (skips the first 0% of X coordinates, skips the first 0% of Y coordinates, uses 25% of the image width, uses 25% of the image height).
This option is only supported for certain camera modules.
lens-position
Default value: default
Moves the lens to a fixed focal distance, normally given in dioptres (units of 1 / distance in metres). Accepts the following spectrum of values:
-
0.0: moves the lens to the "infinity" position -
Any other
number: moves the lens to the 1 /numberposition. For example, the value2.0would focus at approximately 0.5m -
default: move the lens to a default position which corresponds to the hyperfocal position of the lens
Lens calibration is imperfect, so different camera modules of the same model may vary.
Output file options
output
Alias: -o
Sets the name of the file used to record images or video. Besides plaintext file names, accepts the following special values:
-
-: write to stdout. -
udp://(prefix): a network address for UDP streaming. -
tcp://(prefix): a network address for TCP streaming. -
Include the
%ddirective in the file name to replace the directive with a count that increments for each opened file. This directive supports standard C format directive modifiers.
Examples:
-
rpicam-vid -t 100000 --segment 10000 -o chunk%04d.h264records a 100 second file in 10 second segments, where each file includes an incrementing four-digit counter padded with leading zeros: for example,chunk0001.h264,chunk0002.h264, etc. -
rpicam-vid -t 0 --inline -o udp://192.168.1.13:5000streams H.264 video to network address 192.168.1.13 using UDP on port 5000.
wrap
Sets a maximum value for the counter used by the output %d directive. The counter resets to zero after reaching this value. Accepts a numeric value.
flush
Flushes output files to disk as soon as a frame finishes writing, instead of waiting for the system to handle it. Does not accept a value.
post-process-file
Specifies a JSON file that configures the post-processing applied by the imaging pipeline. This applies to camera images before they reach the application. This works similarly to the legacy raspicam "image effects". Accepts a file name path as input.
Post-processing is a large topic and admits the use of third-party software like OpenCV and TensorFlowLite to analyse and manipulate images. For more information, see post-processing.
buffer-count
The number of buffers to allocate for still image capture or for video recording. The default value of zero lets each application choose a reasonable number for its own use case (1 for still image capture, and 6 for video recording). Increasing the number can sometimes help to reduce the number of frame drops, particularly at higher framerates.
viewfinder-buffer-count
As the buffer-count option, but applies when running in preview mode (that is rpicam-hello or the preview, not capture, phase of rpicam-still).
Image options
Edit this on GitHub
The command line options specified in this section apply only to still image output.
To pass one of the following options to an application, prefix the option name with --. If the option requires a value, pass the value immediately after the option name, separated by a single space. If the value contains a space, surround the value in quotes.
Some options have shorthand aliases, for example -h instead of --help. Use these shorthand aliases instead of the full option name to save space and time at the expense of readability.
exif
Saves extra EXIF tags in the JPEG output file. Only applies to JPEG output. Because of limitations in the libexif library, many tags are currently (incorrectly) formatted as ASCII and print a warning in the terminal.
This option is necessary to add certain EXIF tags related to camera settings. You can add tags unrelated to camera settings to the output JPEG after recording with ExifTool.
Example: rpicam-still -o test.jpg --exif IDO0.Artist=Someone
timelapse
Records images at the specified interval. Accepts an interval in milliseconds. Combine this setting with timeout to capture repeated images over time.
You can specify separate filenames for each output file using string formatting, for example, --output test%d.jpg.
Example: rpicam-still -t 100000 -o test%d.jpg --timelapse 10000 captures an image every 10 seconds for 100 seconds.
framestart
Configures a starting value for the frame counter accessed in output file names as %d. Accepts an integer starting value.
datetime
Uses the current date and time in the output file name, in the form MMDDhhmmss.jpg:
-
MM= 2-digit month number -
DD= 2-digit day number -
hh= 2-digit 24-hour hour number -
mm= 2-digit minute number -
ss= 2-digit second number
Does not accept a value.
timestamp
Uses the current system Unix time as the output file name. Does not accept a value.
restart
Default value: 0
Configures the restart marker interval for JPEG output. JPEG restart markers can help limit the impact of corruption on JPEG images, and additionally enable the use of multi-threaded JPEG encoding and decoding. Accepts an integer value.
keypress
Alias: -k
Captures an image when the timeout expires or on press of the Enter key, whichever comes first. Press the x key, then Enter to exit without capturing. Does not accept a value.
signal
Captures an image when the timeout expires or when SIGUSR1 is received. Use SIGUSR2 to exit without capturing. Does not accept a value.
thumb
Default value: 320:240:70
Configure the dimensions and quality of the thumbnail with the following format: <w:h:q> (or none, which omits the thumbnail).
encoding
Alias: -e
Default value: jpg
Sets the encoder to use for image output. Accepts the following values:
-
jpg– JPEG -
png– PNG -
bmp– BMP -
rgb– binary dump of uncompressed RGB pixels -
yuv420– binary dump of uncompressed YUV420 pixels
This option always determines the encoding, overriding the extension passed to output.
raw
Alias: -r
Saves a raw Bayer file in DNG format in addition to the output image. Replaces the output file name extension with .dng. You can process these standard DNG files with tools like dcraw or RawTherapee. Does not accept a value.
The image data in the raw file is exactly what came out of the sensor, with no processing from the ISP or anything else. The EXIF data saved in the file, among other things, includes:
-
exposure time
-
analogue gain (the ISO tag is 100 times the analogue gain used)
-
white balance gains (which are the reciprocals of the "as shot neutral" values)
-
the colour matrix used by the ISP
latest
Creates a symbolic link to the most recently saved file. Accepts a symbolic link name as input.
autofocus-on-capture
If set, runs an autofocus cycle just before capturing an image. Interacts with the following autofocus_mode values:
-
defaultormanual: only runs the capture-time autofocus cycle. -
auto: runs an additional autofocus cycle when the preview window loads. -
continuous: ignores this option, instead continually focusing throughout the preview.
Does not require a value, but you can pass 1 to enable and 0 to disable. Not passing a value is equivalent to passing 1.
Only supported by some camera modules (such as the Raspberry Pi Camera Module 3).
Video options
Edit this on GitHub
The command line options specified in this section apply only to video output.
To pass one of the following options to an application, prefix the option name with --. If the option requires a value, pass the value immediately after the option name, separated by a single space. If the value contains a space, surround the value in quotes.
Some options have shorthand aliases, for example -h instead of --help. Use these shorthand aliases instead of the full option name to save space and time at the expense of readability.
quality
Alias: -q
Default value: 50
Accepts an MJPEG quality level between 1 and 100. Only applies to videos encoded in the MJPEG format.
bitrate
Alias: -b
Controls the target bitrate used by the H.264 encoder in bits per second. Only applies to videos encoded in the H.264 format. Impacts the size of the output video.
Example: rpicam-vid -b 10000000 --width 1920 --height 1080 -o test.h264
intra
Alias: -g
Default value: 60
Sets the frequency of Iframes (intra frames) in the H.264 bitstream. Accepts a number of frames. Only applies to videos encoded in the H.264 format.
profile
Sets the H.264 profile. Accepts the following values:
-
baseline -
main -
high
Only applies to videos encoded in the H.264 format.
level
Sets the H.264 level. Accepts the following values:
-
4 -
4.1 -
4.2
Only applies to videos encoded in the H.264 format.
codec
Sets the encoder to use for video output. Accepts the following values:
-
h264– use H.264 encoder (the default) -
mjpeg– use MJPEG encoder -
yuv420– output uncompressed YUV420 frames. -
libav– use the libav backend to encode audio and video (for more information, seelibav)
save-pts
|
Warning
|
Raspberry Pi 5 does not support the save-pts option. Use libav to automatically generate timestamps for container formats instead.
|
Enables frame timestamp output, which allow you to convert the bitstream into a container format using a tool like mkvmerge. Accepts a plaintext file name for the timestamp output file.
Example: rpicam-vid -o test.h264 --save-pts timestamps.txt
You can then use the following command to generate an MKV container file from the bitstream and timestamps file:
$ mkvmerge -o test.mkv --timecodes 0:timestamps.txt test.h264
keypress
Alias: -k
Allows the CLI to enable and disable video output using the Enter key. Always starts in the recording state unless specified otherwise with initial. Type the x key and press Enter to exit. Does not accept a value.
signal
Alias: -s
Allows the CLI to enable and disable video output using SIGUSR1. Use SIGUSR2 to exit. Always starts in the recording state unless specified otherwise with initial. Does not accept a value.
initial
Default value: record
Specifies whether to start the application with video output enabled or disabled. Accepts the following values:
-
record: Starts with video output enabled. -
pause: Starts with video output disabled.
segment
Cuts video output into multiple files of the passed duration. Accepts a duration in milliseconds. If passed a very small duration (for instance, 1), records each frame to a separate output file to simulate burst capture.
You can specify separate filenames for each file using string formatting, for example, --output test%04d.h264.
circular
Default value: 4
Writes video recording into a circular buffer in memory. When the application quits, records the circular buffer to disk. Accepts an optional size in megabytes.
inline
Writes a sequence header in every Iframe (intra frame). This can help clients decode the video sequence from any point in the video, instead of just the beginning. Recommended with segment, split, circular, and streaming options.
Only applies to videos encoded in the H.264 format. Does not accept a value.
listen
Waits for an incoming client connection before encoding video. Intended for network streaming over TCP/IP. Does not accept a value.
frames
Records exactly the specified number of frames. Any non-zero value overrides timeout. Accepts a nonzero integer.
low-latency
On a Raspberry Pi 5, the --low-latency option will reduce the encoding latency, which may be beneficial for real-time streaming applications, in return for (slightly) less good coding efficiency (for example, B frames and arithmetic coding will no longer be used).
sync
Run the camera in software synchronisation mode, where multiple cameras synchronise frames to the same moment in time. The sync mode can be set to either client or server. For more information, please refer to the detailed explanation of how software synchronisation works.
libav options
Edit this on GitHub
The command line options specified in this section apply only to libav video backend.
To enable the libav backend, pass the codec option the value libav.
To pass one of the following options to an application, prefix the option name with --. If the option requires a value, pass the value immediately after the option name, separated by a single space. If the value contains a space, surround the value in quotes.
Some options have shorthand aliases, for example -h instead of --help. Use these shorthand aliases instead of the full option name to save space and time at the expense of readability.
libav-format
Sets the libav output format. Accepts the following values:
-
mkvencoding -
mp4encoding -
aviencoding -
h264streaming -
mpegtsstreaming
If you do not provide this option, the file extension passed to the output option determines the file format.
libav-audio
Enables audio recording. When enabled, you must also specify an audio-codec. Does not accept a value.
audio-codec
Default value: aac
Selects an audio codec for output. For a list of available codecs, run ffmpeg -codecs.
audio-bitrate
Sets the bitrate for audio encoding in bits per second. Accepts numeric input.
Example: rpicam-vid --codec libav -o test.mp4 --audio_codec mp2 --audio-bitrate 16384 (Records audio at 16 kilobits/sec with the mp2 codec)
audio-samplerate
Default value: 0
Sets the audio sampling rate in Hz. Accepts numeric input. 0 uses the input sample rate.
audio-device
Select an ALSA input device for audio recording. For a list of available devices, run the following command:
$ pactl list | grep -A2 'Source #' | grep 'Name: 'You should see output similar to the following:
Name: alsa_output.platform-bcm2835_audio.analog-stereo.monitor
Name: alsa_output.platform-fef00700.hdmi.hdmi-stereo.monitor
Name: alsa_output.usb-GN_Netcom_A_S_Jabra_EVOLVE_LINK_000736B1214E0A-00.analog-stereo.monitor
Name: alsa_input.usb-GN_Netcom_A_S_Jabra_EVOLVE_LINK_000736B1214E0A-00.mono-fallback
Detection options
Edit this on GitHub
The command line options specified in this section apply only to object detection using rpicam-detect.
To pass one of the following options to rpicam-detect, prefix the option name with --. If the option requires a value, pass the value immediately after the option name, separated by a single space. If the value contains a space, surround the value in quotes.
Some options have shorthand aliases, for example -h instead of --help. Use these shorthand aliases instead of the full option name to save space and time at the expense of readability.
Post-processing with rpicam-apps
Edit this on GitHub
rpicam-apps share a common post-processing framework. This allows them to pass the images received from the camera system through a number of custom image-processing and image-analysis routines. Each such routine is known as a stage. To run post-processing stages, supply a JSON file instructing the application which stages and options to apply. You can find example JSON files that use the built-in post-processing stages in the assets folder of the rpicam-apps repository.
For example, the negate stage turns light pixels dark and dark pixels light. Because the negate stage is basic, requiring no configuration, negate.json just names the stage:
{
    "negate": {}
}
To apply the negate stage to an image, pass negate.json to the post-process-file option:
$ rpicam-hello --post-process-file negate.jsonTo run multiple post-processing stages, create a JSON file that contains multiple stages as top-level keys. For example, to the following configuration runs the Sobel stage, then the negate stage:
{
    "sobel_cv":
    {
        "ksize": 5
    },
    "negate": {}
}
The Sobel stage uses OpenCV, hence the cv suffix. It has a user-configurable parameter, ksize, that specifies the kernel size of the filter to be used. In this case, the Sobel filter produces bright edges on a black background, and the negate stage turns this into dark edges on a white background.
Some stages, such as negate, alter the image in some way. Other stages analyse the image to generate metadata. Post-processing stages can pass this metadata to other stages and even the application.
To improve performance, image analysis often uses reduced resolution. rpicam-apps provide a dedicated low-resolution feed directly from the ISP.
|
Note
|
The rpicam-apps supplied with Raspberry Pi OS do not include OpenCV and TensorFlow Lite. As a result, certain post-processing stages that rely on them are disabled. To use these stages, re-compile rpicam-apps. On a Raspberry Pi 3 or 4 running a 32-bit kernel, compile with the -DENABLE_COMPILE_FLAGS_FOR_TARGET=armv8-neon flag to speed up certain stages.
|
Built-in stages
negate stage
This stage turns light pixels dark and dark pixels light.
The negate stage has no user-configurable parameters.
Default negate.json file:
{
    "negate" : {}
}
Run the following command to use this stage file with rpicam-hello:
$ rpicam-hello --post-process-file negate.jsonExample output:
hdr stage
This stage emphasises details in images using High Dynamic Range (HDR) and Dynamic Range Compression (DRC). DRC uses a single image, while HDR combines multiple images for a similar result.
Parameters fall into three groups: the LP filter, global tonemapping, and local contrast.
This stage applies a smoothing filter to the fully-processed input images to generate a low pass (LP) image. It then generates the high pass (HP) image from the diff of the original and LP images. Then, it applies a global tonemap to the LP image and adds it back to the HP image. This process helps preserve local contrast.
You can configure this stage with the following parameters:
|
The number of frames to accumulate; for DRC, use 1; for HDR, try 8 |
|
The coefficient of the low pass IIR filter. |
|
A piecewise linear function that relates pixel level to the threshold of meaningful detail |
|
Points in the input image histogram mapped to targets in the output range where we wish to move them. Uses the following sub-configuration:
|
|
Strength of application of the global tonemap |
|
A piecewise linear function that defines the gain applied to local contrast when added back to the tonemapped LP image, for positive (bright) detail |
|
A piecewise linear function that defines the gain applied to local contrast when added back to the tonemapped LP image, for negative (dark) detail |
|
An overall gain applied to all local contrast that is added back |
|
A factor that allows the output colours to be affected more or less strongly |
To control processing strength, changing the global_tonemap_strength and local_tonemap_strength parameters.
Processing a single image takes between two and three seconds for a 12 MP image on a Raspberry Pi 4. When accumulating multiple frames, this stage sends only the processed image to the application.
Default drc.json file for DRC:
{
    "hdr" : {
		"num_frames" : 1,
		"lp_filter_strength" : 0.2,
		"lp_filter_threshold" : [ 0, 10.0 , 2048, 205.0, 4095, 205.0 ],
		"global_tonemap_points" :
			[
			    { "q": 0.1, "width": 0.05, "target": 0.15, "max_up": 1.5, "max_down": 0.7 },
			    { "q": 0.5, "width": 0.05, "target": 0.5, "max_up": 1.5, "max_down": 0.7 },
			    { "q": 0.8, "width": 0.05, "target": 0.8, "max_up": 1.5, "max_down": 0.7 }
			],
		"global_tonemap_strength" : 1.0,
		"local_pos_strength" : [ 0, 6.0, 1024, 2.0, 4095, 2.0 ],
		"local_neg_strength" : [ 0, 4.0, 1024, 1.5, 4095, 1.5 ],
		"local_tonemap_strength" : 1.0,
		"local_colour_scale" : 0.9
    }
}
Example:
Run the following command to use this stage file with rpicam-still:
$ rpicam-still -o test.jpg --post-process-file drc.json
Default hdr.json file for HDR:
{
    "hdr" : {
		"num_frames" : 8,
		"lp_filter_strength" : 0.2,
		"lp_filter_threshold" : [ 0, 10.0 , 2048, 205.0, 4095, 205.0 ],
		"global_tonemap_points" :
			[
			    { "q": 0.1, "width": 0.05, "target": 0.15, "max_up": 5.0, "max_down": 0.5 },
			    { "q": 0.5, "width": 0.05, "target": 0.45, "max_up": 5.0, "max_down": 0.5 },
			    { "q": 0.8, "width": 0.05, "target": 0.7, "max_up": 5.0, "max_down": 0.5 }
			],
		"global_tonemap_strength" : 1.0,
		"local_pos_strength" : [ 0, 6.0, 1024, 2.0, 4095, 2.0 ],
		"local_neg_strength" : [ 0, 4.0, 1024, 1.5, 4095, 1.5 ],
		"local_tonemap_strength" : 1.0,
		"local_colour_scale" : 0.8
    }
}
Example:
Run the following command to use this stage file with rpicam-still:
$ rpicam-still -o test.jpg --ev -2 --denoise cdn_off --post-process-file hdr.json
motion_detect stage
The motion_detect stage analyses frames from the low-resolution image stream. You must configure the low-resolution stream to use this stage. The stage detects motion by comparing a region of interest (ROI) in the frame to the corresponding part of a previous frame. If enough pixels change between frames, this stage indicates the motion in metadata under the motion_detect.result key.
This stage has no dependencies on third-party libraries.
You can configure this stage with the following parameters, passing dimensions as a proportion of the low-resolution image size between 0 and 1:
|
x-offset of the region of interest for the comparison (proportion between 0 and 1) |
|
y-offset of the region of interest for the comparison (proportion between 0 and 1) |
|
Width of the region of interest for the comparison (proportion between 0 and 1) |
|
Height of the region of interest for the comparison (proportion between 0 and 1) |
|
Linear coefficient used to construct the threshold for pixels being different |
|
Constant coefficient used to construct the threshold for pixels being different according to |
|
The motion detector will run only this many frames |
|
The pixel subsampled by this amount horizontally |
|
The pixel subsampled by this amount vertically |
|
The proportion of pixels (regions) which must be categorised as different for them to count as motion |
|
Print messages to the console, including when the motion status changes |
Default motion_detect.json configuration file:
{
    "motion_detect" : {
		"roi_x" : 0.1,
		"roi_y" : 0.1,
		"roi_width" : 0.8,
		"roi_height" : 0.8,
		"difference_m" : 0.1,
		"difference_c" : 10,
		"region_threshold" : 0.005,
		"frame_period" : 5,
		"hskip" : 2,
		"vskip" : 2,
		"verbose" : 0
    }
}
Adjust the differences and the threshold to make the algorithm more or less sensitive. To improve performance, use the hskip and vskip parameters.
Run the following command to use this stage file with rpicam-hello:
$ rpicam-hello --lores-width 128 --lores-height 96 --post-process-file motion_detect.jsonPost-processing with OpenCV
Edit this on GitHub
|
Note
|
These stages require an OpenCV installation. You may need to rebuild rpicam-apps with OpenCV support.
|
sobel_cv stage
This stage applies a Sobel filter to an image to emphasise edges.
You can configure this stage with the following parameters:
|
Kernel size of the Sobel filter |
Default sobel_cv.json file:
{
    "sobel_cv" : {
        "ksize": 5
    }
}
Example:
face_detect_cv stage
This stage uses the OpenCV Haar classifier to detect faces in an image. It returns face location metadata under the key face_detect.results and optionally draws the locations on the image.
You can configure this stage with the following parameters:
|
Name of the file where the Haar cascade can be found |
|
Determines range of scales at which the image is searched for faces |
|
Minimum number of overlapping neighbours required to count as a face |
|
Minimum face size |
|
Maximum face size |
|
How many frames to wait before trying to re-run the face detector |
|
Whether to draw face locations on the returned image |
The face_detect_cv stage runs only during preview and video capture. It ignores still image capture. It runs on the low resolution stream with a resolution between 320×240 and 640×480 pixels.
Default face_detect_cv.json file:
{
    "face_detect_cv" : {
        "cascade_name" : "/usr/local/share/OpenCV/haarcascades/haarcascade_frontalface_alt.xml",
        "scaling_factor" : 1.1,
        "min_neighbors" : 2,
        "min_size" : 32,
        "max_size" : 256,
        "refresh_rate" : 1,
        "draw_features" : 1
    }
}
Example:
annotate_cv stage
This stage writes text into the top corner of images using the same % substitutions as the info-text option.
Interprets info-text directives first, then passes any remaining tokens to strftime.
For example, to achieve a datetime stamp on the video, pass %F %T %z:
-
%Fdisplays the ISO-8601 date (2023-03-07) -
%Tdisplays 24h local time (for example, "09:57:12") -
%zdisplays the timezone relative to UTC (for example, "-0800")
This stage does not output any metadata, but it writes metadata found in annotate.text in place of anything in the JSON configuration file. This allows other post-processing stages to write text onto images.
You can configure this stage with the following parameters:
|
The text string to be written |
|
Foreground colour |
|
Background colour |
|
A number proportional to the size of the text |
|
A number that determines the thickness of the text |
|
The amount of alpha to apply when overwriting background pixels |
Default annotate_cv.json file:
{
    "annotate_cv" : {
        "text" : "Frame %frame exp %exp ag %ag dg %dg",
        "fg" : 255,
        "bg" : 0,
        "scale" : 1.0,
        "thickness" : 2,
        "alpha" : 0.3
    }
}
Example:
Post-Processing with TensorFlow Lite
Edit this on GitHub
Prerequisites
These stages require TensorFlow Lite (TFLite) libraries that export the C++ API. From Raspberry Pi OS Trixie onwards, Raspberry Pi builds and distributes a TFLite package, which can be installed with the following command:
$ sudo apt install libtensorflow-lite-devAfter installing, you must recompile rpicam-apps with TensorFlow Lite support.
object_classify_tf stage
object_classify_tf uses a Google MobileNet v1 model to classify objects in the camera image. This stage requires a labels.txt file.
You can configure this stage with the following parameters:
|
The number of results to show |
|
The number of frames that must elapse between model runs |
|
Confidence threshold (between 0 and 1) where objects are considered as being present |
|
Confidence threshold which objects must drop below before being discarded as matches |
|
Filepath of the TFLite model file |
|
Filepath of the file containing the object labels |
|
Whether to display the object labels on the image; inserts |
|
Output more information to the console |
Example object_classify_tf.json file:
{
    "object_classify_tf" : {
        "top_n_results" : 2,
        "refresh_rate" : 30,
        "threshold_high" : 0.6,
        "threshold_low" : 0.4,
        "model_file" : "/home/<username>/models/mobilenet_v1_1.0_224_quant.tflite",
        "labels_file" : "/home/<username>/models/labels.txt",
        "display_labels" : 1
    },
    "annotate_cv" : {
        "text" : "",
        "fg" : 255,
        "bg" : 0,
        "scale" : 1.0,
        "thickness" : 2,
        "alpha" : 0.3
    }
}
The stage operates on a low resolution stream image of size 224×224.
Run the following command to use this stage file with rpicam-hello:
$ rpicam-hello --post-process-file object_classify_tf.json --lores-width 224 --lores-height 224
pose_estimation_tf stage
pose_estimation_tf uses a Google MobileNet v1 model to detect pose information.
You can configure this stage with the following parameters:
|
The number of frames that must elapse between model runs |
|
Filepath of the TFLite model file |
|
Output extra information to the console |
Use the separate plot_pose_cv stage to draw the detected pose onto the main image.
You can configure the plot_pose_cv stage with the following parameters:
|
Confidence threshold determining how much to draw; can be less than zero |
Example pose_estimation_tf.json file:
{
    "pose_estimation_tf" : {
        "refresh_rate" : 5,
        "model_file" : "posenet_mobilenet_v1_100_257x257_multi_kpt_stripped.tflite"
    },
    "plot_pose_cv" : {
       "confidence_threshold" : -0.5
    }
}
The stage operates on a low resolution stream image of size 257×257. Because YUV420 images must have even dimensions, round up to 258×258 for YUV420 images.
Run the following command to use this stage file with rpicam-hello:
$ rpicam-hello --post-process-file pose_estimation_tf.json --lores-width 258 --lores-height 258
object_detect_tf stage
object_detect_tf uses a Google MobileNet v1 SSD (Single Shot Detector) model to detect and label objects.
You can configure this stage with the following parameters:
|
The number of frames that must elapse between model runs |
|
Filepath of the TFLite model file |
|
Filepath of the file containing the list of labels |
|
Confidence threshold before accepting a match |
|
Determines the amount of overlap between matches for them to be merged as a single match. |
|
Output extra information to the console |
Use the separate object_detect_draw_cv stage to draw the detected objects onto the main image.
You can configure the object_detect_draw_cv stage with the following parameters:
|
Thickness of the bounding box lines |
|
Size of the font used for the label |
Example object_detect_tf.json file:
{
    "object_detect_tf" : {
        "number_of_threads" : 2,
        "refresh_rate" : 10,
        "confidence_threshold" : 0.5,
        "overlap_threshold" : 0.5,
        "model_file" : "/home/<username>/models/coco_ssd_mobilenet_v1_1.0_quant_2018_06_29/detect.tflite",
        "labels_file" : "/home/<username>/models/coco_ssd_mobilenet_v1_1.0_quant_2018_06_29/labelmap.txt",
        "verbose" : 1
    },
    "object_detect_draw_cv" : {
       "line_thickness" : 2
    }
}
The stage operates on a low resolution stream image of size 300×300. Run the following command, which passes a 300×300 crop to the detector from the centre of the 400×300 low resolution image, to use this stage file with rpicam-hello:
$ rpicam-hello --post-process-file object_detect_tf.json --lores-width 400 --lores-height 300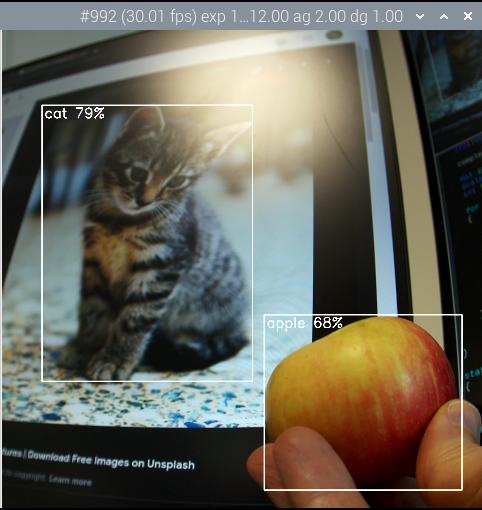
segmentation_tf stage
segmentation_tf uses a Google MobileNet v1 model. This stage requires a label file, found at the assets/segmentation_labels.txt.
This stage runs on an image of size 257×257. Because YUV420 images must have even dimensions, the low resolution image should be at least 258 pixels in both width and height. The stage adds a vector of 257×257 values to the image metadata where each value indicates the categories a pixel belongs to. You can optionally draw a representation of the segmentation into the bottom right corner of the image.
You can configure this stage with the following parameters:
|
The number of frames that must elapse between model runs |
|
Filepath of the TFLite model file |
|
Filepath of the file containing the list of labels |
|
When verbose is set, prints when the number of pixels with any label exceeds this number |
|
Draws the segmentation map into the bottom right hand corner of the image |
|
Output extra information to the console |
Example segmentation_tf.json file:
{
    "segmentation_tf" : {
        "number_of_threads" : 2,
        "refresh_rate" : 10,
        "model_file" : "/home/<username>/models/lite-model_deeplabv3_1_metadata_2.tflite",
        "labels_file" : "/home/<username>/models/segmentation_labels.txt",
        "draw" : 1,
        "verbose" : 1
    }
}
This example takes a camera image and reduces it to 258×258 pixels in size. This stage even works when squashing a non-square image without cropping. This example enables the segmentation map in the bottom right hand corner.
Run the following command to use this stage file with rpicam-hello:
$ rpicam-hello --post-process-file segmentation_tf.json --lores-width 258 --lores-height 258 --viewfinder-width 1024 --viewfinder-height 1024
Write your own post-processing stages
Edit this on GitHub
With the rpicam-apps post-processing framework, users can create their own custom post-processing stages. You can even include algorithms and routines from OpenCV and TensorFlow Lite.
Basic post-processing stages
To create your own post-processing stage, derive a new class from the PostProcessingStage class.
All post-processing stages must implement the following member functions:
char const *Name() const-
Returns the name of the stage. Matched against stages listed in the JSON post-processing configuration file.
void Read(boost::property_tree::ptree const ¶ms)-
Reads the stage’s configuration parameters from a provided JSON file.
void AdjustConfig(std::string const &use_case, StreamConfiguration *config)-
Gives stages a chance to influence the configuration of the camera. Frequently empty for stages with no need to configure the camera.
void Configure()-
Called just after the camera has been configured to allocate resources and check that the stage has access to necessary streams.
void Start()-
Called when the camera starts. Frequently empty for stages with no need to configure the camera.
bool Process(CompletedRequest &completed_request)-
Presents completed camera requests for post-processing. This is where you’ll implement pixel manipulations and image analysis. Returns
trueif the post-processing framework should not deliver this request to the application. void Stop()-
Called when the camera stops. Used to shut down any active processing on asynchronous threads.
void Teardown()-
Called when the camera configuration is destroyed. Use this as a deconstructor where you can de-allocate resources set up in the
Configuremethod.
In any stage implementation, call RegisterStage to register your stage with the system.
Don’t forget to add your stage to meson.build in the post-processing folder.
When writing your own stages, keep these tips in mind:
-
The
Processmethod blocks the imaging pipeline. If it takes too long, the pipeline will stutter. Always delegate time-consuming algorithms to an asynchronous thread. -
When delegating work to another thread, you must copy the image buffers. For applications like image analysis that don’t require full resolution, try using a low-resolution image stream.
-
The post-processing framework uses parallelism to process every frame. This improves throughput. However, some OpenCV and TensorFlow Lite functions introduce another layer of parallelism within each frame. Consider serialising calls within each frame since post-processing already takes advantage of multiple threads.
-
Most streams, including the low resolution stream, use the YUV420 format. You may need to convert this to another format for certain OpenCV or TFLite functions.
-
For the best performance, always alter images in-place.
For a basic example, see negate_stage.cpp. This stage negates an image by turning light pixels dark and dark pixels light. This stage is mostly derived class boiler-plate, achieving the negation logic in barely half a dozen lines of code.
For another example, see sobel_cv_stage.cpp, which implements a Sobel filter in just a few lines of OpenCV functions.
TensorFlow Lite stages
For stages that use TensorFlow Lite (TFLite), derive a new class from the TfStage class.
This class delegates model execution to a separate thread to prevent camera stuttering.
The TfStage class implements all the PostProcessingStage member functions post-processing stages must normally implement, except for Name.
All TfStage-derived stages must implement the Name function, and should implement some or all of the following virtual member functions:
void readExtras()-
The base class reads the named model and certain other parameters like the
refresh_rate. Use this function to read extra parameters for the derived stage and check that the loaded model is correct (for example, has right input and output dimensions). void checkConfiguration()-
The base class fetches the low resolution stream that TFLite operates on and the full resolution stream in case the derived stage needs it. Use this function to check for the streams required by your stage. If your stage can’t access one of the required streams, you might skip processing or throw an error.
void interpretOutputs()-
Use this function to read and interpret the model output. Runs in the same thread as the model when the model completes.
void applyResults()-
Use this function to apply results of the model (could be several frames old) to the current frame. Typically involves attaching metadata or drawing. Runs in the main thread, before frames are delivered.
For an example implementation, see the object_classify_tf_stage.cpp and pose_estimation_tf_stage.cpp.
Advanced rpicam-apps
Edit this on GitHub
Build libcamera and rpicam-apps
Build libcamera and rpicam-apps for yourself for the following benefits:
-
You can pick up the latest enhancements and features.
-
rpicam-appscan be compiled with extra optimisation for Raspberry Pi 3 and Raspberry Pi 4 devices running a 32-bit OS. -
You can include optional OpenCV and/or TFLite post-processing stages, or add your own.
-
You can customise or add your own applications derived from
rpicam-apps
Remove pre-installed rpicam-apps
Raspberry Pi OS includes a pre-installed copy of rpicam-apps. Before building and installing your own version of rpicam-apps, you must first remove the pre-installed version. Run the following command to remove the rpicam-apps package from your Raspberry Pi:
$ sudo apt remove --purge rpicam-apps
Building rpicam-apps without building libcamera
To build rpicam-apps without first rebuilding libcamera and libepoxy, install libcamera, libepoxy and their dependencies with apt:
$ sudo apt install -y libcamera-dev libepoxy-dev libjpeg-dev libtiff5-dev libpng-dev libopencv-dev|
Tip
|
If you do not need support for the GLES/EGL preview window, omit libepoxy-dev.
|
To use the Qt preview window, install the following additional dependencies:
$ sudo apt install -y qtbase5-dev libqt5core5a libqt5gui5 libqt5widgets5For libav support in rpicam-vid, install the following additional dependencies:
$ sudo apt install libavcodec-dev libavdevice-dev libavformat-dev libswresample-devIf you run Raspberry Pi OS Lite, install git:
$ sudo apt install -y gitNext, build rpicam-apps.
Building libcamera
|
Note
|
Only build libcamera from scratch if you need custom behaviour or the latest features that have not yet reached apt repositories.
|
|
Note
|
If you run Raspberry Pi OS Lite, begin by installing the following packages: |
First, install the following libcamera dependencies:
$ sudo apt install -y libboost-dev
$ sudo apt install -y libgnutls28-dev openssl libtiff5-dev pybind11-dev
$ sudo apt install -y qtbase5-dev libqt5core5a libqt5gui5 libqt5widgets5
$ sudo apt install -y meson cmake
$ sudo apt install -y python3-yaml python3-ply
$ sudo apt install -y libglib2.0-dev libgstreamer-plugins-base1.0-dev
Now we’re ready to build libcamera itself.
Download a local copy of Raspberry Pi’s fork of libcamera from GitHub:
$ git clone https://github.com/raspberrypi/libcamera.gitNavigate into the root directory of the repository:
$ cd libcameraNext, run meson to configure the build environment:
$ meson setup build --buildtype=release -Dpipelines=rpi/vc4,rpi/pisp -Dipas=rpi/vc4,rpi/pisp -Dv4l2=true -Dgstreamer=enabled -Dtest=false -Dlc-compliance=disabled -Dcam=disabled -Dqcam=disabled -Ddocumentation=disabled -Dpycamera=enabled|
Note
|
You can disable the gstreamer plugin by replacing -Dgstreamer=enabled with -Dgstreamer=disabled during the meson build configuration. If you disable gstreamer, there is no need to install the libglib2.0-dev and libgstreamer-plugins-base1.0-dev dependencies.
|
Now, you can build libcamera with ninja:
$ ninja -C buildFinally, run the following command to install your freshly-built libcamera binary:
$ sudo ninja -C build install|
Tip
|
On devices with 1 GB of memory or less, the build may exceed available memory. Append the -j 1 flag to ninja commands to limit the build to a single process. This should prevent the build from exceeding available memory on devices like the Raspberry Pi Zero and the Raspberry Pi 3.
|
libcamera does not yet have a stable binary interface. Always build rpicam-apps after you build libcamera.
Building rpicam-apps
First fetch the necessary dependencies for rpicam-apps.
$ sudo apt install -y cmake libboost-program-options-dev libdrm-dev libexif-dev
$ sudo apt install -y meson ninja-build
Download a local copy of Raspberry Pi’s rpicam-apps GitHub repository:
$ git clone https://github.com/raspberrypi/rpicam-apps.gitNavigate into the root directory of the repository:
$ cd rpicam-appsFor desktop-based operating systems like Raspberry Pi OS, configure the rpicam-apps build with the following meson command:
$ meson setup build -Denable_libav=enabled -Denable_drm=enabled -Denable_egl=enabled -Denable_qt=enabled -Denable_opencv=disabled -Denable_tflite=disabled -Denable_hailo=disabledFor headless operating systems like Raspberry Pi OS Lite, configure the rpicam-apps build with the following meson command:
$ meson setup build -Denable_libav=disabled -Denable_drm=enabled -Denable_egl=disabled -Denable_qt=disabled -Denable_opencv=disabled -Denable_tflite=disabled -Denable_hailo=disabled|
Tip
|
|
You can now build rpicam-apps with the following command:
$ meson compile -C build|
Tip
|
On devices with 1 GB of memory or less, the build may exceed available memory. Append the -j 1 flag to meson commands to limit the build to a single process. This should prevent the build from exceeding available memory on devices like the Raspberry Pi Zero and the Raspberry Pi 3.
|
Finally, run the following command to install your freshly-built rpicam-apps binary:
$ sudo meson install -C build|
Tip
|
The command above should automatically update the |
Run the following command to check that your device uses the new binary:
$ rpicam-still --versionThe output should include the date and time of your local rpicam-apps build.
Finally, follow the dtoverlay and display driver instructions in the Configuration section.
rpicam-apps meson flag reference
The meson build configuration for rpicam-apps supports the following flags:
-Dneon_flags=armv8-neon-
Speeds up certain post-processing features on Raspberry Pi 3 or Raspberry Pi 4 devices running a 32-bit OS.
-Denable_libav=enabled-
Enables or disables
libavencoder integration. -Denable_drm=enabled-
Enables or disables DRM/KMS preview rendering, a preview window used in the absence of a desktop environment.
-Denable_egl=enabled-
Enables or disables the non-Qt desktop environment-based preview. Disable if your system lacks a desktop environment.
-Denable_qt=enabled-
Enables or disables support for the Qt-based implementation of the preview window. Disable if you do not have a desktop environment installed or if you have no intention of using the Qt-based preview window. The Qt-based preview is normally not recommended because it is computationally very expensive, however it does work with X display forwarding.
-Denable_opencv=enabled-
Forces OpenCV-based post-processing stages to link or not link. Requires OpenCV to enable. Defaults to
disabled. -Denable_tflite=enabled-
Enables or disables TensorFlow Lite post-processing stages. Disabled by default. Requires Tensorflow Lite to enable. Depending on how you have built and/or installed TFLite, you may need to tweak the
meson.buildfile in thepost_processing_stagesdirectory. -Denable_hailo=enabled-
Enables or disables HailoRT-based post-processing stages. Requires HailoRT to enable. Defaults to
auto. -Ddownload_hailo_models=true-
Downloads and installs models for HailoRT post-processing stages. Requires
wgetto be installed. Defaults totrue.
Each of the above options (except for neon_flags) supports the following values:
-
enabled: enables the option, fails the build if dependencies are not available -
disabled: disables the option -
auto: enables the option if dependencies are available
Building libepoxy
Rebuilding libepoxy should not normally be necessary as this library changes only very rarely. If you do want to build it from scratch, however, please follow the instructions below.
Start by installing the necessary dependencies.
$ sudo apt install -y libegl1-mesa-devNext, download a local copy of the libepoxy repository from GitHub:
$ git clone https://github.com/anholt/libepoxy.gitNavigate into the root directory of the repository:
$ cd libepoxyCreate a build directory at the root level of the repository, then navigate into that directory:
$ mkdir _build
$ cd _build
Next, run meson to configure the build environment:
$ mesonNow, you can build libexpoxy with ninja:
$ ninjaFinally, run the following command to install your freshly-built libepoxy binary:
$ sudo ninja install
Write your own rpicam apps
Edit this on GitHub
rpicam-apps does not provide all of the camera-related features that anyone could ever need. Instead, these applications are small and flexible. Users who require different behaviour can implement it themselves.
All of the rpicam-apps use an event loop that receives messages when a new set of frames arrives from the camera system. This set of frames is called a CompletedRequest. The CompletedRequest contains:
-
all images derived from that single camera frame: often a low-resolution image and a full-size output
-
metadata from the camera and post-processing systems
rpicam-hello
rpicam-hello is the smallest application, and the best place to start understanding rpicam-apps design. It extracts the CompletedRequestPtr, a shared pointer to the CompletedRequest, from the message, and forwards it to the preview window:
CompletedRequestPtr &completed_request = std::get<CompletedRequestPtr>(msg.payload);
app.ShowPreview(completed_request, app.ViewfinderStream());
Every CompletedRequest must be recycled back to the camera system so that the buffers can be reused. Otherwise, the camera runs out of buffers for new camera frames. This recycling process happens automatically when no references to the CompletedRequest remain using C++'s shared pointer and custom deleter mechanisms.
As a result, rpicam-hello must complete the following actions to recycle the buffer space:
-
The event loop must finish a cycle so the message (
msgin the code), which holds a reference toCompletedRequest, can be replaced with the next message. This discards the reference to the previous message. -
When the event thread calls
ShowPreview, it passes the preview thread a reference to theCompletedRequest. The preview thread discards the lastCompletedRequestinstance each timeShowPreviewis called.
rpicam-vid
rpicam-vid is similar to rpicam-hello with encoding added to the event loop. Before the event loop starts, rpicam-vid configures the encoder with a callback. The callback handles the buffer containing the encoded image data. In the code below, we send the buffer to the Output object. Output could write it to a file or stream it, depending on the options specified.
app.SetEncodeOutputReadyCallback(std::bind(&Output::OutputReady, output.get(), _1, _2, _3, _4));
Because this code passes the encoder a reference to the CompletedRequest, rpicam-vid can’t recycle buffer data until the event loop, preview window, and encoder all discard their references.
rpicam-raw
rpicam-raw is similar to rpicam-vid. It also encodes during the event loop. However, rpicam-raw uses a dummy encoder called the NullEncoder. This uses the input image as the output buffer instead of encoding it with a codec. NullEncoder only discards its reference to the buffer when the output callback completes. This guarantees that the buffer isn’t recycled before the callback processes the image.
rpicam-raw doesn’t forward anything to the preview window.
NullEncoder is possibly overkill in rpicam-raw. We could probably send images straight to the Output object, instead. However, rpicam-apps need to limit work in the event loop. NullEncoder demonstrates how you can handle most processes (even holding onto a reference) in other threads.
rpicam-jpeg
rpicam-jpeg starts the camera in preview mode in the usual way. When the timer completes, it stops the preview and switches to still capture:
app.StopCamera();
app.Teardown();
app.ConfigureStill();
app.StartCamera();
The event loop grabs the first frame returned from still mode and saves this as a JPEG.
Use libcamera with Qt
Edit this on GitHub
Qt is a popular application framework and GUI toolkit. rpicam-apps includes an option to use Qt for a camera preview window.
Unfortunately, Qt defines certain symbols (such as slot and emit) as macros in the global namespace. This causes errors when including libcamera files. The problem is common to all platforms that use both Qt and libcamera. Try the following workarounds to avoid these errors:
-
List
libcamerainclude files, or files that includelibcamerafiles (such asrpicam-appsfiles), before any Qt header files whenever possible. -
If you do need to mix your Qt application files with
libcameraincludes, replacesignals:withQ_SIGNALS:,slots:withQ_SLOTS:,emitwithQ_EMITandforeachwithQ_FOREACH. -
Add the following at the top of any
libcamerainclude files:#undef signals #undef slots #undef emit #undef foreach -
If your project uses
qmake, addCONFIG += no_keywordsto the project file. -
If your project uses
cmake, addSET(QT_NO_KEYWORDS ON).
Use libcamera from Python with Picamera2
Edit this on GitHub
The Picamera2 library is a rpicam-based replacement for Picamera, which was a Python interface to Raspberry Pi’s legacy camera stack. Picamera2 presents an easy-to-use Python API.
Documentation about Picamera2 is available on GitHub and in the Picamera2 manual.
Installation
Recent Raspberry Pi OS images include Picamera2 with all the GUI (Qt and OpenGL) dependencies. Recent Raspberry Pi OS Lite images include Picamera2 without the GUI dependencies, although preview images can still be displayed using DRM/KMS.
If your image did not include Picamera2, run the following command to install Picamera2 with all of the GUI dependencies:
$ sudo apt install -y python3-picamera2If you don’t want the GUI dependencies, you can run the following command to install Picamera2 without the GUI dependencies:
$ sudo apt install -y python3-picamera2 --no-install-recommends|
Note
|
If you previously installed Picamera2 with pip, uninstall it with: pip3 uninstall picamera2.
|
Use a USB webcam
Edit this on GitHub
Most Raspberry Pi devices have dedicated ports for camera modules. Camera modules are high-quality, highly-configurable cameras popular with Raspberry Pi users.
However, for many purposes a USB webcam has everything you need to record pictures and videos from your Raspberry Pi. This section explains how to use a USB webcam with your Raspberry Pi.
Install dependencies
First, install the fswebcam package:
$ sudo apt install fswebcamNext, add your username to the video group, otherwise you may see 'permission denied' errors:
$ sudo usermod -a -G video <username>To check that the user has been added to the group correctly, use the groups command.
Take a photo
Run the following command to take a picture using the webcam and save the image to a filename named image.jpg:
$ fswebcam image.jpgYou should see output similar to the following:
--- Opening /dev/video0...
Trying source module v4l2...
/dev/video0 opened.
No input was specified, using the first.
Adjusting resolution from 384x288 to 352x288.
--- Capturing frame...
Corrupt JPEG data: 2 extraneous bytes before marker 0xd4
Captured frame in 0.00 seconds.
--- Processing captured image...
Writing JPEG image to 'image.jpg'.
fswebcam uses a low resolution and adds a banner displaying a timestamp.To specify a different resolution for the captured image, use the -r flag, passing a width and height as two numbers separated by an x:
$ fswebcam -r 1280x720 image2.jpgYou should see output similar to the following:
--- Opening /dev/video0...
Trying source module v4l2...
/dev/video0 opened.
No input was specified, using the first.
--- Capturing frame...
Corrupt JPEG data: 1 extraneous bytes before marker 0xd5
Captured frame in 0.00 seconds.
--- Processing captured image...
Writing JPEG image to 'image2.jpg'.
Remove the banner
To remove the banner from the captured image, use the --no-banner flag:
$ fswebcam --no-banner image3.jpgYou should see output similar to the following:
--- Opening /dev/video0...
Trying source module v4l2...
/dev/video0 opened.
No input was specified, using the first.
--- Capturing frame...
Corrupt JPEG data: 2 extraneous bytes before marker 0xd6
Captured frame in 0.00 seconds.
--- Processing captured image...
Disabling banner.
Writing JPEG image to 'image3.jpg'.

--no-banner to save the image without the timestamp banner.Automate image capture
Unlike rpicam-apps, fswebcam doesn’t have any built-in functionality to substitute timestamps and numbers in output image names. This can be useful when capturing multiple images, since manually editing the file name every time you record an image can be tedious. Instead, use a Bash script to implement this functionality yourself.
Create a new file named webcam.sh in your home folder. Add the following example code, which uses the bash programming language to save images to files with a file name containing the year, month, day, hour, minute, and second:
#!/bin/bash

DATE=$(date +"%Y-%m-%d_%H-%M-%S")

fswebcam -r 1280x720 --no-banner $DATE.jpg
Then, make the bash script executable by running the following command:
$ chmod +x webcam.shRun the script with the following command to capture an image and save it to a file with a timestamp for a name, similar to 2024-05-10_12-06-33.jpg:
$ ./webcam.shYou should see output similar to the following:
--- Opening /dev/video0...
Trying source module v4l2...
/dev/video0 opened.
No input was specified, using the first.
--- Capturing frame...
Corrupt JPEG data: 2 extraneous bytes before marker 0xd6
Captured frame in 0.00 seconds.
--- Processing captured image...
Disabling banner.
Writing JPEG image to '2024-05-10_12-06-33.jpg'.
Capture a time lapse
Use cron to schedule photo capture at a given interval. With the right interval, such as once a minute, you can capture a time lapse.
First, open the cron table for editing:
$ crontab -eWhen you have the file open in an editor, add the following line to the schedule to take a picture every minute, replacing <username> with your username:
* * * * * /home/<username>/webcam.sh 2>&1Save and exit, and you should see the following message:
crontab: installing new crontab
V4L2 drivers
Edit this on GitHub
V4L2 drivers provide a standard Linux interface for accessing camera and codec features. Normally, Linux loads drivers automatically during boot. But in some situations you may need to load camera drivers explicitly.
Device nodes when using libcamera
| /dev/videoX | Default action |
|---|---|
|
Unicam driver for the first CSI-2 receiver |
|
Unicam driver for the second CSI-2 receiver |
|
Video decode |
|
Video encode |
|
Simple ISP, can perform conversion and resizing between RGB/YUV formats in addition to Bayer to RGB/YUV conversion |
|
Input to fully programmable ISP |
|
High resolution output from fully programmable ISP |
|
Low result output from fully programmable ISP |
|
Image statistics from fully programmable ISP |
|
HEVC decode |
Use the V4L2 drivers
For more information on how to use the V4L2 drivers, see the V4L2 documentation.
Unicam
Edit this on GitHub
Raspberry Pi SoCs all have two camera interfaces that support either CSI-2 D-PHY 1.1 or Compact Camera Port 2 (CCP2) sources. This interface is known by the codename Unicam. The first instance of Unicam supports two CSI-2 data lanes, while the second supports four. Each lane can run at up to 1Gbit/s (DDR, so the max link frequency is 500 MHz).
Compute Modules and Raspberry Pi 5 route out all lanes from both peripherals. Other models prior to Raspberry Pi 5 only expose the second instance, routing out only two of the data lanes to the camera connector.
Software interfaces
The V4L2 software interface is the only means of communicating with the Unicam peripheral. There used to also be firmware and MMAL rawcam component interfaces, but these are no longer supported.
V4L2
|
Note
|
The V4L2 interface for Unicam is available only when using libcamera.
|
There is a fully open-source kernel driver available for the Unicam block; this kernel module, called bcm2835-unicam, interfaces with V4L2 subdevice drivers to deliver raw frames. This bcm2835-unicam driver controls the sensor and configures the Camera Serial Interface 2 (CSI-2) receiver. Peripherals write raw frames (after Debayer) to SDRAM for V4L2 to deliver to applications. There is no image processing between the camera sensor capturing the image and the bcm2835-unicam driver placing the image data in SDRAM except for Bayer unpacking to 16bits/pixel.
|------------------------|
|     bcm2835-unicam     |
|------------------------|
     ^             |
     |      |-------------|
 img |      |  Subdevice  |
     |      |-------------|
     v   -SW/HW-   |
|---------|   |-----------|
| Unicam  |   | I2C or SPI|
|---------|   |-----------|
csi2/ ^             |
ccp2  |             |
    |-----------------|
    |     sensor      |
    |-----------------|
Mainline Linux contains a range of existing drivers. The Raspberry Pi kernel tree has some additional drivers and Device Tree overlays to configure them:
| Device | Type | Notes |
|---|---|---|
Omnivision OV5647 |
5 MP Camera |
Original Raspberry Pi Camera |
Sony IMX219 |
8 MP Camera |
Revision 2 Raspberry Pi camera |
Sony IMX477 |
12 MP Camera |
Raspberry Pi HQ camera |
Sony IMX708 |
12 MP Camera |
Raspberry Pi Camera Module 3 |
Sony IMX296 |
1.6 MP Camera |
Raspberry Pi Global Shutter Camera Module |
Toshiba TC358743 |
HDMI to CSI-2 bridge |
|
Analog Devices ADV728x-M |
Analog video to CSI-2 bridge |
No interlaced support |
Infineon IRS1125 |
Time-of-flight depth sensor |
Supported by a third party |
As the subdevice driver is also a kernel driver with a standardised API, third parties are free to write their own for any source of their choosing.
Write a third-party driver
This is the recommended approach to interfacing via Unicam.
When developing a driver for a new device intended to be used with the bcm2835-unicam module, you need the driver and corresponding device tree overlays. Ideally, the driver should be submitted to the linux-media mailing list for code review and merging into mainline, then moved to the Raspberry Pi kernel tree; but exceptions may be made for the driver to be reviewed and merged directly to the Raspberry Pi kernel.
|
Note
|
All kernel drivers are licensed under the GPLv2 licence, therefore source code must be available. Shipping of binary modules only is a violation of the GPLv2 licence under which the Linux kernel is licensed. |
The bcm2835-unicam module has been written to try and accommodate all types of CSI-2 source driver that are currently found in the mainline Linux kernel. These can be split broadly into camera sensors and bridge chips. Bridge chips allow for conversion between some other format and CSI-2.
Camera sensors
The sensor driver for a camera sensor is responsible for all configuration of the device, usually via I2C or SPI. Rather than writing a driver from scratch, it is often easier to take an existing driver as a basis and modify it as appropriate.
The IMX219 driver is a good starting point. This driver supports both 8bit and 10bit Bayer readout, so enumerating frame formats and frame sizes is slightly more involved.
Sensors generally support V4L2 user controls. Not all these controls need to be implemented in a driver. The IMX219 driver only implements a small subset, listed below, the implementation of which is handled by the imx219_set_ctrl function.
-
V4L2_CID_PIXEL_RATE/V4L2_CID_VBLANK/V4L2_CID_HBLANK: allows the application to set the frame rate -
V4L2_CID_EXPOSURE: sets the exposure time in lines; the application needs to useV4L2_CID_PIXEL_RATE,V4L2_CID_HBLANK, and the frame width to compute the line time -
V4L2_CID_ANALOGUE_GAIN: analogue gain in sensor specific units -
V4L2_CID_DIGITAL_GAIN: optional digital gain in sensor specific units -
V4L2_CID_HFLIP / V4L2_CID_VFLIP: flips the image either horizontally or vertically; this operation may change the Bayer order of the data in the frame, as is the case on the IMX219. -
V4L2_CID_TEST_PATTERN/V4L2_CID_TEST_PATTERN_*: enables output of various test patterns from the sensor; useful for debugging
In the case of the IMX219, many of these controls map directly onto register writes to the sensor itself.
Further guidance can be found in the libcamera sensor driver requirements, and in chapter 3 of the Raspberry Pi Camera tuning guide.
Device Tree
Device Tree is used to select the sensor driver and configure parameters such as number of CSI-2 lanes, continuous clock lane operation, and link frequency (often only one is supported).
The IMX219 Device Tree overlay for the 6.1 kernel is available on GitHub.
Bridge chips
These are devices that convert an incoming video stream, for example HDMI or composite, into a CSI-2 stream that can be accepted by the Raspberry Pi CSI-2 receiver.
Handling bridge chips is more complicated. Unlike camera sensors, they have to respond to the incoming signal and report that to the application.
The mechanisms for handling bridge chips can be split into two categories: either analogue or digital.
When using ioctls in the sections below, an S in the ioctl name means it is a set function, while G is a get function and ENUM enumerates a set of permitted values.
Analogue video sources
Analogue video sources use the standard ioctls for detecting and setting video standards. VIDIOC_G_STD, VIDIOC_S_STD, VIDIOC_ENUMSTD, and VIDIOC_QUERYSTD are available.
Selecting the wrong standard will generally result in corrupt images. Setting the standard will typically also set the resolution on the V4L2 CAPTURE queue. It can not be set via VIDIOC_S_FMT. Generally, requesting the detected standard via VIDIOC_QUERYSTD and then setting it with VIDIOC_S_STD before streaming is a good idea.
Digital video sources
For digital video sources, such as HDMI, there is an alternate set of calls that allow specifying of all the digital timing parameters: VIDIOC_G_DV_TIMINGS, VIDIOC_S_DV_TIMINGS, VIDIOC_ENUM_DV_TIMINGS, and VIDIOC_QUERY_DV_TIMINGS.
As with analogue bridges, the timings typically fix the V4L2 CAPTURE queue resolution, and calling VIDIOC_S_DV_TIMINGS with the result of VIDIOC_QUERY_DV_TIMINGS before streaming should ensure the format is correct.
Depending on the bridge chip and the driver, it may be possible for changes in the input source to be reported to the application via VIDIOC_SUBSCRIBE_EVENT and V4L2_EVENT_SOURCE_CHANGE.
Currently supported devices
There are two bridge chips which are currently supported by the Raspberry Pi Linux kernel: the Analog Devices ADV728x-M for analogue video sources, and the Toshiba TC358743 for HDMI sources.
Analog Devices ADV728x(A)-M analogue video to CSI2 bridge chips convert composite S-video (Y/C), or component (YPrPb) video into a single lane CSI-2 interface, and are supported by the ADV7180 kernel driver.
Product details for the various versions of this chip can be found on the Analog Devices website: ADV7280A, ADV7281A, and ADV7282A.
Because of some missing code in the current core V4L2 implementation, selecting the source fails, so the Raspberry Pi kernel version adds a kernel module parameter called dbg_input to the ADV7180 kernel driver which sets the input source every time VIDIOC_S_STD is called. At some point mainstream will fix the underlying issue (a disjoin between the kernel API call s_routing, and the userspace call VIDIOC_S_INPUT) and this modification will be removed.
Receiving interlaced video is not supported, therefore the ADV7281(A)-M version of the chip is of limited use as it doesn’t have the necessary I2P deinterlacing block. Also ensure when selecting a device to specify the -M option. Without that you will get a parallel output bus which can not be interfaced to the Raspberry Pi.
There are no known commercially available boards using these chips, but this driver has been tested via the Analog Devices EVAL-ADV7282-M evaluation board.
This driver can be loaded using the config.txt dtoverlay adv7282m if you are using the ADV7282-M chip variant; or adv728x-m with a parameter of either adv7280m=1, adv7281m=1, or adv7281ma=1 if you are using a different variant.
dtoverlay=adv728x-m,adv7280m=1
The Toshiba TC358743 is an HDMI to CSI-2 bridge chip, capable of converting video data at up to 1080p60.
Information on this bridge chip can be found on the Toshiba website.
The TC358743 interfaces HDMI into CSI-2 and I2S outputs. It is supported by the TC358743 kernel module.
The chip supports incoming HDMI signals as either RGB888, YUV444, or YUV422, at up to 1080p60. It can forward RGB888, or convert it to YUV444 or YUV422, and convert either way between YUV444 and YUV422. Only RGB888 and YUV422 support has been tested. When using two CSI-2 lanes, the maximum rates that can be supported are 1080p30 as RGB888, or 1080p50 as YUV422. When using four lanes on a Compute Module, 1080p60 can be received in either format.
HDMI negotiates the resolution by a receiving device advertising an EDID of all the modes that it can support. The kernel driver has no knowledge of the resolutions, frame rates, or formats that you wish to receive, so it is up to the user to provide a suitable file via the VIDIOC_S_EDID ioctl, or more easily using v4l2-ctl --fix-edid-checksums --set-edid=file=filename.txt (adding the --fix-edid-checksums option means that you don’t have to get the checksum values correct in the source file). Generating the required EDID file (a textual hexdump of a binary EDID file) is not too onerous, and there are tools available to generate them, but it is beyond the scope of this page.
As described above, use the DV_TIMINGS ioctls to configure the driver to match the incoming video. The easiest approach for this is to use the command v4l2-ctl --set-dv-bt-timings query. The driver does support generating the SOURCE_CHANGED events, should you wish to write an application to handle a changing source. Changing the output pixel format is achieved by setting it via VIDIOC_S_FMT, but only the pixel format field will be updated as the resolution is configured by the DV timings.
There are a couple of commercially available boards that connect this chip to the Raspberry Pi. The Auvidea B101 and B102 are the most widely obtainable, but other equivalent boards are available.
This driver is loaded using the config.txt dtoverlay tc358743.
The chip also supports capturing stereo HDMI audio via I2S. The Auvidea boards break the relevant signals out onto a header, which can be connected to the Raspberry Pi’s 40-pin header. The required wiring is:
| Signal | B101 header | 40-pin header | BCM GPIO |
|---|---|---|---|
LRCK/WFS |
7 |
35 |
19 |
BCK/SCK |
6 |
12 |
18 |
DATA/SD |
5 |
38 |
20 |
GND |
8 |
39 |
N/A |
The tc358743-audio overlay is required in addition to the tc358743 overlay. This should create an ALSA recording device for the HDMI audio.
There is no resampling of the audio. The presence of audio is reflected in the V4L2 control TC358743_CID_AUDIO_PRESENT (audio-present), and the sample rate of the incoming audio is reflected in the V4L2 control TC358743_CID_AUDIO_SAMPLING_RATE (audio sampling-frequency). Recording when no audio is present or at a sample rate different from that reported emits a warning.
Differences between rpicam and raspicam
Edit this on GitHub
The rpicam-apps emulate most features of the legacy raspicam applications. However, users may notice the following differences:
-
Boost
program_optionsdon’t allow multi-character short versions of options, so where these were present they have had to be dropped. The long form options are named the same way, and any single-character short forms are preserved. -
rpicam-stillandrpicam-jpegdo not show the captured image in the preview window. -
rpicam-appsremoved the followingraspicamfeatures:-
opacity (
--opacity) -
image effects (
--imxfx) -
colour effects (
--colfx) -
annotation (
--annotate,--annotateex) -
dynamic range compression, or DRC (
--drc) -
stereo (
--stereo,--decimateand--3dswap) -
image stabilisation (
--vstab) -
demo modes (
--demo)Post-processing replaced many of these features.
-
-
rpicam-appsremovedrotationoption support for 90° and 270° rotations. -
raspicamconflated metering and exposure;rpicam-appsseparates these options. -
To disable Auto White Balance (AWB) in
rpicam-apps, set a pair of colour gains withawbgains(for example,1.0,1.0). -
rpicam-appscannot set Auto White Balance (AWB) into greyworld mode for NoIR camera modules. Instead, pass thetuning-fileoption a NoIR-specific tuning file likeimx219_noir.json. -
rpicam-appsdoes not provide explicit control of digital gain. Instead, thegainoption sets it implicitly. -
rpicam-appsremoved the--ISOoption. Instead, calculate the gain corresponding to the ISO value required. Vendors can provide mappings of gain to ISO. -
rpicam-appsdoes not support setting a flicker period. -
rpicam-stilldoes not support burst capture. Instead, consider usingrpicam-vidin MJPEG mode with--segment 1to force each frame into a separate file. -
rpicam-appsuses open source drivers for all image sensors, so the mechanism for enabling or disabling on-sensor Defective Pixel Correction (DPC) is different. The imx477 driver on the Raspberry Pi HQ Camera enables on-sensor DPC by default. To disable on-sensor DPC on the HQ Camera, run the following command:$ sudo echo 0 > /sys/module/imx477/parameters/dpc_enable
Troubleshooting
Edit this on GitHub
If your Camera Module doesn’t work like you expect, try some of the following fixes:
-
On Raspberry Pi 3 and earlier, the graphics hardware can only support images up to 2048×2048 pixels, which places a limit on the camera images that can be resized into the preview window. As a result, video encoding of images larger than 2048 pixels wide produces corrupted or missing preview images.
-
On Raspberry Pi 4, the graphics hardware can only support images up to 4096×4096 pixels, which places a limit on the camera images that can be resized into the preview window. As a result, video encoding of images larger than 4096 pixels wide produces corrupted or missing preview images.
-
The preview window may show display tearing in a desktop environment. This is a known, unfixable issue.
-
Check that the FFC (Flat Flexible Cable) is firmly seated, fully inserted, and that the contacts face the correct direction. The FFC should be evenly inserted, not angled.
-
If you use a connector between the camera and your Raspberry Pi, check that the ports on the connector are firmly seated, fully inserted, and that the contacts face the correct direction.
-
Check to make sure that the FFC (Flat Flexible Cable) is attached to the CSI (Camera Serial Interface), not the DSI (Display Serial Interface). The connector fits into either port, but only the CSI port powers and controls the camera. Look for the
CSIlabel printed on the board near the port. -
Try a different power supply. The Camera Module adds about 200-250mA to the power requirements of your Raspberry Pi. If your power supply is low quality, your Raspberry Pi may not be able to power the Camera module.
-
If you’ve checked all the above issues and your Camera Module still doesn’t work like you expect, try posting on our forums for more help.
Getting help
Edit this on GitHub
For further help with libcamera and the rpicam-apps, check the Raspberry Pi Camera forum. Before posting:
-
Make a note of your operating system version (
uname -a). -
Make a note of your
libcameraandrpicam-appsversions (rpicam-hello --version). -
Report the make and model of the camera module you are using.
-
Report the software you are trying to use. We don’t support third-party camera module vendor software.
-
Report your Raspberry Pi model, including memory size.
-
Include any relevant excerpts from the application’s console output.
If there are specific problems in the camera software (such as crashes), consider creating an issue in the rpicam-apps GitHub repository, including the same details listed above.