MRI image analysis
Liz: Today’s guest post comes from Matt Hall at UCL. Call me easily impressed, but blimey, this is good. Thank you Matt!
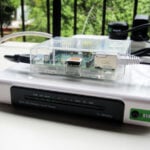
There’s no denying that people are doing some pretty amazing things with their Raspis. Touch screens, different OS’s, robots – this little beastie is certainly adaptable. When I unwrapped mine on Christmas morning I was very excited, and immediately started thinking about how I could put it through its paces – I thought about games and art apps but then I thought “Hold on a tick Matt, aren’t you a research scientist working on medical image analysis? Don’t you maintain an MRI image analysis toolkit? Let’s throw down the gauntlet and see if we can do some proper image analysis.”
Oh, yes of course. Silly me.
How about full-scale state-of-the-art medical image processing on the Raspberry Pi?
What’s it all about?
I work at the UCL Centre for Medical Image Computing (CMIC) in the Microstructure Imaging Group. We’re a team of scientists developing mathematical modelling and advanced computational techniques to analyse Diffusion MRI data. What’s Diffusion MRI? It’s a special kind of MRI imaging that is sensitive to the way water is moving around in the brain (it doesn’t have to be the brain, but brains are pretty interesting to look at, so it usually is). Water motion is interesting to look at because of the things that get in the way of the water. For water in the brain, the thing getting in the way is (you guessed it) the brain.
By looking at the way the water moves, we can get a picture of the stuff getting in the way and learn about the brain. Our work is aimed at using an MRI machine like a microscope. With a normal microscope you have to cut things open and remove bits of tissue before you can look at them, but the scanner can look inside the body without damaging it – a non-invasive microscope.
We’ve build a software toolkit that analyses this kind of data. It’s called Camino, it’s written in Java and designed to run in a Linux-like environment so getting it to run on the Raspi isn’t a completely crazy idea.
Getting it working
So I rolled up my sleeves and had a go. This sort of thing is very calculation-heavy, so I needed to get mathematical code running as fast as possible. This meant finding a Java distribution that would do the maths in hardware, not software. Unfortunately, the usual Java for ARM didn’t do this, but as luck would have it, just as I realised that this might be a problem the nice people at Oracle released the Java 8 for ARM developer’s preview, which did the job nicely. After downloading and installing, I now had an efficient Java environment.
Next, I downloaded Camino and installed it. It compiled first time with no errors – Java can be a wonderful thing sometimes!
After setting a few path variables I was ready to go. Except for one small detail: data. I needed something to analyse! Fortunately, Camino also provides a test dataset. It’s a set of 3D diffusion MR images of a healthy human brain. It’s also available online, so I downloaded this too. Good old Midori.
Making some images
I wanted to try the same sort of analysis that a researcher working in my field might want to use. The simplest and most widely used technique in Diffusion MRI is called Diffusion Tensor Imaging (DTI). The brain is partly made up of a thing called white matter, which is a lot like cabling that connects various bits of it together. DTI can tell us which way the cables are pointing at each point along their length. We can use the information it gives us to make new images which are more useful than the originals.
To my great delight, the Raspi ran a DTI analysis in a little over 5 minutes and produced some really nice images. All these images were generated and displayed by the Raspi. (Liz: you can enlarge all these images by clicking on them.) I used scrot for screen captures, so aside from a little cropping this all is pure Pi.
This is called a colour-FA map:

Here we’re looking down from above at a slice about half way through the brain, so the top of the image is the front of the brain. The brightness of each pixel shows how directed the cabling is: bright means highly directed (like a pipe), dark means not directed at all (like a sponge). The colours indicate direction: red is left-right, green is up-down, and blue is into and out of the image. The bright bits are all major white matter structures in the brain, showing up clearly enough for them to be easily recognisable. I’ll point a few out as we go along.
Here’s a similar image but viewed from the front of the head. Again, this is about half way through the brain:

The blue structures here are called the Cortico-spinal tracts. They connect the areas of the brain controlling movement to the spinal cord and on to the muscles.
We can do more, though. Camino’s image viewer can show the tissue direction directly as well as the coloured FA map. This also runs on the Raspi (albeit a little slowly). Here’s an image of a couple of structures from the middle of the brain with tissue directions thrown in. The colours are as before, but now we’ve added some lines showing tissue direction at each point.

The green bits in the middle are part of the Cingulum, which connects the front and back of the brain and is involved in pain perception. The purple bits are part of the Corpus Callosum, which connects the two sides of the brain together and is involved in all sorts of things. It’s like a high-speed data connection that makes the brain more efficient. Here’s a close-up of another part of it, nearer the back of the brain, it’s the red/orangey bit that looks a like a moustache:

All this was pretty exciting, so I decided to try something a bit more complicated. DTI can only resolve one direction per voxel, so it has trouble with anything cross-shaped. There are a couple of more advanced techniques that can resolve more than one direction so I tried one of these. This is called Q-ball imaging. It needs to do a more complicated set of calculations than DTI and I wasn’t sure how well the Raspi would do with it. To my great delight it ran in about 15 minutes.
Q-ball also generates more information than DTI, and we can make more detailed images from the results. Here’s the output from Camino’s image generator for Q-ball:

The grey colours show directedness (but not direction), but if you look closely at the little coloured shapes in the full-size image you can see they look like little crosses, lines, and blobs. These are Q-ball’s way of describing directions and are coloured in the same way as before, with peaks in the main directions of the tissue.
At this point I really should admit that although the analysis ran in 15 minutes, generating that image so we could look at the results took over 2 hours. I hope you’ll agree it was worth the wait!
What’s next?
I was pretty impressed with how the Raspi performed. Research-level, mathematically complex code on a full-size dataset and it chewed through it in a few minutes. This is a system that you could use in Diffusion MRI research if you wanted to.
So why would you want to? Well, the Raspi is cheap and it uses very little power. This makes me think about using it in the developing world. Of course, in order to do MRI imaging you need an MRI scanner and these are not cheap but… recently some small, cheap MRI scanners that use the Earth’s magnetic field have recently been released. Using a Raspberry Pi to control one of these would allow you to acquire images as well as analyse the data and would make a very cheap complete MRI system that’s also easy to install and maintain – could be pretty handy. I’d love to get my hands on one of those to see if it would work with the Raspi!
Beyond that, the imaging I’ve done here is only the tip of the iceberg for diffusion imaging. Camino has a lot more tricks up its sleeve, although most of these are need a lot more computing power than what we’ve done here. But… there’s no reason why we have to process the data on piece at a time. We could have several Raspis working in parallel to speed things up (or using their GPUs), which would be very cool to try. In fact, using a dozen or more as a computing cluster would be a pretty chunky computing resource and only cost about as much as a single desktop PC.
All in all, a resounding success! If you’re interested in doing this yourself, everything I’ve used is available for free so there’s nothing stopping you from having a go. I’ll post more detailed instructions plus a full set of links soon.
Liz: and, faster than I could possibly have imagined, Matt’s got instructions and links ready to go. Enjoy!


47 comments
George
This is brilliant, especially since it’s related to my main day job.
Another project to add to the list when I get a chance.
GamithUK
Could you give an estimate of how long you might expect Camino to run on a PC (or server or whatever?) I would guess its in the realm of real-time?
I wonder how a solar-powered (with battery) pi cluster might fare in third-world scenarios though I guess the cheap MRI scanners you mention will need a proper power supply so power may not be an issue.
Good job on giving it a whirl and impressive pictures.
Matt H
DTI on a typical desktop PC would run in about 30 seconds to a minute, with a similar difference in speed for Q-Ball. Solar powered Pi’s are a great idea for using this in the developing world, and I suspect a very practical solution. I’m not entirely sure about the power requirements of a earth-field scanner, but they would certainly be a lot lower than for a regular scanner — there are no supercooled superconducting high field magnets and as I understand it the amplifers are a lot smaller as well. No idea how practical this is, but definitely more so than a full-scale system.
Sergio Vera
I guess this is done in the CPU right? How big was the volume? It’s amazing that DTI images may fit (and be processed!) into raspberry ram… 512 Mb model perhaps ?
Congrats
Matt H
Thanks a lot :)
Yep, this is all on the CPU. The problem should be quite parallelisable as the moment we process one voxel at a time. This also means that you don’t (necessarily) have to hold the entire image in RAM at once, you can read one voxel, process it and write it out.
Michael Horne
Very impressive. Thanks for sharing it with us!
stuart
Good God! I thought I’d done well to get OpenCpn, FlDigi, and 3G working!!! My puny efforts pale……….
Alex Lennon
Fantastic stuff.
Can you just clarify that this isn’t using the GPU. You should get some serious speedups then if able to take advantage of that?
Thanks, Alex
Matt H
Thanks!
As mentioned above, this doesn’t use the GPU at all but is definitely a good candidate for parallelisation. Currently, for the more intensive tasks we use a computing cluster to run multiple jobs, but GPU implementations are something we’re very interested in. Processing multiple voxels simultaneously should be an easy win for this sort of thing.
Matt H
Glad you like it :)
Precision and quantity of data are interesting points. This kind of MRI data comes as sets of 3D images. Each measurement in each image is usually encoded as a
shortbut even so the amount of data can run into multiple gigabytes for a large scan.The amount of memory needed can vary a lot depending on the task. DTI doesn’t require that much because you can process one voxel at a time without holding the whole image in memory at the same time. Generating the final image used about 240MBytes, though. I had to scale the image size down by about 30% allow the pi to run it (that’s buried in the options final command in my how-to).
peter
well done, and bravo. keep up the good work
David Guest
Absolutely brilliant and extremely significant work. Congratulations…
Ravenous
Fascinating. I don’t know anything about the actual data side of MRI (numeric precision & quantity) but I wonder how much memory was needed to run those analyses…
Xerxes Rånby
If you want to use the Raspberry Pi GPU from Java take a look at JogAmp that have provided Java GPU bindings for the Raspberry Pi since Aug 2012.
The latest JogAmp on Raspberry Pi Java CPU to GPU offloading live demo was performed at Fosdem 2013 http://jogamp.org/doc/fosdem2013/
Matt H
Thanks! that’s extremely useful!
Xerxes Rånby
A quick heads up: The hardfloat Oracle JDK 8 EA got released after the current JogAmp JOGL rc11 release, we have had to add an ELF header parser in the latest JogAmp sourcecode in order to autodetect the hardfloat JDK at runtime, required for all Java projects that is using JNI in order to know which library armel/armhf to load at runtime. This means that you will have to use the latest JogAmp autobuild if you want to use JogAmp in combination with the Oracle JDK 8 EA.
More info on the workarounds and ELF header parser for use with the 8 EA is mentioned in the following blog post: http://labb.zafena.se/?p=727
Introduction to OpenGL ES shaders and JogAmp JOGL: http://labb.zafena.se/?p=547
Background demo setup and sources used at the JogAmp fosdem 2013 show: http://labb.zafena.se/?p=681
JogAmp history 2008-2013: http://labb.zafena.se/?p=656
Xerxes Rånby
The latest JogAmp autobuilds are found here: http://jogamp.org/deployment/archive/master/?C=M;O=D
The latest release build is found here:
http://jogamp.org/deployment/jogamp-current/
We also support maven:
http://search.maven.org/#search|ga|1|jogamp
Matt H
Xerxes, you’re a hero. I’ll check out those links, I’m sure they’ll be more than useful!
Philip Ashmore
Regarding “recently some small, cheap MRI scanners that use the Earth’s magnetic field have recently been released” – have you got any links for these?
Matt H
There’s definitely this one:
http://www.magritek.com/products-terranova-overview
and I’m pretty sure there are other, large bore systems around as well.
liz
That is *incredibly* cool. I love living in the future.
Andrew Scheller
Neat, but if it takes an hour just take a low-res image of an object 11cmx11cm, presumably it’d be impractical to use it for brain imaging?
I know nothing at all about any of this, so I may be horribly mis-understanding!
Xerxes Rånby
The key to the Pi is to tap into the GPU.
The GPU is capable of 1Gpixel/s, 1.5Gtexel/s or 24 GFLOPs of general purpose compute and features a bunch of texture filtering and DMA infrastructure.
The practical way to use a modern GPU is by accessing it through binary compatible API such as OpenGL ES (possible to do on the pi and can run parallel algorithms using the ES 2 fragment shader) or OpenCL (not yet possible to do on the pi, because no OpenCL driver exist, yet)
Matt H
The size of the bore on that one is also a problem — if you can’t get your head in it you definitely can’t get a brain image!
I have to confess I’m not that well up on earth field scanner technology but I have read research articles that use them for imaging rock samples and emulsions.
Andrew Scheller
Can’t you just chop it up and image it one voxel at a time? ;-)
colin allison
What a superb app for RPi. You have given me an idea – retinopathy imaging (pics of the back of the eye) taken for diabetes monitoring are always canned by the mark 1 eyeball. This can take a long time and is prone to human error. I might just start coding an app on the RPi for this. Could significantly speed up release of results to patients.
Good work!
campi
Philip Ashmore
And the price?
Philip Ashmore
Sorry – I meant to reply here – I couldn’t see a price mentioned for the MRI scanner described in the link.
Is it Raspberry Pi cheap?
Can its resolution be improved?
Can I make it myself from a parts list?
Matt H
This one seems to be a bit more chunky, and also comes with a gradient coil (which you need for diffusion imaging)
http://www.earthsfield-nmr.com/
Still no mention of price, but asking around here people are mentioning figures in teh several hundreds of pounds. Not Raspberry Pi cheap, but considerably cheaper than a conventional scanner.
Enersium
Its not a very relevant question, but I have to ask this. Does someone know a way how to find a cheap ultrasound probe? I am living in the Netherlands and I also have studied on a medical school (including MRI and ultrasound). So I have experience with an ultrasound. And I reallyyy really like to build one. I have searched a lot! The simplest probe begins with a cost price of thousand of euros. This really should be changed. Can someone help me to find one? Or even help to produce this?! I would like to build one by myself, but it wont be that easy. The most expensive part is the piezoelectric crystal.
Jeff Greer
Enersium,
Have you considered using an industrial ultrasound probe? They are useful in both thickness and flaw detection. They are available in many configurations and frequencies, at a fraction of the cost of medical units. You might find them suitable for experimentation.
I find this entire thread amazing. As Liz said, it is wonderful living in the future. I used an NMR back in the early seventies while an undergrad. Immagine tiny samples of an organic material in a tapered vile spinning in a magnetic console the size of a large desk. All to discern atomic structure. Computing power at the time: HP 35, Altair, TRS-80, Z80, …. Now we have Earth field NMR/MRIs and Unix clone computers systems the size of a credit card. Incredible!
Jim Manley
First, this is VERY COOL! A family member works for one of the few companies that design and manufacture the machines that perform this function and I get to see their latest-and-greatest before even outside radiologists do. I have a long history of developing software for large 3-D graphics dataset processing software, and it will be interesting to see if we can get to real-time manipulation of this kind of data (captured previously, of course), spinning objects around at the flick of a pointing device.
It should be clarified that this is using both the ARM CPU (an integer component) and the tightly-integrated on the same System-on-a-Chip (SoC) hardware floating-point unit (FPU – it’s an option in this family of SoC devices and lucky us, it’s included in the BCM2835 used in the Pi!). So, the armhf ports of the OSes, languages, libraries, etc., provides access to both the FPU and the GPU.
The speedup of using the hardware FPU can be hundreds to thousands of times what it takes doing the calculations in software only on the ARM CPU, which is already plenty busy doing lots of other things in typical uses. While the 3-D graphics nature of this dataset’s voxels (volumetric pixels) will lend itself to the GPU very well, we’re somewhat limited by the still-in-development nature of the Java virtual machines and other tools currently available (i.e., there be dragons/bugs beyond that-thar Edge of the World). Like all things Pi though, time just means things will continue improve!
Andrew Scheller
I haven’t been following development that closely – does the armhf build now provide access to the GPU-side floating point unit, or is it still only the ARM-side floating point unit?
Jim Manley
Just the ARM FPU directly via programming languages – the GPU is still accessed via OpenGL ES and OpenVG APIs in The Blob. However, you can cram non-graphics FP data into OGLES data structures, process it in the GPU, and pull it out via the APIs with some knowledge of how the data structures are organized and what the API functions do. Plus, you can take advantage of the GPU’s parallelism (up to four paths for some functions and up to 16 for others, IIRC, but don’t quote me on that).
RobV
what does the boss think?
have you shown the managing director or whatever the top banana is called?
field portability research should be a top priority* – in any discipline – and you just might attract a funding cheque to bring that closer to reality
*i did a typo as i’m with one hand, coffee in t’other and for a moment i had the word pi-ority, but the autocompletor snaffled it away.
thanks jim m for telling us what a voxel is
Jargbe
this is so cool… Raspberry Pi will soon start doing many amazing things, like, going to the supermarket and shopping.. lol!
Alan Jardine
I’m very interested in this. A couple of years ago I completed the Open University’s “Imaging in Medicine” course, my final report being on the subject of MRI. And now I have a working cluster of 4 RPis waiting for something useful to do …
Perhaps I should join the dots?
Alan.
diereinegier
> Next, I downloaded Camino and installed it.
> It compiled first time with no errors –
> Java can be a wonderful thing sometimes!
A good example of good software engineering done by all contributing parties…
…AND LUCK!
When I dusted off a C++ program from 1994 and made it run again on the Raspi I admittedly had to do some adaptions.
Matt H
> A good example of good software engineering done by all contributing parties…
> …AND LUCK!
you’re not wrong!
pd
I wonder if you could do this in real time with a Parallella?
http://www.adapteva.com/
bin
Fantastic work!
Thank you for sharing your brilliant idea!
usually the equipments in research field are very expensive, maybe this will open another window for all of us ! professors will save a lot on their funding and more students will get chance to continue their study.
Skizz
Does anyone else think that “Computationally intensive image analysis” and “Java” is an oxymoron?
Matt H
You wound me, sir!
You’re absolutely right to point out that Java might not lend itself to the most optimal code, but the portability advantages are enormous. We have a community of a couple of hundred users on half a dozen different platforms and a Java implementation helps a lot! Plus, modern JVMs with their JiT native compilers mean that Java is a lot speedier than it used to be.
Skizz
Is the code Open Source? Might be fun to try and optimise it for the Pi. I once optimised an RC5 key search algorithm from C# to assembler and got a 20x speed up!
Yes, Java VMs have got better, but still…..
Matt H
Yes, it’s all open source feel free to download and optimise away!
Matt.
Alan Jardine
Well, after several false starts, I managed to obtain my first image from the Camino test dataset on a single Rasperry Pi. It is slice 21, with vectors displayed. I would display it in this comment if I knew how to. (I had to take a photo from my monitor as I couldn’t find the “scrot” program.
Matt, I think that there is an error in the instructions on your blog. The command for fitting a diffusion tensor is incomplete (probably been chopped due to your page width). It needs to have the following appended:
nii.gz -outputfile dt.Bdouble
– otherwise it doesn’t generate the file needed for input to the next step. (See the Camino tutorial.)
I’m planning to complete the instructions then think about cluster processing.
Regards,
Alan.
Matt H
Hi Alan,
Thanks for this, and apols for not fixing it sooner. I’ve fixed the formatting problems and all should be fine now.
Matt
Comments are closed