Updates to GPIO Zero, the physical computing API
GPIO Zero v1.4 is out now! It comes with a set of new features, including a handy pinout command line tool. To start using this newest version of the API, update your Raspbian OS now:
sudo apt update && sudo apt upgrade
Some of the things we’ve added will make it easier for you try your hand on different programming styles. In doing so you’ll build your coding skills, and will improve as a programmer. As a consequence, you’ll learn to write more complex code, which will enable you to take on advanced electronics builds. And on top of that, you can use the skills you’ll acquire in other computing projects.
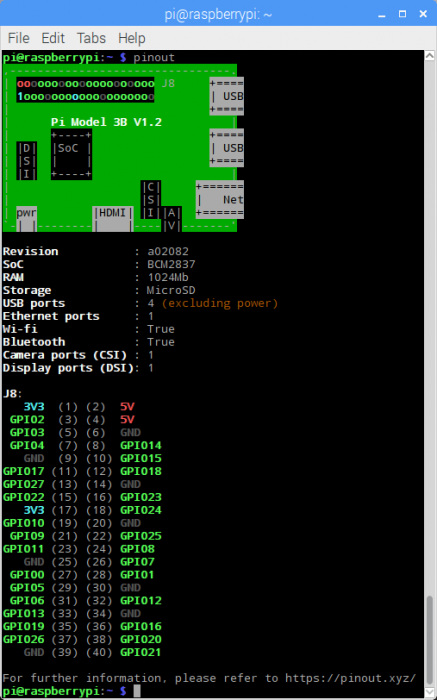
The new pinout tool
Developing GPIO Zero
Nearly two years ago, I started the GPIO Zero project as a simple wrapper around the low-level RPi.GPIO library. I wanted to create a simpler way to control GPIO-connected devices in Python, based on three years’ experience of training teachers, running workshops, and building projects. The idea grew over time, and the more we built for our Python library, the more sophisticated and powerful it became.
One of the great things about Python is that it’s a multi-paradigm programming language. You can write code in a number of different styles, according to your needs. You don’t have to write classes, but you can if you need them. There are functional programming tools available, but beginners get by without them. Importantly, the more advanced features of the language are not a barrier to entry.
Become a more advanced programmer
As a beginner to programming, you usually start by writing procedural programs, in which the flow moves from top to bottom. Then you’ll probably add loops and create your own functions. Your next step might be to start using libraries which introduce new patterns that operate in a different manner to what you’ve written before, for example threaded callbacks (event-driven programming). You might move on to object-oriented programming, extending the functionality of classes provided by other libraries, and starting to write your own classes. Occasionally, you may make use of tools created with functional programming techniques.
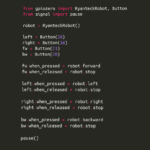
Take control of the buttons in your life
It’s much the same with GPIO Zero: you can start using it very easily, and we’ve made it simple to progress along the learning curve towards more advanced programming techniques. For example, if you want to make a push button control an LED, the easiest way to do this is via procedural programming using a while loop:
from gpiozero import LED, Button

led = LED(17)
button = Button(2)

while True:
    if button.is_pressed:
        led.on()
    else:
        led.off()
But another way to achieve the same thing is to use events:
from gpiozero import LED, Button
from signal import pause

led = LED(17)
button = Button(2)

button.when_pressed = led.on
button.when_released = led.off

pause()
You could even use a declarative approach, and set the LED’s behaviour in a single line:
from gpiozero import LED, Button
from signal import pause

led = LED(17)
button = Button(2)

led.source = button.values

pause()
You will find that using the procedural approach is a great start, but at some point you’ll hit a limit, and will have to try a different approach. The example above can be approach in several programming styles. However, if you’d like to control a wider range of devices or a more complex system, you need to carefully consider which style works best for what you want to achieve. Being able to choose the right programming style for a task is a skill in itself.
Source/values properties
So how does the led.source = button.values thing actually work?
Every GPIO Zero device has a .value property. For example, you can read a button’s state (True or False), and read or set an LED’s state (so led.value = True is the same as led.on()). Since LEDs and buttons operate with the same value set (True and False), you could say led.value = button.value. However, this only sets the LED to match the button once. If you wanted it to always match the button’s state, you’d have to use a while loop. To make things easier, we came up with a way of telling devices they’re connected: we added a .values property to all devices, and a .source to output devices. Now, a loop is no longer necessary, because this will do the job:
led.source = button.valuesThis is a simple approach to connecting devices using a declarative style of programming. In one single line, we declare that the LED should get its values from the button, i.e. when the button is pressed, the LED should be on. You can even mix the procedural with the declarative style: at one stage of the program, the LED could be set to match the button, while in the next stage it could just be blinking, and finally it might return back to its original state.
These additions are useful for connecting other devices as well. For example, a PWMLED (LED with variable brightness) has a value between 0 and 1, and so does a potentiometer connected via an ADC (analogue-digital converter) such as the MCP3008. The new GPIO Zero update allows you to say led.source = pot.values, and then twist the potentiometer to control the brightness of the LED.
But what if you want to do something more complex, like connect two devices with different value sets or combine multiple inputs?
We provide a set of device source tools, which allow you to process values as they flow from one device to another. They also let you send in artificial values such as random data, and you can even write your own functions to generate values to pass to a device’s source. For example, to control a motor’s speed with a potentiometer, you could use this code:
from gpiozero import Motor, MCP3008
from signal import pause

motor = Motor(20, 21)
pot = MCP3008()

motor.source = pot.values

pause()
This works, but it will only drive the motor forwards. If you wanted the potentiometer to drive it forwards and backwards, you’d use the scaled tool to scale its values to a range of -1 to 1:
from gpiozero import Motor, MCP3008
from gpiozero.tools import scaled
from signal import pause

motor = Motor(20, 21)
pot = MCP3008()

motor.source = scaled(pot.values, -1, 1)

pause()
And to separately control a robot’s left and right motor speeds with two potentiometers, you could do this:
from gpiozero import Robot, MCP3008
from signal import pause

robot = Robot(left=(2, 3), right=(4, 5))
left = MCP3008(0)
right = MCP3008(1)

robot.source = zip(left.values, right.values)

pause()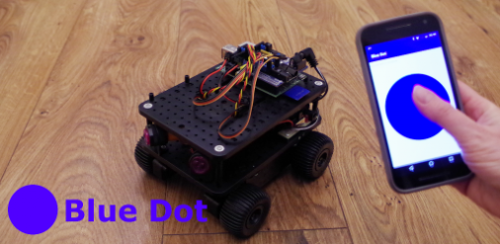
GPIO Zero and Blue Dot
Martin O’Hanlon created a Python library called Blue Dot which allows you to use your Android device to remotely control things on your Raspberry Pi. The API is very similar to GPIO Zero, and it even incorporates the value/values properties, which means you can hook it up to GPIO devices easily:
from bluedot import BlueDot
from gpiozero import LED
from signal import pause

bd = BlueDot()
led = LED(17)

led.source = bd.values

pause()
We even included a couple of Blue Dot examples in our recipes.

Make a series of binary logic gates using source/values
Read more in this source/values tutorial from The MagPi, and on the source/values documentation page.
Remote GPIO control
GPIO Zero supports multiple low-level GPIO libraries. We use RPi.GPIO by default, but you can choose to use RPIO or pigpio instead. The pigpio library supports remote connections, so you can run GPIO Zero on one Raspberry Pi to control the GPIO pins of another, or run code on a PC (running Windows, Mac, or Linux) to remotely control the pins of a Pi on the same network. You can even control two or more Pis at once!
If you’re using Raspbian on a Raspberry Pi (or a PC running our x86 Raspbian OS), you have everything you need to remotely control GPIO. If you’re on a PC running Windows, Mac, or Linux, you just need to install gpiozero and pigpio using pip. See our guide on configuring remote GPIO.
I road-tested the new pin_factory syntax at the Raspberry Jam @ Pi Towers
There are a number of different ways to use remote pins:
- Set the default pin factory and remote IP address with environment variables:
$ GPIOZERO_PIN_FACTORY=pigpio PIGPIO_ADDR=192.168.1.2 python3 blink.py
- Set the default pin factory in your script:
import gpiozero
from gpiozero import LED
from gpiozero.pins.pigpio import PiGPIOFactory

gpiozero.Device.pin_factory = PiGPIOFactory(host='192.168.1.2')

led = LED(17)- The
pin_factorykeyword argument allows you to use multiple Pis in the same script:
from gpiozero import LED
from gpiozero.pins.pigpio import PiGPIOFactory

factory2 = PiGPIOFactory(host='192.168.1.2')
factory3 = PiGPIOFactory(host='192.168.1.3')

local_hat = TrafficHat()
remote_hat2 = TrafficHat(pin_factory=factory2)
remote_hat3 = TrafficHat(pin_factory=factory3)
This is a really powerful feature! For more, read this remote GPIO tutorial in The MagPi, and check out the remote GPIO recipes in our documentation.
GPIO Zero on your PC
GPIO Zero doesn’t have any dependencies, so you can install it on your PC using pip. In addition to the API’s remote GPIO control, you can use its ‘mock’ pin factory on your PC. We originally created the mock pin feature for the GPIO Zero test suite, but we found that it’s really useful to be able to test GPIO Zero code works without running it on real hardware:
$ GPIOZERO_PIN_FACTORY=mock python3
>>> from gpiozero import LED
>>> led = LED(22)
>>> led.blink()
>>> led.value
True
>>> led.value
False
You can even tell pins to change state (e.g. to simulate a button being pressed) by accessing an object’s pin property:
>>> from gpiozero import LED
>>> led = LED(22)
>>> button = Button(23)
>>> led.source = button.values
>>> led.value
False
>>> button.pin.drive_low()
>>> led.value
True
You can also use the pinout command line tool if you set your pin factory to ‘mock’. It gives you a Pi 3 diagram by default, but you can supply a revision code to see information about other Pi models. For example, to use the pinout tool for the original 256MB Model B, just type pinout -r 2.
GPIO Zero documentation and resources
On the API’s website, we provide beginner recipes and advanced recipes, and we have added remote GPIO configuration including PC/Mac/Linux and Pi Zero OTG, and a section of GPIO recipes. There are also new sections on source/values, command-line tools, FAQs, Pi information and library development.
You’ll find plenty of cool projects using GPIO Zero in our learning resources. For example, you could check out the one that introduces physical computing with Python and get stuck in! We even provide a GPIO Zero cheat sheet you can download and print.
There are great GPIO Zero tutorials and projects in The MagPi magazine every month. Moreover, they also publish Simple Electronics with GPIO Zero, a book which collects a series of tutorials useful for building your knowledge of physical computing. And the best thing is, you can download it, and all magazine issues, for free!

Check out the API documentation and read more about what’s new in GPIO Zero on my blog. We have lots planned for the next release. Watch this space.
Get building!
The world of physical computing is at your fingertips! Are you feeling inspired?
If you’ve never tried your hand on physical computing, our Build a robot buggy learning resource is the perfect place to start! It’s your step-by-step guide for building a simple robot controlled with the help of GPIO Zero.
If you have a gee-whizz idea for an electronics project, do share it with us below. And if you’re currently working on a cool build and would like to show us how it’s going, pop a link to it in the comments.


32 comments
David Ferguson
Quick fix: you’re missing:
`from gpiozero.tools import scaled`
from the example where you scale the pot values so the motor goes in both directions, and
`from gpiozero.tools import zip`
from the example after that.
Ben Nuttall — post author
Whoops! You’re right about scaled – I’ve edited the post accordingly. However, zip is a built-in Python function: https://docs.python.org/3.3/library/functions.html#zip
Note that zip in Python 2 is not lazily evaluated so this will not work. The equivalent is itertools.izip: https://docs.python.org/2/library/itertools.html#itertools.izip
David Ferguson
Might want to say that it requires Python 3 in the post then – I for one still use Python2 (because typing python3 is soooo much harder than just typing python xD ) and a lot of people I know do the same.
Ben Nuttall — post author
I thought it was long enough! We do state that when we use zip in the documentation.
And Python 2 is EOL in less than three years! Stop using it! :)
David Ferguson
But I hate having to put brackets round print… I always forget and it takes longer! On a serious note, I have started switching to Python3, but the convenience of being able to sit down at any Mac and program in Python2 means I won’t be switching completely away for a little while yet.
Dave Jones
No prob – we will continue supporting Python 2 in GPIO Zero as long as is necessary (i.e. at least until Py2’s EOL in 2020); even after we drop support, old versions will remain available (at least via pip) so there’s nothing absolutely forcing you off. Still, there’s a lot of very nice stuff in Py3.4 which is worth upgrading for (even in basic file-handling you’ve got the ‘x’ mode in open() and the new pathlib, let alone all the other stdlib improvements). Painful though any migration is, I’d say this one is now worth it (it honestly wasn’t back during 3.2, but 3.4 and beyond are *much* better).
Carl Jacobsen
I know it’s not the Debian Way, but I really wish Raspbian shipped with Python 3.6.x, rather than 3.4.2, which is well over two and a half years old (about a century in Internet years).
Ben Nuttall — post author
Raspbian Stretch will be out soon, and that comes with Python 3.5. It’s not 3.6 but, you know, Debian.
You can always use Python 3.6 on your laptop and use remote pins to control the Pi :)
Carl Jacobsen
Install Homebrew ( https://brew.sh ) on your Mac and then do “brew install python3”. Problem solved. I also put two functions in my ~/.bashrc on macOS (and similar on Raspbian) to make sure I don’t get Python 2 unintentionally from a shell prompt:
function python2 () { /usr/bin/python “$@”; }
function python () { echo “USING PYTHON3”; /usr/local/bin/python3 “$@”; }
I start my scripts with the recommended “#!/usr/bin/env python3” and they Just Work. It’s wonderful to be able to write command-line utilities in (a non-deprecated version of) a language that works on both the Mac and Raspberry Pi.
Also, if you’re putting brackets on your print() statements, well, there’s your problem right there – they need parentheses, not brackets. And note that the same syntax works on modern versions of Python 2 as well, and has for quite some time. if you’re leaving out the parentheses, you’re just writing code that is destined to fail in the future. Writing:
print(‘Hello, {}, it is {:.2f} degrees’.format(name, temperature))
works in both Python 2 and 3, and is the correct way to do things now.
Ben Nuttall — post author
There’s also “from __future__ import print_function”: https://stackoverflow.com/posts/32032727/revisions
David Ferguson
Of course you can install Python3 on Mac, and I have done so about a year ago on mine. However, my point is that I’m able to write a Python2 program and know it’ll run on any Mac without installing anything. Very very useful, especially in education environments where installing software isn’t allowed.
Diego
Hi there, I have a question, this new function will not replace or erase the GPIO habitual library, isn’t it?.
thanks a lot
Ben Nuttall — post author
GPIO Zero is built to use a number of different low-level GPIO libraries, and the default one used is RPi.GPIO which we’re not going to remove – it’ll still be installed in Raspbian, and can be used by GPIO Zero or on its own.
Dave Jones
Just to expand on Ben’s answer: our intention here is not to *replace* anything but to augment it. There’d be no point in forcing people away from an implementation they were familiar with, especially when we rely upon it for our own functionality. We seek to provide alternate (hopefully useful) ways of approaching GPIO programming.
The major difference between GPIO Zero and the existing GPIO implementations (RPi.GPIO, RPIO, and pigpio, which it builds upon) is that the all the existing implementations are concerned with the GPIO *pins*, while GPIO Zero is concerned with the *devices* attached to the pins. When the library knows what you intend to address (an LED, a button, a motion sensor, etc.) it can make inferences about how it should control the pin you’re using (input, output, pull-ups, or even protocols like SPI), and it can present interfaces relevant to that device. We think that’s a friendlier way to present GPIO programming, but as mentioned it’s not the only one and we certain won’t be forcing it upon anybody.
Michael Horne
As someone who has used GPIO Zero quite a bit, I really want to say Thank You! No more messing about with multi-threading, just tie things to an event. No more .setwarnings(), lovely. Great job Ben, Dave & team – love using it. Writing resources using it is a lot simpler now too. Great to hear about all the advanced and new functionality available too!
Dougie Lawson
Thanks for the pinout program.
That’s an excellent addition to GPIOzero (which I don’t often use but think is a wonderful tool for making this stuff easy).
Luis
Excellent news! These new additional features to enable stateless gpio programming will make it so much simpler for kids to dive in without having to understand all the little nuances of hardware right off the bat. Thanks so much for all your hard work!
Dean
Great work and this library certainly makes things a lot simpler.
But as a beginner I might be missing something here but in GPIOzero I wish that there was a simple way of rotating a Stepper motor forwards or backwards just like you can turn a led on or off.
The motor functions in GPIOzero are for a normal dc motor ?
Cheers
Ben Nuttall — post author
That’s on the roadmap for the next release: to provide support for a wider range of motor types, including stepper motors.
You can use stepper motors with gpiozero now, you just have to use the base class OutputDevice on each of the pins, and use appropriate logic to control them as desired.
solar3000
brilliant.
thanks for the hard work.
I always forget the pin assignments.
Ben Nuttall — post author
Me too :)
Andrew Hart
Pinout is a very useful tool. Would be even greater if it included the signal names, such as SDA, SCK, CLK, RX, TX, MOSI, MISO etc. on the screen listing against the pin numbers
A man page with even more details would make it even more useful.
Thank you for this.
Ben Nuttall — post author
We’ll probably add a single level of alt functions in a future release, but it’ll probably require an
--altflag so that regular users just see the simple version by default.Have you seen
pinout -h?We did actually prepare a man page but… forgot to include it with the Debian package. It’ll be in the next release.
Dave Jones
My fault for forgetting the man-page … spent an hour getting it write in the sphinx build and then completely forgot to include it in the .deb package!
Regarding alt functions: I’d love to have them in there, but it does mean expanding the pin database in GPIO Zero and that needs a little thought and work to do in a “sensible” way (the database is a bit adhoc at the moment: because of the enormous variety of pins on the CM we just store everything as strings and just treat certain strings like 5V, 3V3, GND, and GPIOn specially … that needs revising :)
Elfen
This looks great but I have a question about it all.
Before converting all the pins to GPIO, the R-Pi had serial and IC2 connectivity to a few of these pins, which allows one (like a project I was doing) to connect “smart devices” to the GPIO in a “network.” My project connected a few Arduinoes to these pins and communicate with the R-Pi and do various tasks as per their programs.
Question is: are these functions still accessible on these pins?
Great work though, this expands the GPIO greatly. Another question, on the older Model A/B’s is the GPIO expanded similarly? I know the GPIO on these units are smaller but are the Serial and IC2 pins converted as GPIO as per the newer units? This would be very interesting if it works.
Ben Nuttall — post author
The pinout tool works on any Pi model, and will show you the GPIO header for your Pi, including the extra header on some of the old 26-pin models.
Alternative functions are still available, these include SPI, I2C and serial. We don’t know these (currently) on the pinout tool, but might do in future, and you can read all about the alternative functions at http://pinout.xyz
P.A. Blok
I learned by the hard way that it is not the best tool/solution when experimenting with the HC-SR04 ultrasonic distance meter and it is still promoted in the learning resource for ‘kids’. I think a warning/comment there would be correct. Now it is needless frustrating of learners.
Peter
pinout command returns “-bash command not found” with Jessie Lite updated 15-8-2017 on a Pi zero W.
Python shows version 1.4.0 installed.
Any ideas what I’ve missed?
KD
Same here. Seems that the command is not installed unless you install the package for python3:
sudo apt install python3-gpiozero
Peter
Thanks KD.
That was the issue. Have installed python3 & GPIO zero for 3 & pinout works now.
Ben Nuttall — post author
That’s true. The pinout tool is only added by the Python 3 version of the package, because there would be a conflict if both versions tried to add it.
RDB
any examples of securing the remote gpio over ssh?
Comments are closed