AirPi – the next step
Liz: When Clive and I are asked what schools project in the past year has really knocked our socks off, our response is usually the AirPi, an inexpensive pollution and weather monitor developed by Alyssa Dayan and Tom Hartley, a pair of sixth formers from Westminster School in London. AirPi won the PA Consulting Raspberry Pi competition earlier this year, where entries had to “make the world a better place”, and we regularly use it in talks as an example of the amazing things that can be achieved with a Pi and some ingenuity.

Tom, Alyssa and Air Pi
AirPi is an open-source weather and pollution monitoring system, with the ability to record and stream data. Including the Pi, it comes in at £55: tens of times cheaper than equivalent off-the-shelf equipment. Things have come a long way since the first, competition-winning iteration of AirPi: Alyssa and Tom have been learning about PCB design and entrepreneurship and have just launched a Tindie to raise funds to sell the kit. I’ve asked them to write about what they’ve been doing, and what progress they’ve made with AirPi over the last few months. Here’s what Tom had to say:
For the last 10 months, I’ve been working with Alyssa Dayan to create the AirPi. Its a shield for the Raspberry Pi capable of recording data about the air quality and current weather conditions, coupled with code to upload its recordings to the internet in real time. Just last week, we started a fundraiser for our kit on Tindie!

AirPi in its current incarnation. Note shiny PCB.
The project started back in October 2012, when one of our teachers (we’re both sixth form students) told us about the PA Consulting Raspberry Pi competition. The challenge was to create something, using a Pi, which would “make the world a better place”. We didn’t have a very clear idea of what to design, so we looked at the different kinds of hardware we could connect to the Pi. After checking Adafruit’s website, we discovered a vast assortment of sensors, many of which measured meteorological information. Over the next 4 months, we purchased and added on various parts from all over the world (testing and calibrating as we went along), starting with the DHT22 which measured temperature and humidity, and finishing with the UVI-01 which measures UV levels. That was the very first incarnation of the AirPi.
Simultaneous to developing the hardware, we started developing the software. It was split up into Python scripts (which are currently undergoing a complete rewrite!) running on the Pi, and a live updating website (with HTML5 websockets!). By February, we’d started putting basic instructions on how to make your own AirPi onto our website (this was a stipulation of the competition), and one of the most incredible moments we had was when an awesome guy from the UK, Paul, emailed us and said he’d already put one together. Before that point we had no idea that people would actually be interested in building an AirPi themselves!

Early version of AirPi on breadboard
In March, we were invited to the finals of the competition. After polishing up our website and tidying our breadboard (above), we headed to PA Consulting’s offices near Royston. We started by getting a tour around, and seeing the awesome workshop and labs that PA had. In the afternoon we were judged the winners in our category. After the event was over, the project gained some interest online, and about 10 other people have put an AirPi together by hand since then. Of special note however, was Taylor Jones, an electronics engineer in the US, who emailed us saying he wanted to design a PCB for the AirPi. I have now started learning that dark art, but at the time neither I nor Alyssa had any experience making PCBs so we were incredibly glad to have his help!

Final AirPi kit
After three iterations, we had a functional PCB – this made the AirPi much more compact and easy to assemble, so we decided to start making kits for it. We signed up for a stand the Elephant & Castle Mini Maker Faire – this was brilliant as it gave us a fixed date we had to get the kits ready by. After reinvesting the prize money from the PA consulting competition into components, PCBs, packaging and stickers, we were ready to head off to the Maker Faire with the kits. We sold out of all 15 kits we had purchased for the day! In the weeks after the Faire, we were contacted by several very awesome groups of people: a new green initiative in Ho Chi Minh city in Vietnam has purchased three kits in order to measure the air quality there, and the Chaos Computer Club in Germany has bought 15 in order to teach children to solder. We’ve even had several archivists in the UK who’ve asked us to give them some so they can accurately monitor the temperature and humidity of the books they’re looking after! In the near future, we’re hoping to develop a 3D printed case for the AirPi which will allow people to put it outside a lot easier.

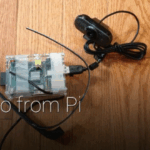
AirPi hooked up to a Pi
After many requests for a kit, we’ve started a fundraiser on Tindie (sort of like a Kickstarter, but especially for electronics). If you’re interested in ordering a kit to measure temperature, humidity, UV, NO2, CO, light and air pressure for £55, then you can go to this page – we’ll be shipping them out in late September. Alternatively, we have published all the source code, instructions, components needed and even the PCB files and schematics online, so if you want make and assemble one yourself (or improve upon our design), feel free to do so. We love open source – without the amazing work of so many people online, there could be no AirPi. If you build one, we’d love to hear from you and add it to our website. Thank you for reading!


26 comments
Dutch_Master
Well done guys! What an amazing start of your careers in science. Enjoy your success!
ronster033
Amazing guys. Keep up the good work.
exartemarte
An interesting and worthwhile project. Lots of people have good ideas. Not so many have the ability and commitment to see them through to completion – but you have, so well done both of you! You’ll have learned a lot – maybe even more than you realise.
Good luck with your future education and careers.
George
Very well done, this is amazing. It’s quite remarkable to see how many major parts are to this project and how useful the resulting device is, from monitoring outdoor air to server rooms and beyond.
Marc
Excellent project, and excellent writeup. Well done.
The Raspberry Pi Guy
That is a cool project! I will look into doing a tutorial/review for it!
The Raspberry Pi Guy
A
So to build this yourself will cost £55 including the cost of the RasPi, but if you don’t want the hassle of that then you can buy their kit for £55 without the raspberry pi? And you still have to assemble it yourself in either case.
Looks like they are getting to grips with the business world quite well, bravo!
Brian
Or you can build one from scratch costing however much you can get the components together for, because the AirPi team give you everything you need to do so. For free.
Looks like you are getting to grips with the world of whining cynicism quite well, bravo!
A
You miss my point.
I was questioning how they can charge £55 when the parts retail cost ~£25 (excluding the pi).
There is no way the PCB can cost £30.
Yes I know they need to make some money on this but that much?
Maybe if it was fully assembled it would be worth the £55 they want for it…But barely.
AndrewS
I don’t think the pricing is quite that cynical.
If you go to the AirPi website it says that it’s a modular platform, so you can pick’n’choose which sensors you include. So I think the “Including the Pi, it comes in at £55” would be for a setup with minimal sensors, whereas the “ordering a kit to measure … for £55” (without the Pi) includes a much broader range of sensors. Maybe still slightly overpriced though, going from the sensor cost figures they quote on http://airpi.es/step1.php
Edward Bowden
Met tom at “tech camp” years ago and we “hacked” the network for the computers there. Start hacking early and you can do great things. Time to bug my parents to buy one.
Florian Ajir
Very cool component ! I want one !
Ben
I too want one of these, for my uses though I need the data stored locally as there will not be a computer nearby.
Will there be an option for locally stored data? I’d be fine with a measurement taken every 15 minutes and stored local. Then I can place this in a location and power it up, record data then retrieve it and examine the data at my leisure. Or it could save locally then upload in a batch later, whatever.
Long term I could get an internet connection, but for testing in multiple areas as I would like to there may no easily accessible internet.
I’ll be in touch!
Jon Brohauge
It’s open source. You need a change in the software, you change it.
pSiMann
Awesome project. Well done. I have just ordered one from Tindie and look forward to receiving the kit.
Good luck out there.
Jon Brohauge
Fantastic job guys!
Brian Martin
Fantastic and informative project. I want one… but I don’t want/need a PayPal account. How else may I pay?
Tom Hartley
Send us a message here: http://airpi.es/contactus.php and we’ll sort you out :) Glad you like the project!
tim
Anyone have any suggestions what to do if you want to buy a Pi for a child but no one you know is tecnically inclined?
if you have teachers, family or friends who can help guide you, then the Pi is great but what about the child that received a Pi and is then left on his own with only the internet as its guide?
Is there a program to make online learning possible?
I fear the ‘Now what?’ stage that would come after unboxing the Pi with a best case scenario being the Pi becomes just another browser to surf Youtube.
There will always be a subset of geeks who will be interested in technology but it seems to me that Eben’s goal was to increase the % which means those that could possibly be interested but dont have the guidance.
I think all the tools exist to make this possible, its a matter of creating an interesting yet challenging (and fun) course that could be accessible as soon as one turns on a Pi.
clive
Hi Tim — we totally agree with you and this is what we are currently putting a huge amount of resources into. We’ll have some news in the next couple of months but in the meantime please email me on clive@…
clive
the Raspberry Pi Education Guy
v
great work!
I’d love to add the pi camera board along with a waterproof thermometer for both a weather cam and to take water temps on the lake I live on! If this moves to being easily moved into a weatherproof casing for permanent outdoor mounting with solar panel power we’ll have a completely standalone system. Add the wifi USB and it’s golden!
Dean
Guys, before berating the ‘profit’ of selling at 55 quid….do consider a number of other factors other than raw material costs….
just a couple of examples….
R&D costs
(all those chemicals, lab time, human time logging sensor response ratios)
Prototype costs
(all those busted, components, broken PCB’s)
also, do YOU really want to work for free?
Some calculations for ACTUAL profit….
lets say they sell 250 units….
lets put a cap on the costs at 30 quid each (physical costs, not labour)
now, that’s 25 quid ‘perceived’ profit per unit
total profit of 6.5 grand…..
Back in 1999, I earned 3 times that a year….it was 4 months wages
lets say, wages have increased now, that 6.5 grand is the equivalent of just 3 months wages
Didn’t I spot at least TWO ’employees’ of the company?
that’s 3.25 grand each then….roughly 6 weeks ‘full time’ wages each….
didn’t they mention they’ve spent nearly a year on this…..
lets take out 500 quid of business expenses – website, prototypes, sample purchases, consumables
leaves 3 grand per person for 10 months work (on and off)
Now they have to ship everything.
lets say they spent just 1 hour each a day developing this thing, 300 hours over 10 months (probably an under-estimate, it’s amazing how much of a time sink these things can be)
how long does it take to assemble a kit into a bag, add the instructions, write up an address label, stick it on the envelope and post it?,
250 kits, , lets say 12 minutes each kit on average
that’s 50 HOURS, just to get these ready
split that into two – 25 hours a person
summary
each person spent 325 hours on this, over 12 months (when the tindie fundraiser finishes)
to get 3 grand in their pocket…
that’s just over 9 quid an hour, BEFORE tax.
now, I don’t know if the tindie’s need to factor in VAT for EU residents,
If it were a commercial enterprise, i’d imagine that 55 quid would need to include VAT
if so, knock that 6 grand profit down by 20%….that’s only 4,800 after VAT
that leaves them with only 7.40 an hour payment for their work,
aint that just above minimum wage in the UK nowadays?
Colin
The other day I was looking at the lack of APRS compatible weather stations…any plans on adding an anemometer setup? It would be a good weather station/aprs rig for a storm chaser.
RichardW
I don’t post stuff often.. you’ve done a top job .. well done :)
Someone
How could I contact you or Alyssa?
clive
@tmhrtly
Comments are closed