Working from home with your Raspberry Pi
Raspberry Pi 4 is more than powerful enough to serve as replacement desktop computer while you’re working from home. Or as a secondary desktop to help you out while you’re doing other things, such video conferencing, on your main computer.
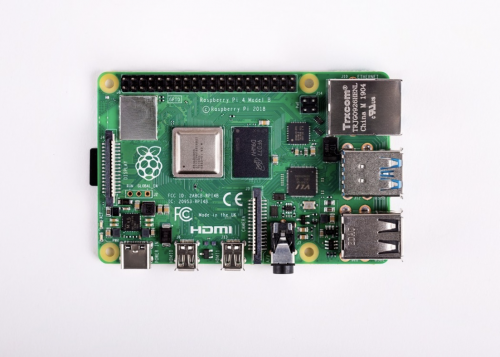
Raspberry Pi 4 Model B
If you’re pulling your Raspberry Pi out of a drawer right now, you should make sure you update it with the latest version of Raspbian; if it’s been a while since you used this Raspberry Pi, you might even want to install a new copy of Raspbian so you know you’re working from a good base image. Fortunately, you can use our new imaging utility, which makes installing a fresh copy of the operating system much easier.
Connecting a monitor, keyboard, and mouse
I normally use my Raspberry Pis headless as a server. But working from home, and using Raspberry Pi as your primary computer, you’re going to need a monitor, keyboard, and mouse.
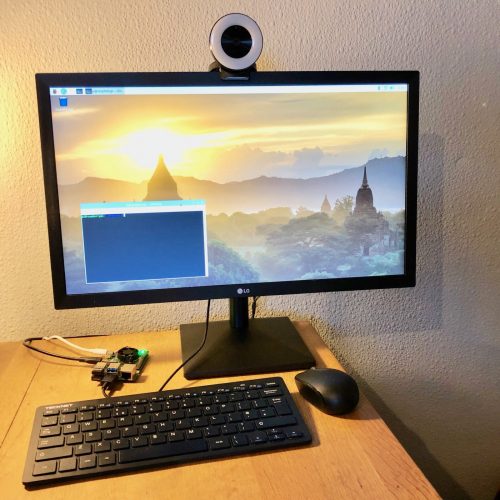
My Raspberry Pi 4, which I use for video calls, perched on the edge of my desk at home
Except for the monitor, the Raspberry Pi Desktop Kit has everything you need to get you going, including a USB-C power supply and all the necessary cables.
Connecting a keyboard and a mouse to your Raspberry Pi just involves plugging them in, although you should probably make sure you plug them into the USB 2 rather than the USB 3 sockets. You can tell these apart by their colour: USB 3 sockets have blue ‘tongues’, while USB 2 sockets have black ones.
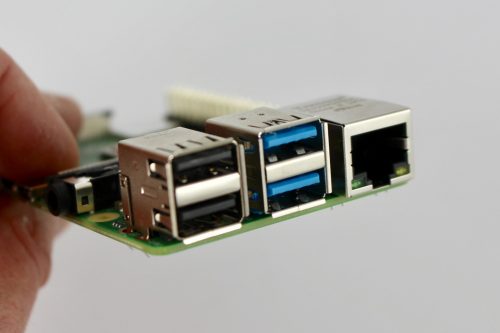
USB 2 sockets (left), USB 3 sockets (middle), and Ethernet socket (right)
Raspberry Pi 4 has two micro HDMI sockets, allowing you to use it with dual monitors if you wish: it supports one 4K screen at 60fps, or two 4K screens at 30fps.
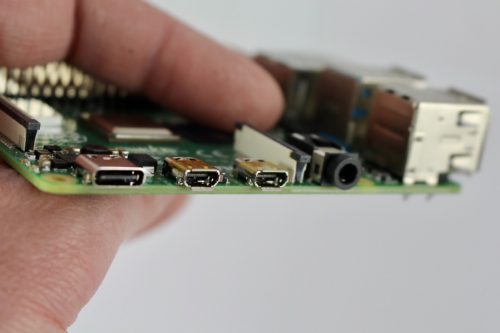
Power (USB-C) socket (left), two micro-HDMI sockets (middle), and the headphone jack (right)
You can connect Raspberry Pi to any HDMI monitor (or two) you have in the house — you’ll only need a micro-HDMI to HDMI cable (or two) to do it. There are two of these included in the Desktop Kit.
While the official Raspberry Pi keyboard and mouse are great, I’ve picked up a smaller wireless keyboard and mouse for added convenience and fewer wires.
Setting up wireless networking
Setting up wireless networking on Raspberry Pi can be done from your desktop. Alternatively, you can also set up networking before you boot your Raspberry Pi for the first time by editing a file on the boot partition of your SD card after you burn the operating system onto it.
$ cd /Volumes/boot
$ nano wpa_supplicant.conf
Then add the following lines to the wpa_supplicant.conf file:
country=COUNTRY
ctrl_interface=DIR=/var/run/wpa_supplicant GROUP=netdev
update_config=1
network={
 ssid="SSID"
 psk="PASSWORD"
 key_mgmt=WPA-PSK
}
COUNTRY should be set the two-letter ISO/IEC alpha2 code for the country in which you are using your Raspberry Pi, e.g.:
- GB (United Kingdom)
- FR (France)
- DE (Germany)
- US (United States)
- SE (Sweden)
SSID is the ESSID of your home network, with PASSWORD being the WPA2 password for that network.
It’s important to enter the correct country code in the file, as this will determine which regulatory domain your Raspberry Pi thinks it’s operating in, and therefore which wireless channels it enables on your adaptor.
Setting up email
For many of us, our email lives in our browsers these days, so just navigate to your normal email provider in Chromium and you will be able to use it as normal.
However, you can get your email directly to your Raspberry Pi desktop if you want to do that. Raspbian ships with the Claws Mail client, which supports both POP3 and IMAP standards. Although some ISPs still use the POP3 protocol, IMAP access is the more commonly used, especially when it comes to most of the web-based services like Google’s Gmail.
Using Microsoft Office
Some workplaces will prefer that you use MS Office. Raspbian ships with Libre Office, and there is no native version of Microsoft Office applications that run on Raspberry Pi. However, you can use Office directly in your browser.
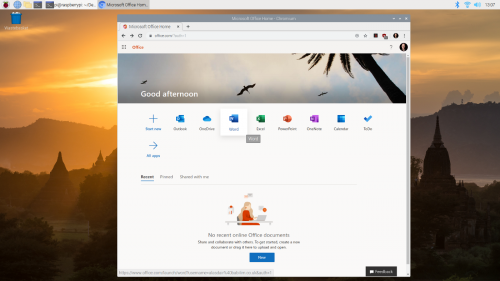
Using Microsoft Office in the browser
Navigate to office.com and log in with your Microsoft Live account to access the free version; if your company subscribes to Office 365, you should be able to log in with your work username and password.
Using Google Docs and Drive
Designed to be used in web browsers, Google Docs, Sheets, Slides, and Forms work out of the box on Raspberry Pi.
Using Google Docs on the Raspberry Pi
Like all the other Google applications you can access Google Drive directly in your browser from your Raspberry Pi. However if needed you can mount Google Drive using FUSE as part of the file system.
Setting up a VPN client
It’s really easy to find advice and tutorials on how to set up a VPN server for Raspberry Pi. Finding information on how to set up your Raspberry Pi as a VPN client, to allow it to connect to your existing work VPN back in the office, is much harder.
How you get your Raspberry Pi to talk to your office VPN is going to depend on exactly which type of VPN your company uses. So reach out to your company’s IT team to ask them for advice.
Using OpenVPN
The OpenVPN protocol is one of the youngest VPN protocols; it is open-source and generally considered one of the more secure protocols.
To get OpenVPN working on Raspberry Pi, first you’ll need to install the OpenVPN package:
$ sudo apt-get install openvpn
Then you’ll need to create a client.conf configuration file in /etc/openvpn.
client
dev tun

proto udp
remote HOSTNAME PORT

resolv-retry infinite
nobind

user nobody
group nogroup

persist-key
persist-tun

# Path to your certificates (ca.crt, client.crt, and client.key)
ca FILEPATH_CA
cert FILEPATH_CRT
key FILEPATH_KEY

ns-cert-type server
comp-lzo
verb 3
Replace HOSTNAME and PORT with the name and port number of your company’s VPN server, and FILEPATH_CA, FILEPATH_CRT, and FILEPATH_KEY with the fully resolved path to your ca.rt, client.crt, and client.key certificate files; you can obtain this information from your company’s IT people. While these files normally live alongside your configuration file in /etc/openvpn, it isn’t necessary to have them saved there if you really want them to live somewhere else.
Then in a terminal window, type:
$ sudo openvpn /etc/openvpn/client.conf
You should then be connected to your company’s VPN via OpenVPN.
Using PPTP
The Point Tunneling Protocol (PPTP) is an older VPN protocols, and despite known vulnerabilities, it is still one of the more widely used ones because it’s integrated into Windows, macOS, and Linux. If your workplace offers other protocols, such as OpenVPN, I suggest that you choose one of these instead, since they are more secure. However, if you do need to use PPTP, you can do so on Raspberry Pi.
First you’ll need to install the PPTP package:
$ sudo apt-get install pptp-linux
Then go ahead and create a /etc/ppp/peers/pptp-config file to hold your PPTP configuration, and copy and paste the following into the file:
pty "pptp HOSTNAME --nolaunchpppd --debug"
name USERNAME
password PASSWORD
remotename PPTP
require-mppe-128
require-mschap-v2
refuse-eap
refuse-pap
refuse-chap
refuse-mschap
noauth
debug
persist
maxfail 0
defaultroute
replacedefaultroute
usepeerdns
Replace HOSTNAME, USERNAME, and PASSWORD with the name of your company’s VPN server, your own username, and your password.
Then in a terminal window, type:
$ sudo pon /etc/ppp/peers/pptp-config
You should then be connected to your company’s VPN via PPTP.
Using L2TP/IPSec
Because of the lack of confidentiality inherent in the Layer 2 Tunneling Protocol (L2TP), it is normally used in conjunction with another protocol called IPSec. Unfortunately setting up an L2TP/IPSec client on Raspberry Pi is somewhat more involved than using either OpenVPN or PPTP.
If your company supports it, I’d opt to use OpenVPN rather than trying to get L2TP/IPsec up and working on Raspberry Pi.
One alternative approach is to swap out Raspberry Pi’s default wireless management for Network Manager and use the Network Manager widget to setup L2TP/IPSec instead of the default tools. It’s probably easier than trying to set things up via the command line, but if you run into problems, it’s going to be somewhat harder to figure out what is going wrong.
Setting up video conferencing
To get video conferencing working with Raspberry Pi, you’ll need three things: a way to get audio out of Raspberry Pi, a way to get audio in, and a camera so that people can see you.
Adding audio
Setting up audio out for your Raspberry Pi is normally fairly easy. You can just plug a set of headphones into the audio jack, or use the speakers in your computer monitor connected via HDMI, and Raspberry Pi should just figure things out for you.
If you’re not getting sound out of your Raspberry Pi, either via the audio jack or the built-in speakers in your monitor, you might need to set audio output manually using the raspi-config tool.
Unfortunately, Raspberry Pi doesn’t have any native audio input capability. The simplest way to to add audio input is to use a USB microphone. These range from a cheap and cheerful mini USB microphone, designed for basic sound capture, to much more impressive ones designed for podcasting.
Alternatively, you can get a compatible USB sound card, which means that you may be able to use a wired headset and microphone with a standard audio jack. But be warned, most USB sound cards don’t provide any gain for passive mics, so you’ll need to provide a good signal.
Adding a camera
The absolutely easiest way to add a camera to your Raspberry Pi for video conferencing is just to plug in a USB webcam. If your camera offers a built-in microphone, like the Razor Kiyo, and your monitor has built-in speakers, then your camera can provide your audio as well as video.
You can test your USB web camera using the fswebcam package.
If you’ve got a Raspberry Pi Camera Module, it’s possible to use that as well — just make sure you configure the Camera Module using raspi-config. You will however need to have a separate microphone, as the Raspberry Pi Camera Module doesn’t have one built in.
Using Google Hangouts
Google Hangouts works in your browser and doesn’t require a client. You should be able to navigate to hangouts.google.com or click directly on the meeting link in your calendar or email.
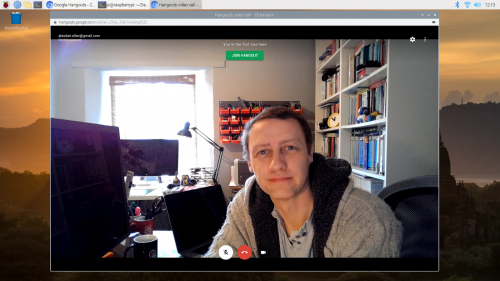
Google Hangouts on the Raspberry Pi desktop
However, the first time you open Hangouts, despite giving permission for the app to access your camera and microphone, you might find that it thinks that access has been denied.
To fix this problem, navigate to the padlock?icon in your browser’s address bar and click on it. This will open a drop-down menue letting you mark both the Camera and Microphone as ‘Allow’. Select ‘Allow’ for both the camera and microphone, even if they are set to ‘Allow’ already.
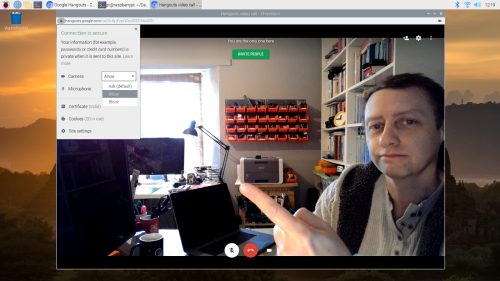
The permissions drop-down menu in Google Hangouts
Close the drop-down menu by clicking on the cross in the top right-hand corner of the dialog window. Doing so add a bar at the top of your window prompting you to ‘Reload’. Click on ‘Reload’. This time, Google Hangouts should be able to access your camera and microphone.
This trick may also be handy for some other video conferencing applications.
Using Zoom
While there isn’t a Zoom desktop client for Raspberry Pi, you can run the Zoom client application, or even host a meeting, directly in the browser.
Open your browser, navigate to join.zoom.us, and enter the meeting ID and password; if you have received an email invitation, you can click directly on the meeting request URL in the email.
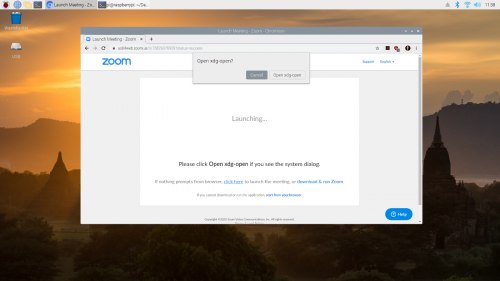
Click on the ‘Cancel’ button when prompted to ‘Open xdg-open’ by Zoom
Then, when you get asked to ‘Open xdg-open?’ in the system dialog that opens, click on ‘Cancel’.
Next click on the ‘click here’ link near the bottom of the page where it says “If nothing prompts from browser, click here to launch the meeting…”. Another ‘Open xdg-open?’ system dialog will open, and you need to click on ‘Cancel’ again.
Then you should see a new “start from your browser” link in really small font at the bottom of the page. Go ahead and click on the this link.
Your Zoom meeting should now start normally in your browser.
Using Skype
There is a Skype web client, which works out of the box on Raspberry Pi. Just navigate to web.skype.com and log in as normal.
Setting up Citrix Workspace (Citrix Receiver)
It’s possible to use Citrix Receiver on your Raspberry Pi, because Citrix offers a prepackaged Linux binary for the ARM architecture that will run without problems on Raspberry Pi.
Download the ‘Full Package (Self-Service Support)’ for Debian Linux, picking the ‘Citrix Workspace app for Linux (ARM HF)’ package.
Then install it by typing into a terminal window:
$ sudo dpkg -I iaclient_19.12.0.19_armhf.deb
You can then find the newly installed client in main desktop menu.
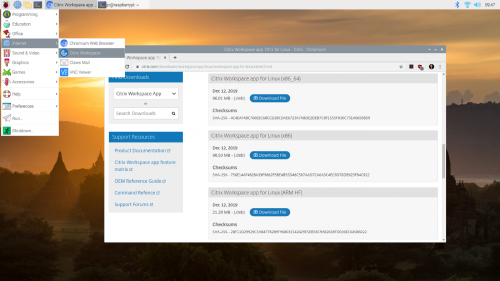
The newly installed Citrix Workspace client
Clicking on the Citrix icon will open a pop-up menu asking you to accept the EULA and then prompting you to add an account. Here you need to enter your work email or the server address provided by your company’s IT people.
Setting up a VNC client
Raspbian includes the VNC Connect client from RealVNC. To open it, navigate to the start menu, click on ‘Internet’, and then on ‘VNC Viewer’.

VNC Viewer connected to my Mac mini
Type the host name of the computer you’re trying to reach into the address bar of the VNC Viewer. You’ll be prompted for a username and password to authenticate to your remote computer. Your remote desktop should appear in a window. You can access the window setting by mousing over near the middle top of the window where a small drop-down panel will appear.
Wrapping things up
I’d been a freelance journalist for years before joining Raspberry Pi, so I perfected my home-working setup a long time ago; but I’m still finding it incredibly useful having a Raspberry Pi set up at the corner of my desk.
A number of our colleagues here at Pi Towers are are using a Raspberry Pi as their main work-from-home computer, or as a supplementary device for conferencing and file-sharing. We’re also seeing a very large number of people, both in our team and out in the community, using Raspberry Pi as a computer for kids to do homework on (an absolute necessity in so many households where parents are using all the available computers to do their own work on!).
If you’ve found any clever work-from-home workarounds that you’d like to share, please let us know about them below.


57 comments
Harry Hardjono
This is a fantastic report that I wish is immortalized in a MagPi magazine article! Just add an extra item for setting up printer, and that will be complete.
I am currently setting up my Raspi4 at home, too. I have a lot of trouble with lighting from the window behind me. It causes my face to become very dark at times. I’m about to give up and relocate my set up into a closet! But you have a window behind you. Do you not have the the problem? What’s your secret?
Jeff
Hey Harry – I can answer – his secret is the webcam he is using as a light ring in it that is lighting his face while running. That’s the advantage of the Razor Kiyo –
Harry Hardjono
Oooh, a light ring. That never crossed my mind. Thank you for letting me know. I’m on Raspi2 now, going to Raspi4 setup for YouTube video shooting. I managed to set up an acceptable set on the dining table. I wish to do it on my writing desk, though. Thanks for the info.
SmokeJaguar
Harry are you on a Windoze machine or a Mac?
Tom Picquet
The CCD in the webcam is being overwhelmed by the difference between the amount of light from the window and the light available from your face. You’ll need to provide a light source shining on your front half to balance the light coming from the window. Try using a small desk lamp placed near the same direction as the webcam. Photographers use a backflash to perform a similar function.
Misel
Is there a ready to use image or setup script to use the Pi Zero + Camera Modul as USB Webcam?
Michael Hunt
Yes, this would be great! With the webcam shortage I could press my Pi Zero and extra Pi Camera into service for friends.
jeff
Not exactly work at home. More like shop at home. Easy to give my older relatives a Pi4 and some stuff like extra cables and keyboard. They have a large tv for the monitor and all the computer stuff is out of sight. Now they have the feeling of some Independence doing their food shopping.
Tony Atherton
I don’t think Web Skype is supported on Chromium or Firefox ESR is it?
Shaun
I have tried Zoom and find the performance in Chromium rather poor. What was your experience?
AndyTiedye
Zoom on chromium freezes up for me.
Richard Mcarthur
Few things to add, apt-get install OneDrive for shared docs, Synergy allows for single mouse and keyboard across multiple devices – I’ve found it works very well. GUI config of WiFi is pretty good in rasbian.
Bernardo
Meet Jit Si https://meet.jit.si/ is another video conferencing tool that works very well with the Raspberry Pi and I have used in the past for small projects. It works in Chromium.
Graham
You say “There is a Skype web client, which works out of the box on Raspberry Pi. ”
I can log in OK bBut I get no audio or video call options in Chromium.
Pi3B+ Rasbian Buster.
Is there a way to get it working of is it only supporting text messages?
EsmeraldaGek
Hello to all
In this difficult forthwith, I love you all
Esteem your one’s nearest and friends
Eric G
Thankfully I got my first Pi, the Raspberry Pi 4 4 GB, towards the end of January. Little did I know that it would make a great Citrix Workspace thin client. Citrix Workspace is available for Linux. It works fine in Raspbian. I found a much better user experience with the Thin Linx thin client software. All the little annoyances are gone. It’s just like I’m working on the thin client at work. I have two monitors set up. I love my little Pi. I’ve heard other people had to buy new computers to work from home during this pandemic. I wish I’d known. I would have told him about this. it has been a real blessing.
Jack Chaney
Thinking of timing for products… If Pi zero is working on an upgrade, can you please consider replacing the mini HDMI with a micro, to match up parts with the Pi4.
Nick B
Hi, really useful post. I know quite a bit of it is dedicated to videoconferencing but, as a few other people have noted, web Skype doesn’t seem to work for audio or video calling and one questions the performance of Zoom. I haven’t had much success with a USB webcam and Google Hangouts – my Pi 3B seems to quickly overheat and drops the connection. Given the circumstances we’re all in perhaps there’s room for an article (a bit like the printing one) that specifically looks at which video conferencing options actually work reliably, how to set them up and what Pi is needed as a minimum?
Thanks for this great resource, Nick.
Graham
That would be useful.
Pedro Geraldes
Hi Nick,
I have a Rpi4 4GB with Raspbian OS, and a USB cam w/ mic. I’m trying zoom with chromium but always the same problem. I can send sound (mic) or send video (cam), but can never do both at the same time. Always gives me the same error, that chromium isn’t allowing the mic to work,
Thanks to everyone
Pedro
Joachim
I agree. Google Meet seems to work relatively well in the bit I’ve tried it, but my kids’ school is using Zoom during the quarantine, and I don’t have any other extra computer to dedicate to them. It’s simply not working with my USB webcam – I can get incoming video with no audio when connecting via HDMI to my TV, and that seems to be it.
So, I have to either stop working every time my kids have a Zoom conference or they skip their school activities.
Carlos Luna
Regarding video conferencing tools, I’ve also used Webex by Cisco and its web client just works. I’ve also had success with Meet by Google with the official camera. Everything worked just fine.
Graham
Carlos: I’ve also had success with Meet by Google”
do you need a monthly subscription to G Suite to host meetings with that? Is there a long-term free option?
Does it work Rpi to RPi, or RPi to Android?
Graham
From Google Meet info:
“A G Suite administrator needs to turn on Meet for your organization. If you cannot open Meet, contact your admin.
To create a video meeting, you need to be signed in to a G Suite account.”
Carlos Luna
Well, right now Google Meet is free and open for everyone. Back when I wrote that message I was using my school’s account.
Carlos Luna
And I was using it to communicate RPi to WIndows Laptop.
Marián Dúbravka
Hi Carlos, which RPi 4 did you use? 2 GB or 4 GB version? Thanks for reply.
Andrés Valencia
good I have a problem with the rasberry is that it does not allow me to connect remotely or by anydes cnv team and other programs it does not allow to connect from a raspberry to a pc but if from a pc to a rasberry and I want to connect from a rasberry to a pc without using ssh I want to image
Raspberry Pi Staff Ashley Whittaker
Someone here will be able to help! Our forum is a wonderful community: https://www.raspberrypi.org/forums/
Oscar Garcia
I second the use of https://meet.jit.si for video conferencing. It works perfectly, and it is free, secure and open source.
Dave
Great to see the instructions on installing citrix, I’ve been struggling for a long time following guides on installing citrix receiver based on an non-workspace version and got no where. This guide was simply install latest version. Just a minor hicup in the instructions in that the -I needs to be -i (lowercase).
sudo dpkg -i iaclient_19.12.0.19_armhf.deb
Eric G
Check out Thin Linx thin client software if you get a chance, http://www.thinlinx.com. They have a 30 day free trial. It is only $10. It’s great.
John
This would be a perfect setup if I could add a hard drive as the boot drive.
Tim Gardner
We use SoftEther VPN. I highly recommend it as a VPN solution. Free and based on OpenVPN. They have builds for Windows, Linux, and Mac. I use it on my Rpi to VPN to my work network for transferring data back and forth from home. Works great.
Rowland
I understand that Microsoft have just released “TEAMS for Linux” as a Debian image. I wonder how well it performs on a Pi4? For those who don’t know, MS TEAMS is MS’s equivalent of Hangouts in that it allows groups of people to collaborate via chat, video conferencing, file sharing etc. Our company has been using TEAMS for a year or so but it has now taken off in the company because of COVID. It will certainly become a permanent way of working from now on.
Nick Sharp
Hi Rowland,
unfortunately the teams client for linux is only available for x86/AMD CPUS, no Arm so it doesnt work on RPi.
Regards
Nick Sharp
Moe Long
This is an excellent article! I recently did something similar, and set my Pi 4 up as a desktop, then exclusively used it for work for a week. And I was pleasantly surprised! I even kept forgetting that I was using the Pi, not my main rig. https://www.electromaker.io/blog/article/can-the-raspberry-pi-replace-your-desktop
Steve Ledonne
Skype, and Zoom do not work on raspberry pi. can someone help out on that?
Steve Ledonne
Zoom and Skype do not work on raspberry pi. Please update your blog!
Raspberry Pi Staff Alasdair Allan — post author
I have both working.
Rich Connelly
Zoom on Raspberry Pi Chromium: What is the quality of the video sent to the meeting? Do not need client – will minimize
Bryan Kemp
Thanks Alasdair. Your article is just what I needed to more comfortably journey into the raspberry Pi realm. Thank you.
Klaus K. Becker
Thanks, it’s very interesting for me! But let me ask You a question: Had You been successful in performing a Zoom Client session including (WITH) AUDIO on a mere pure actual Raspian Version? I do long for an answer!
PS: By the way, yesterday I’d been able to do such a matter, with as Pi 4, but NOT under Raspbian, but under Lubuntu: Generally functioning, but – actually – not very stable, sad to say. I am only an amateurish fool, 74 years of age, you see, but I am very very sure, that at least one ore more worldwide profi one(s) should, would and could STABILIZE this matter; if I would been questioned, I would like to send some observed details.
The reason for: The Raspberry is the most spread, most reliable Computing ressource today (for that price), and
Zoom is – obviously – (one of) the most spread Meeting systems worldwide, and therefore I can imagine, that there is – worldwide – a big huge interest in a functioning combination of Zoom and Raspberry!
Best Regards
Klaus K. Becker, Korbach, Germany
(This is the location from where CONTINENTAL company [tyres and other car technologies] originally originated / came from.)
Muhammad Raqib
This device(Raspberry Pi) is amazing i am using since more than 1 year and no doping the signal no any maintenance issue no power consumption very light and straight forward , I am using for open VPN purpose and i did not receive any complain , I like the product after using the product i order 4 peace more for different side and different project..
James Hathaway
So, i’ve been battling with the “Raspberry pi for Video Conferencing” for at least 2 weeks now, and it’s not at all as easy as suggested in this article – I thought I’d share what I’ve learned… I have an RPi 3B, running Raspian (buster).
Firstly, “Skype for Web” will only really work on Windows OS and with Chrome or Edge – even trying to use Raspbian/Chromium and spoofing the user Agent doesn’t work – the site seems to delve further into the hardware being used – it simply would not recognize my camera or microphone, no matter what i tried.
Secondly, Google Hangouts, Zoom, Meet.jit.si etc, actually found my devices, and “worked” – but were all simply unusable due to REALLY poor performance – an average frame rate of 1/s if i was lucky, but usually more like 1 frame every 5 seconds.
Apparently, these Web-based video chat apps all make use of “WebGL”, and Raspbian/Chromium could simply not cope with WebGL/WebGL2 – it was trying to use software decoding and maxing out CPU (and overheating!) – for some reason Chromium would not use the GPU Hardware acceleration that we know the RPi can do (Kodi will perfectly stream 1080p video using omxplayer and GPU Hardware Acceleration). – You can check this by opening Chromium and navigating to “chrome://gpu” and seeing what it says about WebGL:
It turns out my RPi needed a firmware update for GPU hardware acceleration to work properly in chromium (sudo rpi-update), and I had to set the GPU memory to at least 192MB (sudo raspi-config) – I also needed to enable the “KMS” GL Driver in raspi-config -> advanced settings. (But I’m still not sure if I should be using the Fake or the Full KMS driver…?)
This all made video through chromium a lot better (especially youtube) and stopped my RPi maxing out out CPU usage and eventually overheating.
The downside is that HangOuts, HouseParty, and other web-based tools seem to limit the resolution and frame-rate of the call – Hangouts seems to only do 720p at about 10FPS, no matter what machine I use…
So, I would say that Video calling with a RPi is still not fully cracked, but I would agree with Klaus – if somebody could crack it – it’s a perfect little solution to allow for TV-style video calling with minimal hardware – we might finally be able to communicate with each other like we were promised by Start Trek in 1966 !!
Paul M
Very useful comments James, thanks. Have to say that I have had a similar experience to you with my RPI 3B and that so far the results of my testing have been unproductive. I have managed to get the camera working with the zoom.us test chat, but only once and the frame rate was about 8fps and the image rather pixelated. I tried all of your suggestions but they haven’t improved the situation.
Perhaps Chromium (or WebGL) runs better on another RPI OS. Or, perhaps a different browser?
Julian Whettam
1. A few comments state that Zoom doesn’t work on a Pi 3B – but that’s not surprising. This article is about a Pi 4 – so has anyone had any success or failure with Zoom and Skype on a Pi 4?
2. Some people have said they can’t get sound to work etc., but have they tried all the various settings – the Pi’s own audio settings as well as the Zoom audio settings?
Having had a look around the web, it looks like the best option for Zoom so far is the Chrome app, but I assume that shows a maximum of 4 people. I haven’t tried it. I don’t yet have a Pi4.
Andy
zoom does NOT work on my 8g Pi4. One time it froze, the next time it couldn’t see the camera. jitsi works fine.
Gustavo
Hi, It would be awesome if we can use bluetooth headphones for a Video call… any idea?
Daniel
Hi!
You’re saying the camera module can be used for video conferencing. But the last time I tried this (about one or two months ago, on a PI3B+, admittedly), Hangouts running in Chromium could not use the camera. Is this different on the PI4? Or how can the camera module be used like a regular webcam?
Loz
As the proud owner of a 3B+ I can confirm that Jitsi Meet is stable and reliable. Has anyone managed to resolve the issues with Zoom on the 3B+ ?
Sridhar
Hi, I agree that video conf is not so easy even with Rasp 4B. I have google meet recognise my webcame, but it does not recognize my builtin webcam microphone. my monitor doesnt have speaker. i couldnt get my speakers working. my webcam microphone doesnt get recognized. what ever i tried. Any help would be appreciated
Loz
PS, Jitzi Meet is running on 3B+, Chromium and Raspbian without updates :/
Via a 1080p Full-HD USB Webcam with Built-in Microphone from the Pi Hut :)
Also running a Wacom tablet, wireless keyboard and Apeman M4 Mini all probably without updates ..
Basically plug and play,
Loz :)
Loz
PPS, There’s a heat sink on board :)
Temperature monitor on display with extra margin on the color bands.
All smiley :)
Junior Garvin Alexander
Thank You for such a thorough and informative post. When I am looking for info I usually get the info or should I rightfully say misinformation first. Vague descriptions, and short cuts. But you, came direct, covered every issue and a simplified manner, and I am compelled to commend you for such great work. Keep it up. I was able to follow your read and address my issues and fix them on the first go. Keep up the great work. Thanks again.
Best Regards,
Junior Alexander
P.S. I have a Raspberry Pi 4 8 Gb in a smartpi case 2 and loving it. It is my first time.
Xolarwind
Zoom web in rpi 4 4gb with 32 bit RPI OS (raspbian buster) does not work in the real world. With more than 2 person conference, audio was choppy and video from RPI camera module V2 is freezing all the time. Zoom is not compatible with ARMv8 architecture, And linux zoom client (for debian 10 on x86) runned over box86 emulation software still does not work fine. No video for RPi camera v2 and choppy audio with usb mic and headphones. Only works with analog audio output and with selected old web usb camera with integated mic.
Xolarwind
Google meet works fine with RPi 4gb, raspbian buster (32 bit raspi OS), module V2 pi camera, using an USB headset ( i tried logitech h570e), with integrated usb sound card, volume control, headphones and mic with noise cancelling properties compatible with linux and zoom) . It will be really usefull if a Zoom soft developer build a client app for linux with ARMv8 architecture compatibility, but i recently read that after consulting them, they said the task is not a priority for them at this moment.
Comments are closed