Thermal testing Raspberry Pi 4
Raspberry Pi 4 just got a lot cooler! The last four months of firmware updates have taken over half a watt out of idle power and nearly a watt out of fully loaded power. For The MagPi magazine, Gareth Halfacree gets testing.
![]()
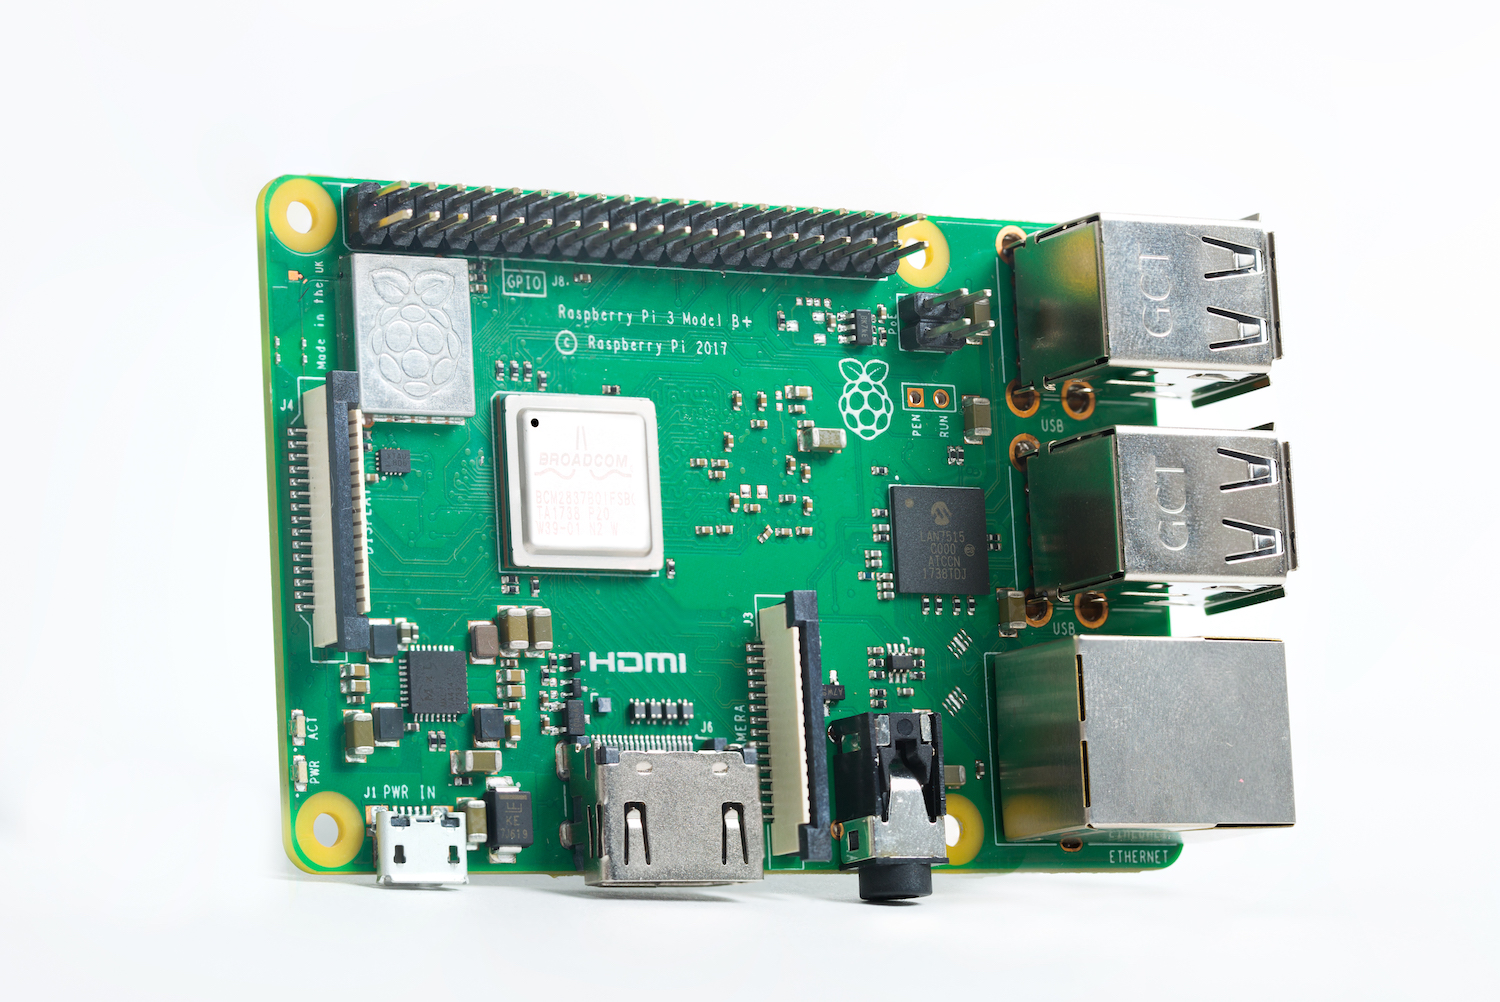
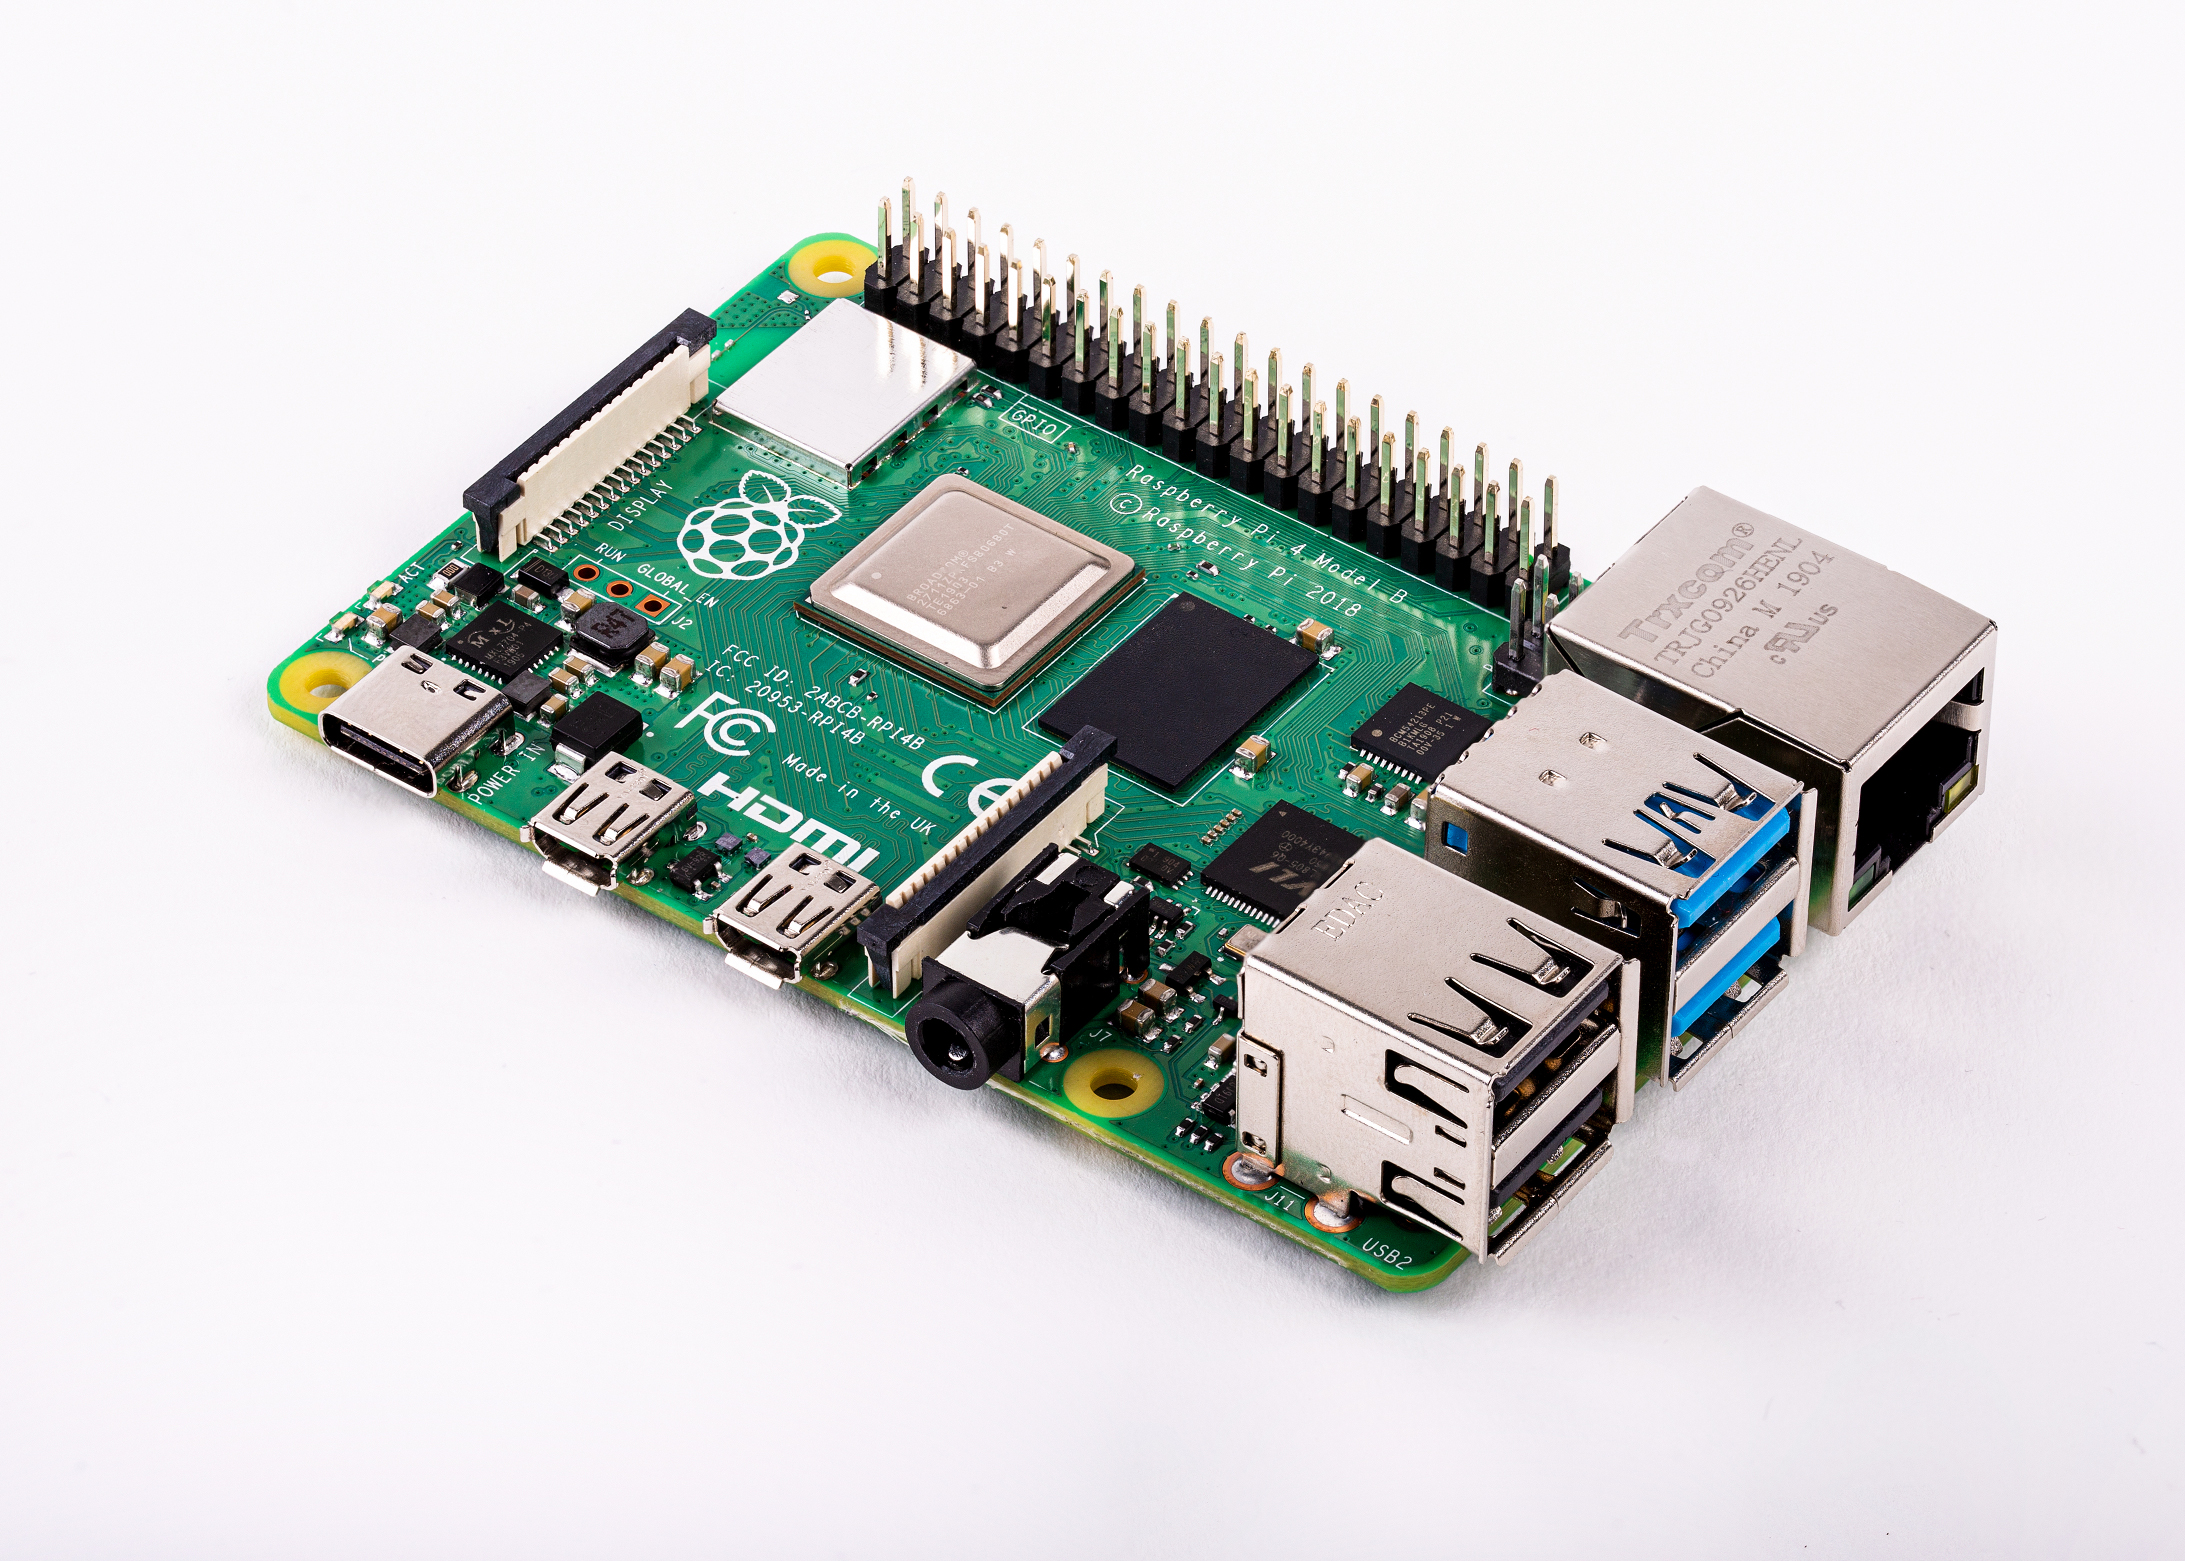
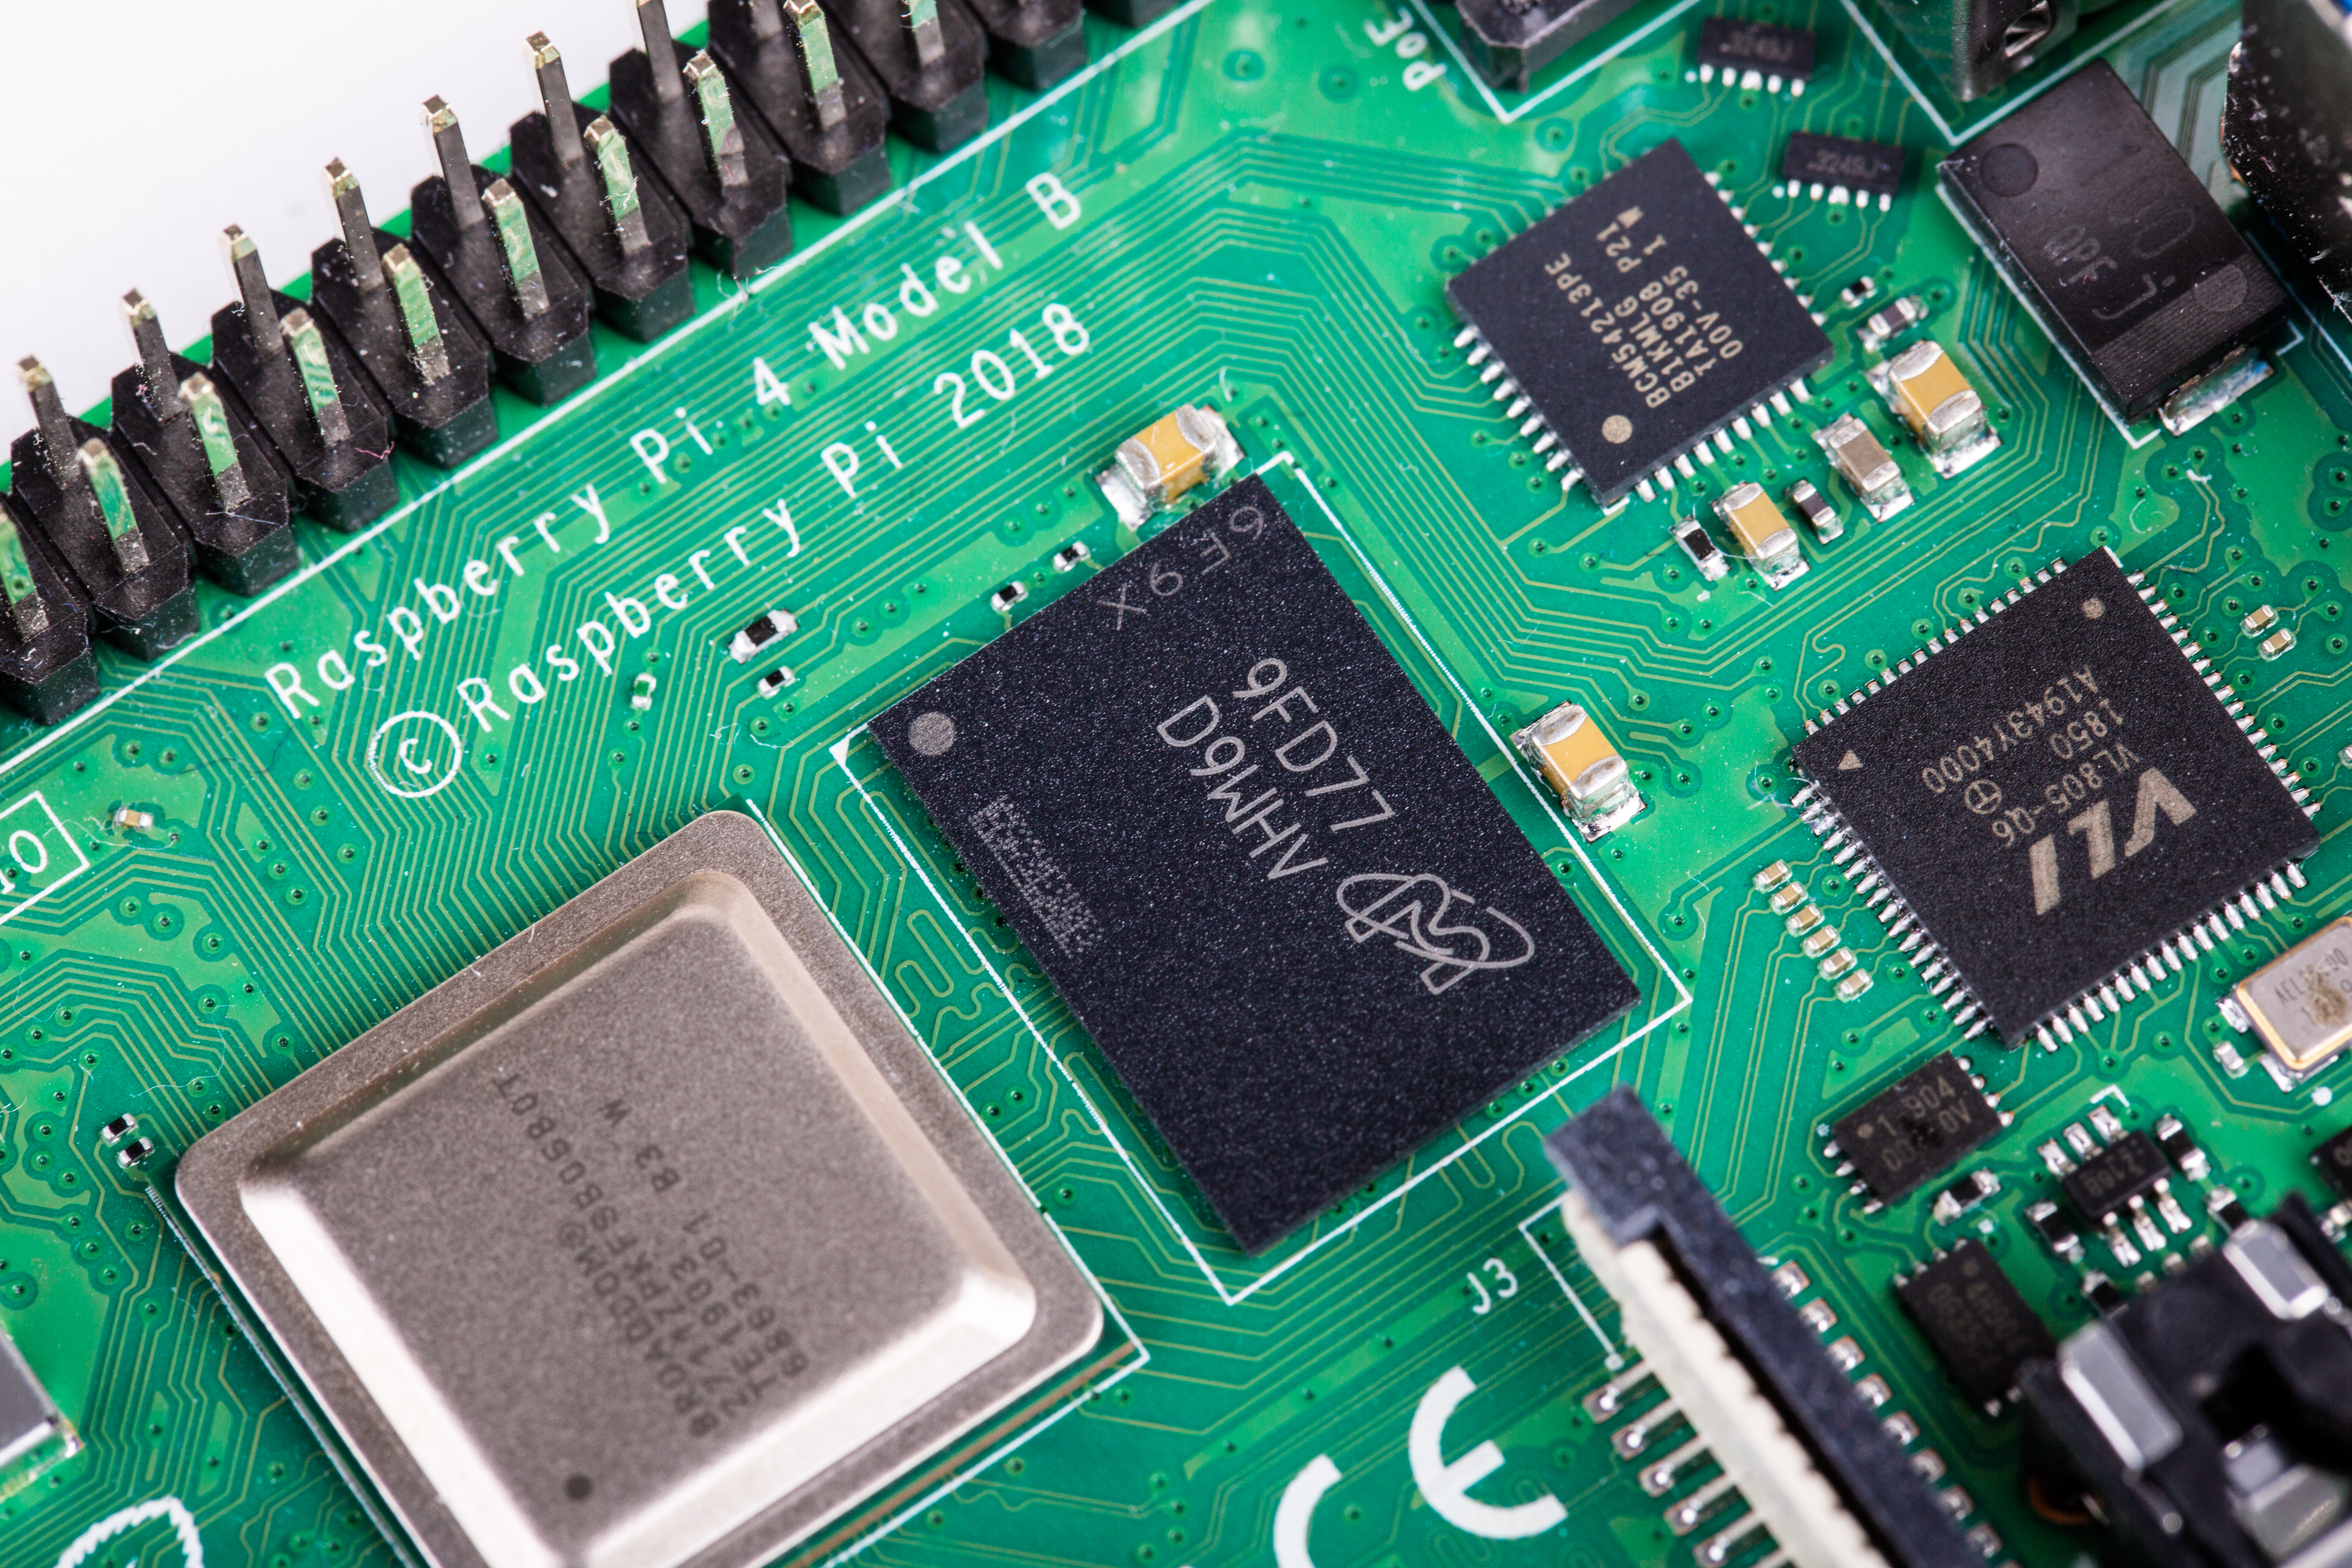
Raspberry Pi 4 Model B
Raspberry Pi 4 launched with a wealth of new features to tempt users into upgrading: a more powerful CPU and GPU, more memory, Gigabit Ethernet, and USB 3.0 support. More processing power means more electrical power, and Raspberry Pi 4 is the most power-hungry member of the family.
The launch of a new Raspberry Pi model is only the beginning of the story. Development is continuous, with new software and firmware improving each board long after it has rolled off the factory floor.
Raspberry Pi 4 updates
Raspberry Pi 4 is no exception: since launch, there has been a series of updates which have reduced its power needs and, in doing so, enabled it to run considerably cooler. These updates apply to any Raspberry Pi 4, whether you picked one up on launch day or are only just now making a purchase.
This feature takes a look at how each successive firmware release has improved Raspberry Pi 4, using a synthetic workload designed – unlike a real-world task – to make the system-on-chip (SoC) get as hot as possible in as short a time as possible.
Read on to see what wonders a simple firmware update can work.
How we tested Raspberry Pi 4 firmware revisions
To test how well each firmware revision handles the heat, a power-hungry synthetic workload was devised to represent a worst-case scenario: the stress-ng CPU stress-testing utility places all four CPU cores under heavy and continuous load. Meanwhile, the glxgears tool exercises the GPU. Both tools can be installed by typing the following at the Terminal:
sudo apt install stress-ng mesa-utils
The CPU workload can be run with the following command:
stress-ng --cpu 0 --cpu-method fft
The command will run for a full day at default settings; to cancel, press CTRL+C on the keyboard.
To run the GPU workload, type:
glxgears -fullscreen
This will display a 3D animation of moving gears, filling the entire screen. To close it, press ALT+F4 on the keyboard.
For more information on how both tools work, type:
man stress-ng
man glxgears
During the testing for this feature, both of the above workloads are run simultaneously for ten minutes. Afterwards, Raspberry Pi is allowed to cool for five minutes.
The thermal imagery was taken at idle, then again after 60 seconds of the stress-ng load alone.
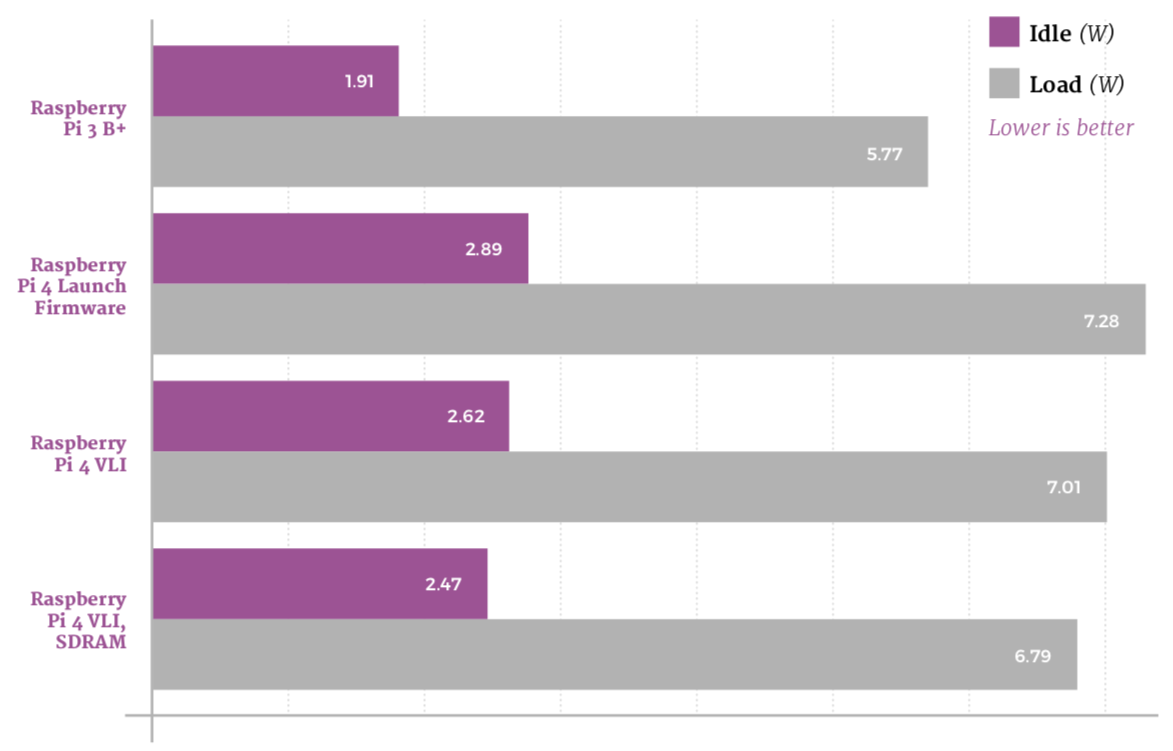
Baseline test: Raspberry Pi 3B+
Already well established, Raspberry Pi 3 Model B+ was the device to beat
Before Raspberry Pi 4 came on the scene, Raspberry Pi 3 Model B+ was the must-have single-board computer. Benefiting from all the work that had gone into the earlier Raspberry Pi 3 Model B alongside improved hardware, Raspberry Pi 3B+ was – and still is – a popular device. Let’s see how well it performs before testing Raspberry Pi 4.
Power draw
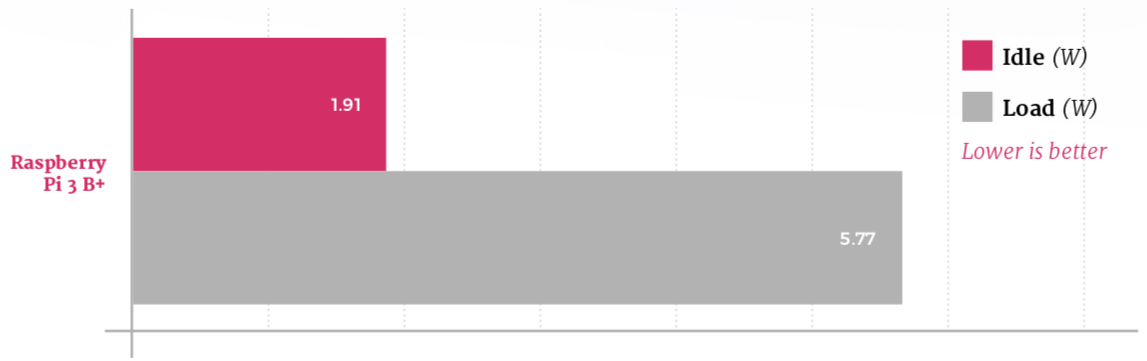
An efficient processor and an improved design for the power circuitry compared to its predecessor help keep Raspberry Pi 3B+ power draw down: at idle, the board draws just 1.91W; when running the synthetic workload, that increases to 5.77W.
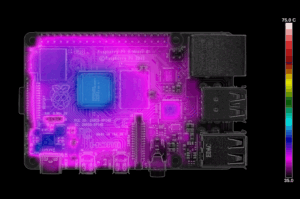
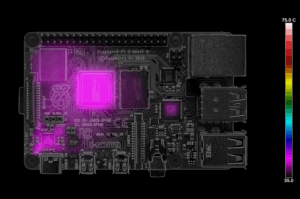
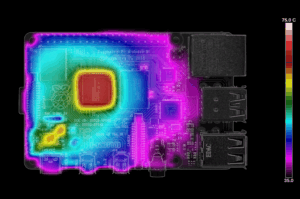
Thermal imaging
-
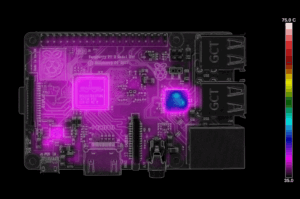
- Raspberry Pi 3B+ heat distribution (idle)
-
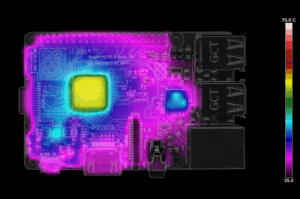
- Raspberry Pi 3B+ heat distribution (load)
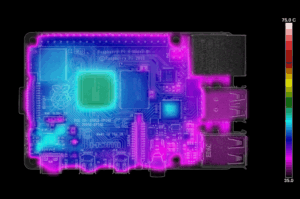
A thermal camera shows where the power goes. At idle, the system-on-chip is relatively cool while the combined USB and Ethernet controller to the middle-right is a noticeable hot spot; at load, measured after 60 seconds of a CPU-intensive synthetic workload, the SoC is by far the hottest component at 58.1°C.
Thermal throttling
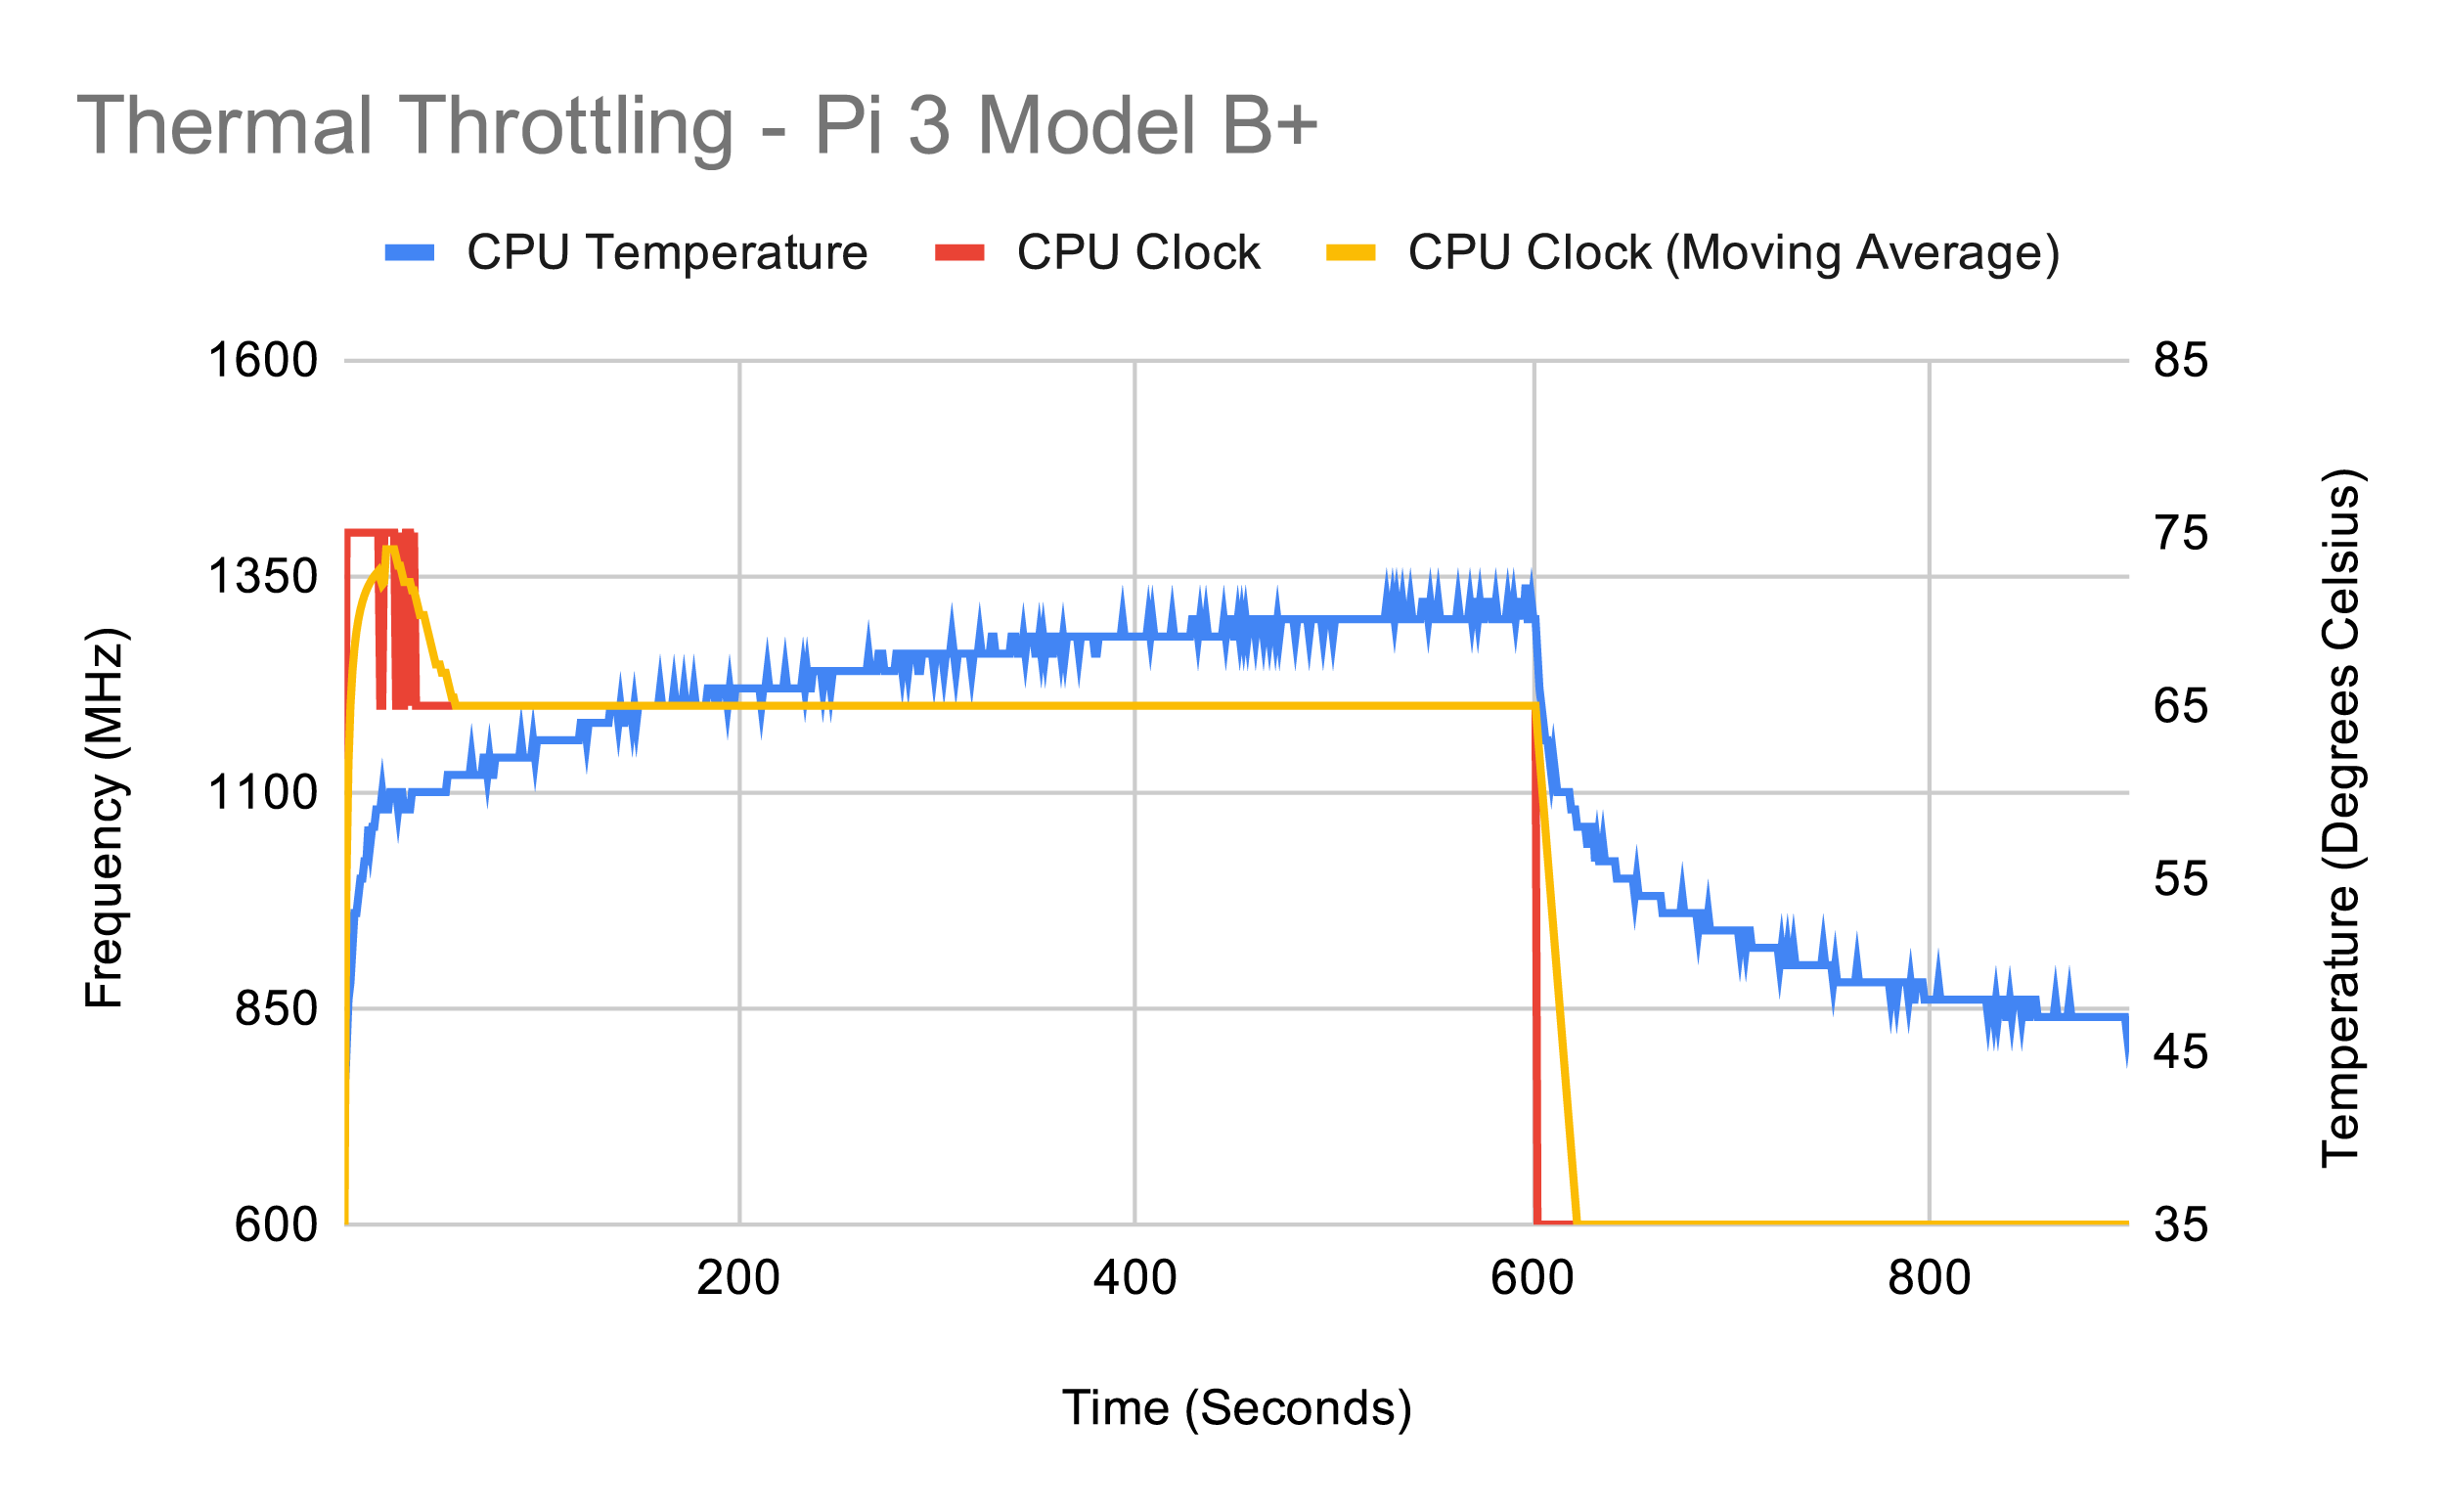
This chart measures Raspberry Pi 3B+ CPU speed and temperature during a ten-minute power-intensive synthetic workload. The test runs on both the CPU and GPU, and is followed by a five-minute cooldown. Raspberry Pi 3B+ quickly reaches the ‘soft throttle’ point of 60°C, designed to prevent the SoC hitting the hard-throttle maximum limit of 80°C, and the CPU remains throttled at 1.2GHz for the duration of the benchmark run.
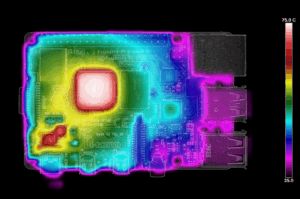
Raspberry Pi 4 Launch Firmware
The fastest Raspberry Pi ever made demanded the most power
Raspberry Pi 4 Model B launched with a range of improvements over Raspberry Pi 3B+, including a considerably more powerful CPU, a new GPU, up to four times the memory, and USB 3.0 ports. All that new hardware came at a cost: higher power draw and heat output. So let’s see how Raspberry Pi 4 performed at launch.
Power Draw
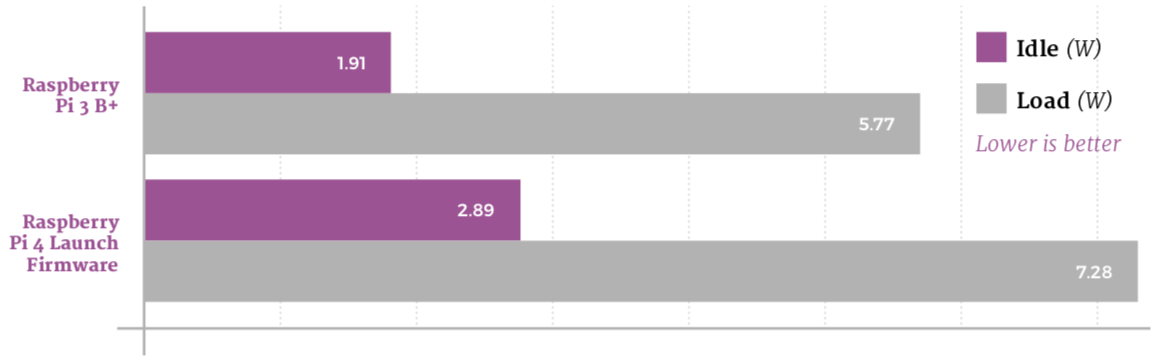
There’s no denying it, Raspberry Pi 4 was a hungry beast at launch. Even idling at the Raspbian desktop, the board draws 2.89W, hitting a peak of 7.28W under a worst-case synthetic CPU and GPU workload – a hefty increase over Raspberry Pi 3 B+.
Thermal Imaging
-
- Raspberry Pi 4 (idle)
-
- Raspberry Pi 4 (load)
Thermal imaging shows that Raspberry Pi 4, using the launch-day firmware, runs hot even at idle, with hot spots at the USB controller to the middle-right and power-management circuitry to the bottom-left. Under a heavy synthetic load, the SoC hits 72.1°C by the 60-second mark.
Thermal Throttling
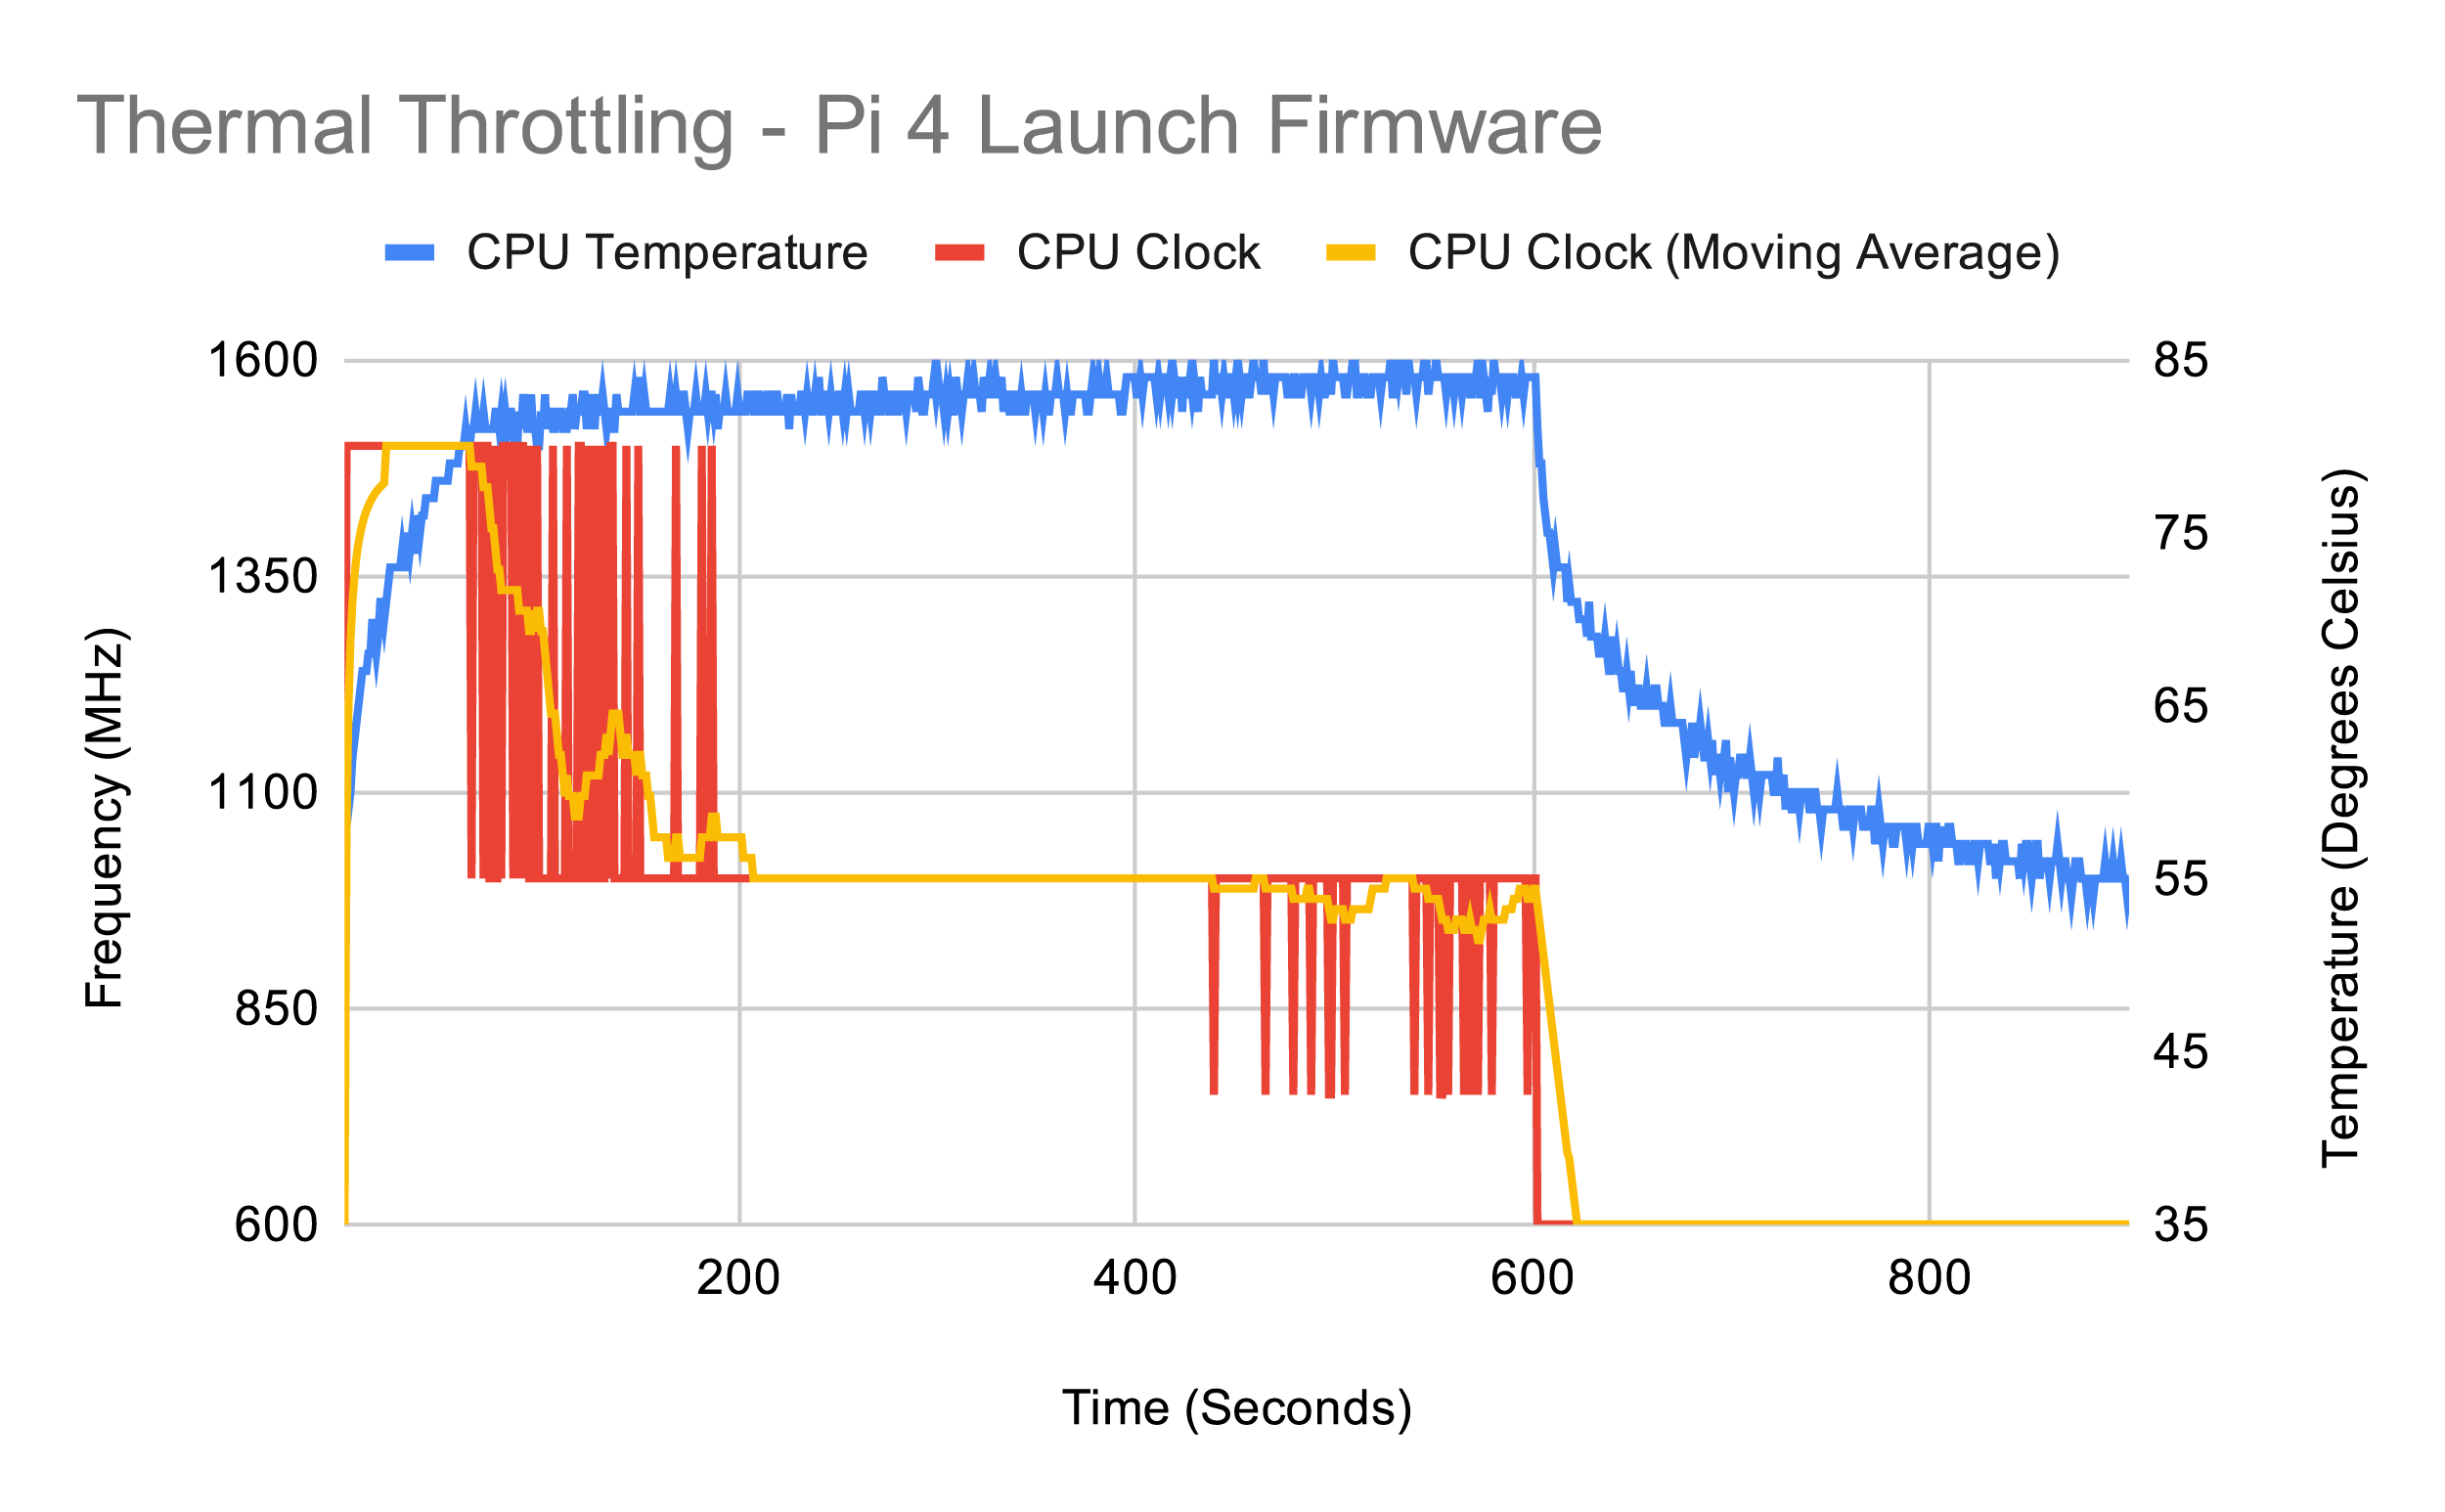
Raspberry Pi 4 manages to go longer than Raspberry Pi 3 B+ before the synthetic workload causes it to throttle; but throttle it does after just 65 seconds. As the workload runs, the CPU drops from 1.5GHz to a stable 1GHz, then dips as low as 750MHz towards the end.
Raspberry Pi 4 VLI Firmware
USB power management brings some relief for Raspberry Pi heat
The first major firmware update developed for Raspberry Pi 4 brought power management features to the Via Labs Inc. (VLI) USB controller. The VLI controller is responsible for handling the two USB 3.0 ports, and the firmware update allowed it to run cooler.
Power Draw
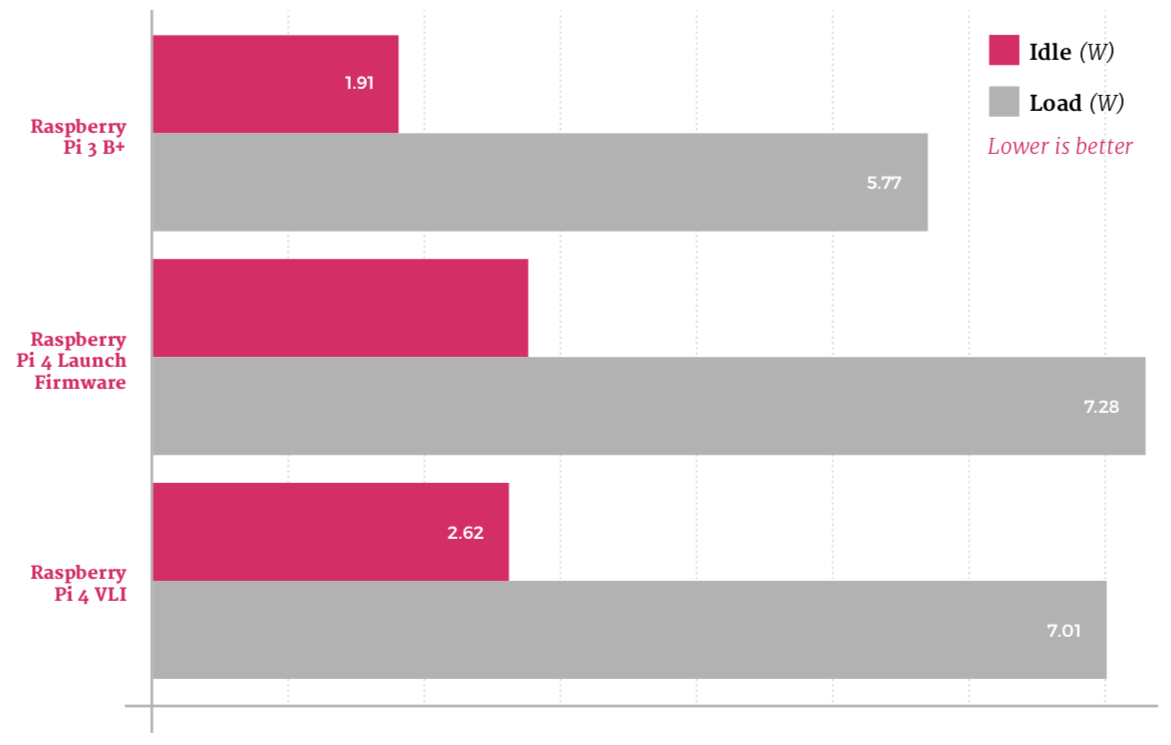
Even without anything connected to Raspberry Pi 4’s USB 3.0 ports, the VLI firmware upgrade has a noticeable impact: idle power draw has dropped to 2.62W, while the worst-case draw under a heavy synthetic workload sits at 7.01W.
Thermal Imaging
-
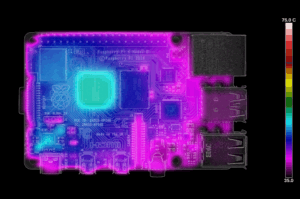
- Raspberry Pi 4 VLI firmware (idle)
-
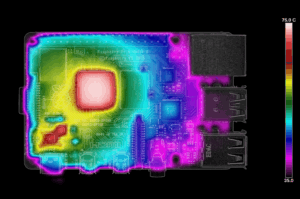
- Raspberry Pi 4 VLI firmware (load)
The biggest impact on heat is seen, unsurprisingly, on the VLI chip to the middle-right; the VLI firmware helps keep the SoC in the centre and the power-management circuitry at the bottom-left cooler than the launch firmware. The SoC reached 71.4°C under load – a small, but measurable, improvement.
Thermal Throttling
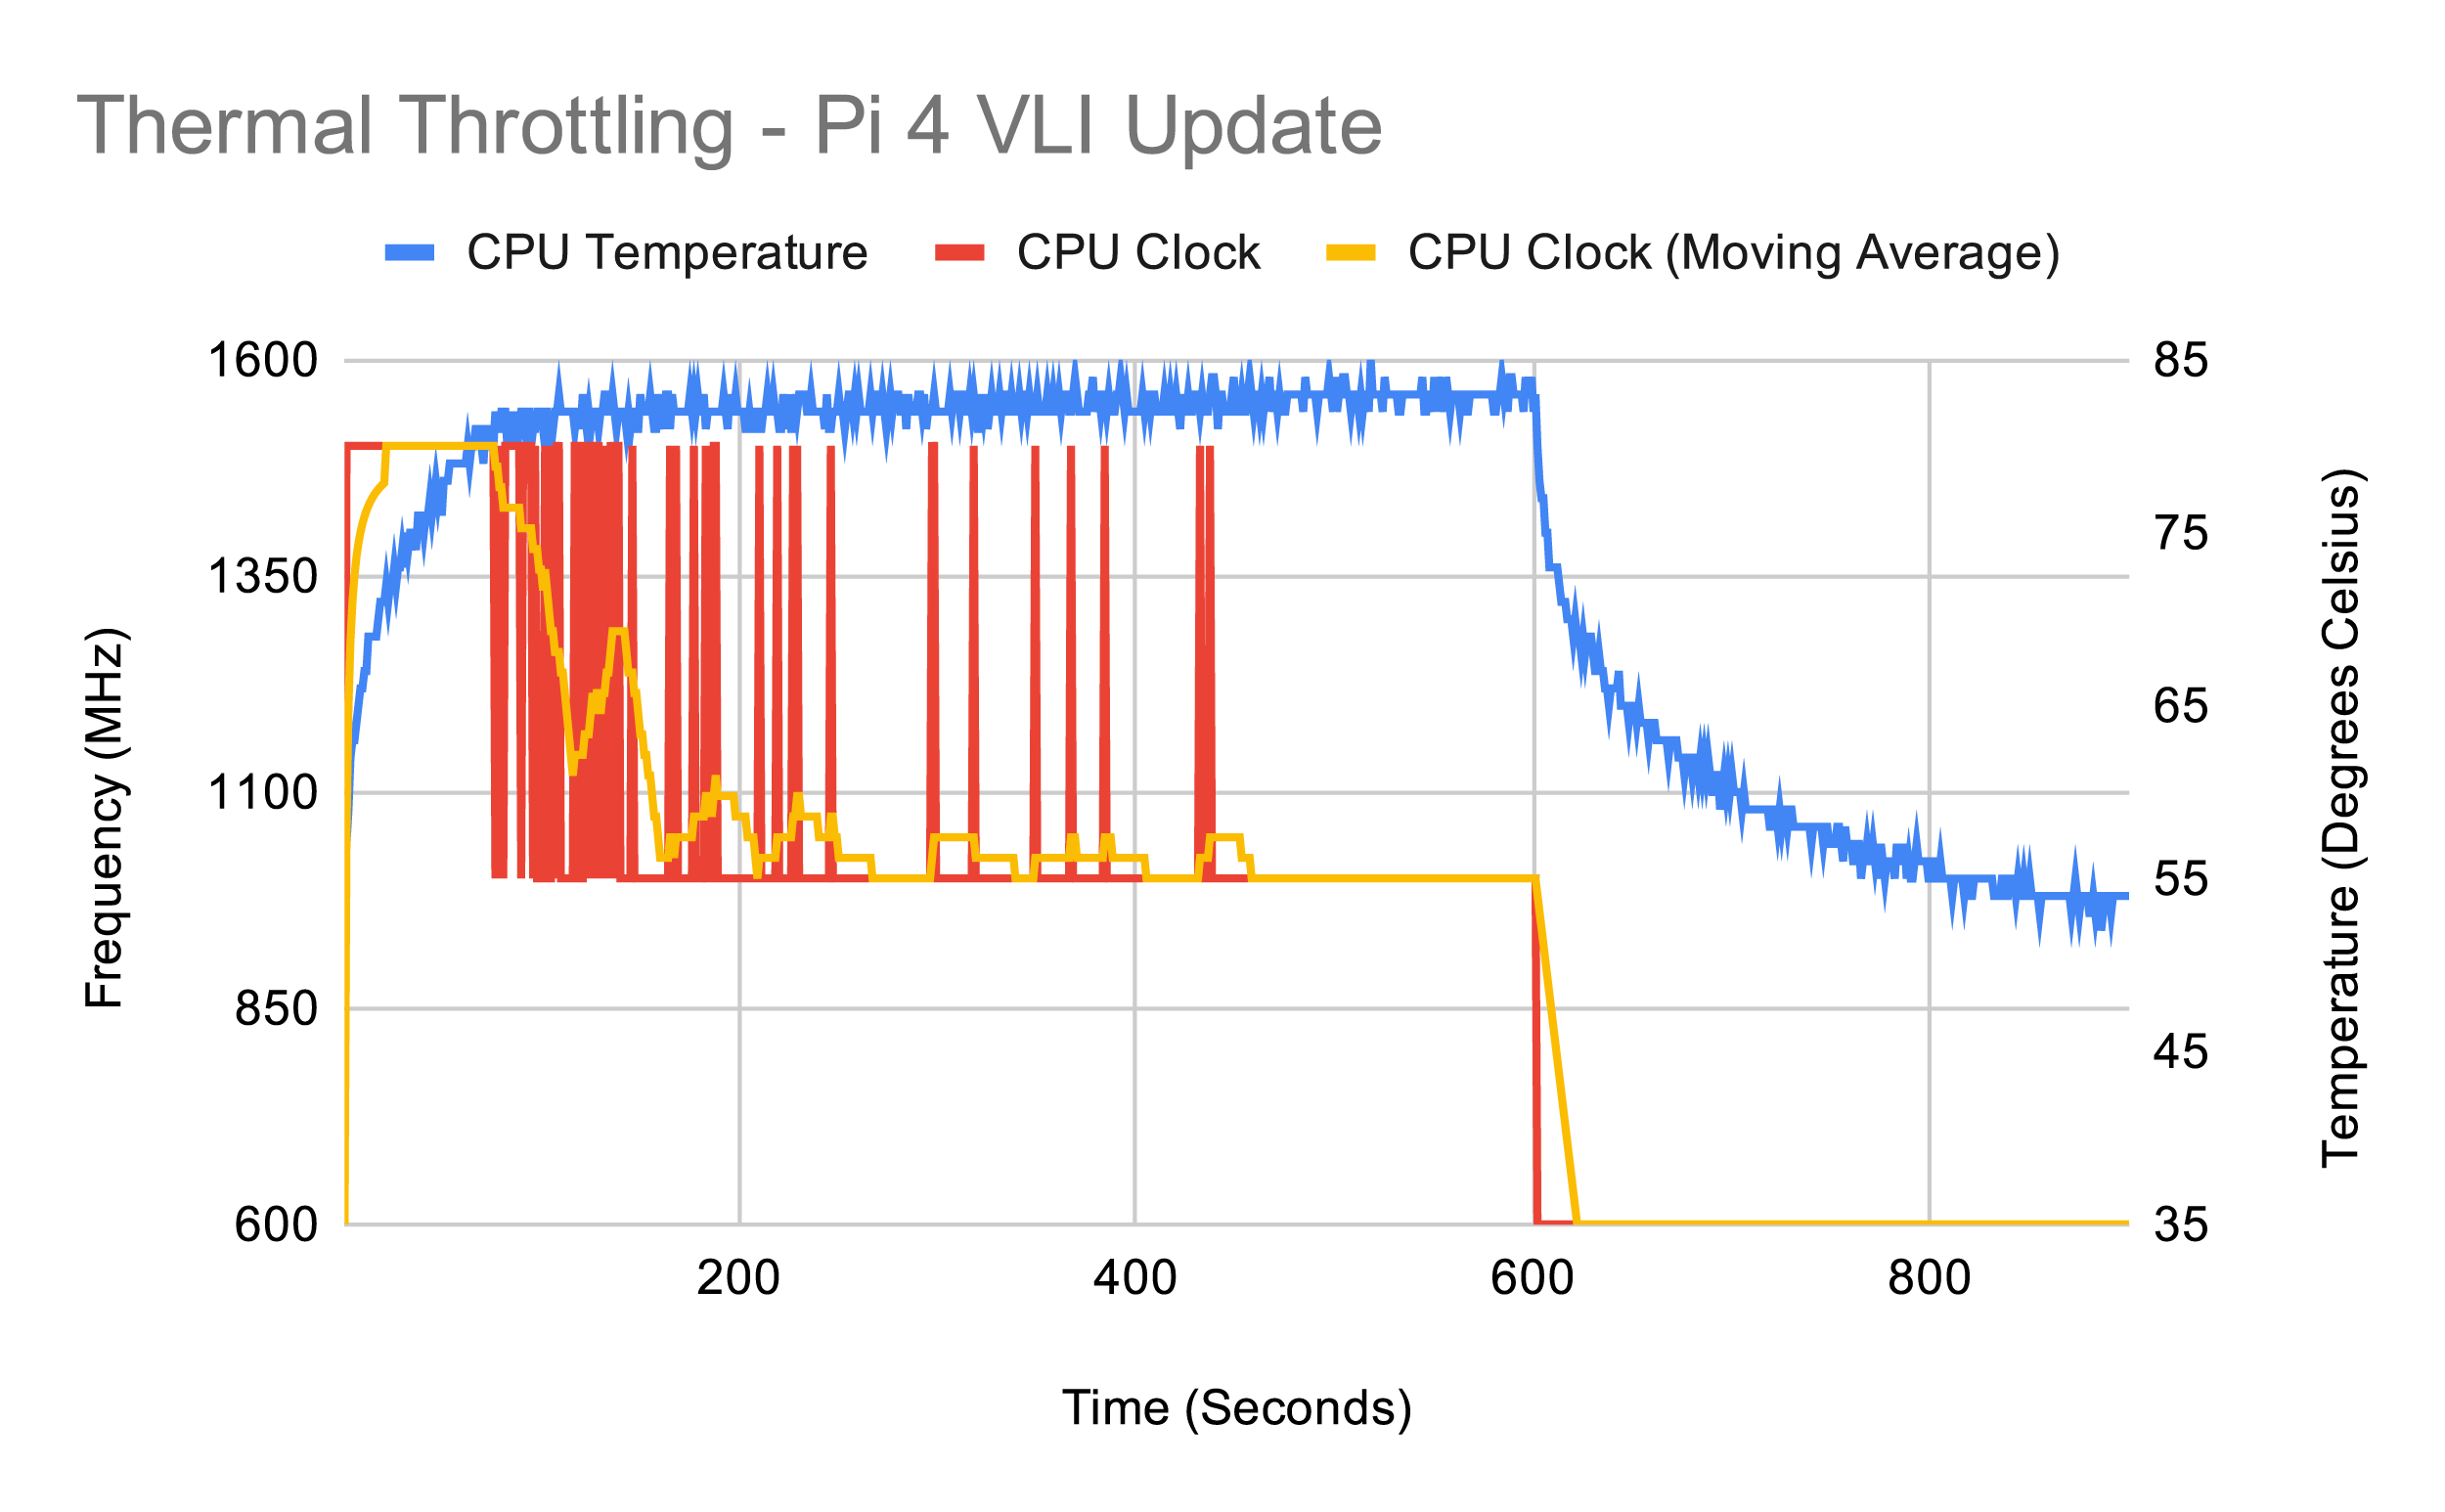
Enabling power management on the VLI chip has a dramatic impact on performance in the worst-case synthetic workload: the throttle point is pushed back to 77 seconds, the CPU spends more time at its full 1.5GHz speed, and it doesn’t drop to 750MHz at all. The SoC also cools marginally more rapidly at the end of the test.
Raspberry Pi 4 VLI, SDRAM firmware
With VLI tamed, it’s the memory’s turn now
The next firmware update, designed to be used alongside the VLI power management features, changes how Raspberry Pi 4’s memory – LPDDR4 SDRAM – operates. While having no impact on performance, it helps to push the power draw down still further at both idle and load.
Power Draw
As with the VLI update, the SDRAM update brings a welcome drop in power draw at both idle and load. Raspberry Pi 4 now draws 2.47W at idle and 6.79W running a worst-case synthetic load – a real improvement from the 7.28W at launch.
Thermal Imaging
-
- Raspberry Pi 4 VLI, SDRAM (idle)
-
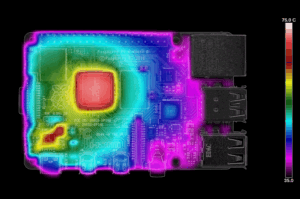
- Raspberry Pi 4 VLI, SDRAM (load)
Thermal imaging shows the biggest improvement yet, with both the SoC and the power-management circuitry running considerably cooler at idle after the installation of this update. After 60 seconds of load, the SoC is noticeably cooler at 68.8°C – a drop of nearly 3°C over the VLI firmware alone.
Thermal Throttling
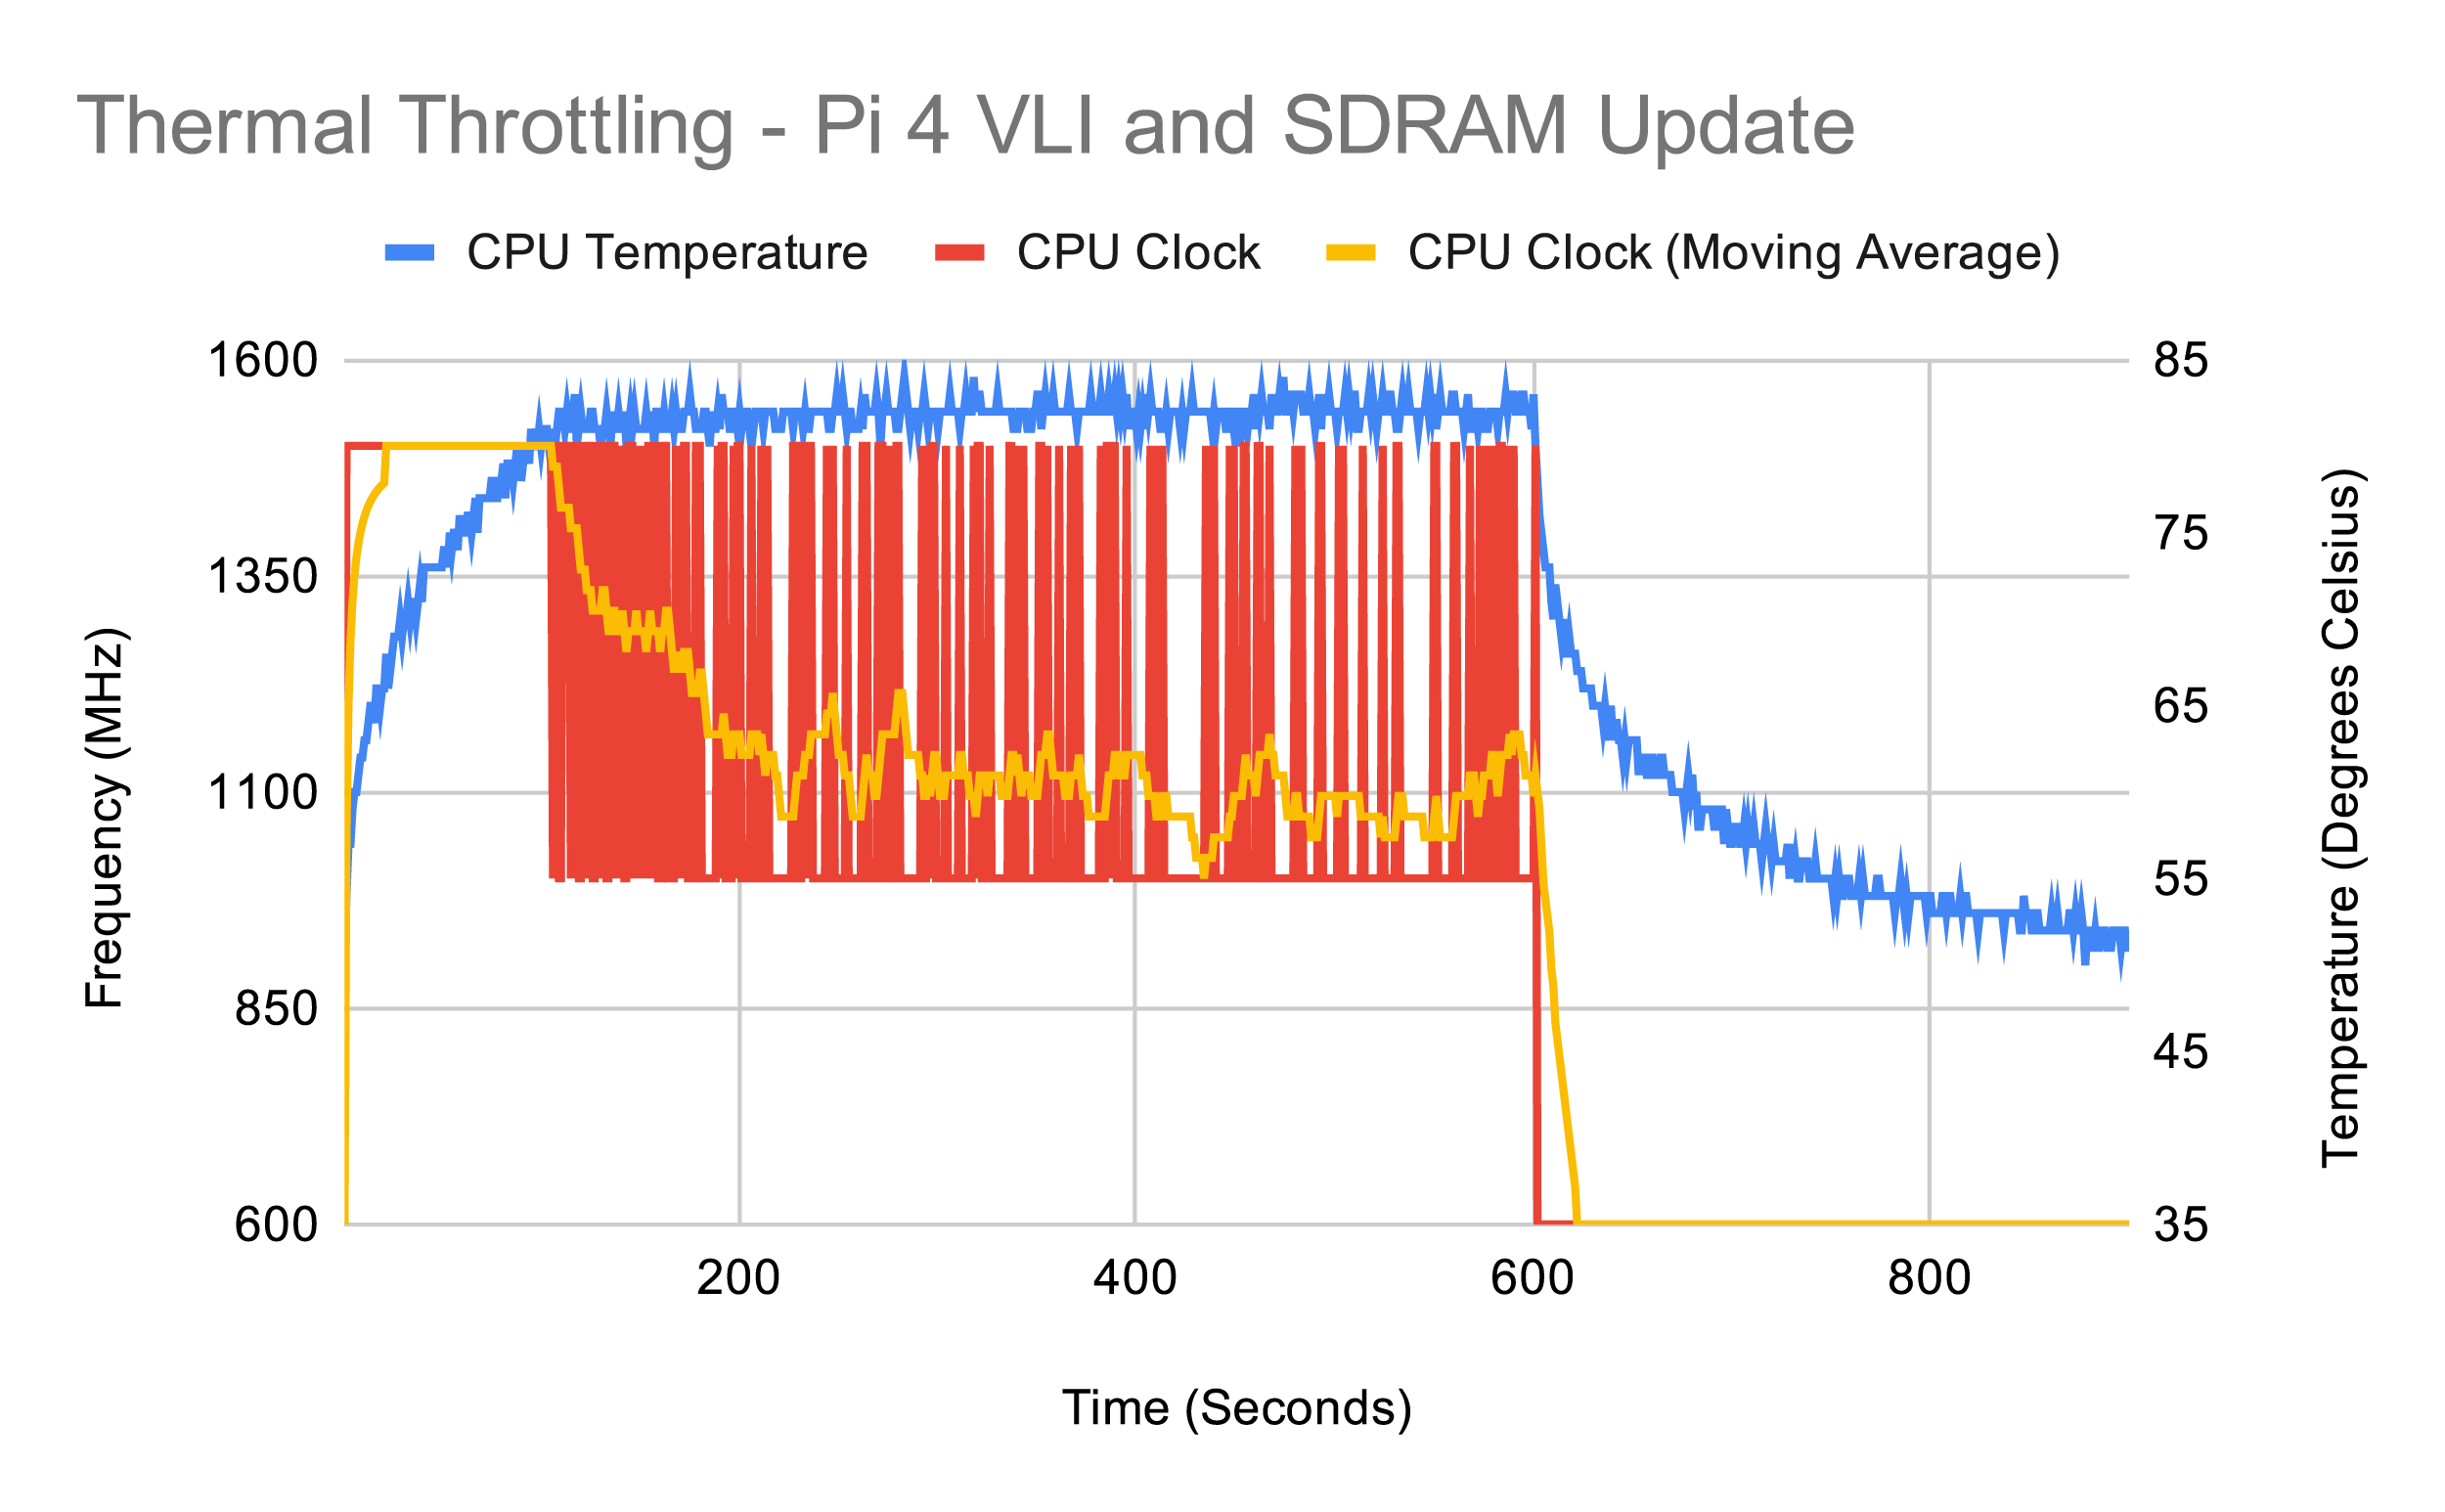
A cooler SoC means better performance: the throttle point under the worst-case synthetic workload is pushed back to 109 seconds, after which Raspberry Pi 4 continues to bounce between full 1.5GHz and throttled 1GHz speeds for the entire ten-minute benchmark run – bringing the average speed up considerably.
Raspberry Pi 4 VLI, SDRAM, Clocking, and Load-Step Firmware
September 2019’s firmware update includes several changes, while bringing with it the VLI power management and SDRAM firmware updates. The biggest change is how the BCM2711B0 SoC on Raspberry Pi 4 increases and decreases its clock-speed in response to demand and temperature.
Power Draw
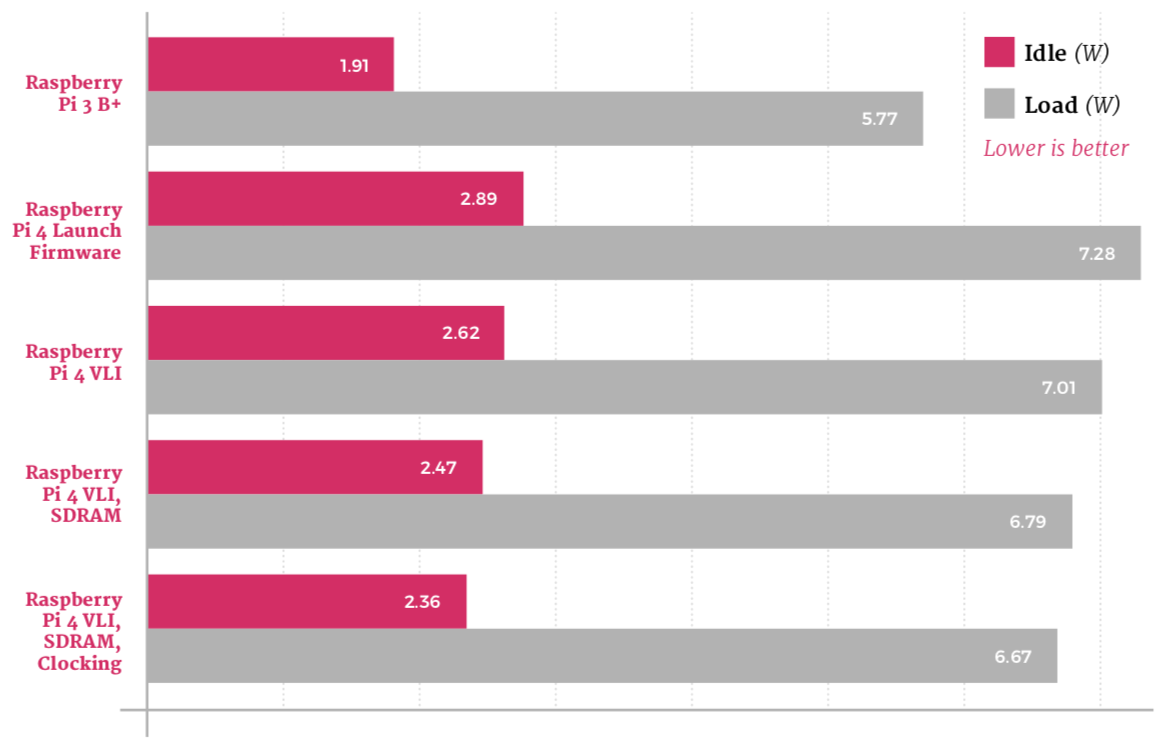
The September firmware update has incremental improvements: idle power draw is down to 2.36W and load under the worst-case synthetic workload to a peak of 6.67W, all without any reduction in raw performance or loss of functionality.
Thermal Imaging
-

- Raspberry Pi 4 VLI, SDRAM, Clocking (idle)
-
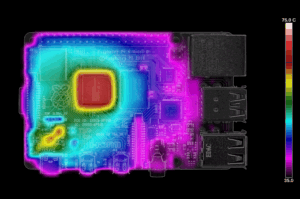
- Raspberry Pi 4 VLI, SDRAM, Clocking (load)
Improved processor clocking brings a noticeable drop in idle temperature throughout the circuit board. At load, everything’s improved – the SoC peaked at 65°C after 60 seconds of the synthetic workload, while both the VLI chip and the power-management circuitry are clearly cooler than under previous firmwares.
Thermal Throttling
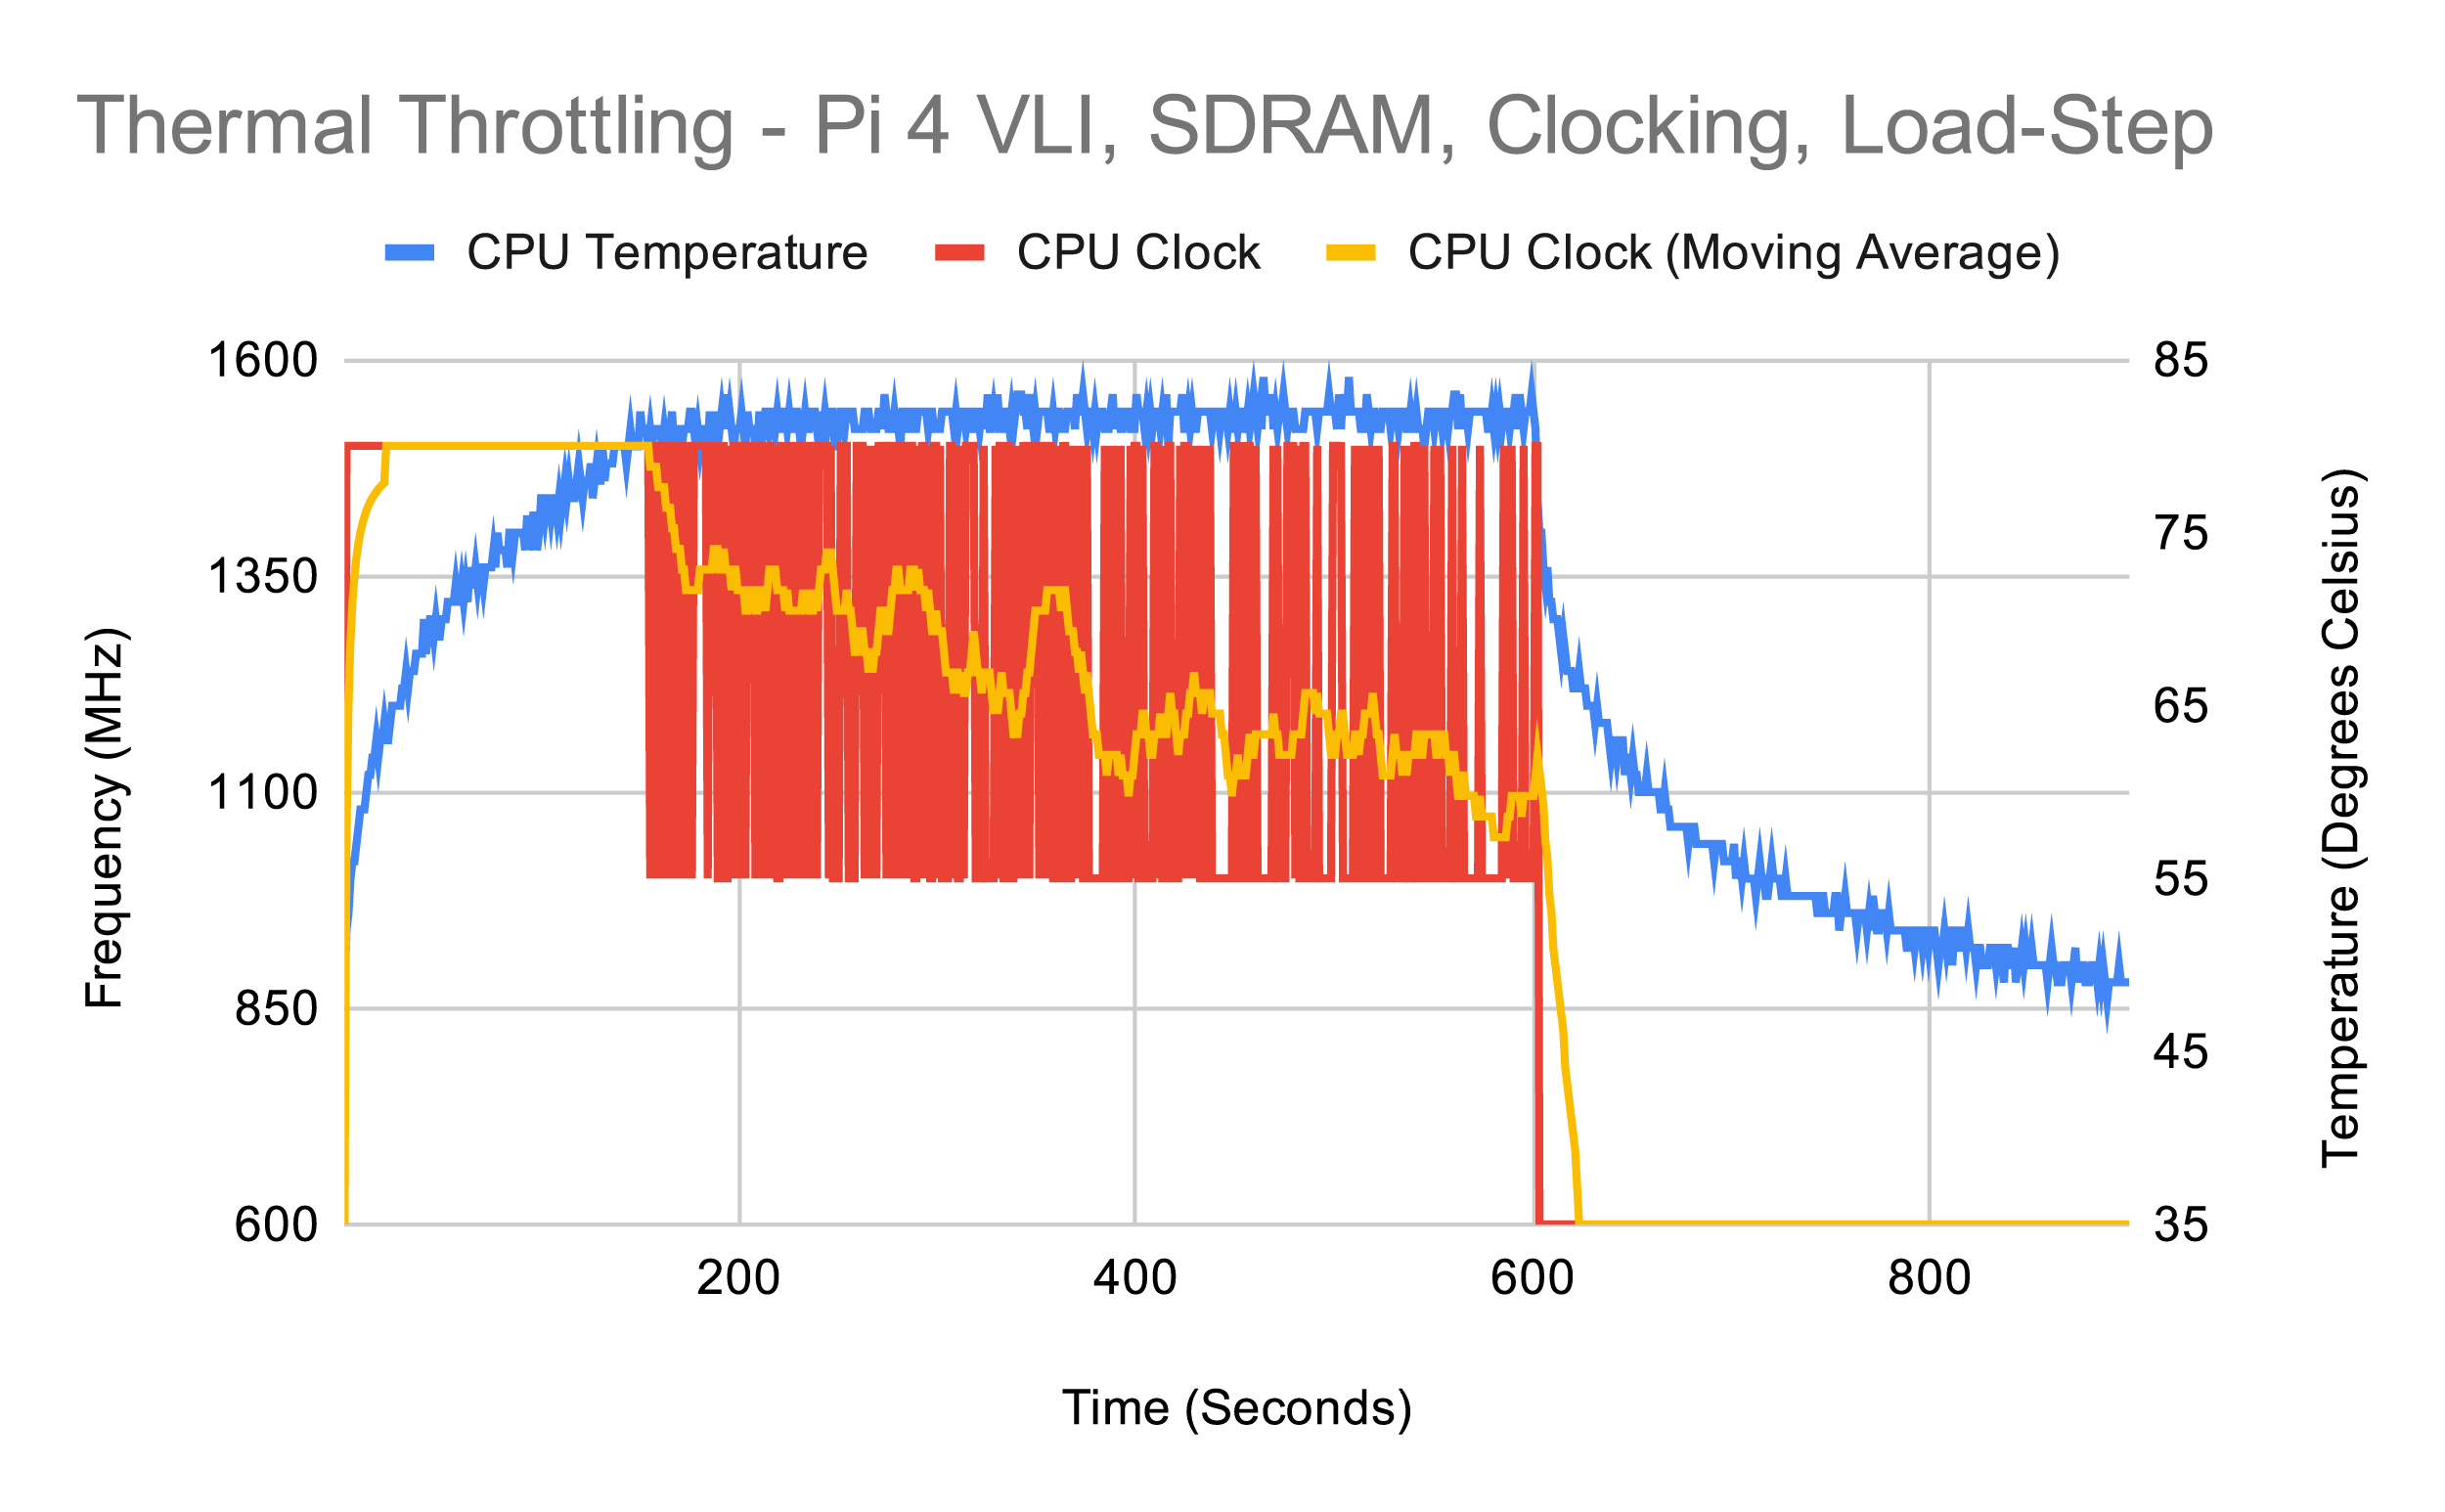
With this firmware, Raspberry Pi 4’s throttle point under the worst-case synthetic workload is pushed back all the way to 155 seconds – more than double the time the launch-day firmware took to hit the same point. The overall average speed is also brought up, thanks to more aggressive clocking back up to 1.5GHz.
Raspberry Pi 4 Beta Firmware
Currently in testing, this beta release is cutting-edge
Nobody at Raspberry Pi is resting on their laurels. Beta firmware is in testing and due for public release soon. It brings with it many improvements, including finer-grained control over SoC operating voltages and optimised clocking for the HDMI video state machines.
To upgrade your Raspberry Pi to the latest firmware, open a Terminal window and enter:
sudo apt update
sudo apt full-upgrade
Now restart Raspberry Pi using:
sudo shutdown - r now
Power Draw
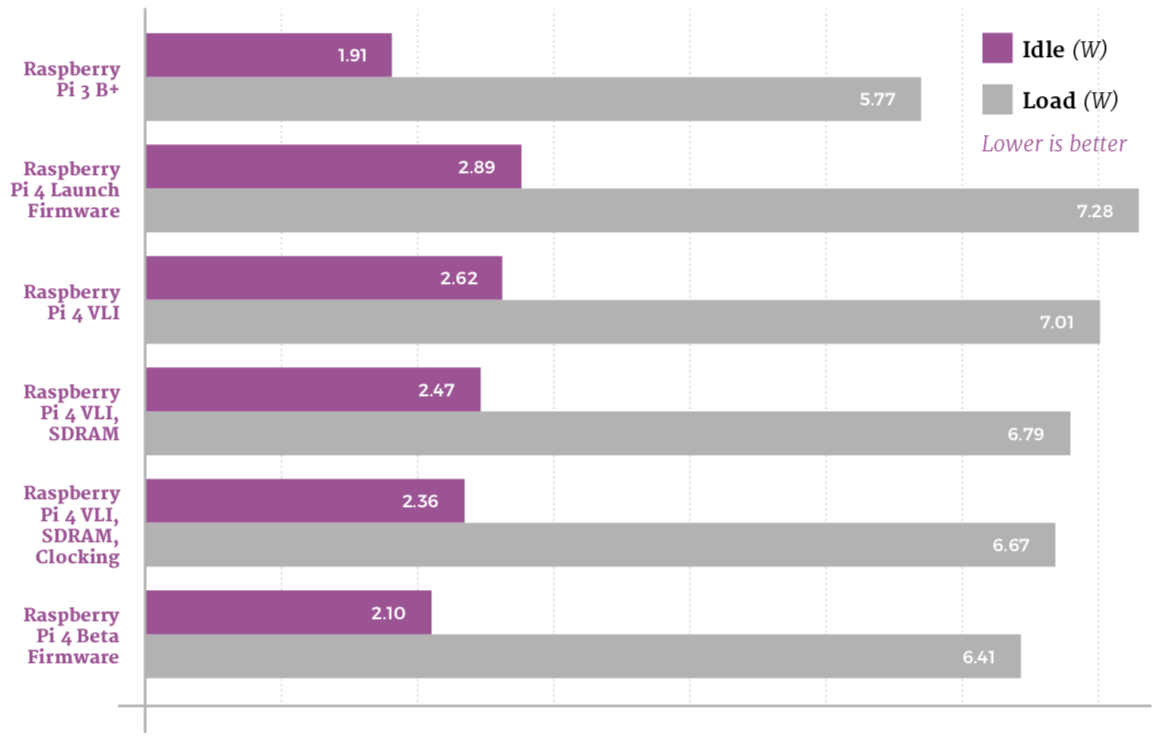
The beta firmware decreases power draw at idle to reduce overall power usage, while tweaking the voltage of the SoC to drop power draw at load without harming performance. The result: a drop to 2.1W idle, and 6.41W at load – the best yet.
Thermal Imaging
-
- Raspberry Pi 4 beta (idle)
-
- Raspberry Pi 4 beta (load)
The improvements made at idle are clear to see on thermal imaging: the majority of Raspberry Pi 4’s circuit board is below the bottom 35°C measurement point for the first time. After 60 seconds of load, there’s a smaller but still measurable improvement, with a peak measured temperature of 64.8°C.
Thermal Throttling
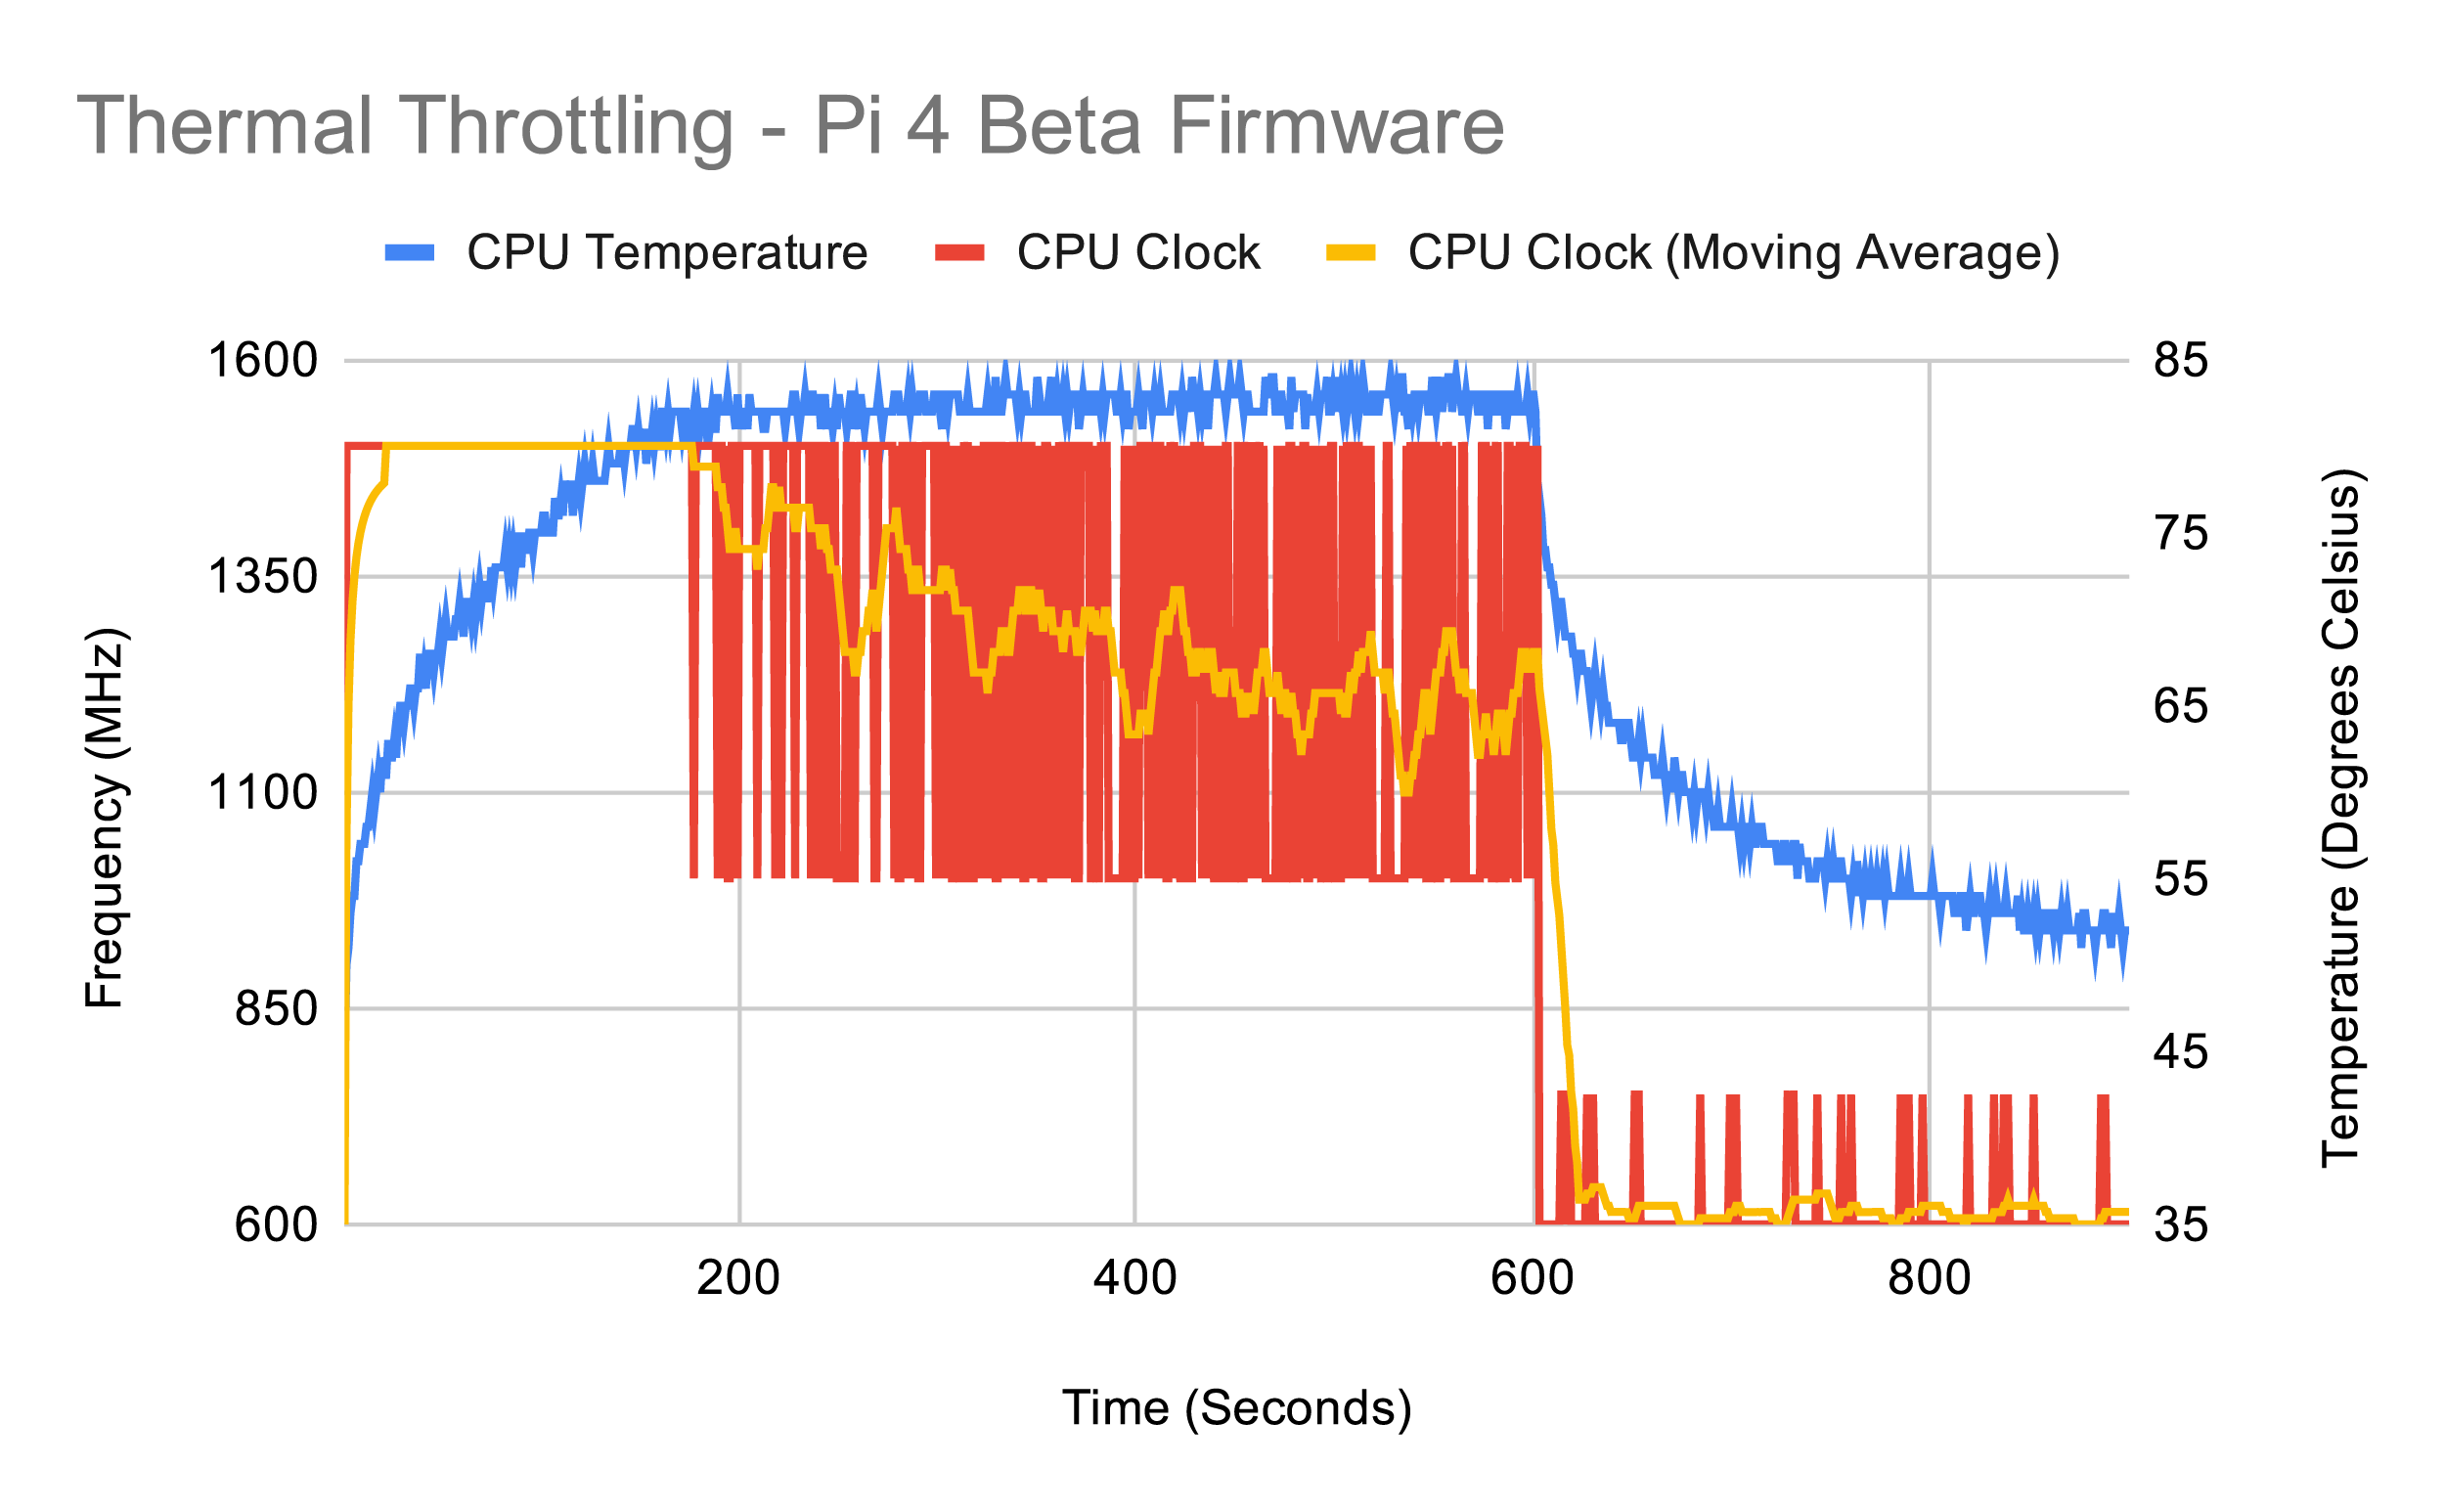
While Raspberry Pi 4 does still throttle with the beta firmware, thanks to the heavy demands of the synthetic workload used for testing, it delivers the best results yet: throttling occurs at the 177s mark while the new clocking controls bring the average clock speed up markedly. The firmware also allows Raspberry Pi 4 to up-clock more at idle, improving the performance of background tasks.
Keep cool with Raspberry Pi 4 orientation
Firmware upgrades offer great gains, but what about putting Raspberry Pi on its side?
While running the latest firmware will result in considerable power draw and heat management improvements, there’s a trick to unlock even greater gains: adjusting the orientation of Raspberry Pi. For this test, Raspberry Pi 4 with the beta firmware installed was stood upright with the GPIO header at the bottom and the power and HDMI ports at the top.
Thermal Throttling
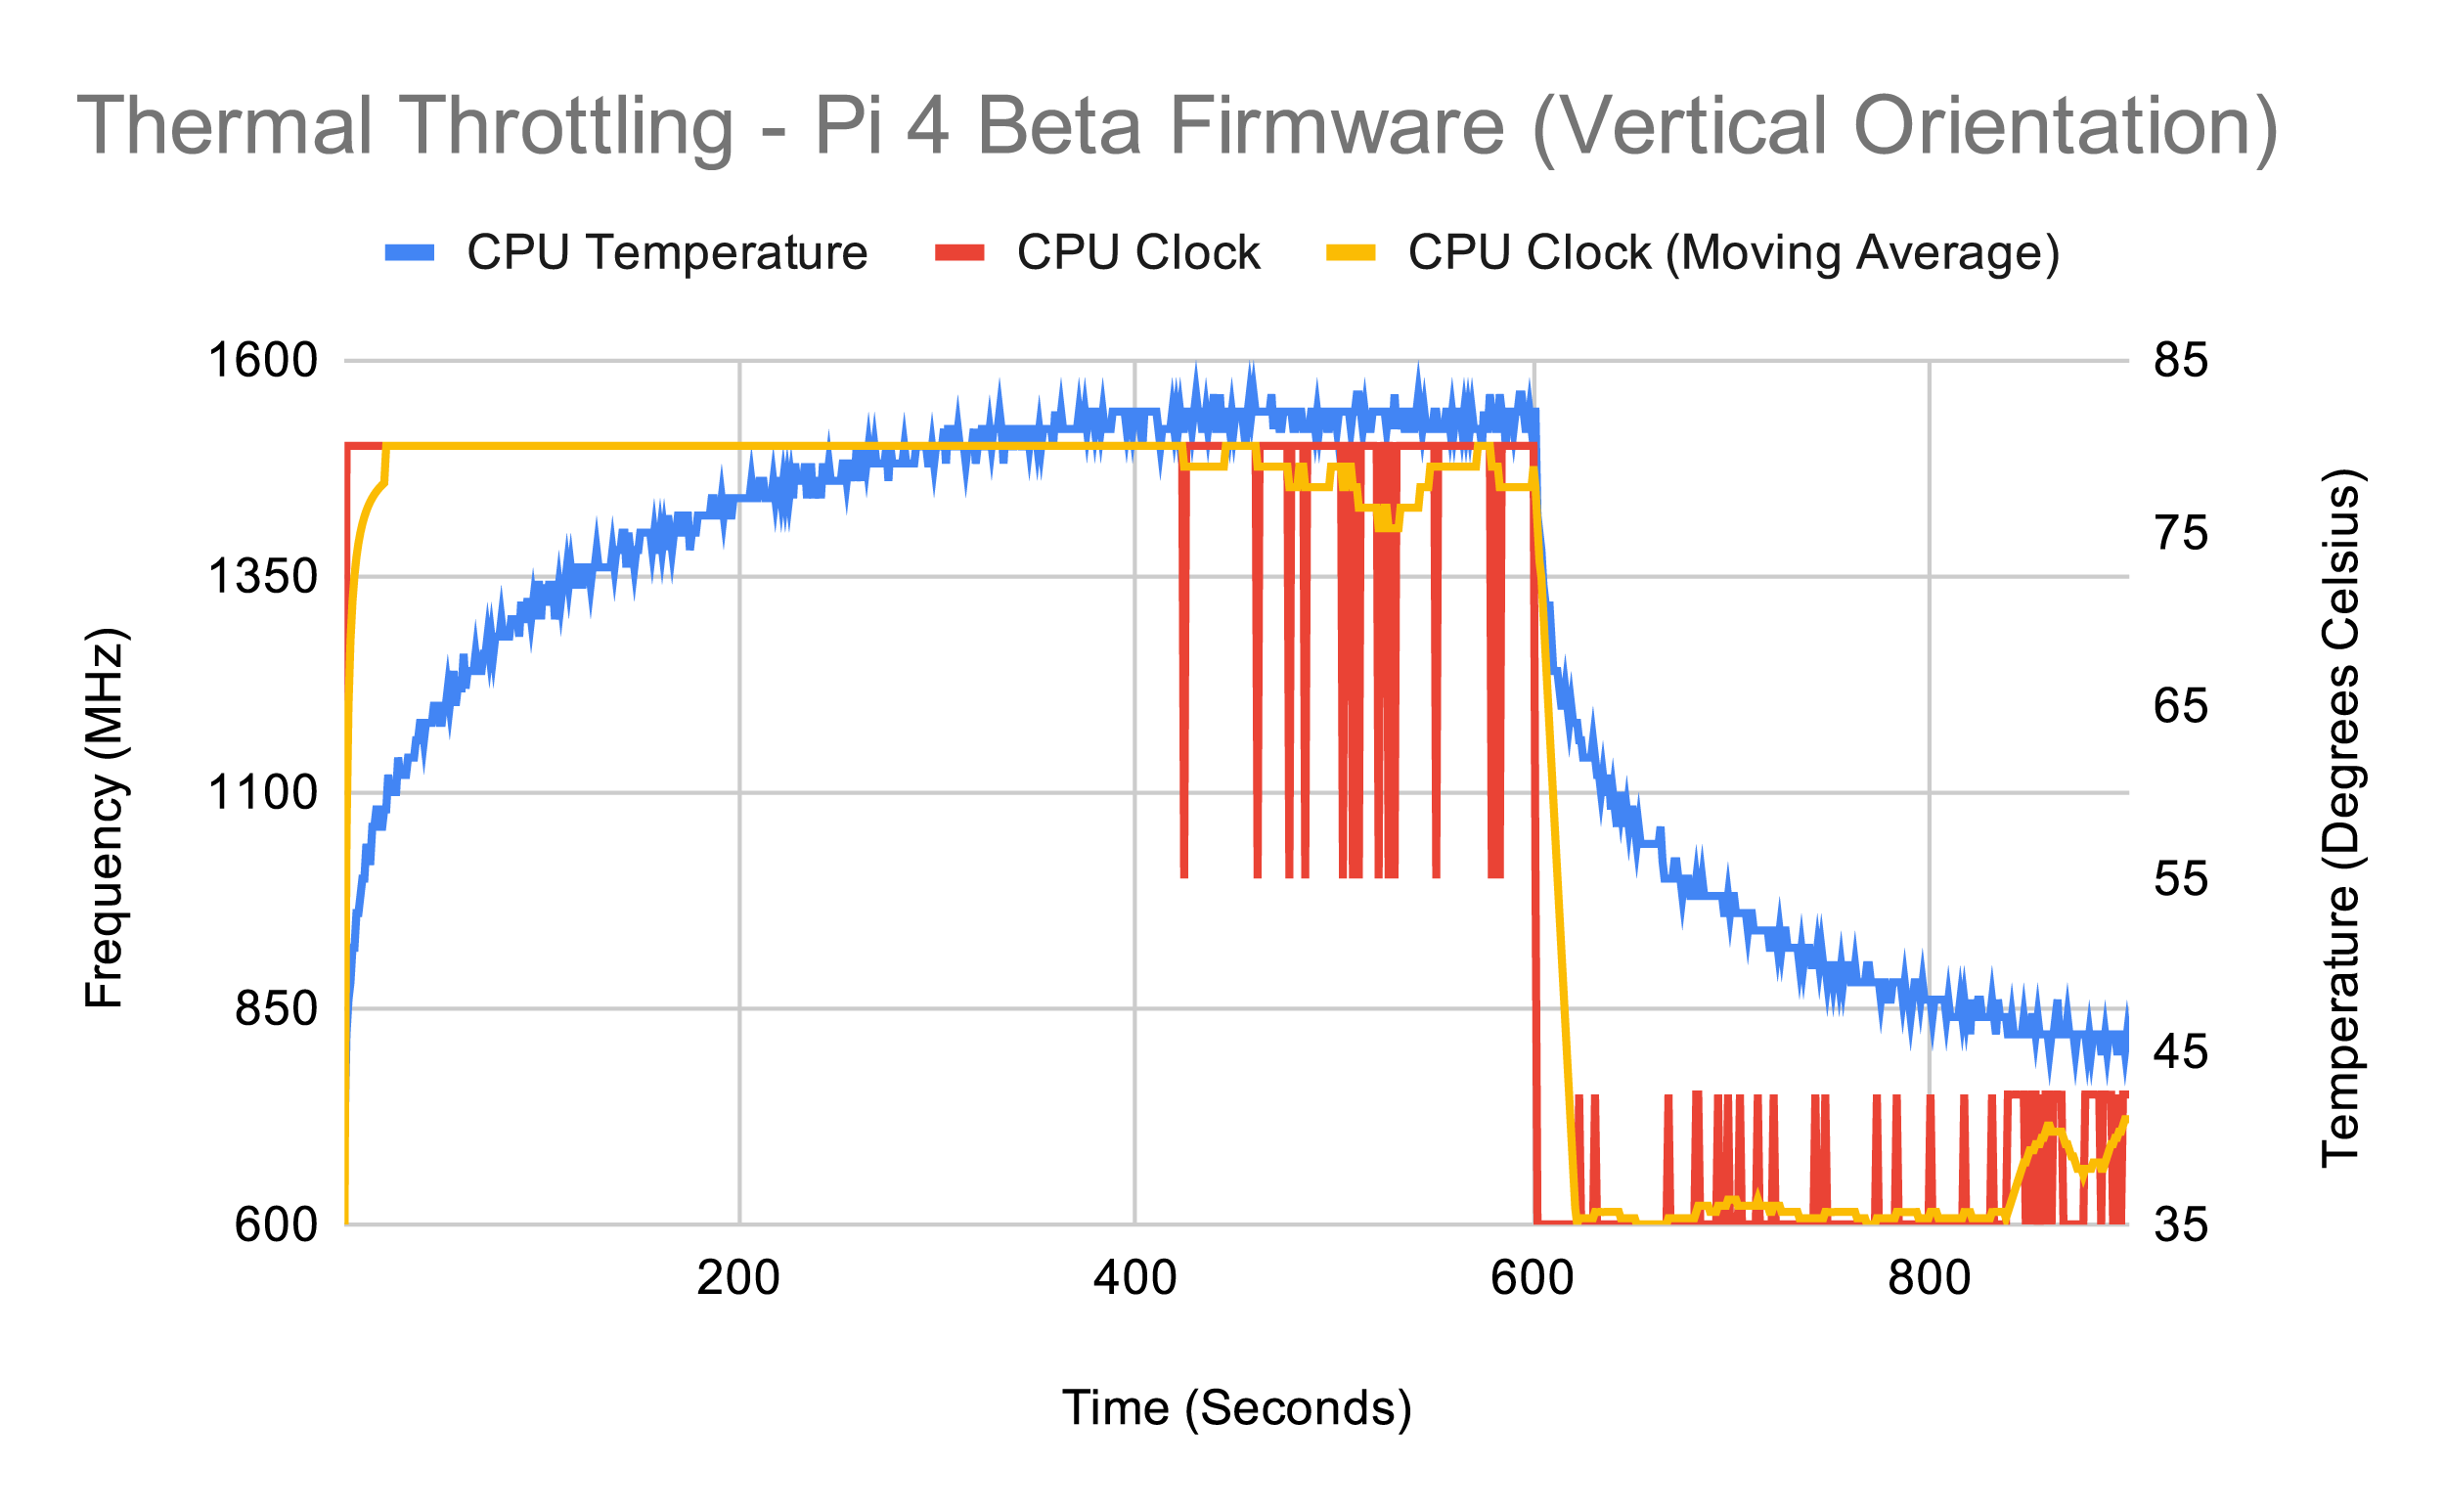
Simply moving Raspberry Pi 4 into a vertical orientation has an immediate impact: the SoC idles around 2°C lower than the previous best and heats a lot more slowly – allowing it to run the synthetic workload for longer without throttling and maintain a dramatically improved average clock speed.
There are several factors at work: having the components oriented vertically improves convection, allowing the surrounding air to draw the heat away more quickly, while lifting the rear of the board from a heat-insulating desk surface dramatically increases the available surface area for cooling.
Throttle Point Timing
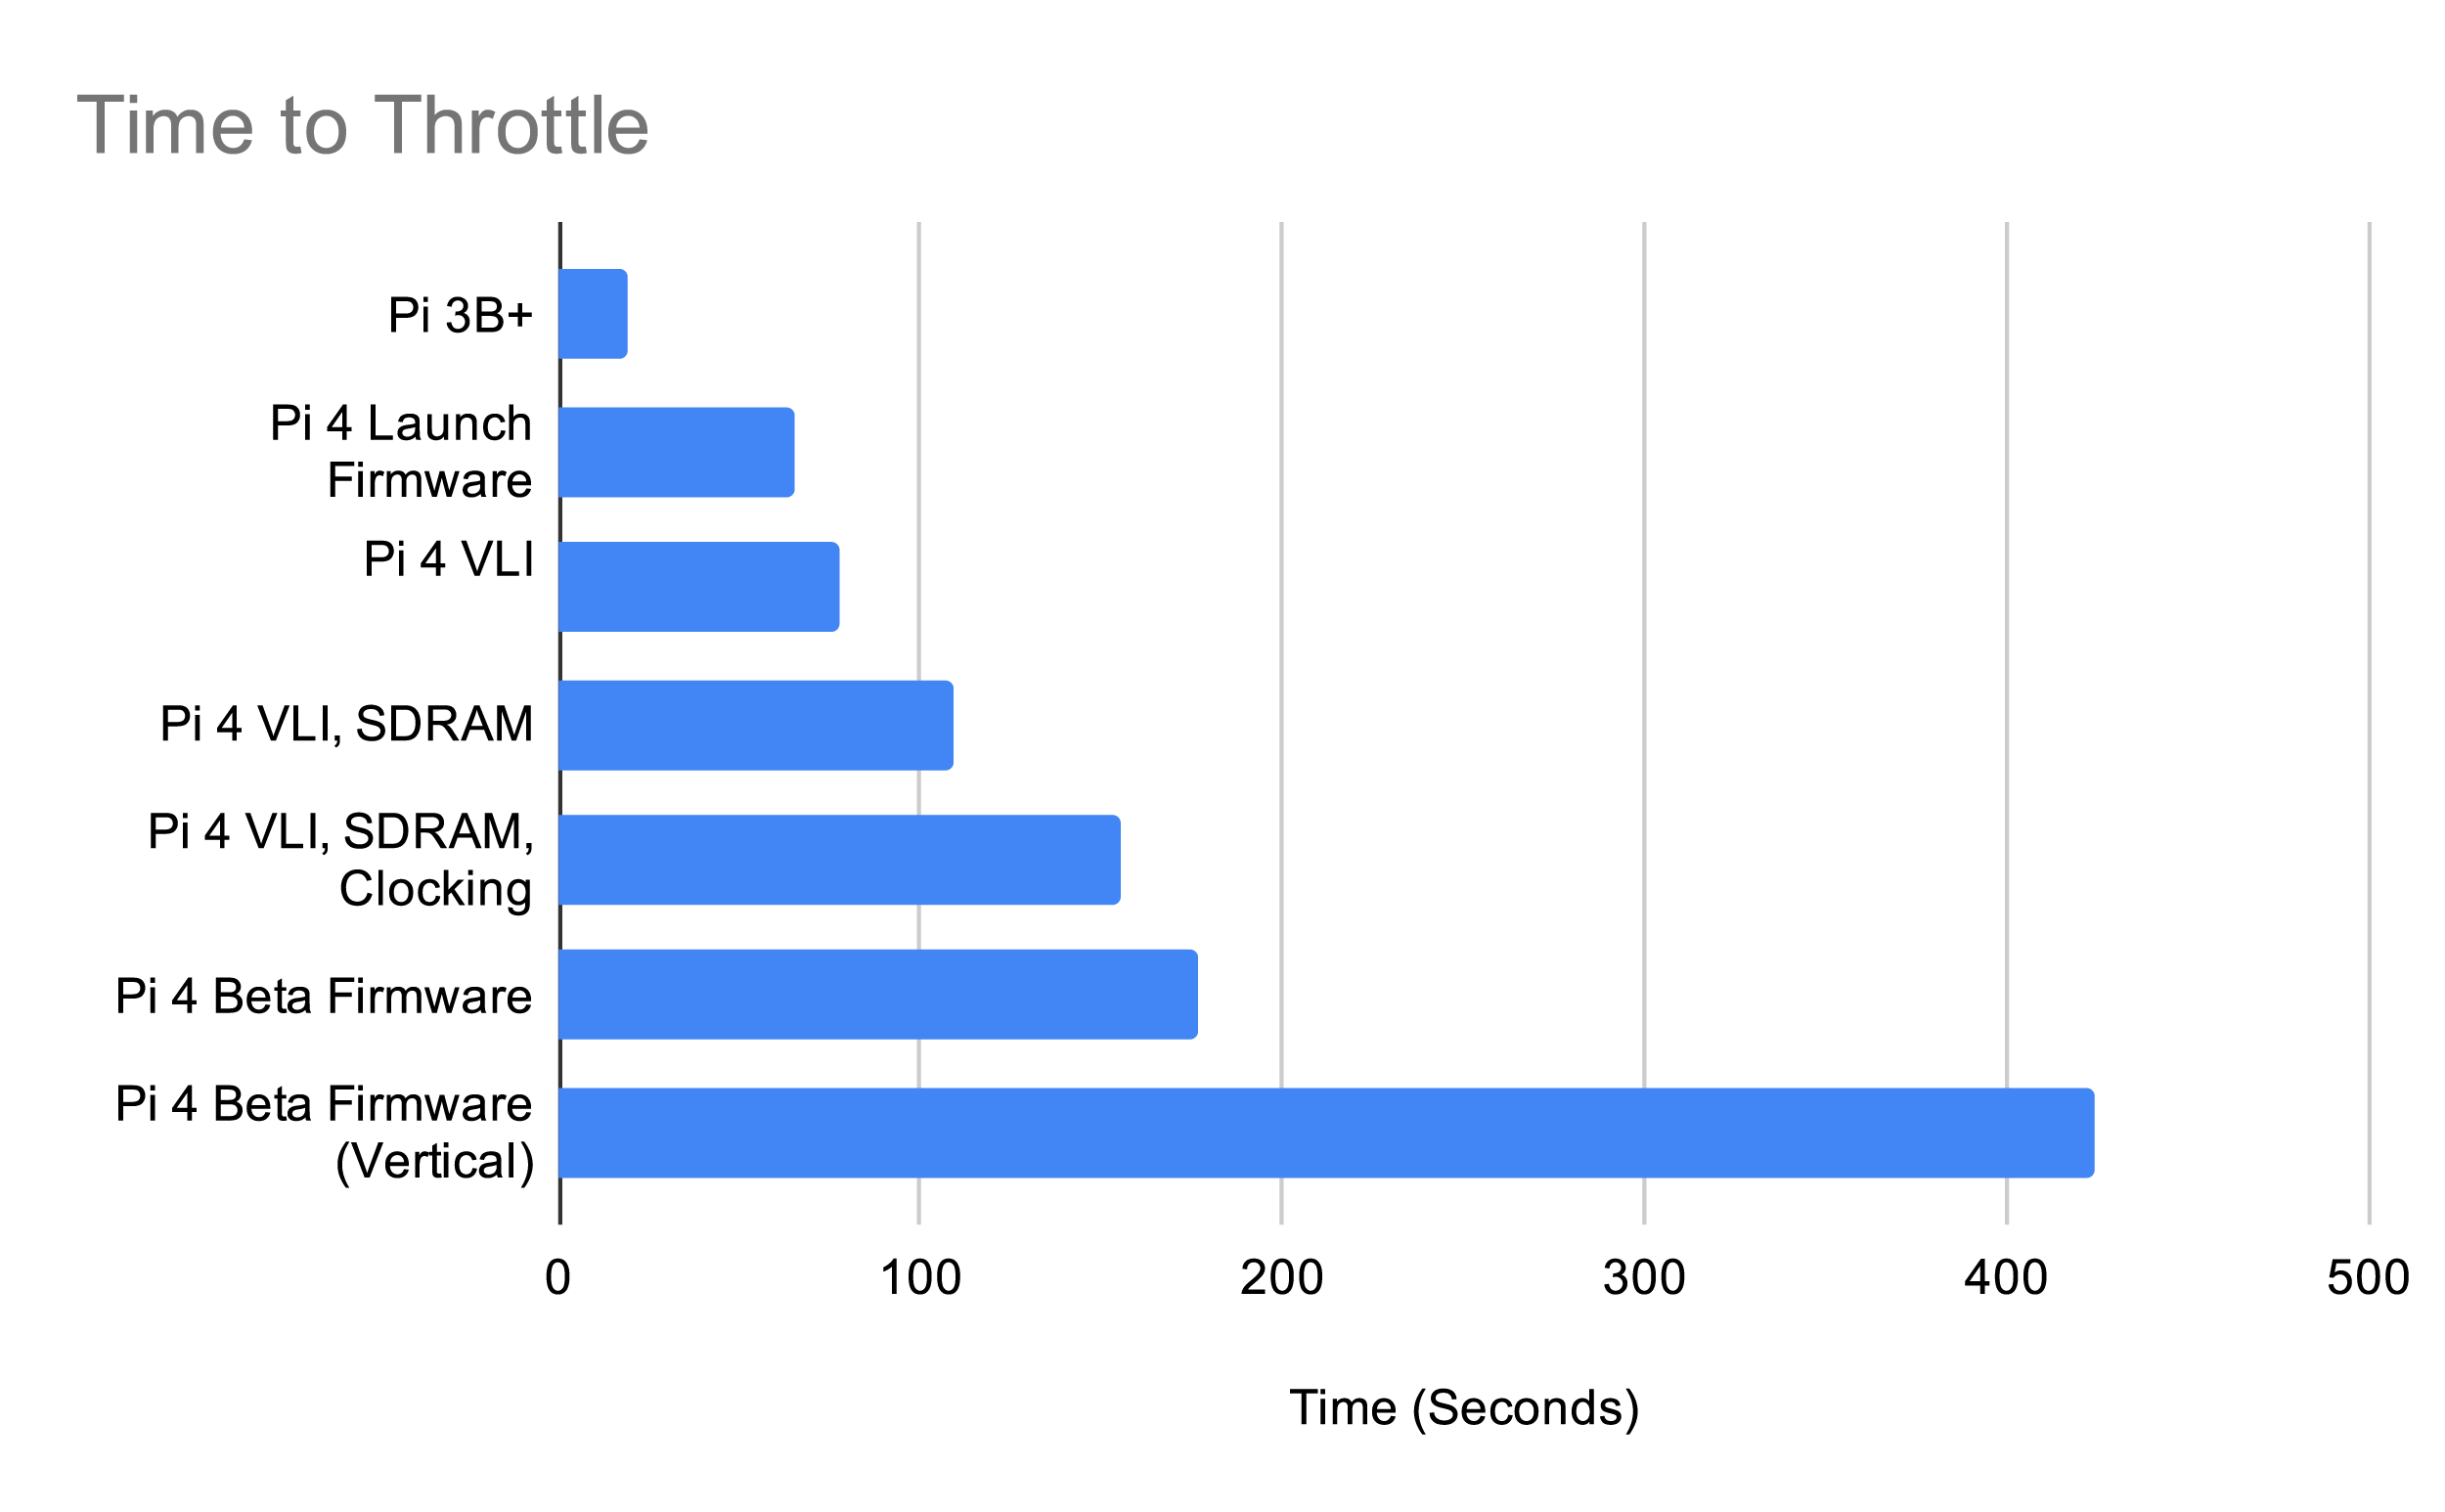
This chart shows how long it took to reach the throttle point under the synthetic workload. Raspberry Pi 3B+ sits at the bottom, soft-throttling after just 19 seconds. Each successive firmware update for Raspberry Pi 4, meanwhile, pushes the throttle point further and further – though the biggest impact can be achieved simply by adjusting Raspberry Pi’s orientation.
Real World Testing
Synthetic benchmarks aside, how do the boards perform with real workloads?
Looking at the previous pages, it’s hard to get a real idea of the difference in performance between Raspberry Pi 3B+ and Raspberry Pi 4. The synthetic benchmark chosen for the thermal throttle tests performs power-hungry operations which are rarely seen in real-world workloads, and repeats them over and over again with no end.
Compiling Linux
In this test, both Raspberry Pi 3B+ and Raspberry Pi 4 are given the task of compiling the Linux kernel from its source code. It’s a good example of a CPU-heavy workload which occurs in the real world, and is much more realistic than the deliberately taxing synthetic workload of earlier tests.
With this workload, Raspberry Pi 4 easily emerges the victor. Despite its CPU running only 100MHz faster than Raspberry Pi 3B+ at its full speed, it’s considerably more efficient – and, combined with the ability to run without hitting its thermal throttle point, completes the task in nearly half the time.
Kernel compile: Raspberry Pi 3B+
Raspberry Pi 3B+ throttles very early on in the benchmark compilation test and remains at a steady 1.2GHz until a brief period of cooling, as the compiler switches from a CPU-heavy workload to a storage-heavy workload, allows it to briefly spike back to its 1.4GHz default again. Compilation finished in 5097 seconds – one hour, 24 minutes, and 57 seconds.
Kernel compile: Raspberry Pi 4 model B
The difference between the synthetic and real-world workloads is clear to see: at no point during the compilation did Raspberry Pi 4 reach a high enough temperature to throttle, remaining at its full 1.5GHz throughout – bar, as with Raspberry Pi 3 B+, a brief period when a change in compiler workload allowed it to drop to its idle speeds. Compilation finished in 2660 seconds – 44 minutes and 20 seconds.
Get The MagPi magazine issue 88 now
This article is from today’s brand-new issue of The MagPi magazine, the official Raspberry Pi magazine. Buy it from all good newsagents, Raspberry Pi Press, and the Raspberry Pi Store, Cambridge.

Subscribe to pay less per issue and support our work, or download the free PDF to give it a try first.


46 comments
Matt Williams
Very cool
Ivan Zhidov
Good work, good point about orientation as well as trapping heat underneath.
Ed
Errant space in the reboot command: should be -r.
3lackhawk
One of the reason why I like RPi’s philosophy is this.You spend time to optimize the software. Keep up your great work!
Giles Read
Interesting to see you’re now using thermal IR to help assess performance.
Back in 2016 I did some work with the Pi 3 using a thermal video camera – you can actually see different parts of the processor ‘light up’ as the ‘thinking’ switches to different parts of the silicon.
I’m not sure if the Akismet system allows linking to Flickr from the body of a message but if you click my name above you should get to the first of two videos.
Andrew Waite
I would think that housing the RPi4 in a case would make these results worse.
Active cooling with a fan gave the best cooling performance at ExplainingComputers (https://www.youtube.com/channel/UCbiGcwDWZjz05njNPrJU7jA).
A fan header to throttle a case fan depending on the CPU temperature would be a nice feature on the next Raspberry Pi model.
crumble
And headless? Can the new SoC run without the GPU?
timg236
GPU a rather broad term on Raspberry Pi and includes common bus infrastructure. However, in headless mode V3D & HDMI will be off and the bus management only has to worry about ARM performance rather than realtime display requirements. Therefore, power consumption will generally be lower in headless mode.
andrum99
Already read that on his website – a very interesting analysis. No doubt further improvements will be made. As recommended on this blog, a Pimoroni fan shim is well worth it – no throttling whatsoever.
Erik Zandboer
Awesome work! For me a Pi3B+ is more than I’d ever need… As they are impossible to get nowadays I am considering to use a 4B without any cooling – Could that work if I underclock by default? It appears it would work, and you could end up with an awesome piece of hardware that requires no extra cooling and consumes not too much power. I wonder how much you need to underclock to get to Pi 3B+ levels… And whether the 4B would still be useable at that point.
Liz Upton
You don’t need to underclock – if you read the article linked here, you’ll see that the firmware updates mean you don’t need cooling.
Michael M. Mulligan
One reason to underclock is to reduce idle (or low-load) power. This is especially helpful when running on (or using backup power from) a battery. The thermal management does not, if I understand it correctly, reduce either idle or low-load power consumption.
Anders
Don’t need cooling for a CPU Raspberry Pi 4 in the Raspberry Pi case? Or uncased?
The article results seem to imply no casing.
Unrulycow
If you get a case that acts as a heatsink like FLIRC, you don’t need active cooling or underclocking. This link shows performance with original firmware, but gives a good idea of how much the case matters.
https://www.phoronix.com/scan.php?page=article&item=raspberrypi-4-cooling&num=1
Michael Hill
Excellent work to keep continuously improving the product even after it’s shipped!
The pictures appear to show the Pi without any heatsinks installed. Several after-market bundles (e.g., CanaKit) supply heatsinks for the CPU and SoC, and I’m curious as to how those would affect the benchmark results for any given firmware version.
Thank you for the excellent products!
dean bl
I’d love to reproduce this with my setup. What did you do to generate the graphs?
Milliways
I too would like to see the code that produced these graphs.
Milliways
I would like to run similar tests on my system, and would like the code that produced the graphs if this is available.
Ralf Vogler
Just wondered the same and found this article using stressberry: https://www.martinrowan.co.uk/2019/09/raspberry-pi-4-cases-temperature-and-cpu-throttling-under-load/
chris stagg
Would be interesting how the new firmware affects overclocked scenarios.
Stefan
I dont have any problem with throttling, but my Raspi 4 is idling constantly around 65 degrees celsius, with almost no CPU load. Using the “official” case, closed, without any holes drilled.
So I just hope this temperature will not lead to any damage in the long run. Or maybe I should buy an “unofficial” case with holes that allows air flow…?
Lada
My slightly overclocked RPI4 (1850MHz) is idling around 36 degrees Celsius. The new firmware haven’t had any dramatic effect on this temperature in my (CooliPi 4B) case – all passive.
I miss ambient temperature in the article, it’s not comparable without it. Mine was 25-26 degrees Celsius.
With regard to the stress program, I find linpack marginally more loading than stress (about 2 degrees Celsius).
What I’m curious is the impact of the new VLI firmware on USB3 throughput and its throttling. It needs to be further investigated. My coolercase cools the VLI chip directly though, so it might be used as a reference against a naked RPI.
I also miss a test with an official case. Most users would want to have their RPIs cased and not placed vertically to collect dust.
James Simpson
Ambient Temperature 24 C
RPI4 Idle 33 C
Ran ‘stress-ng –cpu 0 –cpu-method fft’ and ‘glxgears -fullscreen’ on different desktops simultaneously
Frequency 1500 MHz with no throttling. Latest firmware 02/12/2019. glxgears -fullscreen 60 FPS
30 minutes 55 C.
Pi4 in wooden home built case with heat sink and ducted 0.35W fan and holes in case underside.
Pax
I would very much like to know at what speed RPI 1/Z/2/3/3+ & 4,
can safely run without thermal throttling firmware?
also now that the last patents on MPEG2 has expired, are there any plans on releasing documentation on the hardware, to be competitive with for example the opensource Cedrus Video Decoder for the Allwinner series of chips, now included in Linux 5.5?
TheMonk
A very interesting article indeed.
Could a firmware update possibly resolve the issue with WiFi drop-out and HDMI resolution
https://www.enricozini.org/blog/2019/himblick/raspberry-pi-4-loses-wifi-at-2560×1440-screen-resolution/
https://www.androidauthority.com/raspberry-pi-4-bug-wifi-resolution-1059644/
As I understand according to Eben Upton using properly shielded HDMI cable solves the issue.
Has anyone tested this?
If I buy recommended, original Raspberry Pi HDMI cables this will not be an issue?
https://raspberrypi.dk/produkt/micro-hdmi-til-hdmi-kabel/
Regards
TheMonk
Lada
If you look closely at RPI4 top layer, (for example on my pic here https://www.coolipi.com/RESET.html ), you’ll notice that HDMI differential pairs are routed from (mostly) left bottom side of the BCM chip. These are the closest to the antenna and not shielded. Guess what irradiates more, a shielded cable or a microstrip (albeit of a differential pair) or this ?
So covering them with a metal plate should ease EMI interference. Don’t short-circuit anything though! An EMI gasket could help.
Be aware of the fact, that direct metal (isolated) on the microstrip lines decreases line impedance and may cause the output driver to drive it with a slightly higher current (but it depends whether it is a current or voltage driver). I can’t remember, but AFAIK it’s LVDS differential signalling. Other effects include impedance mismatches.
So, to do it correctly means you need to put a dielectric layer on the pcb top and then a metallic sheet on top of it. Like a sandwich of thick paper and an aluminum foil. A brick of chocolate might help ;-P
I put a note to test it with our heatsink and maybe sell it.
If it doesn’t help enough, you always have a chance to slightly lower HDMI clock (and compensate it with reduced blanking times to sustain framerate). Which is what I suspect RPF will do in the next update, but it’d involve painful setup to define just this resolution slightly skewed.
Alex
I mean that is absolutely great – release this berry, say that it can run 4k at 60hz, but never support it officially – I mean the official os, it still cannot play video files which are 4k resolution… omg guys:(( so developers;(((
Frédéric Pierson
In the real life, we use the Pi with a screen connected on it, USB is also used at least for a mouse and a keyboard. Ethernet can be also useful. But for sure power supply must be connected. Why all connectors are unplugged on your hybrid thermal pictures ? Why heat is not dissipated by connectors and other pieces of metal ? What kind of thermal measurement instrument do yo use ?
James Simpson
Ran the ‘stress-ng –cpu o –cpu-method fft’ on my Pi 4 with a ducted 0.35W fan plus heat sink in a home-made wooden case. Reached 52 C (run for 48 mins.) with no throttling and no over-clocking.
Ambient temperature 23.5 C.
Very happy.
Admin User
Booting from external USB, supported in firmware, is on my must have list.
There are hacks that accomplish this, but you have to start with the SD card.
Chuck
Thank you very much for the article! My Pi4 (my first Pi) in the Official case as part of a “desktop” kit throttled with minutes on the first day I owned it back in September doing nothing more stressful than accessing the Internet. I found that interesting but not troubling as I bought the Pi4 as an educational exercise. I 3d-printed a case in temperature color changing PLA and the case changed colors in a similar pattern to the exotic thermal images in the article quickly.
The throttling, combined with seemingly everyone’s desire to overclock everything, has created and supported a cottage industry of cooling devices and cases. Small packages from Amazon have arrived weekly since then.
Looking forward to further articles.
BTW, I now have four (4) Pi4s and a PiZero.
— Chuck
benjamin
You guys should mention, that IO performance over IO almost halved and sequential transfers are slower.
https://www.cnx-software.com/2019/12/01/run-raspberry-pi-4-cooler-new-firmware-easy-trick/#comment-569212
If you’re running from an external SSDs, thats a serios drop of performance
Michael M. Mulligan
Has anyone tried a Peltier heat pump with a heatsink? Looking at DigiKey.com, ones that would work at 5v and about 14mm on a side seem to be expensive (30-40 USD), but they are quiet, non-mechanical devices.
For example the Marlow NL1023T-04AC seems to be a decent match for the problem – at least for the CPU (SOC).
This is clearly not for everyone due to the price, but if a fast, quiet 4 is your desire it might work.
MMM
CooliPi
A Peltier always increases power consumption and without an adequate heatsink next to it, it even increases temperature of the cooled part. If your concern is low temperatures, go for a big passive solution first, then (if it can’t get the heat away) insert copper columns into critical heat path, then add heatpipes and lastly insert a Peltier between the best heatsink and a CPU.
A fan can be combined with any of the solutions.
We went the first route, which is the cheapest of them all, even though it’s more expensive than a weak cooling solution. Quiet. Long lasting.
If you click my name, you’ll get to our solution.
We’ve even successfully tried to immerse it into liquid nitrogen, very funny. I’ve yet to release a video.
Michael M. Mulligan
I agree that a heat pump without a heat exchanger (heat sink) would not improve the situation. A Peltier cooler would most likely use more power than a fan but would likely have a longer life and make less noise. The choice would depend on what a particular user was trying to optimize.
The heat sink from SensorEq looks like a nice solution assuming there is sufficient room, the WiFi performance is not too adversely effected, and the price appropriate for the user. It has the great advantage of cooling all the major heat generators.
But I was just asking if anyone had tried a Peltier heat pump + small heatsink and, if so, what were the results. If no one reports such experience, I am tempted to try the combination. I think that’s in the spirit of the whole RPi movement.
MMM
Nick
I still haven’t bought a Pi 4 because there’s no news on an updated hardware revision to fix the USB-C implementation on the board. And seeing how the IO performance suffered after the new firmware updates also makes me wait until there’s proper software support for everything on the board, or maybe Pi 4+ (or 5) comes out.
For me, this is the most off-putting Pi that I’d love to have but I keep waiting for better news. If I wouldn’t have almost every previous model, I’d probably have a Pi 4 by now, though.
I look forward to seeing this SBC in its best shape and I’m really glad that so much work has already been put into making it happen. It really feels it’s getting really close to what it was meant to be in the first place. Thanks for constantly pushing updates! This is, without a doubt, the best reason to own these small PCs, beside their vast versatility.
Stanto
Would it not be better to run glxgears with :
vblank_mode=0 glxgears
That way you’re not limiting the rendering to the refresh rate of the screen?
Gray
Is there any plan to offer an alternate firmware with the later thermal fixes, but not the first? I understand that USB IO performance was cut pretty much in half by the VLI changes – which is pretty unfortunate.
Michael M. Mulligan
Better yet, if possible, would be a combination of firmware and software that would allow the user to control the trade-off between power and performance.
MMM
Joe Spurlock
Using the PiMoroni case and their fan shim, I can’t get temps above 59c even with extended load testing as done here (I went 30 min, no change in temp Past 59, no throttling) And even with the original firmware (burned my thumb on this thing at first test without cooling !).
Idles around 34c. Basically you can’t get the chip to throttle even at 100% load. Pi Moroni shim fan is designed also to allow air to blow under the case and out some strategic holes to hit the other chips. Interestingly, the fan worked BETTER if no heatsinks as it can sit a little closer. It’s not loud, is basically silent unless the pi is right next to you.
Not the choice for all I understand, but throttling can be a solved problem if you want…
Alex Ellis
I put a blog post together on “Cooling off your Raspberry Pi 4” which explores some of the options from Pimoroni and the ICE tower. https://blog.alexellis.io/cooling-off-your-rpi4/
Jorge
Hi,
See extensive quotation/review of your post in:
Note2_RPi4_V6.3__The temperature of Pi
web page: radioforcruisers.blogspot.com
Feel free to send me comments, suggestions or proposals of correction.
BR
Jorge Santos
Balsey Dean De Witt
I got the Pi4B with 4GB ram in early January, 2020. Been trying ever since to get it to run right. At first, was able to over clock CPU to 2 GHz and GPU 750 MHz. After doing the firmware update, that vanished, can’t do that anymore, even running the eeprom recovery hoping to bring back the earlier firmware.
It is now February 20, 2020. You will notice it’s been over a month with no more replies here. Even tried to contact Rasperry, all I got was a reference to this webpage, which is really old now.
So where is everyone? You all give up? I guess!
Levente Mihaly
We had to design and machine our own aluminum cooler to keep the Pi 4 heating under control. First we bought a cheap cooler from Ali but that wasn’t enough, also we were afraid to buy the one with double ventilators because who knows how long it would last . We are using the Raspberry to one of our product a refueling authorization system and during summer it would melt down without our passive cooler. Maybe we have to make a bigger cooler now because of global warming.
Taz
Can we place heatsinks on the two USB C “chips” always heating up?
(lower left with marking:
1) “R47”
2) “M x L | mxl7704-p4 | f4ms77 | 1921”)
Or is that a major No No?
Sorry for newbie questions.
There are also 3 other chips with no markings around the M x L. To heatsink or not? That is the question
Thanx for your time,
Taz
Hey Balsey Dean De Witt ,
I’ve been able to change the CPU and GPU speeds and voltage by going to Terminal and typing
sudo nano /boot/config.txt
scrolled down to the section marked:
#uncomment to overclock the arm. 700 MHz is the default.
#arm_freq=800
And added the settings:
over_voltage=6
arm_freq=2147
gpu_freq=750
Depending on your heat management it might need to tone it down.
FYI disclaimer: Follow at your own risk, good luck and may the RPi Gods be with you!
Always run an update and upgrade before.
Comments are closed