Rocket Man
James Dougherty, co-founder and owner of Real Flight Systems, was looking at how to increase the performance of his high-altitude rockets…

These types of rockets… yeah…
James’s goal was to build a ‘plug and run’ video system within a rocket, allowing high-definition video to be captured throughout the entirety of the flight. He also required a fully functioning Linux system that would allow for the recording of in-flight telemetry.
You can totally see the direction he’s headed in, right?
This requirement called for long battery life, high storage to accommodate up to 1080p video, and a lightweight processor, allowing the rocket to be robust and reliable while in flight.
Unsurprisingly, James decided to use the Raspberry Pi for his build, settling for the model B.
Before starting the build, James removed the HDMI port, composite video output, USB post, audio jack, and Microchip LAN9512. Not only did this lessen the weight of the Pi, but these modifications also lowered the power needed to run the setup, thus decreasing the size of battery needed. This shrunken unit, completed with the addition of a Pi camera, meant the Pi could run for 8-10 hours with the recording quality lowered to 720p60 and no audio captured.

Slimline Pi, now with 40% less Pi.
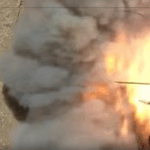
Sadly, the first launch had its issues: the rocket suffered a system failure that resulted in the destruction of the micro SD during the Pegasus flight at BALLS 23, an experimental rocket launch event in the Blackrock desert, USA.

Ruh-roh, Raggy…
Rockets Magazine managed to record the launch which shows the highlights mid-flight.
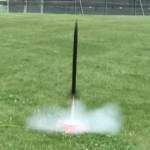
However, the next launch was far more successful, with close friend Jimmy Franco launching Rocket-Pi within a Dominator 4 to record the following footage.
(This clip comes with a motion sickness warning!)
So what was next?
Aside from a few issues with Windows when trying to upload the footage post-flight, the main gripe was the lack of audio.
Investing in a new Raspberry Pi, making sure to keep more of the original components intact, James also updated the board with a USB microphone, added a USB flash drive to eliminate the Windows issues, and replaced the SD card with a lower storage option, as the footage was now stored in the flash drive.
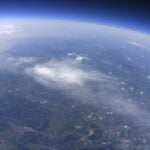
In the meantime, as James has continued to work on the Rocket-Pi, updating the hardware and code, he’s managed to put the Pi through some vigorous testing. During the most recent flight in Blackrock, the Pi reached 48K MSL (48000 feet above sea level… wow), at a speed of up to Mach 1.8 (1381 miles per hour… double wow).

But I AM flying! And from way up here you all look like little ants.
Moving on from the build, James aims to upgrade various features. One of the most exciting upgrades looks to be the migration of Rocket-Pi to the Pi Zero, the smaller size allowing for multiple units in one rocket… creating 360-degree coverage of the flight (yes please!).
More of the build information, coding, and flight documentation can be found at the RFS website.


23 comments
karan
Maybe even the compute module?It has 2 camera ports!
Roland
Downside is that it’s bigger and the the worst part is that the processorboard is plugged into another board which you don’t want when you’re pulling G’s. Some fast burning motors can do 80 – 90 G. If that doesn’t mean anything to you; 80 G for one second is 0 to 2822 km/u in one second. Things break when they are not built to withstand that.
JBeale
The RPi board in the aftermath of that first flight is interesting, it looks like the SOC has melted away like a slice of butter. From the video you can see that the rocket gets there an awful lot faster than a balloon, but the latter is a lot nicer platform for a camera.
AndrewS
“The RPi board in the aftermath of that first flight is interesting, it looks like the SOC has melted away like a slice of butter.”
I noticed that too. I couldn’t figure out what would remove the SoC so ‘cleanly’ from its pads without also melting the CSI and DSI connectors?
Liz Upton
CSI and DSI are regular surface mount – the SOC is PoP mounted, so there’s a lot less solder to heat up before it’ll…pop off.
Bob Hannent
Seems like they could do with doing some epoxy potting of the boards, at least the SoC.
Bsimmo
We use them in Rockets as well, one to record gps/sensehat data and camera anything else that can be attached in the rocket itself and then similar in small payloads to parachute back down. So far we use A+ Pis
The idea came from the European CanSat competition, we would never be able to compete so we devized our own version.
Ours don’t go quite as high, they will only do 4km at the max, maybe more but so far we use a small fast one to go just over a km above. It makes recovery and air control easier.
But then we are only a school and it’s for pupils to have fun with.
Dan3008
I wish I could do cool stuff like this. But all I can do is (another) spectroscopy project. Although, I plan on bringing that to the pizero as a USB device now it has a camera port
James F Dougherty
Yes, to compute module; one with 4 module slots would be ideal. On the other hand, 4x Pi-Zero does the same thing and is fully fault-tolerant (can even use battery chaining/duplication) and nothing compares price/performance.
There is a market for people to make FFC/FPC adapters; either that or a smaller FFC/FPC cable for the Pi-Zero with the female adapter on the standard CSI cable end. Of course outfitting the 0 with the small form factor Spy camera is the goal, or a user may want to extend the existing Pi-Zero cable. I’ve made about a dozen of these and the howto is on the RFS website. 6 meters is possible with the CSI port – but the large failure I had here was not making sure there is no mechanical load (even from flight g-forces) on the physical cable.
The Pegasus crash with the R-Pi left the board and the SOC intact, even the Micro-SD adapter itself is still ok! I would bet that the SOC would still boot, but the rest of the power circuitry (and potting of the Pop-top on the Pi-Board) makes that endeavour near impossible. Oddly, the Micro-SD card snapped at the top, else there would be some even more interesting footage.
Finally, and I should have mentioned this in the RFS blog post, there was a flight last year at BALLS which also failed (early deployment from flight electronics). The Avionics bay was de-nuded from the Rocket at about 25k and Mach-3. We scoured the entire playa for it but could not find it. A fellow rocketeer found this 2 months ago, it had been baking in the Blackrock desert over 100 degrees for 8 months now!
On top of this, there was the rare – once in 10 years monsoon rain in Blacrock desert this year which had most of the Playa revert to it’s original pleistecene era “Quinn River Basin” form – so the sled had been underwater for some number of weeks!
Anyhow, The R-Pi and the USB drive and SD-Card was still intact! Parts of it had been underwater but I did recover the SD-Card and USB and got the full kernel log, 10 seconds of video – and found a short had happened – rebooting the system. Amazing it had been sitting out there for 9 months, but finding it actually helped me determine the short issue (inertia and g-force related) as well as camera cable disconnect – solved with tape!
-james
Alex Bate
Thanks for the extra information, James. As always, tape fixes everything.
AndrewS
Indeed.
https://www.raspberrypi.org/blog/new-high-altitude-ballooning-record-dave-akerman/ “Next time, more duct tape!”
Gordon Hollingworth
James, is it possible to implement a control system to try and stop the rocket from rotating during flight, or would that send it out of control? I’m guessing the rotation is one of the things that make it stable?
I’m guessing only the very slightest of control surfaces should work at Mach 1.8
Gordon
James F Dougherty
Yes, Tape and WD-40 are amazing tools :-)
It is possible to make an anti-roll system, and there is good documentation and even an article I read some years ago for the state machine and adaptive filter (with pwm for servo even).
However – this rocket was designed to spin since it is actually a sustainer for a 100K+ rocket (the booster to be flown still with this rocket) and needs spin stabilization. I have about 6 flights on this vehicle and it was originally made as an upper stage, but it is my most reliable vehicle which is why I used it. definitely not the best for high altitude optics – on the other hand, if it didn’t roll over at apogee we wouldn’t have got the panorama from the IDR’s at the top.
What I plan to do is make a better single stage with no canted fins and then we will get straight-up and down video with no dizzying effect. I’m focusing now on an electronics bay which has 4 Zero’s at 90 degrees and will have a spring-loaded (3d-printed) chassis so that the Spy-cam is flush with the outer airframe (tube).
Note that the spycam is key for this setup – the larger and standard Pi camera is too large of a hole for anything over Mach in the airframe (tube) – it would literally be obliterated at MaxQ (max dynamic pressure on airframe). So….. I am back to taking FFC (1mm Pitch 15 Pin Drawer Type) Top Contact Connector and soldering a bottom Contact connector to it. You have to flip the camera around, but there is enough length in that.
It seems we need a Pi Zero Camera cable with a female (Drawer-type) connector on the Camera connector end. This would allow you to connect ANY existing Camera (Spy, Sony, Noir, etc) to the Zero.
For now, I have hand-soldered 50 of these and plan to coat the pins in Cotronics 4525 as insertion will bend them closing the drawer.
My next endeavour with the Pi (after Quad-cam) would be to use an IMU for inertial apogee detection (fire pyros for deployment).
AndrewS
According to the comments on https://www.raspberrypi.org/blog/zero-grows-camera-connector/ this should work with the PiZero’s camera connector: http://uk.farnell.com/raspberry-pi/rpi-cmdk-adapter/adaptor-compute-module-camera/dp/2433318
(note that the CSI and DSI adaptors are actually different, so you can’t use the DSI adaptor to connect another camera to a second PiZero)
And regarding multiple-pizeros-each-with-a-camera attached, see http://raspberryjamberlin.de/introducing-zero360/
James F Dougherty
Thank you Andrew, good stuff – the only issue with the adapter cable is that it is too large. Check out the site I posted for how I’ve built the adapter – it’s inline, small and lets you still route the FFC cable with ease (which is one thing I have as a constraint). I also may try using silver epoxy to paste together the Zero cable with the spy-cam.
AndrewS
I finally got around to reading your RocketPi page :-)
You say “we plan to remove most all the components making a Model B+ unnecessary”, however the Model B+ has more efficient power circuitry -see e.g. http://raspi.tv/2016/raspberry-pi-zero-1-3-power-usage-with-camera
(However this is obviously now a moot point as you’re switching to the PiZero)
gianluca
with multiple cameras recording around it would be really cool to remove the spinning effect offline, using a dedicated high freq IMU on the rpi recording metadata associated to the video.
this way we could have a real 360 video where you can set your view position around the rocket during the flight.
pbly 4 camera are not enough to have image correlation for a good overlap .. but maybe 8 is ok for a decent video.
8 videos + IMU data = 3D model => unwarping frame by frame
James F Dougherty
Thanks Gianluca! Yes, let’s try this, I have a 4″ OD Airframe and 1/8 wall thickness; we may be able to get 6 in there, let me do some sizing and see what works.
Hank
That is amazing the Pi survived and is a testament to the quality of manufacturing. You should sign up to be an official environmental tester for the Pi team and put together more of these “real world” QA tests. ;)
James F Dougherty
yes, properly built well designed hardware.
D
I wish the I would have known more about the Pi when I was in high school.
This is a video of a launch that I was part of my senior year. https://www.youtube.com/watch?v=b40TZWlvjCs
ben
he came to my school and showed off
James Dougherty
Updated – with Pi0, 4HD, and Pi0 Lipo
http://realflightsystems.com/wordpress/?page_id=722
Comments are closed