Pi in the Sky: hardware for high-altitude balloonists from Dave Akerman
Liz: Regular readers will be very familiar with the name Dave Akerman. Dave has been sending Raspberry Pis to the stratosphere under weather balloons since we launched the Pi in 2012, and his work in helping schools develop their own in-house space programs has been fantastic to watch. He and his friend Anthony Stirk have just produced a telemetry add-on board for the Raspberry Pi to help schools (and everybody else) reproduce the sort of spectacular results you’ve seen from him before. Here he is to introduce it: over to you, Dave!
High Altitude Ballooning is an increasingly popular hobby (I nearly said that interest has been “ballooning”, but fortunately I stopped myself just in time …), bringing what is termed “near space” within the reach of pretty much anyone who is willing to put in the effort and spend a moderate amount of money.

Although it’s possible to successfully fly and retrieve a balloon with a simple GSM/GPS tracker, the chances are that this will end in failure and tears. GSM coverage in the UK is nowhere near 100%, especially in rural areas which is where we want (and aim) the flights to land. The next step up, in reliability and price, is a “Spot” tracker which works solely via satellites, but those don’t work if they land upside down. Also, neither of these solutions will tell you how high the flight got, or record any science data (e.g. temperature, pressure), or indeed tell you anything about the flight until they land. If you’re lucky. A lost flight is a sad thing indeed.

For some countries (e.g. USA, but not the UK), if you are a licensed amateur radio operator you can fly an APRS tracker, in which case the flight will be tracked for you via the ground-based APRS network run by other radio hams. Sadly UK laws prohibit radio hams transmitting from an airborne vehicle, so APRS is out for us.
For these reasons, pretty much everyone involved in the hobby in the UK, and many other countries, uses radio trackers operating in an ISM (Industrial, Scientific and Medical) band where airborne usage is allowed. These work throughout the flight, transmitting GPS co-ordinates plus temperature and anything else that you can add a sensor for. Many radio trackers can also send down live images, meaning that you can see what your flight is seeing without having to wait for it to land. Here’s a diagram showing how telemetry from the flight ends up as a balloon icon on a Google map:

What’s not shown here is that, provided you tell them, the other balloonists will help track for you. So not only will you be receiving telemetry and images directly via your own radio receiver, but others will do to. All received data is collated on a server so if you do lose contact with the flight briefly then it doesn’t matter. However, this does not mean you can leave the tracking up to others! You’ll need to receive at the launch site (you have to make sure it’s working!) and also in the chase car once it lands. The expense of doing this is small – a TV dongle for £12 or so will do it, with a £15 aerial and a laptop, ideally with a 3G dongle or tethered to a phone.
Traditionally, balloonists build their own radio trackers, and for anyone with the skills or the time and ability to learn programming and some digital electronics, this is definitely the most rewarding route to take. Imagine receiving pictures of the Earth from 30km up, using a piece of kit that you designed and built and programmed! So if you are up to this challenge (and I suspect that most people reading are) then I recommend that you do just that. It takes a while, but during the development you’ll have plenty of time to research other aspects of the hobby (how to predict the flight path, and obtain permission, and fill the balloon, etc.). And when you’re done, you can hold in your hand something that is all your own work and has, to all intents and purposes, been to space.

For some though, it’s just not practical to develop a new tracker. Or you might be a programming whizz, but not know which end of a soldering iron to pick up. It was with these people in mind that we (myself and Anthony Stirk – another high altitude balloonist) developed our “Pi In The Sky” telemetry board. Our principle aim is to enable schools to launch balloon flights with radio trackers, without having to develop the hardware and software first. It is also our hope that older children and students will write their own software or at least modify the provided (open source) software, perhaps connecting and writing code for extra sensors (the board has an i2c connection for add-ons).
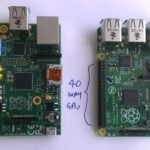
The board and software are based on what I’ve been flying since my first “Pi In The Sky” flight over 2 years ago, so the technology has been very well proven (approximately 18 flights and no losses other than deliberate ones!). So far the board itself has clocked up 5 successful flights, with the released open-source software on 3 of those. Here’s the board mounted to a model B (though we very strongly recommend use of a model A, which consumes less power and weighs less):

It comes in a kit complete with a GPS antenna, SMA pigtail (from which you can easily make your own radio aerial), stand-offs for a rigid mounting to the Pi board, and battery connectors. Software is on https://github.com/piinthesky, with installation instructions at http://www.pi-in-the-sky.com/index.php?id=support, or there is a pre-built SD card image for the tragically lazy. We do recommend manual installation as you’ll learn a lot.
By now you’re probably itching to buy a board and go fly it next weekend. Please don’t. Well, buy the board by all means, but from the moment you decide that this is the project for you, you should task yourself with finding out all you can about how to make your flight a safe success. For a start, this means learning about applying for flight permission (which, if you want to launch from your garden at the end of an airport runway, isn’t going to be given). Permission is provided together with a NOTAM (NOtice To AirMen) which tells said pilots what/where/when your launch will be, so they can take a different path. You also need to learn about predicting the flight path so that it lands well away from towns or cities or motorways or airports. I hope I don’t need to explain how important all of this is.

There’s lots more to learn about too, for example:
- How to track the flight
- How to fill a balloon
- Where to buy the balloon
- What size balloon? What size parachute? How to tie it all together?
None of this is complicated (it’s not, ahem “rocket science”), but there is a lot to know. Don’t be surprised if the time between “I’ll do it!” and “Wow, I did it!” is measured in months. Several of them. In fact, worry if it’s less than that – this research takes time. We will be producing some teaching materials, but meantime please see the following links:
- Pi In The Sky information
- PITS board on github
- UKHAS Wiki
- Tracking A Flight
- Using an SDR to track
- To buy the PITS board
- Balloons and Parachutes etc
- My blog
As for the board, it provides a number of features borne out of a large number of successful flights:
- Efficient built-in power regulator providing run time of over 20 hours from 4 AA cells (using a model A Pi)
- Highly sensitive UBlox GPS receiver approved for altitudes up to 50km
- Temperature compensated, license-free (Europe) frequency agile, 434MHz radio transmitter
- Temperature sensor
- Battery voltage monitoring
- Sockets for external i2c devices, analog input, external temperature sensor
- Allows use of Raspberry Pi camera
- Mounting holes and spacers for a solid connection to the Pi
The open-source software provides these features:
- Radio telemetry with GPS and sensor data using UKHAS standard
- Radio image download using SSDV standard
- Multi-threaded to maximize use of the radio bandwidth
- Variable image size according to altitude
- Stores full-definition images as well as smaller transmitted images
- Automatically chooses better images for download
- Configurable via text file in the Windows-visible partition of the SD card
- Supplied as github repository with instructions, or SD card image
Finally, anyone interested in high altitude ballooning, using our board or not, should come to the UKHAS Conference on 16th August 2014 at the University of Greenwich. Anthony and I will be presenting our board during the morning sessions, and will run a workshop on the board in the afternoon. For tickets click here.


24 comments
Tom West
FYI: Sophos is blocking http://www.pi-in-the-sky.com/ as “mal/HTMLgen-A”, whatever that means.
Dave Akerman
It means that Sophos have yet to fix their software even though this was reported to them weeks ago.
The site is clean as shown by every other web site checker. It’s just Sophos getting it wrong.
Dougie
Ignore it. There’s hundreds of Google results for Sophos detecting false positives with that characteristic. It tends to point to Sophos being a worse than useless pile of steaming stuff.
Dougie
Roughly, how much does it cost to launch a Raspberry Pi to 30Km?
Dave Akerman
It’s almost “how long is a piece of string”, except that the string is about the cheapest part of the project!
Roughly, £60 for a balloon, £90 for the gas, £30 for a parachute, £120 for the Pi board kit, £25 for a model A, £20 for the Pi cam, £15 on foam and tape and string, £15 for an SDR (TV dongle to receive), £15 for an aerial, £5 for Lithium Energizer batteries, plus petrol to go and retrieve it after. Finally, for the smile on your face when it all works, priceless.
Eric Olson
This article recommend the model A. Is the model A still available? It doesn’t seem to be available at element 14 or Rs Components. Is there a replacement for it?
Liz Upton
The Model A is still available, but stock’s quite low at the moment (we briefly discontinued the line to make capacity for the big bump in order of B+). You should be able to buy them again at the retailers you mention very soon – and there are other places selling them if you google around.
Dave Akerman
The A uses about 1/3rd of the power which is why we recommend it. The B will work but you’ll only get about 7 hours out of the batteries, however that’s still plenty enough for a flight. The payload will get warm though the Pi copes with that just fine.
Shiv Manas
Hi Dave,
How would the A compare to the B+ though? I know that the B+ uses about 1.4W with a WiFi dongle and a wireless keyboard/mouse adapter.
Dave Akerman
The B+ has switching regulators but so does our board, so the A still wins. It should be possible to get close by switching off the USB and LAN. The A still wins on weight of course.
Eric Olson
It looks to me like the additional USB ports on the Model B+ would get in the way of mounting the daughter board on top of the Pi as shown in the picture. Is this true?
Dave Akerman
Yes, it won’t fit the B+.
aremvee
I notice the second image shows the ethernet connector taken out. That’s a fairly simple task. Which means if they use a B+ ( or even a highly probable A+ ) they can desolder the extra USB stack while they’re at it.
If you have an obsessive compulsive against even numbers then there’s your chance for gratification on the third; that pesky composite audio/video.
The real trick would be the mounting hole position for the standoffs, but if its perched on the GPIO block and with plenty of room in the opposite corner to drill yer own, life is simple once more. All in the stride of any wannabe HABalloonist.
Dave Akerman
Actually, that’s a model A, and nothing was removed.
I have in the past removed all the non-essential connectors from a model A (i.e. everything apart from the camera connector and some of the GPIO pins), to save weight and therefore increase altitude, but it doesn’t make a massive difference.
Chris Mitchell
Perhaps you should also look at LOHAN (http://www.theregister.co.uk/Wrap/lohan/). There’s at least one Pi in it, and Dave Akerman is there as well…
Dave Akerman
Yes, they’re using our board.
The Other Peter Green
In the opening episode of Channel 4’s “Tom’s Fantastic Floating Home” on Sunday night, inventor Tom Lawton wanted to fly a camera on a (tethered) balloon as an aerial security system. When he said “I found this amazing guy on the Internet who’s got the craziest hobby. He sends up helium balloons into the outer reaches of the earth’s atmosphere”, I was expecting an appearance by Mr Akerman.
Turned out to be a bloke called Chris. Dave, you need a better agent. :D
AndrewS
I don’t think Dave’s doing too bad ;-)
http://www.raspberrypi.org/heston-we-have-a-potato/
Dave Akerman
Yes, and notice that unlike Tom I didn’t lose the balloon :-)
Liz Upton
…thanks to a neat bit of telemetry hacking. W00t!
Stephen Matthew Helms
Dave, I am guessing you are planning something lighter weight by using the compute module?
Damien
What kind of modulation do you use ? AFSK ? RTTY ? Is it possible to decode with a traditionnal receiver and a software like soundmodem with linux ?
chris
Dave,
I will be launching a PITS board in the next month or so. We will be using the APRS (I live in USA) Took awhile to get the board but it is here. I could not see anywhere that tells how to connect the board to the Pi. The power needs to be off I assume?
I have a project through the school that will grow from 2 launches this year to 5 next year.
Any help or suggestions on cameras would be great.
Chris
Dave Akerman
The PITS board just plugs into the Pi via the GPIO connector, and is held securely with the supplied spacers.
For flight you power the pair via batteries in the supplied holder, connected to the PITS board using the supplied cable.
For testing you can do the same of course, or you can supply power to the Pi via the micro USB connector.
APRS is a completely different system, using different frequencies and different modulation, so PITS won’t help you do that at all. For APRS you need a TNC (one is sold for the Pi, but not by us) and a suitable radio.
We do have a PITS+ coming out soon, for the A+ and B+ boards, and afterwards we will be selling an add-on APRS board that fits on top.
Dave
Comments are closed