Ride a model railway from the train driver’s POV
No one at Pi Towers can remember if Beetlejuice actually drives the mini train through the model village version of the film’s fictional setting Winter River. So we’re going with the Addams Family reference instead. Here we go…
Adam Honse saw how maniacally happy it made Gomez Addams when he watched his model train tear around the track, so he and his dad set about creating an immersive experience for their miniature railway. Perhaps Gomez wouldn’t have so callously crashed his own cars if he shared the train driver’s point of view (POV)? Perhaps not. He is an Addams after all.
Revisiting old hobbies
Adam built the model railway with is dad back in the early 2000’s and he always dreamed of incorporating a camera somehow into the build. Fast forward to 2022 and technology has moved on so much that he can easily get his hands on hardware powerful and small enough to make it happen.
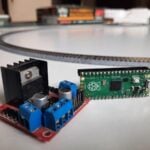
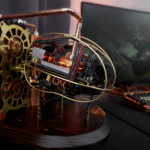
Raspberry Pi Zero 2 W sits in the front car of a custom-built train carriage and drives the Raspberry Pi Camera Module. They cleverly decided to attach the camera to the wheel track right at the front of the carriage so it turns with it, giving you a true POV as if you were the driver.

A battery sits towards the back of the train and powers the other hardware. Adam accesses the camera’s stream on his PinePhone via VLC.
Raspberry Pi-powered railway
Raspberry Pi also powers the model railway itself, not just the special POV camera car. I’m no enthusiast, so I’ll leave it to Adam to explain the setup:
“The railroad uses DCC with the Digitrax DB150 base station. I’ve connected it to a Raspberry Pi 3 [Model B] running JMRI so we can drive trains with the Engine Driver app or the web throttle in addition to the physical Digitrax controllers.”
From Adam’s YouTube project video description
Did that make sense to anyone? Good.
Drop a comment if this build has inspired you to retrofit a long-forgotten toy. I know this is not a ‘toy’ per sé, I just couldn’t think of an appropriate synonym. Don’t come for me.
8 comments
Jim
Maybe you could embrace the spirit of Raspberry Pi/maker space of discovering new things and look up what DCC JMRI are — there’s lot of stuff online. It’s easy to fall into the trap of saying “don’t understand that” without trying very hard.
Des
This is a great little project but…
I would question why are you promoting projects using the Raspberrypi Zerow-W when its clearly unobtanium. I have frequently checked the approved outlets and just as frequently found the pi-zero to be out-of-stock. Will the supply of the pi-zero ever be stable?
Carl
I don’t see any problem promoting projects to those who already have a Pi of some kind. I suspect more than a few hobbyists have a spare Pi that is relatively under-utilized. We all wish for the supply chain issues to clear up ASAP, but IMO that’s no reason to cease celebrating creative uses for the product.
thagrol
Call me when they can do it in T gauge (1:450, 3mm between rails) or at least in British N (1:148, 9mm between rails).
Stewart Watkiss
The Raspberry Pi and/or the Pico is a great fit for model railway automation as well as adding extra features. I’ve mainly been using it on my outdoor railway providing automatic train control (stopping at the station for passengers), as well as a web based interface. I’ve also added track side signals, station departure boards. http://www.penguintutor.com/projects/model-railway
Raspberry Pi Staff Ashley Whittaker — post author
LOVE the departure board you made!
(I’ve put that link in the blog schedule for next week. People seem to love model railway projects)
Richard Hewitt
This is a lovely little project along the lines of what I’ve been after doing for a long, long time. Alot of my Pi-based purchases have been for the day when I eventually ‘get round to it’. I’ve bought a UPS hat from Pi Juice for example. The big stumbling block for me was sound. I noticed the video was silent, so I’m presuming that was an issue with the project maker too?
I’d be grateful for any pointers for video AND sound on a Raspberry Pi.
bb
You need separate mic…. here are some tips… the rest would be… making the capture put those together, since I guess the stream may not have that abulity https://raspberrytips.com/add-microphone-raspberry-pi/
Comments are closed