Raspberry Pi Imager update to v1.6
Since Raspberry Pi Imager was released just over a year ago, we’ve made a number of changes and fixes to help make it more reliable and easier to use.
But you may wonder whether it’s changed at all, because it looks almost exactly the same as it did last year. That’s not a coincidence — we’ve deliberately kept it as simple and straightforward as we can.
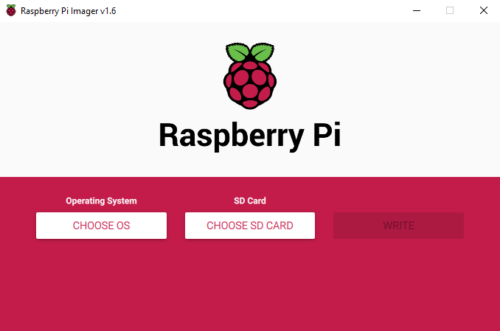
Raspberry Pi Imager
Our mission in designing and developing Imager was to make it as easy to use as possible, with the smallest possible number of clicks. This reduces complexity for the user and reduces the scope for users to make mistakes. However, at the same time, some of our users were asking for more complex functionality. This presented me with a tricky problem: how could we support advanced functionality, while also making it easy to use and hard to get wrong?
After much wrangling in GitHub issues, I finally folded, and decided to introduce an advanced options menu.
For those you adventurous enough to want to play with the advanced options, you need to press the magic key sequence:
‘Ctrl-Shift-X’
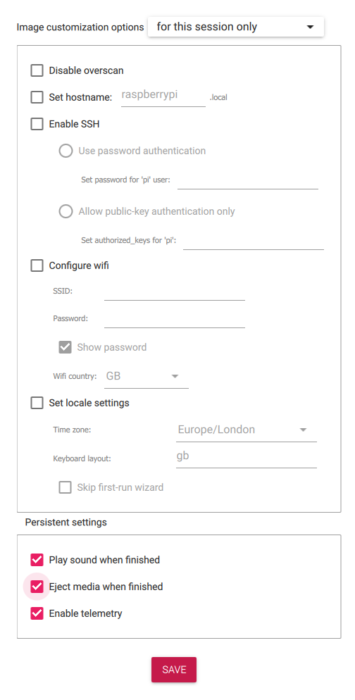
Using the advanced options menu obviously involves a few extra clicks, but it’s actually pretty simple, and it’s worth a look if you find you frequently need to make config changes after you flash a new SD card. It allows you to set some common options (for example, if you set the hostname correctly you don’t need to have a static IP address), and you can either save these for future images or use them for this session only.
If you’d like to turn off telemetry, that’s fine; all it does is send a ping to the Raspberry Pi website that lets us create the statistics pages here. To understand what we send, you can read about it on our GitHub page.
Try Raspberry Pi Imager today
Raspberry Pi Imager is available for Windows, macOS, Ubuntu for x86, and Raspberry Pi OS. Download options are available on our Downloads page, or you can use sudo apt install rpi-imager in a Terminal window to install it on a Raspberry Pi.
Once installed, simply follow the on-screen instructions and you’re good to go. Here’s a handy video to show just how easy it is to prepare your SD card.


116 comments
lee smith
it also could do with a advanced option to enable wifi access point mode (wifi hotspot) which could help with setting up headless server
Mike Houghton
Take a look at the comitup package. It interacts with Network Manager to set up an access point if it doesn’t recognise any SSIDs, puts up a web interface with a captive mode browser (like a free wifi access point might), and in that interface lists all the nearby APs. You pick one, enter the password, it drops its own AP and joins that one. Really impressive.
me
Some useful options here..
Is a pi os dark mode on the to do list for Mr. Long or whoever?
Mark Tomlin
You can kind of make your own dark mode pretty easily with their built in and already installed tools. It would be nice if it was system wide however. IIRC it doesn’t apply very well to the file browser.
Jihua Fang
I am a 78-year-old man who does not understand English, so I really need Sogou input method. However, I cannot install this software that has been used for many years. Now you can only use Pinyin to write Chinese on the gmail page; you cannot write Chinese if you leave the gmail page. We hope to get your help! Thank you
andrum99
You may wish to update the screenshot in this post – the middle button is now labelled ‘CHOOSE STORAGE’ rather than ‘CHOOSE SD CARD’. (New screenshot here -> https://www.raspberrypi.org/homepage-9df4b/static/md-82e922d180736055661b2b9df176700c.png)
Also, I’m assuming the advanced customisations only apply to Raspberry Pi OS – is that right?
Gordon Hollingworth
Currently, yes although most of it should be possible to work with any operating system that uses systemd. We have discussed using cloud-init instead, which would allow us to extend this further for other operating systems if they’re interested.
Frederick Pletz
Very interested in seeing this capability extended to other operating systems. If you are able to extend the OS options it might be worthwhile to have the list of compatible OS somewhere in the advanced options menu (maybe a hover-over tool-tip) just so people can see what is compatible.
GeekyTim
This update is something I’ve wanted for ages. So useful.
Gerald Brown
I just downloaded 1.6 and discovered it still has a problem 1.5 had. That is when I select “Use custom” and try to go to the partition where I download the latest version of RaspiOS, it only shows the root partition of “media”. The partition and folder I use to download the files to is “media/gerald/Downloads/Raspi”. Because of this problem I have to download the file again even though I already have it on my hard drive. Other than that the new version looks good, especially being able to set SSH and password.
Hans Otten
Glad you finally made this possible!
But why o why continue to make it so hard? A little button ‘Advanced’ was still too much? Keep treating all your users as stupid?
Anders
Raspberry Pi has every level of user.
Bradley Johnson
Great answer, reminded me of when I was working. Retired now. I had to write three manuals, one for the beginner, one for the person who needed just the steps. And another for the know it all.
David Reid
Been there, done that… many times… Technical Author for Thales Nederland.
Harry Hardjono
So, you’re thinking that the keypresses should enable the Advanced button? Then disable it via checkbox on the advance menu with text written with enable something something X? I think that’s a good idea. If you have to enable it every time, then that’s cumbersome. Double that if you cannot then disable it later for other people to use.
Wolfgang
What a great development. The ‘Ctrl-Shift-X’ will save so much time for frequent fresh installer! Thanks, guys!
Jeff Geerling
Ah, finally! The only complaint I had was it was annoying to have to image the card, wait for it to get ejected, then manually remount it to enable SSH (which I almost always do). This change makes it a thousand times more helpful for me, and still keeps the simplicity for the average user, so thanks.
And are the key bindings the same on macOS to bring up the advanced settings?
Bacon Butty
Agree. Looks good – ssh and wifi in Advanced will save me loads of tedium. I also like the OctoPi OS option – didn’t notice it before.
MacOS for Advanced is : Apple Command key + Shift + X.
Ton van Overbeek
On MacOS ‘Command-Shift-X’.
The usual substitution of Control by Command.
Ed
Both Cmd- and Ctrl-Shift-X work. I agree with Hans Otten (MSX4EVAH) that this should simply have been in the menu, not an obscure key combination. The options itself are eminently useful.
Jeff Geerling
The settings are extremely useful, and I’ve already set all the options I need to ‘Always’.
But after discussing this over in the GitHub issue queue for the project, I also see the argument for making the official utility be almost idiot-proof.
The more options exposed to first-time users, the more they end up accidentally messing up a configuration on the Pi they just brought home to learn on as their first Linux computer…
On the flip side, it’s not like once you boot the Pi all these settings are hidden away, and AFAICT, none of the settings except overscan in some situations would necessarily break things on first boot. The worst thing that could happen, really, is someone sets up SSH when they didn’t mean to, and if they set an insecure password, it opens them up to attack.
Jeff Geerling
Replying to myself—it is indeed the same key binding on macOS, Shift+Ctrl+X. It would be neat if the key binding were Cmd+, on macOS, which is the traditional shortcut to bring up a preferences dialog.
Gordon Hollingworth
Of course, the point being we chose a key combination that would be the same on both the Mac and the PC, to avoid having to document two different key combinations.
Ed
It’s strange and jarring. But, like I said, Cmd-Shift-X also works, so, ¯\_(ツ)_/¯ The options are great and thanks for implementing them, very useful! I strongly disagree with hiding them behind a “secret” key combination.
Jonathan
I’d second adding a standard “Preferences” menu on macOS. I had to find this blog post to work out how to get to the advanced options. Adding the menu item in the same place as *all* other macOS apps also means you can get away without documenting it. Definitely a user experience that can benefit from some platform-specific improvement.
Theo
Just tried the new version but the menu functions, enable ssh end locale otions didnt do enything. Still had to manualy enable ssh and set the locale options. The menu itself works because after restart the imager, the options are set like i set them (enable ssh and locale options)
I think its back to the drawing table guys?
Theo
Strange my comment is removed.
I just wanted to explain that the options did not work. I enabled the options ssh and locale setting but it did not do anything. Yes the options are saved but i still needed to enable ssh and locale options manualy when i started the raspberry pi for the first time.
ANDRE C GURGEL
What you call Advanced, most of us call More Options.
If you still think a [Advanced] button is too inviting to rookies, just write somewhere “Ctrl(Cmd)+Shift-X to Advanced options”.
Whatever. SSH and Wifi *are* killer features.
Gordon Hollingworth
The other day I had to talk someone through installing Imager onto their computer. They had bought a Raspberry Pi for their child to play with and didn’t have the first clue how to use it. I had to spend half an hour on the phone directing them first to the Raspberry Pi website, then to click ‘Software’ and then to click where it said ‘Download for Windows’. Then had to explain where to put the SD card, also having to explain the different between SD card and micro SD card.
They got there in the end, but the easiest bit of the process was imaging the SD card.
You may think ‘more options’, but for a significant proportion of our target audience this would introduce whole lists of decisions they’d have to make which they don’t understand. The point of this software is to make this process as easy as possible.
Nick
A button labeled “Advanced settings” should be enough to put off the users you are talking about. Or just make the button small and stick it in a corner right out of the way and users like you describe won’t even notice it. If still worried, could we do an overlay over the whole settings popup that says “don’t use this menu if you don’t know what it is”? That would be a bit annoying but so much less annoying then having to look up the “magic sequence” each time.
Unless you are re-imaging bizarrely frequently you are likely to forget the keypress sequence. You might even forget the feature exists at all, which is a shame because it’s genuinely very useful! Please re-consider adding a small button.
Carlos Luna
Not sure about the “Advanced settings” button – it might put oof some users but it might also end up attracting others. Either way, what about adding a “reset settings” button in the Advanced Settings menu? That way even if a non-advanced user ends uo changing something important, there’s a way to undo it.
Nick
The whole point with that wording is to put off users that would be overwhelmed by the extra options, users that don’t need to be in there.
Sure, stick a reset button in there also if you want but that’s an entirely different issue.
Alan Krum
Agreed… having to try to remember how to turn on advanced mode is not good UI experience. Just a small button and warning is fine. I have better things to try and remember at my age.
Paul
I too look forward to the day when the Raspberry Pi 400 arrives with an SSD and RaspiOS preinstalled, you know, like when purchasing any other ‘home’ computer. :-)
Esbeeb
Awesome. Much appreciated.
The telemetry checkbox is a nice touch, which is a nod of respect for those who are sensitive about Privacy. The gains in goodwill from the community are well worth such a seemingly-unimportant feature, I say.
Marc
Now we just need formatting options!
So you can have type=small partition mounted instead of ext4 standard mkfs expanding to the whole SD card by default!
Jack
Just saw the article, and jumped into action. But, when I tried to apt the update, it said 1.5 was the newest. Anyone else?
Gordon Hollingworth
I assume you did this on a Pi? Did you “sudo apt update” first?
Otherwise, try again, I just checked and the repo does now have r1.6
Jack
I use Linux (Mint) on all my PCs. When I ran apt, it said 1.5 was newest. Perhaps I should point to a different source.
Nick
I think you’ll need to install the latest version manually from the .deb file on the downloads page. The version in whatever repository your Mint install points to won’t see updates (except critical security updates).
James
Do
sudo apt update first
Then try again
m-p{3}
Just wondering, how does it sets the hostname during the imaging process? Is there a new headless configuration available in the boot folder, similar to wpa_supplicant.conf ?
Gordon Hollingworth
I’d suggest you image a card, set the hostname and then plug it back into the host computer. Look at cmdline.txt and firstrun.sh
m-p{3}
Thanks, I’ll take a look!
Nono25
Very good job! Very useful for me!
Perhaps a checkbox to enable VNC ?
Best regards
Stewart Watkiss
Sounds like that is going to be a really useful update.
Charles Godwin
Excellent. I can scrap a lot of code I had to do these settings. Did you consider adding a public authentication key to the install in .ssh ?
Now, when will it image a non-beta 64bit Pi OS?
Charles Godwin
I made a mistake, you do support authentication key. Very good. Thanks again.
ß₥ɦ
Advanced options are for advanced users. If you can’t remember CTRL-SHIFT-X then you probably shouldn’t be messing with the advanced settings.
Steve
Thank you so much for this Gordon! I feel your pain when it comes to keeping things simple — it is impossible to overstate how easy it is to confuse a beginner! Most die-hard RPi users have computer expertise, and often forget what it’s like for people without that kind of experience. But this is a most welcome development, and it will be a HUGE time-saver for just about any Pi user who is beyond the beginner stage. I think the “secret incantation” approach is fine if it’s well-documented (which it already is!), since the information is readily available to people “ready” to use it. So bravo, and thanks for adding this functionality, and thanks for letting us know in the blog!
Vincent
Considering the target audience the Raspberry Pi has I agree with you that it is a good idea to hide some of the more advanced features. I am also very happy to see that the foundation is being very transparent about the telemetry it generates and that it can be turned off. Thus I am willing to leave it on. Something I do not usually do.
Ray Glendenning
Telemetry should be opt in!
Milliways
Probably handy for new users (who would be unlikely to find the options). I still don’t understand WHY anyone would download an image more often than every 2 years. (Mine is Raspberry Pi reference 2019-06-20)
My next will be Bullseye.
Chris
I’m constantly writing fresh SD cards for Pis, pretty much any time I pull one out for a project or tinkering.
James
I disagree.
I download the latest image when it comes out, so there is less updating to do
Milliways
But then you have to re-install all your applications AND set configuration – takes much longer than an upgrade!
SamVimes
Unfortunately still no build-in support for batocera…
Nguyen Trong Thanh
“all it does is send a ping to the Raspberry Pi website “, suggest to change ‘telemetry’ to some wording like ‘send a ping’ so it is easy to accept it.
MDI
Extremely valuable new optionst they should not be accessible in a so esoteric and only way like an Easter egg (key combination). If a program HAS a feature it has to be exposed. Just appropriately labelled as hard, or for experts or extra, but still exposed. Like a “for guru” button or a menu. And all in all, IN CASE a newby makes a mistake, it’s a lesson learnt. So simple but accessible. Less need for extra documentation and website resources when you don’t remember the secret combination.
Ed
Agreed.
Marc
+1
Stephen Glynn
This is great! I was pretty impressed until I ran it, and I see that is grabs the current WiFi SSID and password. That is hats off cool! Thanks.
Martyn
The new Raspberry Pi Imager v1.6 is great and with the advanced Ctrl+Shift+X feature is such a time saver. The one feature that is missing for me is a log. I use HDDRawCopy, because it gives me a some text that I copy and save in a log for all my SDCards. My log lets me know: 1. What was written to the card (O/S etc), 2. How many sectors were written and 3. How long it took to write, so I can see which brand is better. I also change the DOS VSN on the boot partition, so I can uniquely identify the SDCard without having to boot it up.
Bensimmo
It’s on github, so add your logging to the program as you like it.
Harry Hardjono
Easy enough to do on second screen of Advance option. Plus, you can add a checkbox to say “Enable ‘Advance’ button, to keep the button available at all times.
Martyn
Thanks Bensimmo – I took a look the code on github. I know a bit of C++ but would not have a clue as to how to go about creating a build environment for a project like that.
norb
I used to use Noobs back when I had my first Pi model B, is this software a renamed version? What’s the difference?
Puffergas
This looks so good that I will give the Imager my first test drive.
Puffergas
Tested it a day ago and it worked perfect. Thanks.
Mark Tomlin
Thank you so much for the advanced options! I have to turn on SSH and set a Hostname all of the time, being able to do this in one step is very, very nice! You’ve probably saved me days of my life over the next few years.
Fred Pletz
Will the advanced options work for non-Raspberry Pi OS? If so, is that going to be confined by Debian based OS, or would it work on something like a CentOS 7 image?
Fred Pletz
Nevermind – just realized this was already answered.
Neil
Mmmmm. A GUI interface with keyboard-only functions. That makes so much sense (not). Label the button “Experts Only”, then on their own heads be it.
BlobbyDBob (aka: Anonymous)
I tried installing Raspberry Pi OS on my new 128gb sdxc card but after many errors and finally getting a successful install, my Pi just would not boot. I’m just glad I didn’t screw up while copying my old card over. I know that these updates are crucial in helping people get a Pi booted quickly, easily and somewhat cost-free, I see that this has a lot more issues in writing the OS onto the card than v1.5
Gustavo Jose
I’m using a mini keyboard Rii and I can’t get the advanced menu with Ctrl-Shist-X
Christian
As probably already people suggested, please add some button to open the advanced Settings. I really like being able to set a few things (as Jeff Geerling already stated), but for sure I won’t remember the key combination in a few weeks.
But as I said, thanks for the new menu, thats very useful!
Tim
I opened an issue about this being completely undiscoverable on Github, but they just closed it. Completely bone-headed. Btw did you know that the window is also *deliberately* not resizable? Madness!
Ed
Wow, what. Resizable would be a great improvement, it’s very cramped right now. The “advanced” settings I mean; the main window is fine.
Stuart Andrew Jones
A note for Imager users under Windows 10: In order for Imager to work, the micro-SD card must be connected via a micro-SD to USB adapter. The Imager will not recognize a micro-SD card connected via a built-in SD card reader on a laptop or desktop computer. Furthermore, trying to get Imager to write to a card connected by a built-in reader will disable the alternative Win32DiskImager program until the laptop/desktop is rebooted.
andrum99
Not true – Imager works fine with both my laptops’ built-in SD card slots.
I found Win32DiskImager was not reliable even before Imager was released – it would often fail when I tried to write an image to the SD card, complaining it could not access the drive.
Jakob
There were advanced options this whole time! I know it’s not that big a deal but it’s a nice feature.
richard mullens
Is there any compelling reason why I should not continue to use “dd” to transfer an image to a micro sd card ?
Stuart Naylor
Not if you don’t want to
Richard Mullens
Thank you. That’s just what I wanted to know.
Hugues FERTIN
Request features:
what about a button “Advanced options” instead of the “Ctrl-Alt-X” keystroke ?
I also would like a bubble that shows an explanation when the pointer fly above an option : for example, I have no idea of what the check box “Enable telemetry” is about (and after an quick web search, I still do not understand what it means)
Thanks for your great work !!!
Timo
The added features behind the shortcut are great!
The shortcut itself was already in use by another app on my (windows) machine. Not being able to change it or use a button is annoying. BTW also in the other app (ClipClip) I was not able to change the shortcut. I’ll complain to them as well :)
Stuart Naylor
Yeah!!! SSH & WiFi !!!
Finally :)
illusion
I’m a first time user, but I have a keyboard with the keys set in a dvorak layout. This made it impossible to enter the password. It should be possible to change the keyboard settings before setting the password.
Jolle
This is terrific news indeed. This will make it so much easier to set up arrays of headless Raspberry Pi’s! Thanks a lot
Andrew Anderson
Fantastic, love the advanced / simple implementation. It’s always tempting to do everything but it’s always better to temper and keep things true. So Pi!
Mark B
It’s great that Imager has been enhanced in these ways. What I cannot figure out, considering how long the various Raspberry Pi models have been with us, is why Imager doesn’t do the reverse – ie save a fully-configured SD card setup to a compressed image file which could be restored should a problem arise with a card. We have Win32DiskImager, Apple Pi Baker and, of course, the unwieldy and risky dd on Linux? Given the zilions of uses for a Pi that exist, the lack of a unified SD card imaging utility amazes me and I have never seen it mentioned anywhere. I tend to use Clonezilla for my images and I had success with pudd in Puppy Linux too.
Mike
Doesn’t the SD Card Copier already in RPi OS serve that purpose already?
Jim H
Getting an error on every image. Using win10 and only enabling ssh and setting wifi/locale. The image works fine but I get the error “Error creating firstrun.sh on FAT partition” When the Pi boots, nothing has been customized.
Jim H
It appears my issue was using the laptop built-in SD card reader. I used a USB->MicroSD adapter and it worked fine
dieserniko
But this isn’t really a great workaround. Built-in readers are mostly faster than USB readers, I don’t really want to switch because of that
Chris Cannon
I’m getting the same error, even when using a USB adaptor. Is there anything else to try?
Milliways
I just decided to perform a fresh installation and try out the new options.
I was quite disappointed to discover there is no option to use my existing wpa-supplicant.conf or ssh public keys.
Milliways
It seems to have plucked one of my public keys from the ~/.ssh directory on my Mac so there is no issue with that.
GB
Why are these amazing options hidden behind a key combo that no one will know? And those of us that do know will need to keep Googling it to remember? Just add an “Advanced” button or something on the main UI.
Michael Back
Thy really need to ad it so when using the selection box like for wifi country you can type U and it jumps down to U’s. It is very slow to scroll and I dislike the click an drag. The click and drag is faster but still not a normal way to move down for me.
Dench
Fantastic, love the advanced as well as simple implementation.
It’s great to keep things true.
Thats Pi!
Steven Kan
1) Adding to the dog-pile asking for a visible checkbox or menu item for the Advanced options. I’ve used Imager 3x now, and every single time I’ve had to google to find the secret decoder keystroke.
2) But awesome application nevertheless! Huge time saver.
3) And a feature request to add option to assign static IP address on the Ethernet port, for applications where a headless unit might be installed on an isolated network with no DHCP server or DNS server.
Gerald Brown
Your option #3 would be a good option if it worked, which any options chedked currently do not work on my Ubuntu Linus machine
Gerald Brown
I just installed rpi-imager 1.6.1 on my Raspi4-8gb and when I TRIED to run it I kept getting error message “can not open “/dev/ssd” when it tried to write the image.
Also when I run imager on my Ubuntu machine and check any of the advanced options I get a message about opening FAT partition and then the error message “error creating ‘firstrun.sh’ on FAT partition. Last night I read an article about imager-1.7-beta available for windoze. I then created a comment asking when it would be available and received a reply saying “version 7 was renamed to 6.1 because there weren’t many changes made” and the comment was CLOSED.
Version 1.6.1 DOES NOT WORK WHEN ANY ADVANCED OPTIONS ARE CHECKED ON LINUX. That other article had comments saying that 1.7-beta was working on windoze.
Gerald Brown
I just went to “https://github.com/raspberrypi/rpi-imager/blob/qml/README.md” and there they have directions on how to download and install on all systems. When I installed it from there and ran it it showed it was now v1.6.2 instead of v1.6.1 and it created the missing firstrun.sh file.
If you go to the Raspberry Pi site to download the Rpi-imager file be warned it is still the old version 1.6.1 as of 4/23/21.
Good luck in installing and using this very useful program.
horace
wow! i just found out about ctrl-shift-x. very useful! :)
would it also be possible to include “boot to cli” and “overlay file system” options? and maybe the amount of “video ram”? :)
Andrew Hart
I also agree that the hidden options should not be hidden. I just used the imager and had forgotten that I had set a different password. took me forever to figure out why I could not login on a newly flashed image. So PLEASE make it obvious.
Thank you
Remo Höppli
Love it! I did write a script to automate few steps I repeatedly do when configuring a new pi for a DIY project. It also covers static IP configuration, swap size and more. Maybe it helps some of you:
https://medium.com/codex/speed-up-your-raspberry-pi-configuration-1de16f894de8
https://github.com/it-monkey/py-init
Thorsten brandau
That is really nice. I would apreaciate if this could be extended to, e.g. initial update, own commands, and also Desktop/Profile configuration (e.g. installed a zipped default profile). That would make a roll-out as terminal clients super-easy.
Keep up the good work!
Marco Kauf
Could you encrypt the WPA password like wpa_passphrase does?
# wpa_passphrase ‘FRITZ!Boxxx’ ‘defaultpwd’
network={
ssid=”FRITZ!Boxxx”
#psk=”defaultpwd”
psk=ca8a6b783a6983b57554ef0aebc2b5969169b918011be972cd58c822c24a60e9
}
I think is not good practice having a secret in clear letters in any file
Thanks
Adam Hindmarch
love the menu, one of the best additions. also could you possibly consider an option that simply adds “usbhid.mousepoll=0” to “/boot/cmdline.txt” so that the “lagging/floaty” mouse issue can be resolved for those who are not a fan of it like myself
Klauss
The advanced options are awesome but can be possible to add a card backup option to the software (some of us don’t use gui), I think that will make the software even more awesome.
Thanks
Dave
Windows 10 behaviour is not what I expected.
Version 1.6.2: I had entered the information I normally want written to the SD card, including wifi id and long, _long_ password, SSH on and password and saved the session as “To always use”. I successfully wrote several SD cards using this information.
Then I wanted to create a SD card with slightly different details, so selected “For this session only”, amended what needed changing, wrote the card and clicked the “x” at top right to close Imager.
Today I needed to write some more SD cards using my regular details and found no options had been saved. I expected Imager to store what was entered “To always use”, not wipe it.
Is this a bug or a feature? If it’s a feature, I’d like to request that Imager store information entered “To always use”, but not information “For this session only”.
Marco J
The CTRL + Shift + X option was something I never knew about. Awesome, this is exactly what I have allways wanted. Doing the enable SSH and WiFi configuration after flash has been annoying :-)
One request, please set the “expert” mode available from the Imager menu. The ‘double’ hidden hidden expert mode is odd!
Scott Prive
Feature Request: Support for ZIP files which are password-protected.
I know how to unlock the ZIP file when unzipping just fine, but there are times you need to share an image with someone who is not well-versed with different compression tools.
Darren Conway
Hi
The imager app is great and I have some suggested improvements.
The display of the advanced features should be a persistent option. After using the super cryptic keys to get into Advanced mode, there should be a tick box to select whether Advanced mode will be displayed by default, or not. That way, you can keep the GUI simple, or allow advanced users to keep seeing advanced features without remembering the keys.
The functions of the advanced mode could be extended to include more common config tasks, like:
configuring networks, ntp, Access Point etc.
Comments are closed