Bringing LLMs to the edge
This Maker Monday, the Raspberry Pi AI Camera meets large language models. Today’s tutorial is courtesy of the editor of Raspberry Pi Official Magazine, Lucy Hattersley.
(Yes, we know it’s Tuesday, but we enjoyed a glorious and uncharacteristically sunny Bank Holiday Monday in the UK yesterday, and we gather the US had a holiday too. We’re therefore extending Maker Monday by a day so we don’t have to wait nearly a whole week until the next one.)
Large language models (LLMs) offer new intuitive ways to interact with technology. From natural conversations with chatbots to summarising long documents, LLMs excel at understanding and generating human‑like text.
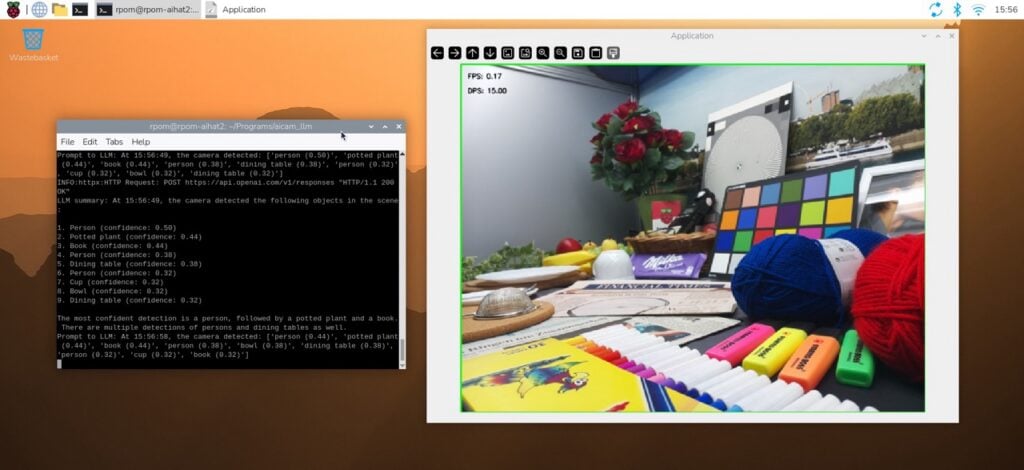
What happens when we combine the power of LLMs with the Raspberry Pi AI Camera? This pairing opens up new ways to connect the physical world of vision recognition to intelligent language-driven systems.
These powerful new systems are being called vision-language models (VLMs). This approach lets you build systems that describe and reason about the physical world using natural language. All without streaming video to the cloud, helping to keep your capture private and reduce the burden of GDPR compliance.
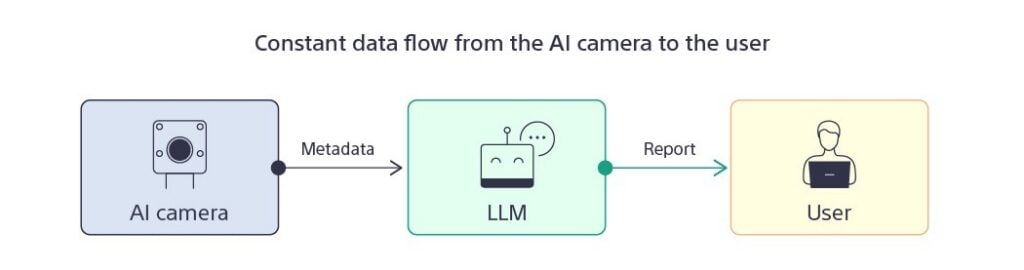
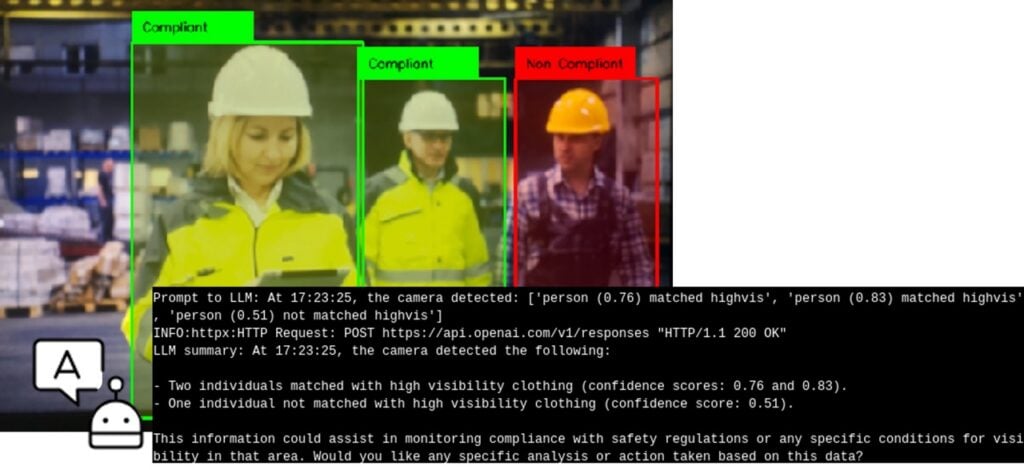
In this tutorial we will consider one way to do this using the Raspberry Pi AI Camera. Our approach will be where the Raspberry Pi AI Camera constantly sends prompts containing the metadata to the LLM. This approach can be seen in Figure 1.
Set up AI Camera
Ensure your Raspberry Pi AI Camera is connected to Raspberry Pi. Before we start, ensure that your Raspberry Pi runs the latest software. Run the following command to update:
$ sudo apt update && sudo apt full-upgradeThe AI Camera must download runtime firmware onto the IMX500 sensor during startup. To install these firmware files onto your Raspberry Pi, run the following command:
$ sudo apt install imx500-allRaspberry Pi’s AI Camera does the heavy lifting with the AI model detecting objects, recognising patterns, and generating metadata on the sensor like {Cat (0.76), Box (0.81)}.
Instead of streaming raw video to the cloud, the system can output the inference results as metadata, drastically reducing the amount of data transmitted to the cloud or to other systems. This is particularly beneficial in environments with limited bandwidth or expensive data costs. This means the camera provides structured insights as inference results; for example, labels, bounding boxes, and confidence scores. These are then passed to an LLM, which turns structured detection data into human-readable summaries and contextual insights.
The code snippet (01_aicam_to_llm.py) at the end of this article can be adapted to your own situations. This sends the metadata from the Raspberry Pi AI Camera to an LLM using OpenAI. To run it, you will need to install modlib and the OpenAI library, then get your own API key for OpenAI.
Let’s set up the code. First, clone all the files from our GitHub account.
$ git clone https://github.com/lucyhattersley/aicam_llm.gitTake a look inside with ls and you will see example code for all our projects. Many code files contain the same code with different prompts. We expect you to finally use one of the original code files with your own prompt.
We will need to create a virtual environment so we can add the OpenAI and Application Module Library (modlib) packages.
$ python -m venv envAnd activate our virtual environment:
$ source env/bin/activateUse pip to install modlib and openai:
$ pip install modlib openaiNow edit the file and add your API key. We are going to use the Thonny IDE to do this:
$ thonny 01_aicam_to_llm.pyAdd your API key to line 8, replacing <OPENAI_API_KEY> with the key inside straight quotes so it looks like:
client = OpenAI(api_key="abcde012345")Save the file and exit Thonny.
Now run the file with:
$ python 01_aicam_to_llm.pyThe first time you do this, it will perform a Network Firmware Upload. Wait for the file to upload (around 30 seconds). After this, the terminal will display a text description of what is in the viewfinder:
LLM summary: At 16:33:29,
The camera detected several objects with their respective confidence scores.
The detected objects include:
**Persons**: 3 instances with confidence scores of 0.44, 0.38, and 0.32.
**Books**: 2 instances with confidence scores of 0.44 and 0.32.
**Potted plant**: 1 instance with a confidence score of 0.38.
**Dining table**: 1 instance with a confidence score of 0.38.
**Cup**: 1 instance with a confidence score of 0.32.
**Bowl**: 1 instance with a confidence score of 0.32.
This suggests a setting likely involving people, reading materials, and dining or relaxation items.
We can adjust this program to identify different things by adjusting the prompt on line 23 of our code. The subsequent programs adjust this prompt to perform different tasks.
- 01a_smart_home.py
- 01b_retail_shelf.py
- 01c_factory_floor.py
Inspect these programs with Thonny or an IDE of your choice and look at the prompt on line 23.
Smart Home Observer
On the Raspberry Pi AI Camera, we run an object detection model to detect objects of interest like people and pets, producing results with data containing the class and confidence like:
{"detections": ["Person (0.92)", "Cat (0.87)", "Box (0.82)"]}Then the Raspberry Pi AI Camera sends this information to the LLM, which processes the results. The prompt on line 23 is:
prompt = f"You have access to a smart camera in the living room of my home. At {time.strftime('%H:%M:%S')}, the camera detected: {labels}"When run, the code produces a friendly update:
At 14:23, one person is in the living room with the cat. A box is in the room as well.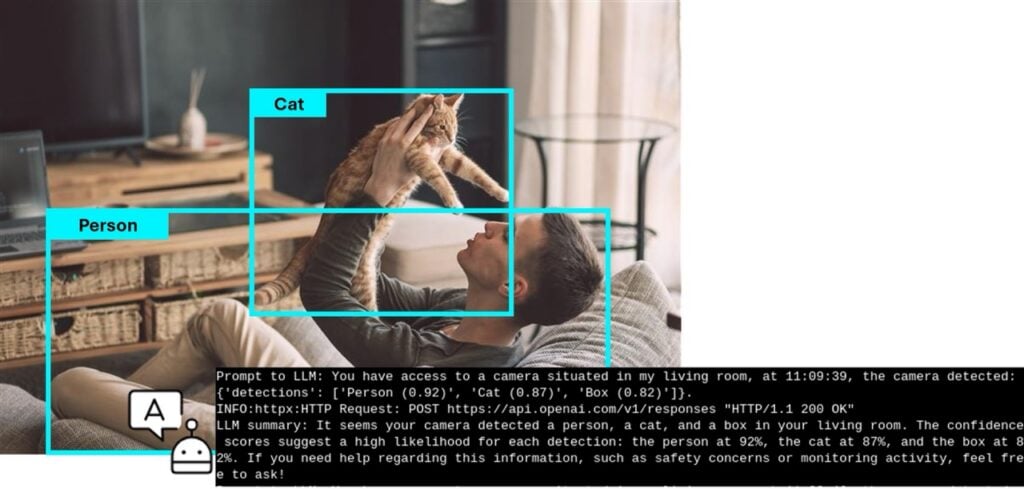
Retail Shelf Monitor
With a Raspberry Pi AI Camera monitoring a shelf, vending machine, or a fridge, we can use an object detection model to detect the items we wish to monitor. Then we can add functionality to check what shelf or row the items are on. We send the LLM the detections with a prompt:
prompt = f"You have access to a smart camera in a vending machine. At {time.strftime('%H:%M:%S')}, the camera detected: {labels} Provide information on the stock levels of the vending machine."And the LLM generates a report:
"Four soda bottles are left in row three — stock may need replenishing soon."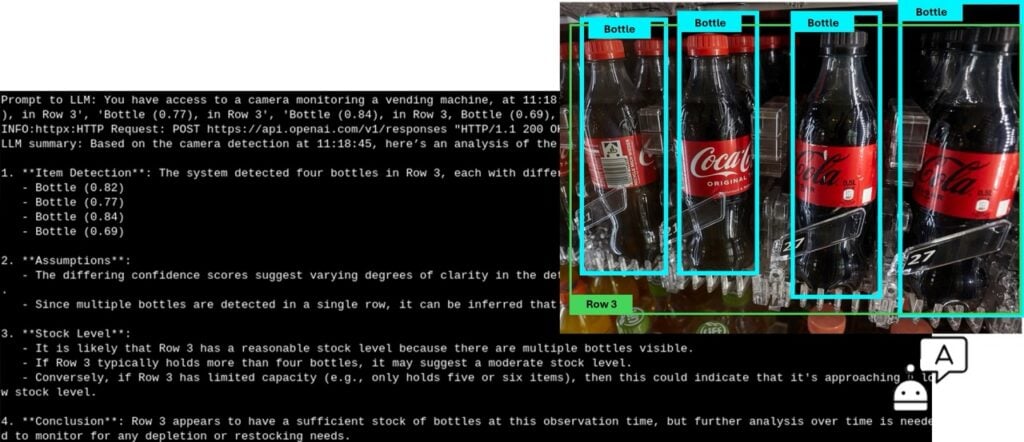
Factory Floor Watcher
Raspberry Pi AI Camera checks if workers are wearing safety gear. In this situation, we can add some more application logic to match people with high-vis jackets to make sure they are wearing one. The prompt on line 23 of our code is:
prompt = f"You have access to a smart camera in a warehouse. At {time.strftime('%H:%M:%S')}, the camera detected: {labels} Provide information if people are wearing highvis jackets."Then the metadata is forwarded to an LLM, which produces a natural alert:
Warning: one worker is not wearing a high-vis.As we can see, the prompt on line 23 of our code can be adjusted to a wide variety of tasks using natural language.

8 comments
Jump to the comment form
Anders
Really wonderful stuff, thank you. I really enjoy seeing how far I can push the Pi with AI.
Just not enough time in a day to do it all.
rclark
On the surface sounds interesting, but practical, or should we, well, maybe not.
First camera AI ‘monitoring’ inside a home sounds Orwellian. Don’t see any reason for this application even if AI is ‘local’… More stuff consuming energy and need-less for most situations.
The bottle count would easily be handled by a mechanical switch as the last bottle in line passes it (now have 4 available). simple, reliable, and cheap.
I really really think AI is just being pushed for AI sake… Not for practicality or an eye to the future of humanity… Places like China will love using this tech, and I can see why they are pushing so hard. Monitoring people just seems wrong.
That said, places like Quality Control where you can scan a product (like a PCB, or whatever) as goes by for obvious faults (chip in backwards, not present, no solder, etc.) before a functional check that a human might miss, CNC QA checks, or other very useful boring tasks. Go for it.
Aardvark
Pi is a learning platform. Many things we do on the Pi is for the purpose of learning and understanding something by practice.
Donald D. Uck
Your python code uses ‘from modlib.devices import AiCamera’.
Previously on : https://www.raspberrypi.com/news/build-a-raspberry-pi-classifier-detect-different-raspberry-pi-models/ you used ‘from picamera2.devices import IMX500’.
Care to comment? Is this the new way?
Thanks.
Raspberry Pi Staff Lucy Hattersley — post author
Good spot. It provides access to the SSDMobileNetV2FPNLite320x320 model which is lighter than the one in IMX500.
This is not ‘the new way’. Just a horse for this particular course.
alex
See https://pypi.org/project/modlib/, you can use modlib to create machine learninge apps w ai camera. But it also handles the device communication, directly through libcamera.
Nick Pettefar
I’d like it if it could identify plants in my garden. That would be seriously useful.
“Wild garlic”
“Bluebells”
“Potatoes”
DocSchaub
It would be even cooler if the program would use ollama locally on the RPI itself. A RPI 8 or 16GB can manage that easily. Or the AI Hat 2+ with hailo-ollama.
None the less a nice project.
Cheers!