Join the online colour-changing LED community with Pico W
In the latest issue of HackSpace magazine, out now, we show you how to add some light to your electronics with the brand new Raspberry Pi Pico W.
While Pico W is very similar to Pico, you will need to get the special wireless version of the MicroPython firmware. You can download this here.
Make sure that you select the version for Pico W, as the version for the regular Pico won’t work. You should have a UF2 file, and this can be loaded onto Pico W.

First, make sure that Pico W is unplugged from USB, then hold down the BOOTSEL button and plug Pico W into your computer using a micro USB to USB cable, then release the button. You should notice a new USB drive appear on your computer. You can drag and drop the UF2 firmware file onto this drive. Once it’s copied over, the drive will disappear and Pico W will reboot into MicroPython.
We recommend Thonny for working with MicroPython (though you can connect over serial as well). If you haven’t already got this, you can download it from thonny.org – it works on Windows, Mac, and Linux (including Raspberry Pi). Open up Thonny and it should automatically detect and connect to MicroPython running on Pico W. In the bottom box, you should see a line something like this confirming it:
MicroPython v1.19.1-88-g99c258977 on 2022-06-30; Raspberry Pi Pico W with RP2040If you see that, then you’re all set up and ready to go.

For our first internet-connected project, we’re going to create a CheerLight. The idea of this is to have a colour-changing LED linked into a global system of setting colours. You can set the colour by tweeting
@cheerlights and including a colour name in the tweet. This will change LEDs across the world to the colour you name. In an increasingly divided world, having an LED change colour is just a little reminder of how we’re all connected. This can sit in the corner of your office and remind you, in a small way, that you’re not alone. You’re part of a worldwide community of makers.
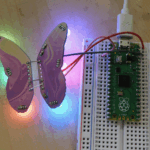
We’ll be using WS2812B LEDs (also known as NeoPixels) as our light. These can be programmed to display a wide range of colours. These LEDs come in a few different forms, but most commonly strips. You can use any form you like.

First, let’s wire it up. Your LEDs should have three inputs, usually in the order 5 V, Data In, and GND. 5 V and GND should be connected to VBUS and GND on Pico W, while Data In should be on GPIO 18 (you can use another GPIO pin if you like, but you’ll need to change it in the code). You can solder these on or connect them with jumpers and crocodile clips.
Coding it up
We need to connect Pico W to the wireless network. Obviously, this needs an SSID (network name) and password. You can put these directly in your MicroPython code, but this can be a bit inconvenient because it means you have to be a bit careful about uploading your code to an online code repository, and it means you have to type the details into the code each time you take them from a repository onto your device. Instead, we’re going to use a secrets file. In this, we’ll put all the things that we don’t want to be publicly known. It’ll include the WiFi login details, as well as secret keys for things we’ll be using in other examples.
secrets = {
'ssid': 'XYZ',
'password': 'XYZ',
'aio_key': 'XYZ',
'aio_username': 'XYZ',
'ifttt_key':'XYZ',
}
Enter that in Thonny and press Save, select ‘MicroPython device’, and call it secrets.py.
Now, let’s connect to the network:
import network
import urequests
import json
import time
from machine import Pin
from secrets import secrets
import machine
import neopixel

ssid = secrets['ssid']
password = secrets['password']

print("starting connection")
wlan = network.WLAN(network.STA_IF)

wlan.active(True)

print("connecting ...")
wlan.connect(ssid, password)

wait = 10
while wait > 0:
    if wlan.status() < 0 or wlan.status() >= 3:
        break
    wait -= 1
    print('waiting for connection...')
    time.sleep(1)

# Handle connection error
if wlan.status() != 3:
    raise RuntimeError('wifi connection failed')
else:
    print('connected')

status = wlan.ifconfig()
print( 'ip = ' + status[0] )
We also need a bit to set up our LEDs:
pixels = neopixel.NeoPixel(machine.Pin(18), 10)Now that we’re online, we need a way of grabbing the colour. There’s a back-end system that grabs colour changes from Twitter and posts them to the URL
api.thingspeak.com/channels/1417/field/2/last.json in JSON format. We just need to download this and extract the ‘field2’ data. This is hex encoded, so we need to extract the red, green, and blue values from this and set our LED accordingly.

As long as we’re connected to the internet, we can use the urequests module to do just this, and the json module will convert a JSON string to a Python dictionary. The following code grabs the latest colour from the URL and returns a colour:
def get_colour():
    url = "http://api.thingspeak.com/channels/1417/field/2/last.json"
    try:
        r = urequests.get(url)
        print(r.status_code)
        if r.status_code > 199 and r.status_code < 300:
            cheerlights = json.loads(r.content.decode('utf-8'))
            print(cheerlights['field2'])
            red_str = '0x' + cheerlights['field2'][1:3]
            green_str = '0x' + cheerlights['field2'][3:5]
            blue_str = '0x' + cheerlights['field2'][5:7]
            colour = (int(red_str), int(green_str), int(blue_str))

                  r.close()
            return colour
                 else:
                 return None
    except Exception as e:
        print(e)
        return None
    return colour
We have to do a bit of string manipulation to get the colours out of the string. First, we use slicing to get the two hexadecimal digits that relate to the colour, then we add ‘0x’ to the start of these two digits. The ‘0x’ lets Python know that the string contains hexadecimal characters, so we can then use int() to convert this new string into an integer.
Finally, we just need a loop that checks the colour every minute and updates the LED.
while True:
    print("getting colour")
    colour = get_colour()
    if colour is not None:
        pixels.fill(colour)
        pixels.write()
    time.sleep(60)
You can get the full code here.
Load it up to your Pico and you should see the LED occasionally change colour. Alternatively, tweet to
@cheerlights and send a message to lots of devices – including some Pico Ws – to change colour.
HackSpace magazine issue 57 out NOW!
Each month, HackSpace magazine brings you the best projects, tips, tricks and tutorials from the makersphere. You can get HackSpace from the Raspberry Pi Press online store or your local newsagents.

As always, every issue is free to download in PDF format from the HackSpace magazine website.


5 comments
Canelo
Will Thonny available for Windows? Where can i download that?
Dave
Here you are:
https://lmgtfy.app/?q=thonny+for+windows+install+instructions+
AndrewS
“you can download it from thonny.org – it works on Windows, Mac, and Linux (including Raspberry Pi)”
Szalai
available for Windows 11?
Meckerliese
What about opening thonny.org and look yourself? If you can’t … it says Win 11… so yes …
Comments are closed