Pimoroni Trilobot review | HackSpace #54
It’s a great time for people to get into building robots – there’s no end to the recipes and tutorials online. You could choose to totally scratch-build, or go for something more off-the-shelf to get you up and running fast. Firmly at the latter end of the spectrum sits the Pimoroni Trilobot kit.

Definitely looking like a trilobite, the Trilobot kit (£48) allows the robo-curious to build a gorgeous little bot sporting two driven wheels at the front and a castor at the rear to allow quick, responsive turning. It comes in two different kit options; a base kit where you need to add a Raspberry Pi 4 and a USB-C power bank to get it up and running, or a full kit which includes a Raspberry Pi 4, power bank, SD card, and Raspberry Pi Camera. We’ve built the base kit for the purposes of this review.
All the motor driving electronics are built into the chassis, and the chassis structure is formed out of beautifully designed FR4 PCBs. FR4 is super-tough so, once assembled, the Trilobot feels really rugged and will survive a few crashes and tumbles. The assembly itself is pretty straightforward with good instructions.

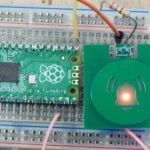
You begin attaching the micro gear motors to the underside of the chassis board. The boards are beautifully designed and the artwork and silkscreen are of the usual excellent Pimoroni quality. After adding the motors and wheels, you add the castor assembly. You then mount the Raspberry Pi 4 – you can mount the camera, but we momentarily couldn’t find one, so skipped this! Included in the Base kit is an ultrasonic sensor which you can mount alongside a camera. Everything slots together well, and it all physically comes together in perhaps 20 minutes. You’ll notice, when you plug in the motors, that the Trilobot has a pair of Qw/ST connectors. These are available so you can add extra sensors/hardware easily. In addition to the Qw/ST connectors, there are five ‘Breakout Garden’ sets of pins, ready to receive sockets (sold separately) which open up the Trilobot to a huge range of Pimoroni peripherals. Finally on pins, there is a set of three pin pads broken out specifically for a servo connection, and we imagine a classic first modification might be to try and pan the ultrasonic sensor or a camera to aid robot navigation.
Adding the top plate, which is a reversible choice of two delicious artwork designs, you can attach a power bank with the included Velcro straps, and they also provide a short flexible USB-C right-angle cable. There’s a nice gap in the top plate that allows easy access to the Raspberry Pi SD card slot, and also routes the USB-C power cable. We didn’t use the slick-looking Pimoroni power bank that’s included with the full kit – ours was quite large, but was still perfectly accommodated and held securely on the top plate.

Having dragged a copy of NOOBS onto the SD card, you need to hook up the Trilobot to a keyboard and monitor for first boot, and to tinker with the code examples. At the end of the assembly instructions there are details of how to enable the camera and I2C interfaces, and also how to clone and interact with the Pimoroni Trilobot GitHub repository which contains some great example Python scripts to get you started. The first suggestion is to run the flash_underlights.py example which shows off the incredibly bright LED under-lighting built into the chassis! Beyond flashing the lights, there’s a great range of examples to get you started with all kinds of functionality.
Speaking of functionality, the PCB has several buttons built-in, and there are numerous examples of using the buttons to interact with the LEDs, and also a really simple example single_button.py which just shows how to detect if a button has been pressed. There are lots of examples around movement, from simple scripted short movements through to an example, remote_control.py, which allows you to choose from a range of wireless controllers and then you can soon be driving around at your leisure. Speaking of driving, we wondered how well the castor arrangement would work on a variety of surfaces. It’s fair to say this isn’t an outdoor all-terrain robot, but we found that it was perfectly happy on hardwood or lino flooring, but also did fine on carpets and rugs. If you have a long shag pile carpet, we aren’t so sure!

Finally, on the subject of examples, there are numerous examples around adding and controlling servos to the Trilobot, as well as some very nice examples of using the ultrasonic sensor for distance measuring or object avoidance. These include avoid_walls.py, which does what it says on the tin, as well as interesting examples like distance_lights.py, where the LED under-lights indicate how far away they are from an object in view of the ultrasonic sensor.
To sum up, we feel the Trilobot is definitely a mid-level kit that’s capable of some excellent robotics project work, as well as great fun to watch, drive, or navigate. There are some tiny nuts and bolts which may mean really young ones might need a hand or some supervision, but the excellent software examples give a huge opportunity for both robotics projects and learning Python.
Verdict
A great mid-level kit suitable for home fun and learning, or perfect in an education environment.
HackSpace magazine issue 54 out NOW!
Each month, HackSpace magazine brings you the best projects, tips, tricks and tutorials from the makersphere. You can get HackSpace from the Raspberry Pi Press online store or your local newsagents.

As always, every issue is free to download in PDF format from the HackSpace magazine website.


No comments
Comments are closed