How to make a Raspberry Pi film scanner
Anton Gutscher wanted to find a way to digitally capture their grand-aunt’s film reels. In today’s new issue of HackSpace magazine, Andrew Gregory takes a look at how Raspberry Pi made it possible.
Before smartphones and video cameras, there was a period of time where memories were captured on film. In 1932 Eastman Kodak launched their 8 mm film, now known as Standard 8 or Regular 8, and it became popular very quickly. 8 mm filming had its peak of popularity in the 1950s to the 1980s, after which it became rapidly replaced by video cameras. Mostly captured without sound – wonderful memories nevertheless – it made home movies possible for a large audience for the first time.

When my grand-aunt passed, she left behind a tremendous amount of film reels. Family events, as well as holidays, had been captured in the dozens over the years and stored in boxes in the basement.
Feeling responsible and curious at the same time, I looked at the options of bringing the content into the 21st century, having them available for all family members on modern equipment such as tablets, smartphones, computers, and TVs.
One possibility would have been to get them digitised. There are companies out there offering exactly that, and I used such a service for a few reels from another family member some years back. The result was really good, but bringing hundreds of reels with unknown content to such a service seemed a bit odd and costly to me.

So I looked into commercially available film scanners. There are a few out there, but reading the reviews wasn’t very encouraging.
One day I stumbled upon an article about a guy using a Raspberry Pi to capture films using an old film projector. Since I didn’t have any projector, that wasn’t really an option for me, but it sparked the idea of using a Raspberry Pi Camera to capture film, frame by frame and using a stepper motor for film transportation.
The two most popular film formats were Regular 8 and Super 8. The ‘8’ stands for the width of the film in millimetres. The picture frames are even smaller: 4.5 × 3.3 mm for Regular 8 and 5.5 × 4 mm for Super 8, because a part of the filmstrip has sprocket holes for film transportation in the camera during filming.
So the first thing I needed to know was if and how the Raspberry Pi Camera would be capable of taking a picture of the tiny film frames in good quality.
Picture-perfect
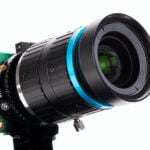
Firstly, I 3D-printed a small adjustable camera mount that allowed me to experiment with different settings. While impressed by the quality of the camera itself, I noticed that the field of view is much too large for the tiny film frames. I had a clip-on macro lens for smartphones laying around – I tried this and it worked! The frame now took about 40% of the field of view, just enough to avoid the distortion of the lens on the sides.

While I’ve learnt that the camera with the additional macro lens would be capable of capturing these tiny pictures in reasonably good quality, I also needed to find a way of consistent lighting through the film. An LED under an acrylic sheet for diffusion did the trick. While the light tapered off slightly towards the edges, it didn’t matter too much since these parts would be cropped away.
Now it was time to look at the next challenge – moving the film frame by frame.
I started experimenting with a simple 28BYJ-48 stepper motor. These motors are inexpensive and easy to control with the Raspberry Pi. Moving the film with a 3D-printed sprocket worked fine, but it was not precise enough. Given the height of only 3–4 mm for a frame, even a tenth of a millimetre variation in film transportation makes a visible jitter once you view the pictures stitched together as film.

Accurate lighting is essential 
The lighting dims a little towards the edge, but this doesn’t affect the scan
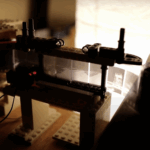
So I read up on stepper motors and decided to try a bipolar NEMA 14 0.9° stepper motor without gear. This motor also required a different motor driver. I used the DRV8825 stepper motor driver. The results have been very promising, so I continued optimising the film transport with this motor. Using my son’s ‘MATADOR’ wooden building bricks, I made a frame to hold the film reel and could, for the first time, scan thousands of frames in one go. Thousands may sound a lot, but considering that Regular 8 was usually filmed with 16 frames per second and Super 8 with 18 frames per second, a single minute of film takes about 1000 frames.
This setup allowed me to optimise the camera settings, but it also revealed some problems.
The stepper motor got warm during operation, around 50 °C, which seemed normal, so nothing to worry about, I thought. But after scanning for a longer period of time, I realised that the film adjustment was way off and the transport wasn’t working as precisely as before. I noticed that the film transport sprocket was not sitting firmly on the motor axle anymore. Looking at the 3D-printed mount plate, I saw small changes in the geometry. Not a lot, but enough to cause the setup to not work as it should.

I had printed all parts in PLA, which I thought should have no problem handling such moderate temperatures, but it did. So I took a spool of ABS, reprinted the mount plate of the stepper motor as well as the sprocket, and never had that problem again.
A much bigger challenge was sections where parts of the films had been glued together. At these points, the film is slightly thicker, which would sometimes cause problems with the film transport. While watching the scanning process on the screen, I could instantly spot it; however, the machine needed to run unattended for hours. This was a real headache. After experimenting on the film transport parts, I concluded that I could not fix it by only mechanical improvements and that I, therefore, needed another solution for the problem. If only the machine could see what I see when I watch it running into the problem … Well, I already had a camera taking a picture of every single frame; why not use it for a quality check?

I read up on computer visualisation, and after overcoming some struggles installing OpenCV on my Raspberry Pi, I did some experiments with it. That opened a whole new range of possibilities! Not only could the Raspberry Pi now check on every single frame if it was adjusted correctly, but using the sprocket holes on the film as reference, it could also automatically correct the position before saving the picture by adjusting the film with the stepper motor. What a breakthrough! In hindsight, this technology may have made it possible to use the cheaper 28BYJ-48 stepper motor and adjust the inherent imprecision, but at that time, the design was too much centred around the NEMA 14 already, so I did not want to change it anymore.
The only thing left to do was optimise the part of the picture analysed by OpenCV in order to reduce calculating time. Since the only part really relevant was the sprocket holes on the filmstrip, I cropped out just that area for analysis.
There was one more thing this technology enabled: it allowed precise automatic cropping of the individual pictures of the frames. Every imprecision of the transportation could be compensated by exact cropping, as long as the complete frame was scanned. So while at first it looked like a workaround for a problem caused by the mechanics, OpenCV became a key element of the project.

Originally, I thought I would process the individually scanned frames outside the machine on another computer, using video editing tools. But having now precisely cropped frames made me think it would be possible that it could all be done in one go – scanning, cropping, stitching, from the film reel to the digital copy of the film. Again, I searched the internet for software that could stitch frames to a movie on the Raspberry Pi and I found FFmpeg, which did exactly what I needed.
With the increasing complexity of the project design, the tool I used to design simple geometries for 3D printing became a bottleneck. I started this project using Tinkercad, easy to learn and use software. But now, I needed something that could simplify design changes and provide me with additional design tools, so I started to learn Autodesk’s Fusion 360 since the internet seemed to be full of makers using it. It was not an easy start, and many things that feel so intuitive by now made me struggle in this first project. But it was totally worth the learning effort. It became one of my most appreciated pieces of software, and I cannot imagine having done many of my other projects without it.

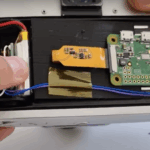
With this new tool in place, I redesigned practically everything and added the holders for the film reels as well as the casing for the Raspberry Pi and the other electronics.
Since I planned to potentially build more than one of these scanners, in order to hand them over to other family members so they too can scan their films, I decided to go with a custom PCB to make the assembly easier. I designed the PCB as a Raspberry Pi HAT and ordered five pieces online. It took about a week until the PCBs arrived. I soldered the parts in place and put everything together. I was really happy with the compact design. I was ready for the first scan of a film reel with the fully assembled machine.
It worked well – until it didn’t.

Since the Raspberry Pi and the other electronic components have always just been lying on my desk, it never crossed my mind that rising temperatures in an enclosed case will ultimately cause problems. After about half an hour, it got too warm for the Raspberry Pi’s liking and started indicating it. So I changed the design of the case, adding air vents and also putting a heatsink on the Raspberry Pi’s CPU, which I hoped would be enough since I did not want to add a cooling fan into this already cram-full machine.
Lights, camera, action
It was time for another test.
I took a film reel that had ‘Singapore 1976’ on the box. It seemed that my grand-aunt had been there on a holiday in 1976. Since I live in Singapore, I was especially curious to watch this one, and I thought it’s the appropriate first film to scan entirely with my (hopefully) completed little machine. All went well, and after a while, the ready-to-watch digital version of a holiday memory from 1976 was ready to be seen for the first time after its long sleep in a box in the basement.

Seeing the city how it looked so many years ago through the eyes of my grand-aunt, seeing the people she filmed, young and old, moments of her experience being in Singapore more than 40 years ago. It made me appreciate these little time capsules and feel proud that I could bring them to life again with such a simple machine.
This project was as exciting as it was challenging. While building and troubleshooting, I found so much useful information on the internet that helped me to learn, understand, and get inspired, that I really wanted to give back something, so I’ve put all the information on how to build this scanner online for anyone to access.
In hindsight, there are things I would do differently. Maybe I will make
another version of it one day, hopefully someone else will. I would be very happy if it would be because of this project.
HackSpace magazine issue 49 out NOW!
Each month, HackSpace magazine brings you the best projects, tips, tricks and tutorials from the makersphere. You can get it from the Raspberry Pi Press online store or your local newsagents.

As always, every issue is free to download in PDF format from the HackSpace magazine website.


5 comments
Matt
There’s another Pi-based film scanner software project that e.g. does bracketing to achieve better dynamic range https://github.com/dgalland/yart
Merging these two projects together would be awesome!
haleyma
Great article! Thanks for your clear thought process. I’m curious what resource you used to learn (and learn to like) Fusion 360?
Roger
Good stuff! I’ve a few reels of Standard and Super 8 film in a shoebox so while it would be nice to digitise them, it wouldn’t be worth the effort. However, I’ve got folders of 35mm negs from when I used to be heavily into photography and they would be worth doing something about. Given the greater pitch of 35mm film sprocket holes, the basic stepper motor would probably be adequate to drag a 6 frame neg strip through a camera head so I’ll put it on the list of Things To Do!
Thanks for the inspiration!
Bruce Hamilton
I used to work as a projectionist in the film days. The very precise stop motion movement of the film through the gate was controlled mechanically by the intermittent movement, also known as a Geneva cross. Is 3d printing accurate enough to make one? https://en.wikipedia.org/wiki/Geneva_drive
Alan
That was a really interesting read, thanks – great combo of PCB design, 3D printing and image processing. It’s amazing to see what’s possible! :)
Comments are closed