How to build your own Raspberry Pi webcam
We were captivated by a fantastic project called PiSight by Max Braun, which used the now-20-year-old (!!) Apple iSight webcam. Max had disassembled his iSight in order to use its casing as a retro chic enclosure, putting a Raspberry Pi Zero inside along with one of our camera modules. He then programmed it to turn it into a plug-and-play webcam. Unfortunately, the software he wrote was no longer working due to progressions with our operating systems — but we were super keen for people to be able to use a Raspberry Pi camera as a webcam, and if we’re being scrupulously honest, we really wanted to recreate PiSight for ourselves. Happily, Dan and Kieran from Ideas on Board came to our rescue and got the software tweaked and working again.

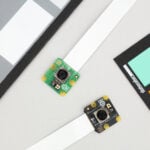
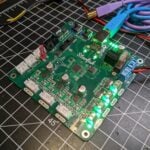
We slightly amended Max’s original design for the 3D-printed parts so they fit our newest Raspberry Pi Camera Module 3. You need to print just two small support pieces so that the Raspberry Pi Zero 2 W and the camera module will sit nicely inside an Apple iSight shell. You can find the parts on Printables, and download them for free. We found an Apple iSight on good old eBay and we’ve made a disassembly video to show you how to remove the internals.


Plug-and-play Raspberry Pi USB webcam
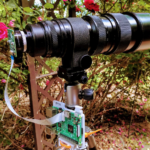
With the software now updated and working, we decided to go the whole hog and create a big fancy Raspberry Pi webcam tutorial. It walks you through the process of building your own plug-and-play Raspberry Pi USB webcam using any of our cameras. You don’t need to hunt down a retro Apple iSight webcam to use as your shell: our tutorial shows you how to 3D print or laser cut your own sleek mount designs to hold the hardware in place atop your computer.

The tutorial includes a shopping list showing you everything you’ll need, and it hand-holds you through installing the software, building your own mount, and assembling all your hardware. A typical laptop webcam is often low-quality and low-resolution — now you can enjoy a Raspberry Pi-powered upgrade.

15 comments
thagrol
Your linked tutorial suggests using a 3B but without a significant (and undisclosed) hardware change neither the 3B nor the 3B+ support the required USB device mode.
The 3A+ does but needs a non-standard USB A male to USB A male cable not a “standard USB to USB cable”.
Further “Finally, if you’re using Raspberry Pi 4, simply connecting a suitable USB-C cable to your usual computer from your Raspberry Pi’s USB-C port will work, because this port can handle both power and data. You won’t need any additional cables.” is not guaranteed in my experience. It might work with a USB 3 host port but can be very hit and miss on a USB 2 host port. By your own documentation an idle bare board 4B needs 600mA. USB 2 permits a maximum of 500mA.
Those flaws in the tutorial are likely to cause folks trying to use anything other than a zero/zeroW/zero2W some problems.
thagrol
Oh, and your addition to cmdline.txt (“dtoverlay=dwc2,dr_mode=otg”) also won’t work an a 3A+ as the ID pin is permanently pulled low. Use “dtoverlay=dwc2,dr_mode=peripheral” instead.
Raspberry Pi Staff Toby
Thanks for the feedback thagrol, we’ll amend the docs.
Jason
I set this up exactly as in the instructions (copy and pasted every command) and when I finally connect to the computer “Usb device not recognised”. Device manager shows “unknown USB device (device descriptor request failed)”. I can’t make it work. Running on a zero 2 W btw.
Les
Exactly the same issue here. Windows 10 Device Manager reports an Unknown USB Device (Device Descriptor Request Failed). Followed the steps twice, same error each time. Seeing the error on a Raspberry Pi Zero 2 W, and Camera Module 3.
Any help is appreciated. Thanks
Xenonffm
I had the same issue.
Use the systemd service instead of rc.local to execute the script on startup. This did the trick for me. https://learn.sparkfun.com/tutorials/how-to-run-a-raspberry-pi-program-on-startup#method-3-systemd
I logged the follwing error using the given rc.local method: [0:00:32.302173000] [386] ^[[1;32m INFO ^[[1;37mCamera ^[[1;34mcamera_manager.cpp:299 ^[[0mlibcamera v0.0.4+22-923f5d70
No cameras were identified on the system
ThousandMoths
I tried using systemd but still getting Device Descriptor Request Failed.
Crazy thing is I had it working on the exact same hardware a while back.
Sasought
Hi ThousandMoths,
I’ve been facing this same issue for a few weeks now and stumbled upon this thread. Any luck getting the program to work? I am also seeing “Device Descriptor Request Failed” on Windows, and MacOS is not even registering that something was connected.
JohnV
I have an old iSight, but if it doesn’t run at 6000°F it’s just not the same.
SamVimes78
That’s a really nice tutorial and i’d really like to give it a try. Unfortunately the only Zero2 i was able to come by is already in use for another project. I got 2 spare Zero W’s, but according to the tutorial i may run into performance issues.
I already bought 2 camera module 3 wide (standard an noir). The noir was meant to replace the v2 module in my birdbox. Unfortunately the v3 cam isn’t suitable as a drop-in replacement of the v2 cam. The birdbox runs with RPi Cam on a Zero V1.3. It’s perfect for us because it enables us to record and download videos with a nice web-based gui.
Sadly i wasn’t able to find something even remotely similar that works with the camera module 3.
Carlos Luna
Just tried the instructions with a Zero 2 W and a Camera Module 3 and works perfectly. Now, how can we pass args to set resolution or activate, for example, HDR mode on the module?
Thanks!
Ted
Nice work and may I ask if there is any way to modify the camera parameters such as resolution, brightness, exposure mode, white balance etc. ?
Raspberry Pi Staff Liz Upton
There are! https://www.raspberrypi.com/documentation/computers/camera_software.html – I have a sense you’re going to have some fun here.
Gina
Hello there! Thank you for this tutorial. I am trying to run this on my Raspberry Pi 4 with a Raspberry Camera Module 3, but unfortunately VLC or Quicktime are not showing it after I followed all the steps. Camera is shown available though through $ libcamera-hello –list-cameras.
Is there anything I have to be aware of with this setup? Thank you so much!
JB
Hello !
Thank you for bringing back to life this amazing setup with an up to date version 😃!
I managed to make it work with the tutorial and see the webcam as an USB-C gadget on OSX. However only on most recents version (tested both OSX Ventura 13.4 and Big Sur 11.7.6, but only Ventura 13.4 works). Nevermind it’s ok since I was about to switch to Ventura anyhow.
However I need some helps regarding performance improvements. The thing is that as soon as I activate the webcam on OSX side (Photo Booth or Zoom), the processes (`uvc-gadget -c 0 uvc.0`) on the PI starts using a lot of CPU. One process use a full CPU core, and 5 others use another core all combined. At the moment it makes it almost impossible to use on a daily basis without burning down the PI.
Would you have any ideas ? Reducing quality or compression for example ? Ways to reduce those quality ? On showmewebcam project we had the https://github.com/peterbay/camera-control for example.
Comments are closed