Droplet photography
I get asked sometimes what my favourite projects from this blog are. Dave Hunt’s water droplet photography’s right up there: Dave rigged up a Pi to trigger a solenoid valve and a camera shutter at the same time, to take perfectly timed macro photos of water drops. You can see his original, beautiful pictures here in our archives.
Over in Germany, Markus May has based his own rig on Dave’s, with a few alterations; he’s also put a lot of effort into lighting and colour effects, with spectacular results.
Markus’ original blog post is in German, but Google Translate does a pretty bang-up job of making things understandable for idiots like me who promptly forgot all the German they knew moments after taking a GCSE exam in it. (I still remember that Zwiebel means onion, but that won’t get you far on holiday unless you really like onions.)

We love this stuff: bringing the sort of thing you could only do with an expensive professional rig inside the budget an amateur with a DSLR might have gets us really excited.

This rig is more involved than Dave’s original, with a couple of Mariotte’s bottles which produce an equal flow rate, however full the bottles are. Guar gum for thickening, milk for opacity and food colouring went into the liquid for extra gorgeousness.

Markus has made a circuit diagram available, and Dave’s original post still contains everything you’ll need to make your own rig. There are more of these spectacular photographs at Markus’ Flickr, and you’ll find a great writeup of the original session, with behind-the-scenes pictures at his blog post.


5 comments
bertwert
Slightly nicer than my setup…
https://www.raspberrypi.org/forums/viewtopic.php?f=32&t=104892#p731786
My equipment: Ribena bottle (after drinking of-course!), plastic tubing, margarine tub, chair, tripod, DSLR, lens. Total cost $700… (the last two make it add up!)
bertwert
And water + food coloring.
Bryan Crotaz
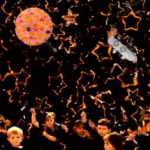
You can also do this with a microphone. I’ve taken some lovely pics of party poppers and balloons popping by triggering the flash from a microphone with a simple transistor amplifier into a login input on an arduino – same thing would work on a Pi. I found a short millisecond or two delay got me a better picture, just after the initial action.
Flash guns have adjustable power settings. They don’t adjust the brightness of the light – instead they use a shorter duration to give out less light. This gives you a sharper picture. So wind the power down as low as you can go without the picture getting too noisy.
What I used to do was to turn out all the lights, fire a 30 second exposure on the camera, and during that 30 seconds, trigger the bang. This hits the microphone, triggers the timer, then fires the flash. This gets you a very clean picture with very very short exposure so you get all the motion detail.
bertwert
Cool!
Can we see a pic?
Lorna
This is really gorgeous! I need to try rigging something like this up with my DSLR.
Comments are closed