Dewarping 360° images from the Pi camera board
Katherine Scott, newly equipped with a Raspberry Pi camera board, was looking for an image processing challenge. She realised she had an unused panoramic lens for an iPhone rolling around in a drawer somewhere at home, and got to work with the silly putty and cardboard to hook it up to the camera board.
![]()
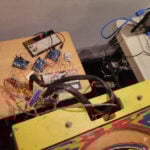
Since my RPI camera module is just loose, and not mounted to anything, I needed a non-destructive and quick way to attach the lens to the camera. I created three cardboard shims using my pocket knife, one that fit snugly to the camera, one that fit snugly to the protrusion on the lens, and one to space the two parts out. I used silly putty to “glue” the boards together while allowing me to slide them around to get the alignment just right. Silly putty works great for this as it is non-conductive and easy to pick out the RPI camera board without breaking it. Also cleans up fairly easily.
The raw output from a lens like this gives you a doughnut-shaped image and a lot of surrounding cruft – Katherine uploaded some unmanipulated footage from the camera to YouTube to demonstrate what she had to work with.
Katherine’s job was to cut and unfold that doughnut, until she had a dewarped it into a recognisable rectangular image. To do this, she needed to understand where the centre of the doughnut was, what the radius of its hole was, and what the radius of the doughnut itself was. This information meant she’d be able to be able to map all the points in the image, and then translate them to a rectangle instead of a torus. Here are her notebook calculations:

Katherine coded all this in Python and has made it available for you to play with on GitHub. The results:
You can read much more, including a first draft of the dewarping code, Katherine’s plans for the project (which include 3d printing a more robust shim to attach the lens to the camera – we’re kind of sad about that, because we love the silly putty) here on her blog. The rest of the website is also well worth a browse; Katherine’s got some really interesting computer vision projects on the go. Thanks Katherine – we’re looking forward to seeing what you do next with the camera board!


16 comments
Adrian
Nice work Katherine, great to see the details published so we can all learn.
The Raspberry Pi Guy
Excellent work, looks epic!
The Raspberry Pi Guy
Tobias
ImageMagick convert can do depolarisation mapping for you.
Example from a few days ago:
http://redd.it/1kgux5
liz
But it’s more fun (and way more rewarding) to do it yourself!
AndrewS
Absolutely. A while ago I wrote something vaguely similar to do arbitrary rotates and scales of an image using matrices and Python Imaging Library. As well as being more rewarding, coding it yourself gives you much more control and flexibility.
AndrewS
Heh, that’s a really neat project!
I wonder if changing the focal distance on the RPi camera http://www.raspberrypi.org/archives/4279 would allow you to get a less blurry image from the panoramic lens?
René
Greet work, less is more, bluatifull project. Looking forward to next step streaming images.
See http://www.ryubin.com/panolab/panoflash/projects_360panolive01.html
Brian C
Great idea Katherine! Some of us old gits remember “silly putty” as a pink, thixotropic silicone… it flows very slowly and bounces dropped, but shatters when hit with a hammer. Methinks the stuff you had was more like “Blu-Tac” which is also good for posting plain-paper notices and the like. One must be careful with it around optics and electrical contacts…the oiliness is hard to remove if it gets in the wrong places.
Lei Nuo
co cool
horace
with opengl it could work in realtime.
simply use a fine enough mesh grid that has the uv-coordinates in doughnut shape and the 3d-coordinates in the rectangular shape. use the video input as texture.
Peter Bierman
With the GPU on the Pi, it should be able to do this in realtime using just her math and a shader program. Is it possible to get the video from the camera as a GL texture? This is the sort of thing that has me most excited about the Pi, but it’s very hard to find info about utilizing the GPU with the camera.
hamjudo
That would be cool to mount on a robot.
The math and image quality will differ with the type of mirror or lens. I think I will try this with a spherical or conical mirror, assuming I can find or make one of a reasonable size. Ball bearings are incredibly precisely made, so they good precision mirrors, if you can find one big enough to be useful. I own some big ones, the question is “can I find them?”.
I also own a science book for children that includes a flexible mirror that can be bent into a cone. When last I played with it, it was a surprisingly high quality mirror (except at the joint), given that it was part of a book.
For bonus weirdness, if there were three spheres or cones in the field of view of the camera, one image could be used to generate a stereo pairs around the circle. The quality would be comparatively low, because each cone or sphere wouldn’t take up much of the frame, but it would be nifty.
Calum
There is a german university that has done just this.
They have a custom board for it, not a Pi, but it works amazingly for mobile robotics, and can track its position in a room by the distance between markers in the video.
They enter Eurobot with it each year. I forget the uni name, but i remeber them being german!
Omar EL KADMIRI
DIY omnidirectional images unwrappin:
http://www.academia.edu/1026409/An_omnidirectional_image_unwrapping_approach
Free software for unwrapping omnidirectional images :
http://www.0-360.com/software.asp
Robot with omnidirectional camera:
http://www.youtube.com/watch?v=By59AZYyQ1o
RobV
cool.
next time I holiday in New Zealand i could use a Pi so equipped to sucker to the roof of a hire car, two wires down to the cabin. Saves stopping every 500m.
konker
Great work! A good lesson is that sometimes you need to step back from the keyboard and use a notebook or a whiteboard for a bit.
Comments are closed