Dave Hunt’s time-lapse touchscreen controller
Regular readers will know Dave Hunt well. He’s behind some of the…no, scratch that; he’s behind THE most beautiful posts we’ve featured here. (There’s a new example of Dave doing something beautiful with the Pi in this post: you’ll have to read to the bottom before you get to it.)
Dave is a photographer, and he’s used the Raspberry Pi in several different rigs to replace much more expensive specialised hardware. His water droplet photography rig is easy and inexpensive to set up, and it produces extraordinary results. His focus-stacking Pi solution will save you around £600 on a clean macro photography setup; his rising/falling time-lapse rig has taken video that will have you running to the travel agent to book tickets to Ireland as soon as you’ve watched it.

A quick reminder of some of Dave’s previous work with the Pi. Click the image to find out how to take a photo like this yourself.
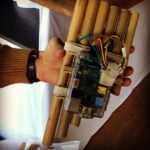
Dave said last year that he was looking to add more elements to the time-lapse rig (amazing, really, given that it already has features like a little heater to evaporate any dew that threatens to condense on the lens). The rig already raises and lowers the camera in tiny incremental stages as the time-lapse is being shot, so the camera moves as the footage is being taken, which adds a lot of interest to the shot. Dave’s now refined that action by adding touchscreen controls using Adafruit’s PiTFT Mini Kit (which we saw recently being used by the good folks at Adafruit to turn a Raspberry Pi Camera Board into a touchscreen point-and-shoot camera). He adapted Phil Burgess’ graphical user interface (GUI) from that project to create one that controls the length of the pulse sent to the motor, the delay between shots, the number of shots and the motor’s direction.
All this means that where previously the Pi-powered time-lapse rig had to be sent commands wirelessly via a phone or a laptop, it can now be controlled directly from the touchscreen panel mounted on the Pi itself.
https://youtube.com/watch?v=jxQcbp0qXQs%3F
The user interface he’s built allows you to position the dolly on the rail via the motor control buttons; change the motor pulse duration between shots; change the delay between shots; change the number of shots; see what time is left for the current sequence; and start and stop the time-lapse.
Dave has provided, as always, a parts list (the whole controller, including the Pi and the screen, will come in at around $100), full instructions, and all the code you’ll need on his website. And the results? We think they speak for themselves.


25 comments
bertwert
Nice :)
liz
I think the fact that I’ve watched that video five times today and am still not bored with it speaks volumes. Gorgeous, isn’t isn’t it?
AndrewS
Wow. More stunningly beautiful photography from Dave.
I especially liked the rainstorm-in-the-distance blowing past at around 2:30 :-)
I guess it shouldn’t be too hard to interface this to use raspistill instead?
liz
Shouldn’t be too hard. (Dave’s using a DSLR, of course, but he’s sending it instructions using the Pi.)
Texy
With David’s assistance, I have modifed the code to work with my own design 2.8″ TFT board (http://www.raspberrypi.org/forum/viewtopic.php?f=93&t=65566).
I also intend to make it compatible with the Pi camera ;-)
Texy
Dave Hunt
Andrew, during that rainstorm you mention, there’s was thunder and lightning moving in behind me, and I was at the highest point in my area (the trig point for that hill was only 10 metres from me), so as the lighting got closer and closer, I was getting more and more nervous. That’s why I cut the sequence a bit short, I just wanted to get the heck out of there! :)
TheMainMan
Glad you stayed as long as you did, that was my favourite shot as well.
Alex Eames (RasPi.TV)
‘tiz an amazing video isn’t it? Every bit as good as the stuff you see on BBC nature programmes.
Thaddy
Miss the voice of D.A., though.
And bagpipe.
AndrewS
I guess it wouldn’t work nearly so well with cloudless skies though? Hurrah for the British Isles ;)
liz
> British Isles
Oo! Controversial!
Jim Manley
Ummm, let me guess, “British Aisles” would be more politically erect, I mean, correct? :lol:
tai viinikka
https://en.wikipedia.org/wiki/British_Isles_naming_dispute
“The term became more resisted when both islands ceased to be part of the same political entity in 1922.”
The Raspberry Pi Guy
Great work!
If it was a week earlier it would have featured in my Two years of Pi video!
The Raspberry Pi Guy
Texy
….David’s excellent work has featured on this front page a few times over the last year ;-)
Texy
Thomas S
Just beautiful! That’s all I can say!
Tetty
Fantastic footage. I’m gonna have a bash at doing something similar but using the Picam. I got a few servos lying around to move the RPi along. Just need some kind of track.
Hans
I build done of these with Pi and PiTFT and installed the Python scripts all is working except there is no information anywhere, not at adafruit or Dave’s blog, how to actually wire the whole thing with the shutter release npn transistor and resistor and most importantly how to connect the PI GPIO to the motor circuit to get forward and backward directions. If anyone has figured it out, please share.
Narciso Rodrigues
Hi Hans,
Check here:
https://learn.adafruit.com/touchscreen-pi-timelapse-controller/hardware
If you still looking ;)
I’m trying to install but I’ve too much errors :(
Best regards,
Narciso Rodrigues
Joe
Did you find solution? I have the same problem.
Joe
I have the same problem. Anyone can help me? please.
Joe
Hi,
Can you help me how to connect the PITFT to the stepper Arduino L298N which pins on gpio?
Thanks
Ben Nuttall
Try the forums
Joe
Please
Joe
Anyone know how to wire pi gpio to stepper Arduino L298N??
Thanks
Comments are closed