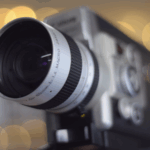
Raspberry Pi can revive almost any Super 8mm camera
Here’s how to build a digital cartridge, using Raspberry Pi Zero W, that can slot into almost any of the old Super 8mm cameras.
The design follows the standard cartridge format for 8mm cameras, and all the schematics are freely available, so anyone who has one of these old-fashioned beauties collecting dust can revive it.
Why spend 0.5 seconds putting an Instagram filter over your crystal clear digitally shot videos, when you could spend several hours modding a vintage 8mm camera to shoot authentically shaky frames? Because you’ve the heart of an engineer, that’s why. And we salute you.

How to build your own
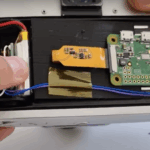
Here’s all the source code you need to build your own Super 8 retrofitting cartridge based in a Raspberry Pi Zero connected to a photosensor. And the CAD model so you can get the sizes just right. The maker advises that you need to click on “Part Studio 1” in the tabs along the bottom and create an account in order to copy, modify, or download the design.


The circuit comprises:
- white LED with 1k resistor to 5V
- photoresistor with 10k resistor in series to 5V
- GPIO18 on Raspberry Pi Zero connected to joint of photoresistor and 10k resistor
There is still some blurriness and shakiness to the final image quality, but that is totally part of the charm.
Retrofitting enthusiast
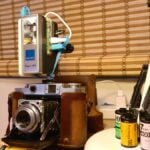
This isn’t the first time that maker Befinitiv has transformed a retro camera. Earlier this year, we blogged about their custom film cartridge, made with Raspberry Pi Zero W. It enabled their gorgeous old analogue camera to take digital photos and videos, and even wirelessly live stream to the internet. Check it out below.
Make sure you’ve got the right Raspberry Pi OS camera settings
Remember, if you’re using the latest version of Raspberry Pi OS, Bullseye, you’ll need to add the legacy camera interfaces if you want to make your own version of this project. To do this, click the update icon in the taskbar to update. Then open a terminal (Ctrl-Alt-T) and type ‘sudo raspi-config’, go to ‘Interface Options’ and then ‘Legacy Camera’, and reboot.


7 comments
Colin Rose
Nice Flavia!
Russ Nelson
You can download without creating an account. But, I’m not sure it’s worth the effort, because the walls of the printed object are too thin even to get them off the print bed, much less reliably insert them into my Minolta XL-400. There are no fillets at the base of the RPi holder pegs, so they snap off easily.
Paul
After some wok between me and a friend who was going to print it we sort of worked out the correct dimensions.
Yes – it is pretty thin and flimsy (more than an original film case!) and as it turns out the opening for the film gate is completely wrong! After some serious Dremeling I got the damned thing to fit – now all I need is to put the electronics together. Problem is the Pi Zero W is currently unobtainium.
Marcus
Hi Paul,
would you have a photo showing how you Dremeled the opening for the film gate. It doesn’t fit at all and I don’t even know where to start. Many thanks, Marcus
E,Mason
Got old vine cameras everywhere. This article should be really useful. Thanks
Elliott Savva
I’ve thought about the same thing before and it is good to see that someone has executed it. However I don’t like your advertisement about it being about getting some kind of unique effect from an 8mm camera. As far as I understand it, 100% of the “character” of 8mm footage comes from the film it is shot on (not counting framerate obviously), so unless there is some kind of odd quirk that I don’t know about about the camera optics, there is no reason that this would give you any of the effects of 8mm footage without digital processing.
Of course what is good about it is that you can make use of the optics and body of a cine camera that aren’t obsolete as part of a more modern video camera set up, so you have a DIY video camera out of a cine camera that saves a lot of work. And what’s also great is that it is just a cartridge so it doesn’t modify the camera and you can still shoot with film when you want, or a different sensor.
Paul
In the video there is nothing in the central film feed hole to sense the camera. The parts in the 3D print kit include a sort of round ‘gate’ which the film feed is supposed to rotate to then expose the optical diode. No evidence of any of that in the video.
I am also not sure that the little plastic thingy will properly engage with the film feed, but that is something I still need to prove.
Right now, I am not sure how I can route the camera from the Zero W to the plastic bracket that fixes it in front of the film gate.
Comments are closed