Raspberry Pi Pico Hot Wheels drag race track | HackSpace #51
There’s a brand new issue of HackSpace magazine out today and my favourite feature is this one by Robert Hamilton-MacLaren. He powered a Hot Wheels track with one of the free Raspberry Pi Pico units we gave away on our front cover when they launched.

Last February, my children rushed in with a copy of the latest HackSpace magazine for me, excited because of the gold lettering and free gift on the cover. The gift was a microcontroller, and my children’s enthusiasm was a catalyst for me to come up with a project that would appeal to and involve them. This would be the first project that I had done with a microcontroller. I picked the Python route as it seemed the closest step from BASIC that I had used many years ago at school. I worked through the tutorials published in HackSpace issue 39, and these gave me a good understanding of how to flash the Pico with Python and connect components. If you are starting out with the Pico, I recommend this as a great place to begin.
With small children, we have an abundance of toy cars and building bricks and, whilst rolling cars down improvised tracks built from books and supported by DUPLO, I thought it would be great if we could set up a race track and use the Pico to determine the winner. After research on YouTube, watching videos of Hot Wheels cars being raced down roof sheets and guttering, I was left wondering how I could transport such a large track. I needed to find a more portable solution, and inspiration arrived in the form of plastic conduit. I took a trip to the local electrical wholesaler to find the optimum width for the cars to run along (38 mm) and the 2 m lengths easily flexed to fit into the car. Hot Wheels track would be another option but, for a fair race, the competing tracks would need to be identical and quite a large collection would be needed. A 3D-printed adapter could probably be made to incorporate loops and jumps to add to the excitement.

In terms of components and materials for the build, this is a low-cost project (£30 or less, depending on components you already have). Of course, you will need a soldering iron and a computer to program the Pico, but other parts can be adapted or improvised using whatever you have available. I chose to house the sensors in 3D-printed parts that fit to DUPLO because I could save a lot of printing time. All that was needed was a few bespoke bricks. Thingiverse proved a great starting point with bricks that could be modified to fit the chosen sensor. On Thingiverse, ‘klamowk’ has published a customisable DUPLO-compatible brick. The required size can be entered, which takes the hard work out of making a brick that will fit to others. Other benefits of using DUPLO are that you don’t need much space to store the completed project because it can easily be disassembled, and the layout can be varied every time. Don’t be put off doing a similar project at this point if you haven’t got access to a 3D printer – you could easily mount the sensors in wood or even cardboard.

The Track
The track on its own is quite flexible so does need supporting. I designed a track connector that slides over two pieces of conduit to join them. If you don’t have a 3D printer, the track could easily be supported and joined by fixing it to a batten (this would be very rigid, but not so easy to collapse to store). DUPLO towers were used at intervals to support the track along its length up to the finish line, with custom bricks holding it in place. I got the children involved in building the towers, and we were having fun racing cars even before I’d started on the electronics.
Break beam sensors
We tried timing the races manually, and the children realised how difficult it was to tell by eye which car had won the race. Browsing the available sensors, I came across the Adafruit Breakbeam sensor, which will operate at the Pico’s 3.3 V (certainly over the distance needed for the project). There are two parts (an infrared LED and a sensor) and, as both components are the same size, I was able to design a brick that could be used for both and know that they would be perfectly aligned. I chose to place the sensor vertically above and below the finish line. The conduit track can easily be drilled to allow the beam to pass through without compromising the car’s path. Once connected to the Pico, the pin is high until the beam is broken. I set up a trigger event to capture the pin going low (see Code 1 listing). The code run by the trigger event is really simple: if an in_a_race flag is set to True, then the beam1_broken variable is set to True. The rest of the code is within the main loop so that the trigger code is run as quickly as possible. Initially, I had thought I would need to deal with multiple signals as the car passed through the beam. But actually, I haven’t had any trouble with false triggers and I just need to know the first instance of the beam being broken.
Code 1:
breakbeam1 = Pin(5, Pin.IN, Pin.PULL_UP)

def beam1broken(pin):
    #set beam broken flag only if in a race
    global beam1_broken
    if in_a_race == True:
        beam1_broken = True

breakbeam1.irq(trigger=Pin.IRQ_FALLING, handler=beam1broken)
Starting lights
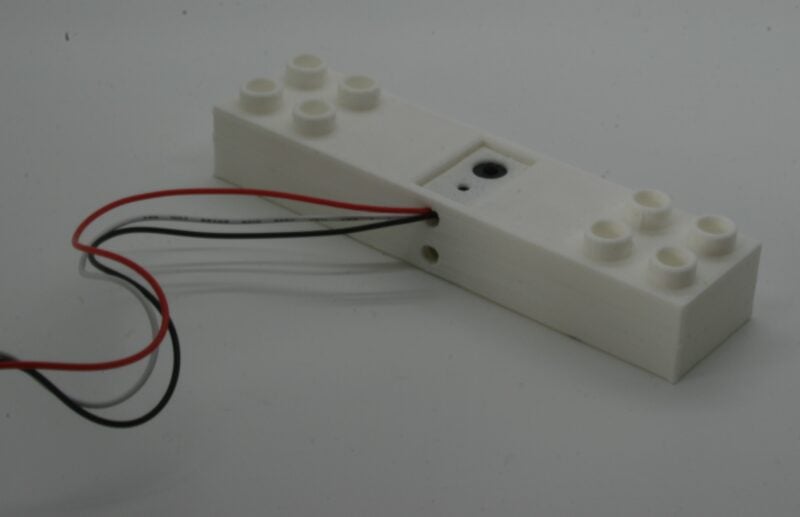
Rather than a basic stop/go light, I wanted to create the feel of a race track starting grid with a series of red and green lights similar to those seen on Formula 1. I started designing a brick to house the lights, but realised a DUPLO window brick combined with a 3D-printed front panel for housing the starting lights would considerably cut down the printing time and, of course, a blank was available on Thingiverse.

I did start looking at options such as adapting an SPI module which would have only required a few wires. I opted to keep things simple, and connected each LED to a pin on the Pico as there were plenty available for this project. The eight LEDs were soldered onto a stripboard with appropriate resistors, as this ensured the correct spacing for the printed door. The finished circuit fitted nicely into the window casement.
We thought it would be fun to have an audible start to the race, but the first piezo buzzer I used was far too quiet. I purchased a louder one on eBay, which I thought had a built-in transistor to operate (as there is not enough current to power direct from the pin). After testing, it turned out there was no transistor, but once I wired it up with an external one, it provided a good loud beep.
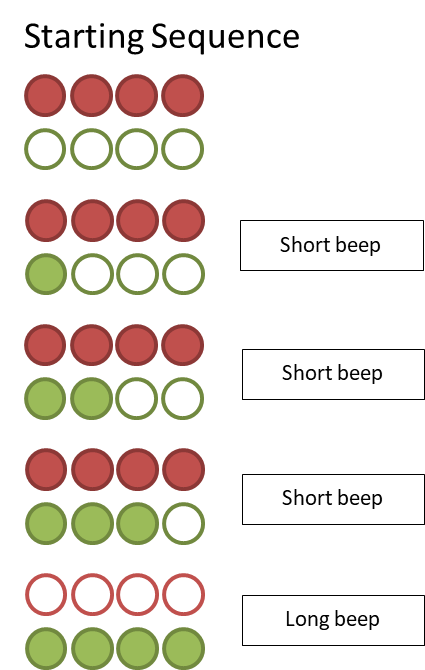
To program the light and beep sequence (see image above), I created a starting light routine which can be called from the main loop each time a race is started.
The race is started (or reset) by pressing a button mounted in a printed custom DUPLO brick. In the future, I would like to change this to a remote control to reduce the number of wires.
The lights also perform a second function; they are used to show first and second place at the end of the race, with the red lights flashing accordingly to indicate the winner (see End of the race image, below).

Bringing all the parts together
After initially testing the various parts on a breadboard, I decided to make the wiring more permanent using stripboard. The JST connectors make the project easier to take apart, but are not essential. I added some extra connections to facilitate future upgrades. The circuit was covered with a 3D-printed DUPLO brick-size case. A downside of using DUPLO for the construction is that there is nowhere to route the cables. If repeating this project, I would have built the starting lights and control box into one enclosure to reduce the number of exposed wires.
The Code
The main code is a loop within which there is a sub loop that runs while a race is taking place. This sub loop looks to determine if an event has been triggered by a beam being broken. If it is the first occurrence, it is recorded as the winner, and the second occurrence finishes the race and lights display the final race positions.

The setup can be run connected to the computer, but as the intention was to have this as a standalone toy, I saved the code on the Pico as main.py so that it would run each time the circuit was powered. I used a USB power adapter, but a battery would make this even more portable.
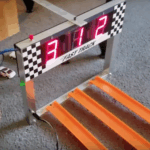
In action
After some initial testing, the track was put to use at a party. Children quickly got to grips with how to operate and interpret the results. Initially they were just racing cars, but soon they wanted to answer questions like, “Which types of cars were fastest?” and “Does the same car always win?”

Future ideas
In terms of construction, there are plenty of potential enhancements, such as ramps and jumps or even a car launcher. These could be 3D-printed or made from cardboard. An upgrade to the electronics would be to display the race finishing times (the full code already stores the times in variables which could be output to a display). Older children might enjoy the challenge of modifying the code further. For example, a relay race where as many cars as possible are sent down the track in two minutes, or a time trial which uses both of the sensors on the same track and measures the time between the two to calculate the speed.

Conclusion
The Pico Drag Race Track has provided us with hours of entertainment, and the ease with which it can be packed up, transported, and reassembled has meant it has made regular appearances at family gatherings. This project has developed my 3D printing, electronics, and programming skills and has also been fun to build, especially as I’ve been able to involve my children with so much of the process. It is an accessible and versatile project that can be adapted in many different ways (if cars aren’t your thing, how about modifying this for a marble run?). I’ve put the code and 3D models on a Facebook group,should you want to create something similar.
HackSpace magazine issue 51 out NOW!
This month and every month, HackSpace magazine brings you the best projects, tips, tricks and tutorials. In this issue, you can find out about the other two Christmas PCBs I made, learn about about how makers are using Machine Learning, get started with vinyl cutting, and much more. You can get HackSpace from the Raspberry Pi Press online store or your local newsagents.

As always, every issue is free to download in PDF format from the HackSpace magazine website.


5 comments
Filesynced
I will surely make Hot Wheels for my child.
Harry Hardjono
I want to see the continuation of K40 article, especially regarding software, drivers, and maybe some tutorials.
Also, what page is egg art, cnc drawing bot is at? All my searches only points out at the cover, both at the cover, and the cover inside on p. 45.
Nevsie
How is there no video!
But love it.
unlinked
Dear Ben Everard, please make a video tutorial so it can be easy for us.
krnl
I want to see a continuation of the K40 article, specifically regarding software, drivers and maybe some tutorials.
Comments are closed