Keeping an eye on nocturnal visitors | HackSpace #66
In the latest issue of HackSpace magazine, Andrew Gregory explains how he set up a wildlife camera to track mysterious nocturnal visitors that kept waking up his dog. Spooky.

Something keeps waking my dog up in the middle of the night. That would be fine, except the dog keeps waking me up in the middle of the night. This is not fine. To find out what this is, I resolved to set up a wildlife camera to monitor the back garden.

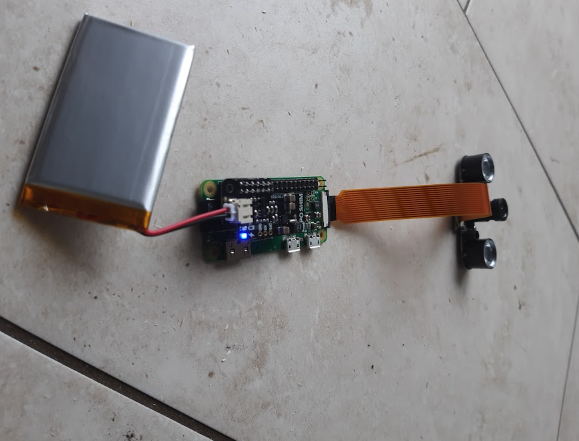
There’s a range of cameras on the market for Raspberry Pi: I thought about the Pi Camera Module 3, the Raspberry Pi Global Shutter Camera, the Raspberry Pi High Quality Camera, and various heat-sensitive modules. But as the visitor comes at night, the logical place to start was the night vision camera module available at Pimoroni et al.
I’m starting out with a Raspberry Pi 4, as that’s what I have to hand; later on, when I’ve got the software working, I’ll transfer what I’ve learned to a Raspberry Pi Zero W.

The camera module comes with two ribbon cables; one to fit a full-fat Raspberry Pi, the other to fit the slightly smaller camera connector of the Raspberry Pi Zero. There’s a black plastic clip that pulls out, and pushes back in to tighten the connection. The blue side of the cable needs to face away from the pins on the connectors. In the terminal, I ran sudo apt update and sudo apt full upgrade, because it’s nice to have the latest software versions, and even nicer to see loads of text fly past and feel like I’m some sort of hacker. Now, to test that you’ve got everything connected, run the following command:
raspistill -v -o test.jpgIf all is well, you’ll see an image flash up on your screen for a second or two. The colours will be off – that’s because the night vision camera module uses infrared light (most camera modules filter this layer of the light spectrum out).
Now we know that the camera is connected, it’s time to install the software. The package I went with is called Pi-Timolo (Raspberry Pi Time, Motion, and Low light), by Claude Pageau.
This is quite a hefty download, so run the following command:
curl -L https://raw.github.com/pageauc/pi-timolo/master/source/pi-timolo-install.sh | bashAnd put the kettle on while it downloads.
If you stuck around while Pi-Timolo was downloading, you’ll have noticed the names of loads of packages installing. Fortunately for us, Claude has created a menu system to guide the user through configuring it all; we won’t go into this here, other than to say that we keep to the defaults.

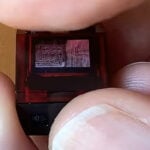
This object is going to live in the back garden, close enough to set up a video stream over the home Wi-Fi network, but far enough away that it’ll need battery power. In hindsight, we should have gone for a USB battery pack – these come ready to plug into whatever device you’re using, and have the benefit of some degree of protection. We opted for a 1200mAh 3.7 V LiPo battery, which comes naked and fragile, and can’t connect directly to the Raspberry Pi Zero W. We added a LiPo SHIM for Raspberry Pi Zero – this requires some soldering, but it comes with a header that you can solder the SHIM to, then slide it on and off the Raspberry Pi Zero W’s headers so you can reuse the board in other projects.

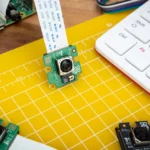
That’s the software and hardware just about sorted – now I just needed to build an enclosure. The classic for an outdoor project is a Tupperware box, with a hole cut out for the camera, but I want this to look nice, so I’ve found some scrap wood and I’m building a bird box-style enclosure. The benefit of this is that it uses a single plank of wood, cut into six pieces: a base, front, back, sides and a roof. The downside is that if your wood has been sitting around warping for a couple of years, it might not fit together snugly.
For the hole that fits the camera module, we found a 20 mm Forstner bit, which is the diameter that most closely matches the widest parts of the camera module, bored out four holes in a line, then cleaned the hole up with a chisel.
What have we learned from this build? First, there’s a reason that Tupperware containers are popular for outdoor projects. They’re waterproof, naturally, but they’re also thin enough that you can poke the camera lens through without interfering with either the light-dependent resistors or the infrared lights on the camera module. We’ve also learned that the 5MP sensor on the night vision camera feels tiny compared with the 12MP of the Raspberry Pi Camera Module 3, so we’re strongly tempted to find some infrared LEDs and make our own camera module.
HackSpace magazine issue 66 out NOW!
Each month, HackSpace magazine brings you the best projects, tips, tricks and tutorials from the makersphere. You can get HackSpace from the Raspberry Pi Press online store or your local newsagents.


8 comments
nafanz
Where is the photo of the uninvited guest?
IoT前哨站
I also want to know.
denbolle
CLICKBAIT.. now I still don’t know what keeping / awakes your dog?!
Raspberry Pi Staff Ashley Whittaker
True story actually… I’ll go get Andrew. Hold please.
Dando
This cliff hanger is as good as any Breaking Bad episode!!
Immediate update is required and you know why.
⌘+R, ⌘+R, ⌘+R, ⌘+R, ⌘+R, ⌘+R……
Raspberry Pi Staff Ashley Whittaker
So, Andrew has spoken:
“The hound was barking vigorously at the noises coming from behind the fence. Turned out to be a fox that was stuck there.
We felt for the poor beast, and fed it a meal of pilchards in tomato sauce. maybe that’s why the little blighter keeps coming back.
UPDATE: we put up some curtains so the dog can’t see the outside world. Now I sleep better, for longer.”
Raspberry Pi Staff Ashley Whittaker
Andrew sent through I nice video of the rescued fox wrapped in a blanket with his bowl of pilchards but I can’t upload it in the comments. Alas.
Sattva
You can upload it to Youtube and publish the link. Right? If no, then say how to find it by tag #nightvisionfox
Comments are closed