Pico W IoT with Anvil: Mood lamp | HackSpace #62
In today’s new issue of HackSpace magazine, Phil King shows you how to create a colour-changing RGB LED mood lamp controllable from a web app.

With built-in wireless connectivity, Pico W is ideal for creating Internet of Things (IoT) projects. To make it even simpler, Anvil has released a Pico W IoT toolkit to enable you to connect easily, and securely, to web apps you create on the Anvil platform. There’s a drag-and-drop web UI builder, built-in database, user authentication, email integration, HTTP APIs, and more – and it all talks to your Pico W.
By using Anvil’s special UF2 firmware image, you can code programs on Pico W in MicroPython as normal, with a few extra lines to connect to Anvil, then create a web app on the Anvil site which can send and receive data to/from your Pico W program. In this tutorial, we’ll be showing you how to control the colour of an RGB LED using sliders in an Anvil web app.
01. Install the firmware
To be able to link your Pico W to the Anvil framework, you’ll need to use a special firmware file. Go to magpi.cc/anviluf2 and download the latest ‘complete’ UF2 file. (If you want to avoid overwriting any existing files on Pico W, use the ‘firmware-only’ version.)
As usual, hold Pico W’s BOOTSEL button while connecting it to a computer via USB, then drag the UF2 file to the mounted ‘RPI-RP2’ volume. Once it’s copied across, Pico W will automatically reboot and reappear as a volume called ‘Pico W’.

02. Connect to WiFi
With Pico W connected to your computer, open up the Thonny IDE and make sure the Python interpreter (shown at the bottom right) is set to ‘MicroPython (Raspberry Pi Pico)’. The main.py file on Pico W will run automatically, so you will need to stop it by pressing the Stop icon. Open the boot.py file and enter your wireless router’s SSID (name) and password at the top.
WIFI_SSID = "<put your network name here>"

WIFI_PASSWORD = "<put your wifi password here>"
Now when Pico W reboots, it’ll automatically connect to your wireless network.
03. Wire up the circuit
Place your Pico W on one end of a breadboard, as in Figure 1. Add your RGB LED at the other end with each leg placed in a different row. It has four legs, the longest of which should be the ground connection – use a jumper wire to connect that to a GND pin on Pico W.
As usual with LEDs, you should use resistors to limit the maximum current to avoid possible LED burnout. We’ve used three 330 Ω resistors placed over the central dip of the breadboard to connect the LED’s R (red), G (green), and B (blue) legs to jumper wires connected to GPIO pins 13, 14, and 15 respectively on Pico W.

Note: Our RGB LED’s legs were in the order R, GND, B, and G, but yours may differ.
04. Test the circuit
To make sure everything is connected correctly, we’ll run a simple program on Pico W. In the Thonny IDE on your computer, make sure the Python interpreter (shown at the bottom right) is set to ‘MicroPython (Raspberry Pi Pico)’.
Open a new file and add the code from the RGB_test.py listing (overleaf). Run it and the RGB LED should turn red, green, and blue in turn. If the colours are in the wrong order, you will need to swap over the relevant jumper wires.
05. Write the code
Now let’s write the MicroPython code for our RGB LED ‘mood lamp’, as seen in the mood_lamp_sliders.py listing. The top line, import anvil.pico, enables Pico W to connect to Anvil’s servers. The second, import uasyncio as a, sets up an asynchronous scheduler for running concurrent functions. We also import the Pin and PWM classes from the machine library so we can control our RGB LED from the GPIO pins.

When run, the Pico W MicroPython code will connect to the linked Anvil web app
Further down is a line starting UPLINK_KEY =. This is where you will later need to paste the uplink key for the web app you create on Anvil so your Pico W program can link to it. At the bottom of the program is a line to connect using it.
Next, we create three variables to set the levels of the red, green, and blue parts of the RGB LED. We then set up the PWM pins as in our test code.
06. Call the decorator
In our code, we have three functions: one each for controlling the red, green, and blue parts of the RGB LED. Before each, we add a ‘decorator’ and also add async at the start of the line defining the function; for instance:
@anvil.pico.callable_async

async def red(slider):
This lets our connected Anvil web app know that this function is available to call from the web. We’ll be sending a value to it, set by a slider in the web app, which will set the level of that colour. As we’re using values from 0 to 255 for the slider, we multiply it by 256 to turn it into an unsigned 16-bit integer (0 to 65535) for the PWM level setting.

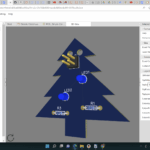
07. Design the web app
Go to anvil.works and sign up for a free account. We want to use slider controls for our lamp, which aren’t available as a standard Anvil component, so we’ll open up a demo app containing the Sliders library: go to anvil.works/library/slider and click ‘Open in Anvil’.
The Sliders demo app only has two sliders and we want three, for red, green, and blue. From the right-hand Toolbox panel, drag a Slider custom component to just above the Reset button. Now select an existing ‘Value:’ element, press CTRL/CMD + C to copy it, and paste it under the new slider with CTRL/CMD + V. Copy and paste a ‘1’ component to the right of it.
Click on each ‘Value:’ element in turn and change the text for it (in the right-hand Properties panel) to ‘Red:’, ‘Green:’, and ‘Blue:’ respectively. Set each ‘1’ text element to ‘0’. Also, set the ‘Blue:’ element name to ‘label_6, and the accompanying ‘0’ element name to ‘label_7’. For each slider, set the ‘slider_max’ value to 255.

08. Enable server uplink
Click the ‘+’ button at the bottom left and select Uplink, then click Enable next to Server Uplink. This will generate a Server Uplink Key (ignore the client key) for the app which you should paste into line 5 of your MicroPython code on Pico W so it can connect to it.
09. Adjust web code
We need to alter the web app code so the setting for each slider is sent to the red, green, or blue function in your Pico W program. Click on the Code tab and add the following lines (indented) to the slider1_change function:
anvil.server.call_s("green",self.slider_1.level)

  pass
Note that slider 1 is the middle one, which we’ve assigned to green. Similarly, for slider2_change, add the following two lines (indented):
anvil.server.call_s("red",self.slider_2.level)

  pass
Add a similar new function for slider 3:
def slider_3_change(self, **event_args):

  self.label_7.text = self.slider_3.level

  anvil.server.call_s("blue",self.slider_3.level)

  pass
Finally, add these lines to the reset_btn_click function in the web code:
self.slider_3.level = 0

  self.label_7.text = 0

  anvil.server.call_s("red",0)

  anvil.server.call_s("green",0)

  anvil.server.call_s("blue",0)

  pass
10. Run both apps
We’re now ready to roll. First, run your Pico W program in Thonny. You’ll see messages in the Shell pane to show it connecting. Once it has, run your Anvil web app. You can now move the sliders to adjust the red, green, and blue components of your RGB LED to alter its shade.
To make it a little more effective, you may want to diffuse the LED’s light. We simply placed the translucent plastic cover from a PIR sensor over it, which works fairly well. You now have a web-controlled mood lamp! Next time, we’ll be reading Pico W sensor data in an Anvil web app.


4 comments
Michael Lavers
If you haven’t tried Anvil.works I fully suggest you have a look. Its awesome for connecting up things like this!
JF
Hello,
I found this post really interesting, I didn’t know Pico was capable of that!
By the way, I have a blog where I’m publishing RPi applications, is there a way I can contribute on this webpage with my content?
Raspberry Pi Staff Liz Upton
We don’t accept guest posts, but if you find yourself publishing something you think we might want to write about, please email us via the contact page – we’re always looking for projects!
Paul Milton
I wanted to get the RGB_test.py code. When I clicked on the link it took me somewhere but I couldn’t find that python file. It’s the same with the other links to other files. Why don’t the links connect to the files?
Comments are closed