Control your mouse by playing the trombone | HackSpace #63
In the latest issue of HackSpace magazine, Rob Miles show you how to play the game Trombone Champ (or control your mouse) with an authentic trombone action.

Trombone Champ is an excellent music game. Figure 1 shows the game in action. You toot your way through tunes old and new, trying to get a perfect pitch from your trusty trombone. It is one of those rare games where playing badly is at least as amusing as playing well. The game is controlled using the mouse. But what if you want some real trombone action? In this article, we are going to build a Raspberry Pi Pico-powered trombone controller programmed with CircuitPython that uses a laser rangefinder and an air pressure sensor to get an authentic trombone slide action from a couple of pieces of drainpipe.
Trombone anatomy
The pitch of a note played by a trombone is controlled by changing the length of the pipe producing the sound. The player slides a U-shaped section of the instrument back and forth to set the pitch. A trombone player hits the right notes by learning the position for each note and the distance between them. The trombone controller needs to determine the position of the slider part of the ‘trombone’ and use this to send mouse movement information to the game. It also has an additional input so that the game can be told when the player is blowing the trombone.

Figure 3 shows a finished controller. The handle on the left-hand side contains a sensor which measures the distance to the target on the handle on the right. The target is connected to a piece of pipe which slides over one connected to the handle. This means that the balance of the controller will change during play, just like a real trombone. It also means that the handle will fall off the end of the trombone if you move it too far, which is just like a real trombone too.
Distance measuring
Initial distance measuring tests were performed using an HC-SR04 ultrasonic sensor. This worked, but it could only generate around 20 readings per second, and the reading rate slowed down as the target was moved further away from the sensor. The speed of sound, 343 metres per second, limits the rate at which readings can be produced using an ultrasonic sensor. So instead, the project uses a VL53L4CD Time of Flight (TOF) sensor which measures the time taken for reflected pulses of laser light to arrive. Because it uses light pulses, it can take readings very quickly. Using CircuitPython running in a Pico, the author was able to get 100 distance readings per second from this sensor.

Sensor software
The TromboneController.py program and all the libraries that you need in the GitHub
repository for this project can be found here. You can use Thonny or Mu on your computer to open the program and download it into your Pico. The program uses a VL53L4CD sensor to measure distance. The TromboneController.py program exposes the sensor in the form of an object. When the program starts, it creates an instance of a DistanceSensor object that connects to the sensor.
i2c_sda = board.GP0
i2c_scl = board.GP1

i2c = busio.I2C(i2c_scl, i2c_sda)
distance = DistanceSensor_vl53l4cd(i2c)
distance.start()
The statements above create a distance sensor connected to a VL53L4CD sensor. The distance sensor object exposes a method called start, which is used to start the sensor running.
The program can read distance values from it by calling a method called blockingWaitForValue provided by the sensor object:
print(distance.blockingWaitForValue())The above statement would print out the current distance reading on the console. The distance is given in centimetres. The method blockingWaitForValue is named to indicate that method will cause the program to pause while the reading is obtained from the sensor.
Rolling with the averages
The readings from the distance sensor are a bit noisy. Each reading is a few millimetres different from the previous one. If the program uses the readings as received from the sensor, this would make the mouse jitter up and down, making precise positioning difficult. This problem can be addressed by averaging the noisy values. We work out the average of a series of values by adding them together and dividing by the number of values. We could add five distance values together, divide the result by five and (assuming that the noise in the signal is randomly distributed) we will get an average which is closer to the actual value. However, this would reduce the rate at which we can update the mouse position. If we average five values to get a less noisy reading, the program would have to wait for all five to arrive before it could send a new mouse position. This would mean we would swap a jittery mouse for a sluggish one.

The solution is to use a ‘rolling’ average. The program keeps a list of recent values – each time it gets a new value, it discards the oldest, subtracting it from the average total, and stores the newest, adding it to the average total. This generates an updated average with each successive reading. You can see the code below:
def blockingWaitForAverage(self, timeout=1):
    distance = self.blockingWaitForValue()

    self.valueTotal = self.valueTotal + distance
    self.valueTotal = self.valueTotal - self.
rollingValues[self.valuePos]
    self.rollingValues[self.valuePos] = distance
    self.valuePos = self.valuePos + 1
    if self.valuePos == self.
rollingAverageLength:
        self.valuePos = 0
    return int(self.valueTotal/self.
rollingAverageLength)
The method blockingWaitForAverage from the DistanceSensor class updates the rolling average for a distance sensor. The number of rolling average values used is set by the rollingAverageLength property of the class. The rollingValues property holds the readings being averaged, and the valuePos property holds the current position in the value array.
Getting hysterical
The rolling average technique settles the mouse and removes a lot of jitter. However, a problem with this technique is that it adds ‘hysteresis’ to the signal, as the average value takes a while to catch up in the face of changes. Hysteresis in a system is a delay between an input signal and a corresponding change in output. You see it in electrical circuits involving coils, and in lots of real-world situations. For example, if you turn the steering wheel while driving, it takes a little while for the effect to emerge in the form of a change of direction of your car. The hysteresis in the steering control is one reason why learning to drive is so tricky.

Figure 4 shows hysteresis in action. The blue trace shows raw sensor values, and the red trace shows the rolling average. You can see that the average starts at zero and then rises to the blue level when the program starts running. Then, in the middle of the graph, the distance is changed by moving the target, and the red average value lags the raw value as the rolling average catches up. Too much hysteresis in our controller will make it hard for the player to accurately hit notes. After some experimentation, it was found that an average size of five readings gave a stable mouse cursor without too much lag.
Mouse driver
The values from the distance sensor are used to move the mouse up and down. CircuitPython provides a library which allows a program to behave as a USB mouse. A program can send X and Y movements and press and release mouse buttons.
import usb_hid
from adafruit_hid.mouse import Mouse
mouse = Mouse(usb_hid.devices)
The code above creates a mouse object which can be given commands to move the mouse.
speed = 0.4
dist = distance.blockingWaitForAverage()
change = old_dist-dist
mouse_dist = int(change*speed)
if mouse_dist != 0:
    mouse.move(y=mouse_dist)
old_dist = dist
The code above uses values from the distance sensor to move the mouse up and down. It calculates the change in distance, multiplies it by a speed value, and then moves the mouse the specified distance up or down. If the controller has not been moved, the mouse is not moved. The trombone controller moves the mouse up or down, and so it only sends a value for Y. If required, it could send a value for X and move the mouse left and right as well. The speed variable controls the responsiveness of the mouse to movements of the trombone. You may have to adjust this value so that it works correctly on your PC.
Taking a breath
The Trombone Champ game reads the left mouse button to detect when the player is blowing into the trombone. Trombone players create the sound by blowing into a mouthpiece. The trombone controller detects the breathing action by using an air pressure sensor and sends clicks the left mouse button when the pressure goes up.

Figure 5 shows the hardware. The BMP280 environmental sensor is in the small container which has the mouthpiece connected to it. When the player blows into the mouthpiece, this causes a detectable change in the pressure inside the container, which is used to trigger the left mouse button press.
import adafruit_bmp280
class PressureSensor_BMP280(PlaySensor):

    def __init__(self, i2c):
        super(PressureSensor_BMP280, self)._ _
init_ _()
        self.bmp280 = adafruit_bmp280.Adafruit_
BMP280_I2C(i2c, address=0x76)
        self.pressure_detect = 5
        self.base_pressure = self.bmp280.pressure

    def play_pressed(self):
        pressure_change = self.bmp280.pressure -
self.base_pressure
        return pressure_change > self.pressure_
detect
The code above implements the pressure sensor as a class. The _ _init_ _ method is passed an I2C interface which is used to create a BMP280 sensor connection. The _ _init_ _ method records the current air pressure and also sets the pressure_detect value to 5. The play_pressed method returns True if the current pressure reading is above the pressure_detect threshold.
if play.play_pressed():
    if mouse_down == False:
        mouse.press(Mouse.LEFT_BUTTON)
        print("toot")
        mouse_down = True
else:
    if mouse_down == True:
        mouse.release(Mouse.LEFT_BUTTON)
        print("untoot")
        mouse_down = False
The code above uses the result of play_pressed to control the mouse. It uses a flag called mouse_down so that mouse events are only sent when the pressure state changes. It also prints messages that show the status of the breath sensor.
Dribble trouble
If you look carefully at the trombone picture in Figure 2 at the start of this article, you will notice a little finger-operated valve at the end of the trombone ‘D’ on the left of the picture. This is called the ‘spit valve’ – it is a very important part of the instrument. It turns out that blowing into something doesn’t just produce a lot of air, it also produces a lot of moisture. Trombone players use the valve to drain their instrument every now and then. Unfortunately for our trombone controller, it doesn’t have a valve to let out liquid. The problem in the controller is not as great as for a trombone player, in that a player is just blowing to produce a pressure change in a sealed box, not blowing air through the controller, but the sensor can still get sufficiently moist for this to become a problem. A future version of the design could contain a service of baffles and a valve to get rid of any stray dribble, but to keep things simple, it was decided to implement a button-operated version of the controller where a push-button replaces the breath sensor. The author also wondered whether passing round a device and taking turns to blow into it was really a good idea in these virus-ridden times.
class ButtonPlaySensor(PlaySensor):

    def __init__(self, pin):
        super(ButtonPlaySensor, self).__init__()
        self.red_button = DigitalInOut(board.
GP14)
        self.red_button.switch_to_
input(pull=Pull.UP)

    def play_pressed(self):
        return self.red_button.value == False
The driver class for the push-button play sensor is shown above. It contains a play_pressed method, which means that a ButtonPlaySensor instance can be interchanged with a PressureSensor_BMP280 instance without needing to change anything else in the code. The play_pressed function returns true if the value of the button has become false because the switch in the button has connected the input pin to ground.
Controller Construction
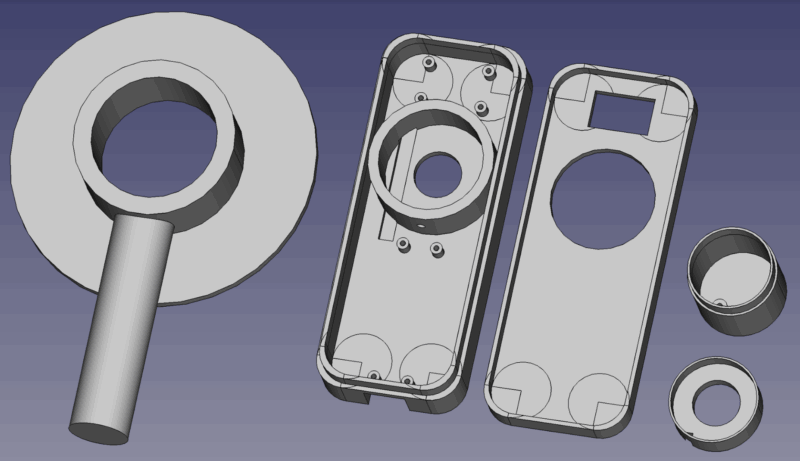
Figure 7 shows the 3D-printable components that make up a controller. They are available for download from the GitHub repository for the project. The small drainpipe is a friction fit into the base of the controller, and the large drainpipe is a friction fit into the target.

Figure 8 shows the Pico controller inside the controller handle. The distance sensor is at the top of the handle, and the 32 mm diameter waste pipe fits over it.
Trombone power
The trombone controller works well, although it is very hard work using the breath interface to control the game. It gives you a lot of respect for people who play the real instrument. The push-button version is much easier to use, and not prone to dribble trouble. The author is very proud of getting a ‘B’ rating on one of the tracks in the game using the controller. It certainly adds a lot to the gameplay.
HackSpace magazine issue 63 out NOW!
Each month, HackSpace magazine brings you the best projects, tips, tricks and tutorials from the makersphere. You can get HackSpace from the Raspberry Pi Press online store or your local newsagents.

As always, every issue is free to download in PDF format from the HackSpace magazine website.


2 comments
Joseph Barrow
Can it play ‘Night Bird?’
Rob Miles
You’d need to practice…
Comments are closed