How to add Ethernet to Raspberry Pi Pico
Raspberry Pi Pico has a lot of interesting and unique features, but it doesn’t have networking. Of course this was only ever going to be a temporary inconvenience, and sure enough, over Pi Day weekend we saw both USB Ethernet and Ethernet PHY support released for Pico and RP2040.
The PHY support was put together by Sandeep Mistry, well known as the author of the noble and bleno Node.js libraries, as well as the Arduino LoRa library, amongst others. Built around the lwIP stack, it leverages the PIO, DMA, and dual-core capabilities of RP2040 to create an Ethernet MAC stack in software. The project currently supports RMII-based Ethernet PHY modules like the Microchip LAN8720.
Breakout boards for the LAN8720 can be found on AliExpress for around $1.50. If you want to pick one up next day on Amazon you should be prepared to pay somewhat more, especially if you want Amazon Prime delivery, although they can still be found fairly cheaply if you’re prepared to wait a while.
What this means is that you can now connect your $4 microcontroller to an Ethernet breakout costing less than $2 and connect it to the internet.
Building from source
If you already have the Raspberry Pi Pico toolchain set up and working, make sure your pico-sdk checkout is up to date, including submodules. If not, you should first set up the C/C++ SDK. Afterwards you need grab the the project from GitHub, along with the lwIP stack.
$ git clone [email protected]:sandeepmistry/pico-rmii-ethernet.git
$ cd pico-rmii-ethernet
$ git submodule update --init
Make sure you have your PICO_SDK_PATH set before before proceeding. For instance, if you’re building things on a Raspberry Pi and you’ve run the pico_setup.sh script, or followed the instructions in our Getting Started guide, you’d point the PICO_SDK_PATH to
$ export PICO_SDK_PATH = /home/pi/pico/pico-sdkthen after that you can go ahead and build both the library and the example application.
$ mkdir build
$ cd build
$ cmake ..
$ make
If everything goes well you should have a UF2 file in build/examples/httpd called pico_rmii_ethernet_httpd.uf2. You can now load this UF2 file onto your Pico in the normal way.
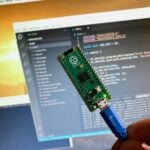
Go grab your Raspberry Pi Pico board and a micro USB cable. Plug the cable into your Raspberry Pi or laptop, then press and hold the BOOTSEL button on your Pico while you plug the other end of the micro USB cable into the board. Then release the button after the board is plugged in.
A disk volume called RPI-RP2 should pop up on your desktop. Double-click to open it, and then drag and drop the UF2 file into it. Your Pico is now running a webserver. Unfortunately it’s not going to be much use until we wire it up to our Ethernet breakout board.
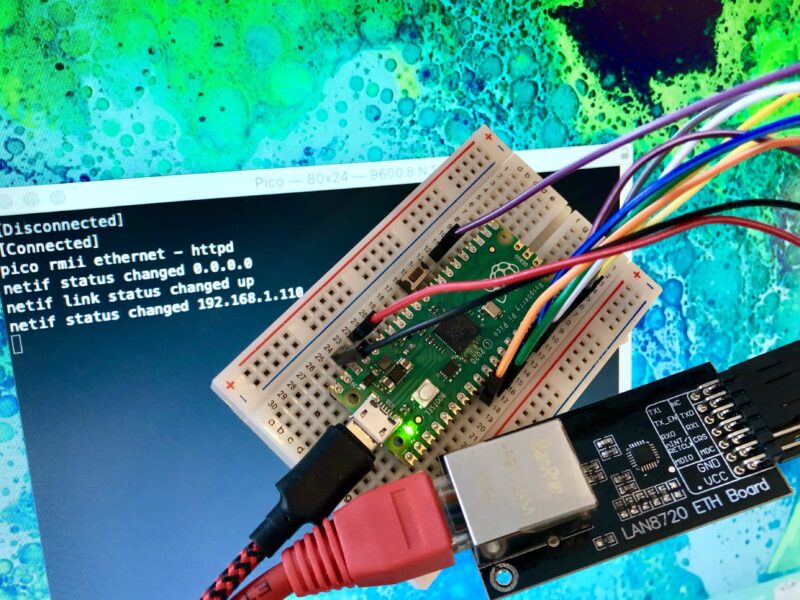
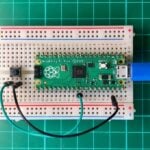
Wiring things up on the breadboard
Unfortunately the most common (and cheapest) breakout for the LAN8720 isn’t breadboard-friendly, although you can find some boards that are, so you’ll probably need to grab a bunch of male-to-female jumper wires along with your breadboard.
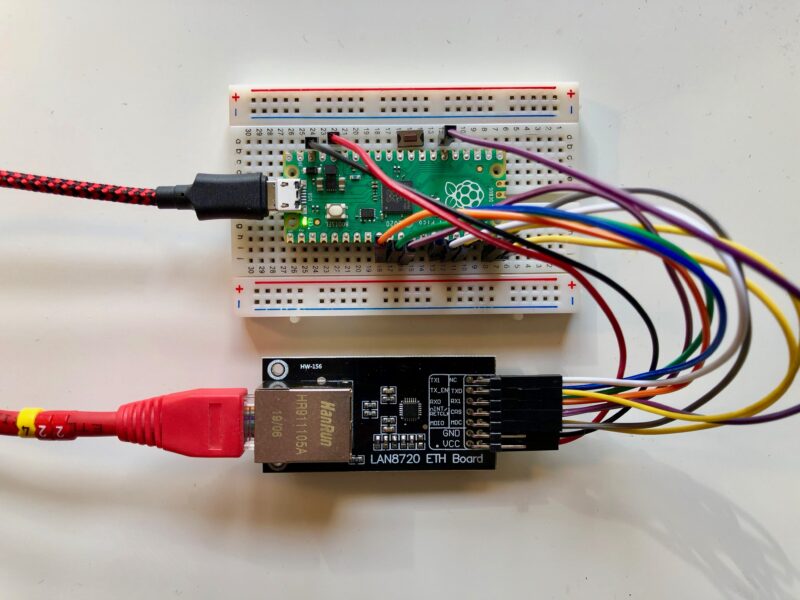
Then wire up the breakout board to your Raspberry Pi Pico. Most of these boards seem to be well labelled, with the left-hand labels corresponding to the top row of breakout pins. The mapping between the pins on the RMII-based LAN8720 breakout board and your Pico should be as follows:
| Pico | RP20401 | LAN8720 Breakout |
| Pin 9 | GP6 | RX0 |
| Pin 10 | GP7 | RX1 (RX0 + 1 ) |
| Pin 11 | GP8 | CRS (RX0 + 2) |
| Pin 14 | GP10 | TX0 |
| Pin 15 | GP11 | TX1 (TX0 + 1) |
| Pin 16 | GP12 | TX-EN (TX0 + 2) |
| Pin 19 | GP14 | MDIO |
| Pin 20 | GP15 | MDC |
| Pin 26 | GP20 | nINT / RETCLK |
| 3V3 (OUT) | — | VCC |
| Pin 38 | GND | GND |
1 These pins are the library default and can be changed in software.
Once you’ve wired things up, plug your Pico into Ethernet and also via USB into your Raspberry Pi or laptop. As well as powering your Pico you’ll be able to see some debugging information via USB Serial. Open a Terminal window and start minicom.
$ minicom -D /dev/ttyACM0If you’re having problems, see Chapter 4 of our Getting Started guide for more information.
Hopefully, so long as your router is handing out IP addresses, you should see something like this in the minicom window, showing that your Pico has grabbed an IP address using DHCP:
pico rmii ethernet - httpd
netif status changed 0.0.0.0
netif link status changed up
netif status changed 192.168.1.110
If you open up a browser window and type the IP address that your router has assigned to your Pico into the address bar, if everything goes well you should see the default lwIP index page:
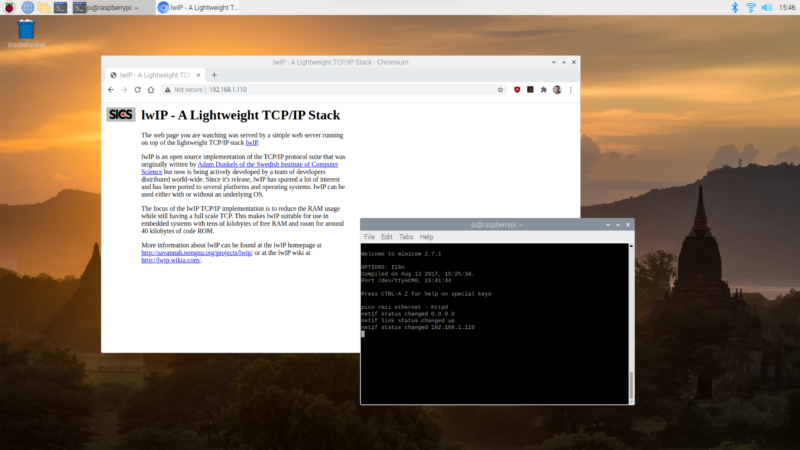
Congratulations. Your Pico is now a web server.
Changing the web pages
It turns out to be pretty easy to change the web pages served by Pico. You can find the “file system” with the default lwIP pages inside the HTTP application in the lwIP Git submodule.
$ cd pico-rmii-ethernet/lib/lwip/src/apps/http/fs
$ ls
404.html   img/        index.html
$
You should modify the index.html file in situ here with your favourite editor. Afterwards we’ll need to move the file system directory into place, and then we can repackage it up using the associated makefsdata script.
$ cd ..
$ mv fs makefsdata
$ cd makefsdata
$ perl makefsdata
Running this script will create an fsdata.c file in the current directory. You need to move this file up to the parent directory and then rebuild the UF2 file.
$ mv fsdata.c ..
$ cd ../../../../../..
$ rm -rf build
$ mkdir build
$ cd build
$ cmake ..
$ make
If everything goes well you should have a new UF2 file in build/examples/httpd called pico_rmii_ethernet_httpd.uf2 , and you can again load this UF2 file onto your Pico as before.
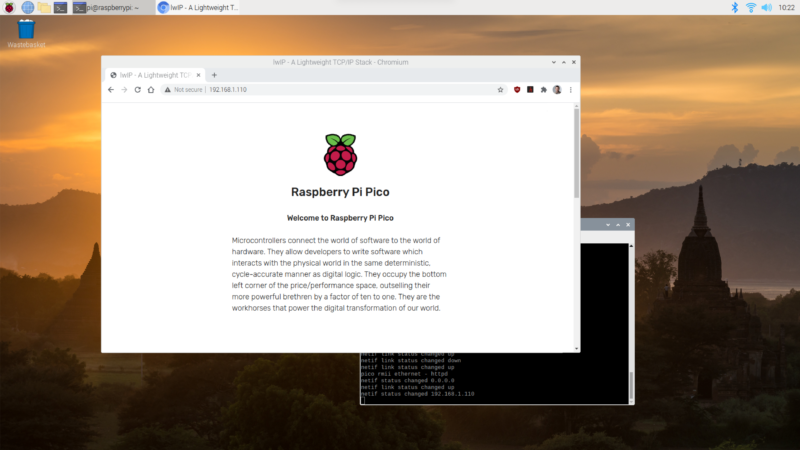
On restart, wait till your Pico grabs an IP address again and then, opening up a browser window again and typing the IP address assigned to your Pico into the address bar, you should now see an updated web page.
You can go back and edit the page served from your Pico, and build an entire site. Remember that you’ll need to rebuild the fsdata.c file each time before your rebuild your UF2.
Current limitations
There are a couple of limitations on the current implementation. The RP2040 is running underclocked to just 50MHz using the RMII modules’ reference clock, while the lwIP stack is compiled with NO_SYS so neither the Netcon API nor the Socket API is enabled. Finally, link speed is set to 10 Mbps as there is currently an issue with TX at 100 Mbps.
Where next?
While the example Sandeep put together used the lwIP web server, there are a number of other library application examples we can grab and twist to our own ends, including TFTP and MQTT example applications. Beyond that, lwIP is a TCP/IP stack. Anything you can do over TCP you can now do from your Pico.
Wrapping up
Support for developing for Pico can be found on the Raspberry Pi forums. There is also an (unofficial) Discord server where a lot of people active in the new community seem to be hanging out. Feedback on the documentation should be posted as an Issue to the pico-feedback repository on GitHub, or directly to the relevant repository it concerns.
All of the documentation, along with lots of other help and links, can be found on the Getting Started page. If you lose track of where that is in the future, you can always find it from your Pico: to access the page, just press and hold the BOOTSEL button on your Pico, plug it into your laptop or Raspberry Pi, then release the button. Go ahead and open the RPI-RP2 volume, and then click on the INDEX.HTM file.
That will always take you to the Getting Started page.


18 comments
Leo
hey,
Is it possible to supply the pico also via poe?
Anders
Will be a function of the breakout board for the LAN8720 I think.
Raspberry Pi Staff Alasdair Allan — post author
Right. Exactly that. You could build a breakout board for the LAN8720 that does PoE. But unfortunately I haven’t come across one, sorry!
Mark Tomlin
There is one for Adafruit’s RP2040 Feather form factor. It outputs 3 or 4 Watts depending on the version you get. Haven’t tried it yet (just ordered 3), but it looks like it could be the thing if you have a feather!
https://www.tindie.com/products/silicognition/poe-featherwing/
Puffergas
I didn’t think this would materialize so fast. Outstanding and thank you.
Alexander
Nice project! Although SPI connected W5500 ETH would be even nicer to the Pico. :)
Jake Lee
Hi Alexander,
Check this hackster post out :)
https://www.hackster.io/bjnhur/how-to-add-w5500-ethernet-to-raspberry-pi-pico-python-1-c7340c
Jan Szymanski
I would prefer to use RPi Zero W instead of the described solution.
Neil
If the Foundation doesn’t produce a Pico II with built-in WiFi networking and Bluetooth, I sure someone else will (or maybe already has). Arduino announced a product based on the RP2040, but I haven’t seen it on the street yet.
JBeale
Always good to have options. I’m doing some data acquisition now with a Pico and want to push my data to my LAN. I have ethernet nearby so this might have worked, except that it needs many GPIO pins, requires underclocking (to a possibly less accurate timebase, the Pico’s crystal is pretty good) and it uses some PIO resources. I don’t know how much but might conflict with my own use. What I’ve done so far is use a separate ESP32 wifi board. With a simple serial protocol, needing as few as one GPIO pin (Tx only) it can do what I want in my particular case. They can be had about $5 each. The QC on cheap ESP32 boards is bad; 1 board out of a 4-pack did not program, but the others worked.
clint
My employer said ESP32 boards are easily hacked, which is likely one reason they are less than half the price of comparible boards – they aren’t doing it to give us a good deal.
JBeale
I don’t think that theory could be disproved, but AFAIK the ESP8266 and ESP32 pricing is similar to every other board on eBay, like the Arduino Nano knockoffs sold there for 1/4 the price of the least expensive genuine Arduino board. They are certainly cheap in every sense of the word, both good and bad.
neosoyo
anyone already port micropython + W5500 support to rp2040?
Nick Pettefar
WiFi!
Gert Wijsman
Thanks for the blog post. Very useful!
I replayed the solution, maybe this helps others :-)
I had to remove and insert the network cable to obtain an IP. (of course I spent a lot of time checking the wirering first …)
Now on to the mqtt client, thanks!
Bill
The LAN8720 is a single socket chip. It was designed for VERY simple apps such as a network printer.
It is useless for a reasonable high-powered Pico.
Even the Arduino shield has 4 sockets and one can get the 8 sockets Wiznet 5500 for it.
This is really not a solution.
David Z
The LAN8720 is a PHY, not a MAC. So the chip itself doesn’t have any concept of sockets at all, where the W5100 and W5500 incorporate a MAC and socket library as well. Using a PHY like this, the only limitations are the software MAC and socket code on the Pi Pico for the number of open sockets at once.
Messani
Hi.
I managed to run LAN8720 at 100MBit and without underclocking RPi Pico. If you are interested, look here: https://github.com/messani/pico-lan8720
It was only an experiment but it can inspire you.
Comments are closed