How to add a reset button to your Raspberry Pi Pico
We’ve tried to make it as easy as possible for you to load your code onto your new Raspberry Pi Pico: press and hold the BOOTSEL button, plug your Pico into your computer, and it’ll mount as a mass storage volume. Then just drag and drop a UF2 file onto the board.
However, not everybody is keen to keep unplugging their micro USB cable every time they want to upload a UF2 onto the board. Don’t worry — there’s more than one way around that problem.

Firstly, if you’re developing in MicroPython there isn’t any real need to unplug and replug Pico to write code. The only time you’ll need to do it is the initial upload of the MicroPython firmware, which comes as a UF2. From there on in, you’re talking to the board via the REPL and a serial connection, either in Thonny or some other editor.
However, if you’re developing using our C SDK, then to upload new code to your Pico you have to upload a new UF2. This means you’ll need to unplug and replug the board to put Pico into BOOTSEL mode each time you make a change in your code and want to test it.
No more unplugging with SWD?
The best way around this is to use SWD mode (see Chapter 5 of our C/C++ Getting Started book) to upload code using the debug port, instead of using mass storage (BOOTSEL) mode.
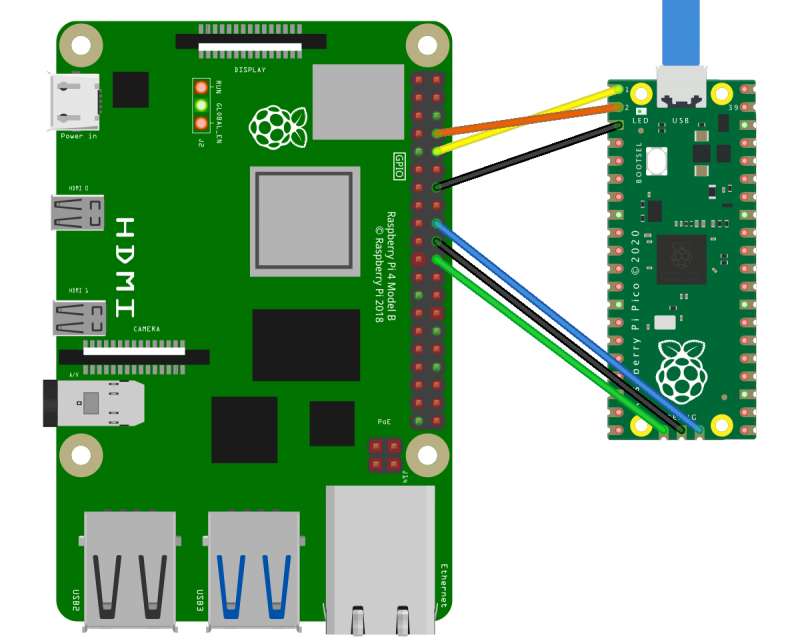
This gets you debugger support, which is invaluable while developing, and involves adding just three more wires. Afterwards, you’ll never have to unplug your Pico again.
Keep on dragging and dropping
But if you want to stick with uploading by drag-and-drop, adding a reset button to your Raspberry Pi Pico is pretty easy.
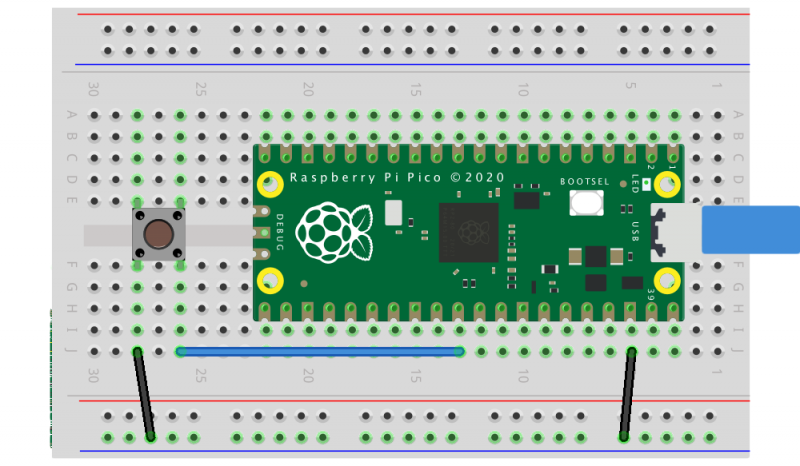
All you need to do is to wire the GND and RUN pins together and add an extra momentary contact button to your breadboard. Pushing the button will reset the board.
Then, instead of unplugging and replugging the USB cable when you want to load code onto Pico, you push and hold the RESET button, push the BOOTSEL button, release the RESET button, then release the BOOTSEL button.
If your board is in BOOTSEL mode and you want to start code you’ve already loaded running again, all you have to do now is briefly push the RESET button.
We’ve see some people use the 3V3_EN pin instead of the RUN pin. While it’ll work in a pinch, the problem with disabling 3.3V is that GPIOs that are driven from powered external devices will leak like crazy while 3.3V is disabled. There is even the possibility of damage to the chip. So it’s much better to use the RUN pin to make a reset button than the 3V3_EN pin.
What about the other button?
As an aside, if you want to break out the BOOTSEL button as well — perhaps you’re intending to bury your Pico inside an enclosure — you can use TP6 (that is, Test Point 6) on the rear of the board to do so. See Chapter 2 of the Pico Datasheet for details.
Where to find more help and information
Support for developing for Pico can be found on the Raspberry Pi forums. There is also an (unofficial) Discord server where a lot of people active in the new community seem to be hanging out. Feedback on the documentation should be posted as an issue to the pico-feedback repository on GitHub, or directly to the relevant repository it concerns.
All of the documentation, along with lots of other help and links, can be found on the same Getting Started page. If you lose track of where that is in the future, you can always find it from your Pico: to access the page, just press and hold the BOOTSEL button on your Pico, plug it into your laptop or Raspberry Pi, then release the button. Go ahead and open the RPI-RP2 volume, and then click on the INDEX.HTM file.
That will always take you to the Getting Started page.
43 comments
adrian
It should also be possible to include the same code micropython uses in your own code. It’s not foolproof because your code can crash (presumably micropython always has the repl loop running), but it should cover a reset much of the time.
I don’t think there’s much more to it than :
if (bootsel pressed)
reset()
Raspberry Pi Staff Alasdair Allan — post author
As documented in the Pico Datasheet. The BOOTSEL button is not connected to RP2040 GPIO at all, it is connected to the Chip Select (/CS) pin of the W25Q16JV flash memory chip. The /CS pin enables and disables the flash chip. The button disables flash boot, enabling USB boot. AFAIK there is no way to access the BOOTSEL button from MicroPython, I can’t see how that would be possible.
Dominic
Nice, Do you know when they are back in stock for Canada? I need one for a project coming up.
Thank you
Bob Roberts
Why isn’t there a reset button on the actual Pico like every other dev board out there?
Raspberry Pi Staff Alasdair Allan — post author
The board costs US$4.
BlastFX
And these switches cost 4¢ in 10k quantities. Your point?
Cost!
Cost Cost Cost.
You dont keep things at 4$ by adding cents here and there.
But dont take my word for it. From the creators themselves : https://theamphour.com/529-embedded-hardware-with-the-raspberry-pi-team/
Stewart Watkiss
Nice feature.
I wish I’d known that yesterday as I must have unplugged my Pico about 100 times trying to get my C code working.
Ed
Thanks, a very helpful post for a lot of people, I’m sure! Including myself wrt. the run/en choice.
Lorenzo
Hi,
are you planning to do any tutorial for those would like to program in C the Pico?
Thanks
LM
Raspberry Pi Staff Alasdair Allan — post author
Published one the day before yesterday, see https://www.raspberrypi.org/blog/how-to-blink-an-led-with-raspberry-pi-pico-in-c/.
Anders
Another micro push-to-make switch onto the BoM for v1.1
Raspberry Pi Staff Alasdair Allan — post author
The board is US$4, and momentary contact switches are surprisingly expensive.
Harry Hardjono
Maybe for the next design iteration, you can just put in some holes and jumper so people can solder their own switches if they so desire? Thereby people who needs power switches can buy and solder their own without too much trouble.
There is even the possibility that 3rd party packager will include a freebie switch as part of their electronic kits.
Pico is a good product as is, and you’re right in that putting in power switch isn’t too much trouble. But until you literally showed us how, we didn’t know. So perchance that you do put in such feature in the future, please provide clear and available note to that effect. Thank you.
Anders
I’ll go with Harry’s suggestion. I reckon I can cope with 12p each inc VAT from Mouser for a one off.
Anders
I wonder how expensive a few 10s of thousands of PCB mounted USB socket failures is to reputation.
Carlos Luna
Not that expensive I guess. Many of the larger Raspberry Pis have been getting unplugged and plugged for power cycling over the years and I haven’t seen any relevant news about USB sockets falling off. And there are far more than a few 10s of thounsands of those out there…
Anders
Power cycling is one thing, but every time a change to code is tried is a bit more than that. I am a great fan and promoter of all things from Raspberry Pi, but this one does feel a bit clumsy.
Steve
Anders is right about this; during development (especially early on) you need to reset a LOT, far more than we generally find ourselves power cycling a “traditional” Pi.
I think @ Harry Hardjono has the right solution: put in some holes and jumper so people can solder their own switches! This shouldn’t add any extra cost to the board, and would allow selling the Pico at its current low cost. If it were MY decision (which it most certainly isn’t), I would revise the board and add the the reset button…I think more people would want it than not.
Lorne
If it had a reset button then they would not be able to sell that board for use as a passive electronic part into a larger product.
JWH
I’d have paid an extra $1 or two for a reset pushbutton. The plug/unplug drill is VERY counterproductive!
Carlos
Very handy trip. I get the host RPi Zero reset every time I plug/unplug the USB cable connecting the RPi Pico.
SWD is always a alternative, however if it is just for flashing, SWD is not as convenient as copying a single file to a directory.
E Ward
Another option is just put a power strip onto the desk close to where you’re working. Or buy a USB cable with integrated switch that have been on the market for the several years now:
https://www.amazon.com/iUniker-Raspberry-Switch-Supply-2-Pack/dp/B077JYXZLL
So many simple solutions. Don’t forget the Pico is also being targeted to be sold as a component to corporate customers such as industrial usage as stated in the articles. In those deployments the Pico could be stuffed into tight spaces. Having the reset button be accidently pressed by some stray cable due to movement, presssure, etc will not look good. The Foundation is attempting to be cost effective by selling a single multi-purpose product so have to make certain design decisions.
In any case the C/C++ environment is meant to allow more advanced control of the behavior of the hardware. If it is too difficult to figure out how to deal with turning the Pico on and off, maybe it is best to stick with using micropython…
Anders
I understand the need for some to defend this. I don’t think C/C++ vs Micropython superciliousness is very helpful.
In the pipeline is a Pico Emulator from Uri Shaked. If this is successful then a solution would be to develop on the emulator and deploy to hardware less often.
A bit like the Micro:Bit can.
Null’s Brawl
I’d have paid an extra $1 or two for a reset pushbutton. The plug/unplug drill is VERY counterproductive! and also great article
John
Why do Picos cost at least 25% more in Japan even though they’re made here and don’t have to be shipped internationally. 2 of the 4 official sellers on your website don’t have any picos (it doesn’t seem like they sold out; they just don’t have product listings beyond informational), and the other 2 sell for more than $4. They way you treated the Japanese makers with the Pi Zero and Zero W was abysmal, and it’s looking like the pico isn’t much better.
Helen Lynn
Raspberry Pi Pico is priced at $4 US plus local taxes and shipping. I’ve just checked several of our Approved Resellers in Japan and all those I looked at are offering Raspberry Pi Pico at $4 US + a similar amount to UK local taxes. All the ones I checked either seemed, as far as I can tell with the help of Google Translate, to allow me to proceed to checkout or else to have a clear “out of stock” indicator.
Ed
I would definitely have put the Pico in at the top of the breadboard, so the pin numbers match the breadboard numbers… :)
For reference, the RUN pin is number 30, or the 11th from the top on the right side, and GND is any pin with a square pad or in this case pin 38 (3rd from the top on the right).
wilfried Münstermann
Hello together,
I lost my USB Connection to the Board. I have made main program which only increase a variable and print it to the computer. Is there a way to stop the program and get the access to the pico back ?
Thanks for help ! Best regardes Willi
Henk
Maybe this is helpful: in the official documentation “Rasp Pi Pico Python SDK”, chapter 2.2, there is a possibility to access your board. This alternative
interface is handy if you have trouble with USB, if you don’t have any free USB ports, or if you are using some other
RP2040-based board which doesn’t have an exposed USB connector
rclark
Thanks for the tip. Reset button works as advertised. I’d like to use SWD mode, but, at least for these first iterations, plugging in a Pico into my Linux workstation instead of an RPI is more convenient. Easier to work with as my RPIs are either headless (ssh/sftp into them) or very small displays.
Joe
Need help. I have micropython code that blinks the led, then reads rc522, if correct pico activates a relay. Issue, when run in Thonny, it’s great, when thonny is closed, it only blinks the led at the beginning of the script (named main.py) If I connect via Thonny, then send a soft reboot, it also runs without issue. I have tried non-host system usb, usb bricks, and 5v buck as input, same result, only the leds at the start of the script blink, then nothing. Any ideas? It’s been a few hours and I am stuck. Thanks, Joe
Joe
Additional finds… When Thonny is open, and a soft reset (ctrl + D) is performed, the full script runs flawlessly, and continues to run flawlessly even after I close Thonny. Hmm, ideas? -Joe
Joe
Fixed: the gist was updated last night… this did the trick.
https://github.com/danjperron/micropython-mfrc522/blob/master/mfrc522.py Thanks everyone.
Jason Gaunt
For those looking to reset the RP2040 in software using the BOOTSEL button, please see this sample application I have uploaded to Github: https://github.com/jasongaunt/rp2040-bootsel-reboot-example
Simon Ellwood
This is a really good idea, making an extra switch not needed for most.
Dominic
Physical button can be add soldered to the board:
https://www.google.com/amp/s/www.tomshardware.com/amp/news/raspberry-pi-pico-reset-button
https://shop.pimoroni.com/products/captain-resetti-pico-reset-button
Poe
There is also the simple route by just getting a push button usb cable off ebay.
https://www.ebay.co.uk/itm/Hot-USB-to-Micro-USB-with-ON-OFF-Switch-Charger-Power-Cable-for-Raspberry-Pi-UK/263254699488
No soldering necessary. And once the board is ready to be assembled into the final project, no worries about tripping a reset button or having to desolder it.
ataraxic
to avoid USB plug/unplug to deliver binaries:
Connect push-switch to pins [38]GND and [37]3V3_EN
and use it together with ‘bootsel’ button to put ‘pipi’ in a USB storage mode.
ataraxic
https://ibb.co/cFJVqzy
Diego
Nice! I’m waiting for my Pico arrive home to start the tests.
Addington
I am programming in MicroPython, performing simple LED flashing routines, and sometimes when I finish a session and stop the program and quit Thonny a pin stays high. Without unplugging the USB, what is the best method for putting the Pico in a safe state?
Please excuse the multiple questions, but what is the state of the pins when the Pico is initially plugged into a Raspberry Pi via USB with no program running?
Many thanks
Addington
A partial answer:
After clicking on Stop, went into the shell and entered machine.reset(). The annoying LEDs went off immediately. [No need to re-import machine]
Comments are closed