Getting started with soldering
In our newest resource video, Content and Curriculum Manager Laura Sach introduces viewers to the basics of soldering.
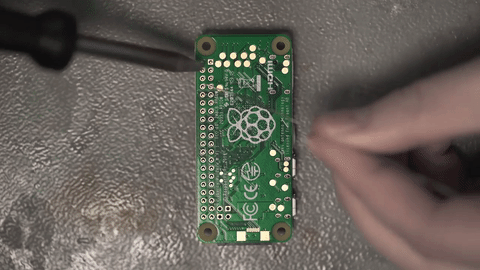
So sit down, grab your Raspberry Pi Zero, and prepare to be schooled in the best (and warned about the worst) practices in the realm of soldering.
Do I have to?!
Yes. Yes, you do.
If you are planning to use a Raspberry Pi Zero or Zero W, or to build something magnificent using wires, buttons, lights, and more, you’ll want to practice your soldering technique. Those of us inexperienced in soldering have been jumping for joy since the release of the Pimoroni solderless header. However, if you want to your project to progress from the ‘prototyping with a breadboard’ stage to a durable final build, soldering is the best option for connecting all its components together.
Hot glue just won’t cut it this time. Sorry.
I promise it’s not hard to do, and the final result will give you a warm feeling of accomplishment…made warmer still if, like me, you burn yourself due to your inability to pay attention to instructions. (Please pay attention to the instructions.)
Soldering 101
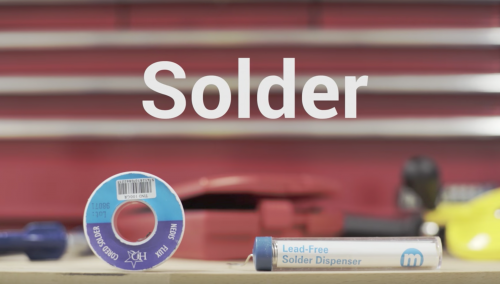
As Laura explains in the video, there are two types of solder to choose from for your project: the lead-free kind that requires a slightly higher temperature to melt, and the lead-containing kind that – surprise, surprise – has lead in it. Although you’ll find other types of solder, one of these two is what you want for tinkering.
The decision…is yours.
In order to heat your solder and apply it to your project, you’ll need either Kryptonian heat vision* or, on this planet at least, a soldering iron. There is a variety of soldering irons available on the market, and as your making skills improve you will probably upgrade. But for now, try not to break the bank and choose an iron that’s within your budget. You may also want to ask around, as someone you know might be able to lend you theirs and help you out with your first soldering attempt.
Safety first!
Make sure you always solder in a well-ventilated area. Before you start, remove any small people, four-legged friends, and other trip hazards from the space and check you have everything you need close at hand.
The lab at Pi Towers is well ventilated thanks to this handy ventilation pipe…thingy.
And never forget, things get hot when you heat them! Always allow a moment for cooling before you handle your wonderful soldering efforts. I remember the first time I tried soldering a button to a Raspberry Pi and…let’s just say that I still bear the scars incured because I didn’t follow my own safety advice.
Let’s do this!
Now you’re geared up and ready to solder, follow along with Laura and fit a header to your Raspberry Pi Zero! You can also read a complete transcript of the video in our free Getting started with soldering resource.
If you use Laura’s video to help you complete a soldering project, make sure to share your final piece with us via social media using the hashtag #ThanksLauraSach.
*spoiler alert!


16 comments
Jeremy
Brilliant video!
Is it worth mentioning that the solder should be flux cored? It mostly is nowadays I guess.
Gordon Hollingworth
Yes pretty much all solder now contains flux cores, the only reason you’d choose not to is for something like soldering copper pipes. And that solder is quite different in dimensions!
Herman
Very nice explanation indeed. but some extra info on how to choose a good soldering iron for RPi (Zero W) projects would be the icing on the cake!
Gordon Hollingworth
Depends on what you’re after, in general you’ve got two choices, cheap all in one soldering iron or a soldering station.
The all in one is significantly cheaper but tends to be slow to heat up and runs at a constant 350-400 degrees.
The soldering station has a separate soldering iron and power supply with options such as a temperature setting. If there’s no temperature setting then quite often the tip has a temperature setting instead (you have to change the tip to change the temperature). They heat up much faster and are great if you’re expecting to do lots of soldering over many years (you can replace the tip when it gets damaged)
The gold standard is the RF soldering station which can heat up in less than ten seconds. Also changing soldering tips is really easy, just pull out one and push in a second one, by the time you’re ready to solder it’ll be hot! But these are very expensive!
S Foster
Really clear ‘How to’ video Laura. I wish there was something so clear as this when I started soldering. Great work.
James
I was just thinking about hooking up my AIY kit to my Zero, so… this is timely and I now have a weekend project. Thanks Laura for the video and Alex for the post!
Nelsontb
Please mention the importance of flux, beginners burn and melt lots of parts due to the solder not “sticking” to the part. There should be a mention to clean then part and use flux, otherwise people get frustrated with “how difficult” it is to solder.
Elfen
Ah yes… I have been soldering since for ever! Literally with an oven and Long Irons back in the 70’s! (It was Metal Shop in Jr HS/Secondary School) Those were fun days! Then Grandma got me a 200/250 Soldering gun! (Still got it!) You do not know how many Tube Radios and TV Sets I repaired with that thing!
Linus S.
Does soldering on raspberry pi void its warranty?
H. Head
In a similar variant: would using a hammer header also void the warranty of the Pi Zero? Or is this a situation where the particular shop is in charge to decide how to handle such cases?
Elfen
I need to ask, what warranty?
The only warranty I know of if that when you buy a boxed R-Pi (From the Model A to the R-Pi 3) that paper inside the box says the R-Pi Unit that comes in the box is guaranteed to work when you set up and plug it correctly as it was tested in new-working condition before they put it in the box.
The R-Pi Zero (all models) comes in that flimsy anti-static bag and has no written guarantees like the boxed units. In an old forum post I dared ask about repairing them and somebody posted “Repair a $5 computer? You are better off in buying a new one!” My argument was “For most hobbyists like us that maybe an option. But for a school in a third world nation, they need to do without.”
Only the people in the Raspberry Pi Foundation can tell you what rights one has to warranties one has on these units since none are specified in writing with the R-Pi Zeroes.
Elfen
It depends on the Raspberry Pi for one.
The Raspberry Pi Zero is made without a GPIO Header, so that means if you want access to the GPIO, one way is to solder a header on it. There are options to solderless GPIO attachments to the R-Pi 0 but they are more expensive than a $1(USD) header strip and 30 minutes of soldering time.
Personally I have repaired a few “dead” Model Bs and B+s but as the video says, they used lead-free solder and that made soldering difficult but still doable. On the Model Bs, they had blown out voltage regulators and replacing them got them running again. This what happens when you power the R-Pi through the GPIO while putting power through the Micro USB Port. On the Model B+s, I replaced the USB and Ethernet ports that got crushed from a couple abused R-Pis I got from ebay. Again, the lead-free solder made it tricky to remove the crushed components but I got it done. At under $5(USD) for each Pi, I managed to buy and fix 6 of them for $30. This is not for the faint of heart or shaky hands.
I do have a couple of dead R-Pis that needs a CPU replacement but that is not possible without a SMD/SMT workstation.
Jack Barnard
Thanks Raspberry Pi I really needs to know how to solder.
Mike Cook
Just another tip, get the solder as thin as possible. You will be amazed at how much easier it makes things.
Also always use Lead solder, the Lead free stuff is rubbish.
Tony
An excellent video, thank you.
Might I add a few extra thoughts.
1. Buy a temperature controlled iron. This is the single most important thing and it will probably not cost you a huge amount more. With this type of iron your soldering iron bits will last longer, they will not oxidise up so much and accept solder more easily. Also you will be able to do smaller more sensitive components with less risk of damage. A good iron has a high output as well for doing larger components but keep the temperature at the required level.
2. If using blue tac watch out as the heat from the solder can make it go gooey and get into the components, if you can buy a “Helping hand” weighted holder that will make life a lot easier and you can turn it to the most convenient angle to work on.
3. Unless you have a very gentle fan blowing the smoke away from you as you solder ( gentle or it will take too much heat from your iron) take a deep breath before you begin and gently blow the smoke away from you.
4. The sponge shown is a special high temperature type, don’t try and use a typical washing up sponge 8-). Moisten your sponge before use so that it is lightly damp and not soaking wet and clean your tip with quick scrapping motions.
5. If you need to solder a component or wire somewhere a useful technique is to hold the solder between the your pinky finger and the one next to it. It takes a little getting used to to but means you can feed solder straight on to the joint whilst your thumb and forefinger position the component.
6. When soldering older component it is worth checking for oxidation and cleaning them if necessary by scraping.
7. Try to ensure that the iron contacts both the pieces to be connected such as the pad and pin in this case.
I hope this is of help. Tony (ICT technician for 20 years)
James Barnhart
Thanks, Laura for sharing such a brilliant video !! I really needed to know that how to solder Raspberry Pi.
Comments are closed