Encased in amber: meet the epoxy-embedded Pi
The maker of one of our favourite projects from this year’s Maker Faire Bay Area took the idea of an ’embedded device’ and ran with it: Ronald McCollam has created a wireless, completely epoxy-encased Pi build – screen included!
*cue epic music theme* “Welcome…to resin in resin.”
Just encase…
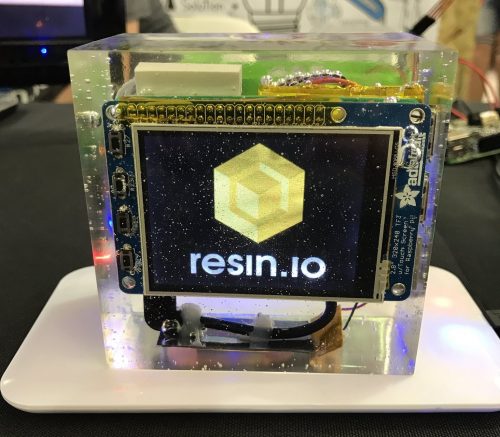
Of course, this build is not meant to be a museum piece: Ronald embedded a Raspberry Pi 3 with built-in wireless LAN and Bluetooth to create a hands-on demonstration of the resin.io platform, for which he is a Solution Architect. Resin.io is useful for remotely controlling groups of Linux-based IoT devices. In this case, Ronald used it to connect to the encased Pi. And yes, he named his make Resin-in-resin – we salute you, sir!
“Life uh…finds a way.”
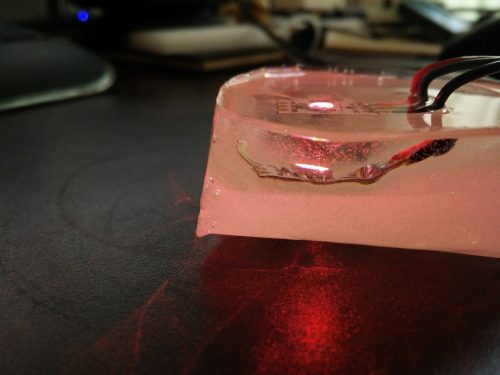
Before he started the practical part of his project, he did his research to find a suitable resin. He found that epoxy types specifically designed for encasing electronics are very expensive. In the end, Ronald tried out a cheap type, usually employed to coat furniture, by encasing an LED. It worked perfectly, and he went ahead to use this resin for embedding the Pi.
Bubbleshooting epoxy
This was the first time Ronald had worked with resin, so he learned some essential things about casting. He advises other makers to mix the epoxy very, very slowly to minimize the formation of bubbles; to try their hands on some small-scale casting attempts first; and to make sure they’re using a large enough mold for casting. Another thing to keep in mind is that some components of the make will heat up and expand while the device is running.
His first version of an encased Pi was still connected to the outside world by its USB cable:
Updates don't get more "hands off" than a Raspberry Pi encased in epoxy — @resin_io inside resin! Come ask me about it at @DockerCon! pic.twitter.com/Efx0YXMQr6
— Ronald McCollam (@RonaldMcCollam) April 12, 2017
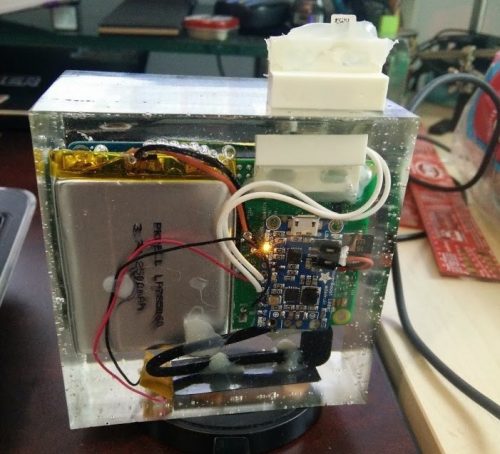
Not satisfied with this, he went on to incorporate an inductive charging coil as a power source, so that the Pi could be totally insulated in epoxy. The Raspberry Pi Foundation’s Matt Richardson got a look the finished project at Maker Faire Bay Area:
https://twitter.com/MattRichardson/status/865988795140775936
MAGNETS!
The charging coil delivers enough power to keep the Pi running for several hours, but it doesn’t allow secure booting. After some head-scratching, Ronald came up with a cool solution to this problem: he added a battery and a magnetic reed switch. He explains:
[The] boot process is to use the magnetic switch to turn off the Pi, put it on the charger for a few minutes to allow the battery to charge up, then remove the magnet so the Pi boots.
“God help us, we’re in the hands of engineers.”
He talks about his build on the resin.io blog, and has provided a detailed project log on Hackaday. For those of you who want to recreate this project at home, Ronald has even put together an Adafruit wishlist of the necessary components.
Does this resin-ate with you?
What’s especially great about Ronald’s posts is that they’re full of helpful tips about getting started with using epoxy resin in your digital making projects. So whether you’re keen to build your own wireless Pi, or just generally interested in embedding electronic components in resin, you’ll find his write-ups useful.
If you have experience in working with epoxy and electronic devices and want to share what you’ve learned, please do so in the comments!
Note: There’s been concern over encasing a battery in epoxy resin, so please do not try it at home – let’s leave that to Ronald.


14 comments
Zebu
I love all of this, i wonder how the resin would effect a camera module, it could make for some interesting underwater photography as it should be completely waterproof
Elfen
Indestructo!
Give it a few hundred years and it will evolve to Brainiac.
beta-tester
haha… a new meaning, when you say, you bricked your RPi.
now your Rpi is a epoxy brick.
or, if you bricked the bricked RPi, you still can use it as a brick.
yeah, i know… that was a lot of non-sense of me…
DynamoHumm
You may want to invest in a small vacuum chamber and pump. They are available on Ebay and Amazon and relatively inexpensive. This will remove the bubbles from the epoxy.
Dinofly
Isn’t this battery going to explode like the one in the Galaxy Note 7 ?
Terence
This is so cool! Great job Ronald and excellent ideas, especially the inductor coil. Even if you keep the battery out of the encasing, you can still use it externally to control the magnet instead. So the Pi would still be “battery” powered, and taking that away the Pi could be immediately shut down like any other electronic device in an emergency.
Jerry Wasinger
How well will the components on the RPi be able to dissipate heat now that they are embedded in an insulating material?
Jason Bramwell
The resin although electrically insulating may actually work as a heatsink being thermally coupled to the Pi. Sure it’s not as good as something like aluminium but it’s possibly better than air.
MSMW
Epoxy resin is about 15 times better heat conductor than air, with similar heat capacity per kg. So it will be better cooled than air cooled one. But even with it’s high mass and high surface area my guess is that it still will be much worse cooling solution than proper size copper heat sink. (copper is over 1000 times better heat conductor than resin, aluminum is about 600 times better heat conductor than resin) It might be still better than small cheap aluminum heat sink.
Tofi
What is missing in this project is a wireless charging. Raspberry lipo charging module connected to some qi charging plate.
herapus
“Not satisfied with this, he went on to incorporate an inductive charging coil as a power source, so that the Pi could be totally insulated in epoxy.“
See the picture.
Ajax jones
I have many pi’s and regularly experience corruption on the SD cards if a shutdown isn’t performed correctly. I hope he has a watchdog UPS feature on it.
Tai Viinikka
Wow! Ronald has gone beyond the normal limits here. I hope the lessons learned here will help me encase some much smaller, simpler components with relative ease. E.g. I would just run headless rather than deal with potting a monitor. I think the most practical way to do power is probably with a cable gland, right? https://www.adafruit.com/product/761
The fact that this whole-Pi approach works gives me hope that even with less skill and effort, very useful things are possible.
WarHawk (Brian C)
Nice!!! Needs to vacuum it down to remove the bubbles…but so very cool…definitely weather proof…let’s just hope he never has to change that LiPo battery.
Still a very cool setup and hey…
“Oh. He’s encased it in Carbonite. It should be quite well protected. If it survived the freezing process, that is.” :p
Comments are closed