Stream to Twitch with the push of a button
Stream your video gaming exploits to the internet at the touch of a button with the Twitch-O-Matic. Everyone else is doing it, so you should too.
eSports and online game streaming
Interest in eSports has skyrocketed over the last few years, with viewership numbers in the hundreds of millions, sponsorship deals increasing in value and prestige, and tournament prize funds reaching millions of dollars. So it’s no wonder that more and more gamers are starting to stream live to online platforms in order to boost their fanbase and try to cash in on this growing industry.
Streaming to Twitch
Launched in 2011, Twitch.tv is an online live-streaming platform with a primary focus on video gaming. Users can create accounts to contribute their comments and content to the site, as well as watching live-streamed gaming competitions and broadcasts. With a staggering fifteen million daily users, Twitch is accessible via smartphone and gaming console apps, smart TVs, computers, and tablets. But if you want to stream to Twitch, you may find yourself using third-party software in order to do so. And with more buttons to click and more wires to plug in for older, app-less consoles, streaming can get confusing.
Enter Tinkernut.
Side note: we ❤ Tinkernut
We’ve featured Tinkernut a few times on the Raspberry Pi blog – his tutorials are clear, his projects are interesting and useful, and his live-streamed comment videos for every build are a nice touch to sharing homebrew builds on the internet.

So, yes, we love him. [This is true. Alex never shuts up about him. – Ed.] And since he has over 500K subscribers on YouTube, we’re obviously not the only ones. We wave our Tinkernut flags with pride.
Twitch-O-Matic
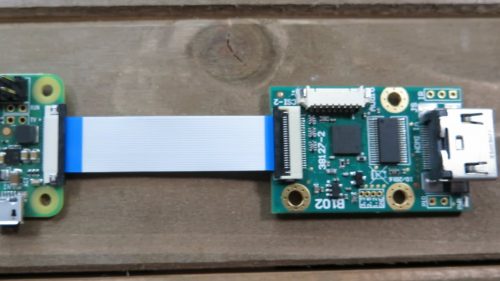
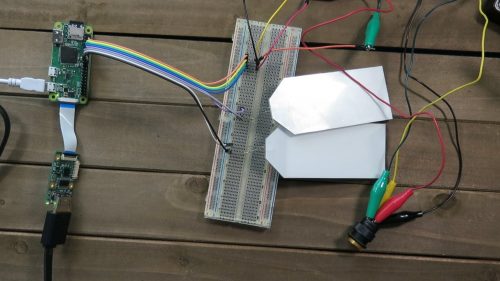
With a Raspberry Pi Zero W, an HDMI to CSI adapter, and a case to fit it all in, Tinkernut’s Twitch-O-Matic allows easy connection to the Twitch streaming service. You’ll also need a button – the bigger, the better in our opinion, though Tinkernut has opted for the Adafruit 16mm Illuminated Pushbutton for his build, and not the 100mm Massive Arcade Button that, sadly, we still haven’t found a reason to use yet.

“I’m sorry, Dave…”
For added frills and pizzazz, Tinketnut has also incorporated Adafruit’s White LED Backlight Module into the case, though you don’t have to do so unless you’re feeling super fancy.
The setup
The Raspberry Pi Zero W is connected to the HDMI to CSI adapter via the camera connector, in the same way you’d attach the camera ribbon. Tinkernut uses a standard Raspbian image on an 8GB SD card, with SSH enabled for remote access from his laptop. He uses the simple command Raspivid to test the HDMI connection by recording ten seconds of video footage from his console.
One lead is all you need
Once you have the Pi receiving video from your console, you can connect to Twitch using your Twitch stream key, which you can find by logging in to your account at Twitch.tv. Tinkernut’s tutorial gives you all the commands you need to stream from your Pi.
The frills
To up the aesthetic impact of your project, adding buttons and backlights is fairly straightforward.
Pretty LED frills
To run the stream command, Tinketnut uses a button: press once to start the stream, press again to stop. Pressing the button also turns on the LED backlight, so it’s obvious when streaming is in progress.
The tutorial
For the full code and 3D-printable case STL file, head to Tinketnut’s hackster.io project page. And if you’re already using a Raspberry Pi for Twitch streaming, share your build setup with us. Cheers!


9 comments
AndrewS
NES with an HDMI output? Curious!
*googles and finds the “Hi-Def NES”* Clever!
Grant
This is cool and all but there is one issue. People on twitch.tv rarely watch a stream for the game but rather for the personality. So microphone audio/facecam would be needed in a possible updated version of this.
Tinkernut
It’s easy to at least add a USB microphone and stream that using the same avconv script.
pax
97$ addon for a 5$ computer… there are complete android topsets with hdmi input costing less.
Shannon
Got a point on the cost for that HDMI to CSI adapter. I think that might be a good peripheral for the RPI folks to offer at a $30 price point. I mean, seriously, if it were less expensive there would be all kinds of Pi video processing stuff running around. The 3 has enough horses…That price point and the difficulty finding a good supplier kind of kills the whole thing.
AndrewS
Bear in mind that (AFAIK) this will only work with un-encrypted HDMI signals (i.e. where HDCP is turned off), which may limit the kind of video-processing stuff you can do.
Tinkernut
I tend to agree. Hopefully another manufacturer will come up with a cheaper version. This is marketed more as a “developer” version, which is why the price is so high.
6by9
Please be aware that using raspivid with that board is unsupported by Pi Towers. It’s demo code written for the Embedded World show in Nuremberg in 2014 (as has been blogged about http://blog.pi3g.com/2014/03/embedded-world-in-nuremberg-2014-new-developments-on-the-raspberry-pi-sbc-market/).
I have working drivers to support that chip sensibly, but using raspivid and the firmware drivers has significant restrictions.
Tinkernut
The official documentation suggests using raspivid
https://auvidea.com/download/manual/B10x_technical_reference_1.4.pdf
Comments are closed