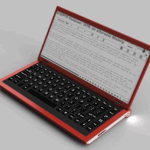
Steampunk laptop powered by Pi: OMG so fancy!
In this digital age, where backup computers and multiple internet-connected devices are a must, maker phrazelle built this beautiful Raspberry Pi-powered steampunk laptop for his girlfriend.
And now we all want one. I mean, just look at it!

There’s no denying that, had Liz seen this before me, she’d have copied the link into an email and titled it INSTABLOG before sending it to my inbox.
This build is gorgeous. And as a fan of quirky-looking tech builds and of making things out of wood, it caught my eye in a heartbeat, causing me to exclaim “Why, I – ugh! – I want a Steampunk laptop?!” Shortly afterwards, there followed the realisation that there is an Instructables page for the project, leading me to rejoice that I could make my own. “You’ll never finish it,” chides the incomplete Magic Mirror beneath my desk. I shush it with a kick.
Winging it
“I didn’t really spec this out when I started building. I knew I wanted a box, but didn’t know how I was going to approach it,” explains phrazelle, a maker after my own “meh, I’ll wing it” heart. He continues, “I started with a mechanical keyboard with some typewriter-esque keys and built out a board for it. This went in a few directions, and I wound up with a Frankenstein keyboard tray.”

Image credit: phrazelle via Instructables
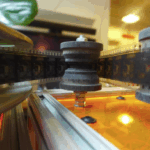
Originally wanting a hole for each key, phrazelle used a paint relief method to mark the place of each one. However, this didn’t work out too well, so he decided to jigsaw out a general space for the keys in a group. After a few attempts and an application of Gorilla Glue, it was looking good.

Image credit: phrazelle via Instructables
Building a Steampunk laptop
With his father’s help, phrazelle’s next step was to build the box for the body of the laptop. Again, it was something of an unplanned mashup, resulting in a box that was built around the keyboard tray. Via a series of mitred joints, routing, and some last minute trim, he was able to fit an LCD screen from a cannibalised laptop into the lid, complete with an LCD driver acquired from eBay.

Image credit: phrazelle via Instructables
All of the Steampunk trimmings
“As I was going in the Steampunk direction, gears and gauges seemed to make sense,” says phrazelle. “I found a lot of cool stuff on Etsy and Amazon. The front battery gauge, back switch plate, and LED indicator housings came off Etsy.” He also discovered that actual watch gears, which he had purchased in bulk, were too flimsy for use as decoration, so he replaced them with some brass replicas from Amazon instead. Hand-blown marbles worked as LED defusers and the case was complete.

Image credit: phrazelle via Instructables
Inside the belly of the (beautiful) beast
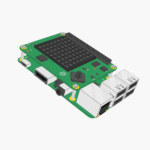
Within the laptop body, phrazelle (do let us know your actual name, by the way) included a Talentcell battery pack which he modified to cut the output lines, something that was causing grief when trying to charge the battery. He utilised a plugable USB 2.4 four-port powered hub to power the Raspberry Pi and optional USB devices. He also added a bushel of various other modifications, all of which he explains on his Instructables page.
I ran with the Pixel distro for this build. Then I went through and did some basic security housekeeping like changing the default password, closing every unnecessary port on the firewall, and disabling the Bluetooth. I even put the Bro IDS platform on it to keep an eye out for shifty hackers… *shakes fist*

Image credit: phrazelle via Instructables
This thing runs like a champ! For its intended functionality, it does everything it needs to. You can get on the internet, write papers, check email… If you want to get nerdy, you can even brush up on your coding skillz.
Instructables and you
As I said, we love this build. Not only is it a great example of creating an all-in-one Raspberry Pi laptop, but it’s also gorgeous! Make sure to check out phrazelle’s other builds on Instructables, including his Zelda-themed bartop arcade and his ornate magic mirror.
While you’re there, check out the other Raspberry Pi-themed builds on Instructables. There are LOADS of them. And they’re great. And if you wrote any of them – ahem! – like I did, you should be proud of yourself – ahem! – like I am. *clears throat even more pointedly*
Have you built your own Pi laptop? Tell us about it in the comments below. We can’t wait to see it!


12 comments
Steve Dyer
ULTRA cool ENIGMA look.
Mark Swope
That is gorgeous! Now I have to read the instructables article to see how he did all the other bits, like the battery meter and the touchpad…
Jason Willis
The look of this laptop reminds me of the original Apple 1 Computer. https://en.wikipedia.org/wiki/Apple_I
Ken Warren
A beautiful construction. I’d love to have it.
mincepi
Here’s my attempt at a Pi laptop:
https://hackaday.io/project/19595-laptop2pi
It’s not so much a Pi laptop as a Pixel_x86 laptop with a Pi Zero co-processor. It has a twist though – the Pi Zero also emulates a USB mass storage device, which replaces the laptop hard drive.
json parser
Nice post. Thanks!
Emilya
I love the case! Wonderful!
Elfen
It is a lovely construction. Worthy of a Make!
Robbie Frazelle
Thanks for the writeup! Glad you all like it! My real name is Robbie, btw :)
Ken MacIver
Is it just me? Or in the first picture, the brass whatsit on the bottom right looka a lot like the shell of a Vacant\Engaged indicator\locking device. Which apart from being ultra cool would make a magnificent Power On/Off switch for such a wonderful case.
karan
I’m working on a raspberry pi laptop called lemon-book. It is built into an aluminium briefcase. I just need to fix all the components to it.
Piehti
*sobbsobb* Need one of dat wood-companioncubes, NOAW! Where to get it?! Could you assamble me one into an antique guitar? :)
Comments are closed