Network install beta test: your help required!
Until today you’ve always needed to use another computer to run Raspberry Pi Imager, or to run something similar, to let you flash your operating system onto an SD card when you get a new Raspberry Pi. But how do you get the operating system onto an SD card if you don’t have another computer in the first place?
It’s the classic chicken and egg problem, and we’ve just solved it.

There is now a beta version of the Raspberry Pi bootloader that implements network installation, and we’d like your help to test it. The new Network Install feature can be used to start the Raspberry Pi Imager application directly on a Raspberry Pi 4, or a Raspberry Pi 400, by downloading it from the internet using an Ethernet cable. The Raspberry Pi Imager application, which will run in memory on your Raspberry Pi, can then be used to flash the operating system onto a blank SD Card or USB disk, just like normal.
How to use the network installer
If you want to try out the network installer you’ll first have to install a beta version of the bootloader.
Updating the bootloader will be necessary for existing boards already in circulation. However, once the beta period has ended, we’ll eventually ship Raspberry Pi boards with the new network bootloader installed directly from the factory and this step won’t be necessary anymore.
Installing the new beta bootloader
The easiest way to update the bootloader on your Raspberry Pi 4 or 400 is by using Raspberry Pi Imager, either running on your Raspberry Pi or on another computer, to copy the required software onto an SD card. You’ll need a spare blank SD card and, if you’re using a Raspberry Pi or another computer that doesn’t have an SD card slot, a USB to SD card dongle.
You should be aware that the SD card you’re using to update your Raspberry Pi’s bootloader will be wiped of any existing data, so you shouldn’t use the SD card you are currently using with your Raspberry Pi.
In the Imager application, click on the “Choose OS” button and scroll down the “Operating System” list in the pop-up window. Select “Misc utility images”, then select “Beta Test Bootloader”.

Next, you need to select the boot order. All of the options are the same but will have a different boot order. Unless you have a reason to do otherwise, you should probably select “SD Card Boot”.

Afterwards, select your media and follow the normal instructions to burn the updated bootloader to your SD Card.
When the SD card has finished burning you should power off your Raspberry Pi and remove the existing SD card and put it somewhere safe. Insert the card you just flashed with the Imager application into the Raspberry Pi and power it back on. The board LED will blink regularly, and the screen will go green to indicate that flashing the new beta bootloader was successful.
If you ever want to restore your bootloader back to the “Release” version you can follow these steps again, selecting the top “Bootloader” option instead of the “Beta Test Bootloader” option.
Now remove your bootloader update SD card and turn your board off and back on again.
Trying out network boot
Now that you have updated the bootloader everything should still work as before.
When a Raspberry Pi is switched on, the bootloader searches for software to load. It first looks for an SD card, then a USB stick, and so on. It will keep going round in a loop until it finds some software to use. After a few seconds, you’ll see a diagnostics display on the screen showing you what it’s doing.
If you want to insert your original SD card (the one you were using before all this started) your Raspberry Pi should boot seamlessly back into the operating system as normal.
This hasn’t changed. However, the Raspberry Pi now also looks for a connected keyboard.
If you boot your Raspberry Pi without an SD Card in the slot, or with a blank SD Card, and if you have a keyboard connected, you’ll now see something a bit different.
If you have a keyboard connected (this will always be the case for Raspberry Pi 400) and the Raspberry Pi is unable to find an operating system, it will show the new network install screen.

In the background, your Raspberry Pi is still looking for a working operating system. But at this point, you can start the network install process by holding down the Shift key for three seconds. Confirm you want to go ahead by pressing Space when prompted, and it should ask you to insert an Ethernet cable.
You’re going to need to physically connect your Raspberry Pi to your router via an Ethernet cable rather than connecting it to your wireless network. You’ll need an Ethernet cable that has a male RJ45 connector on both ends. Most home routers have sockets on the back to allow you to plug Ethernet cables in, so plug one end of the cable into the back of the router, and the other end into your Raspberry Pi.
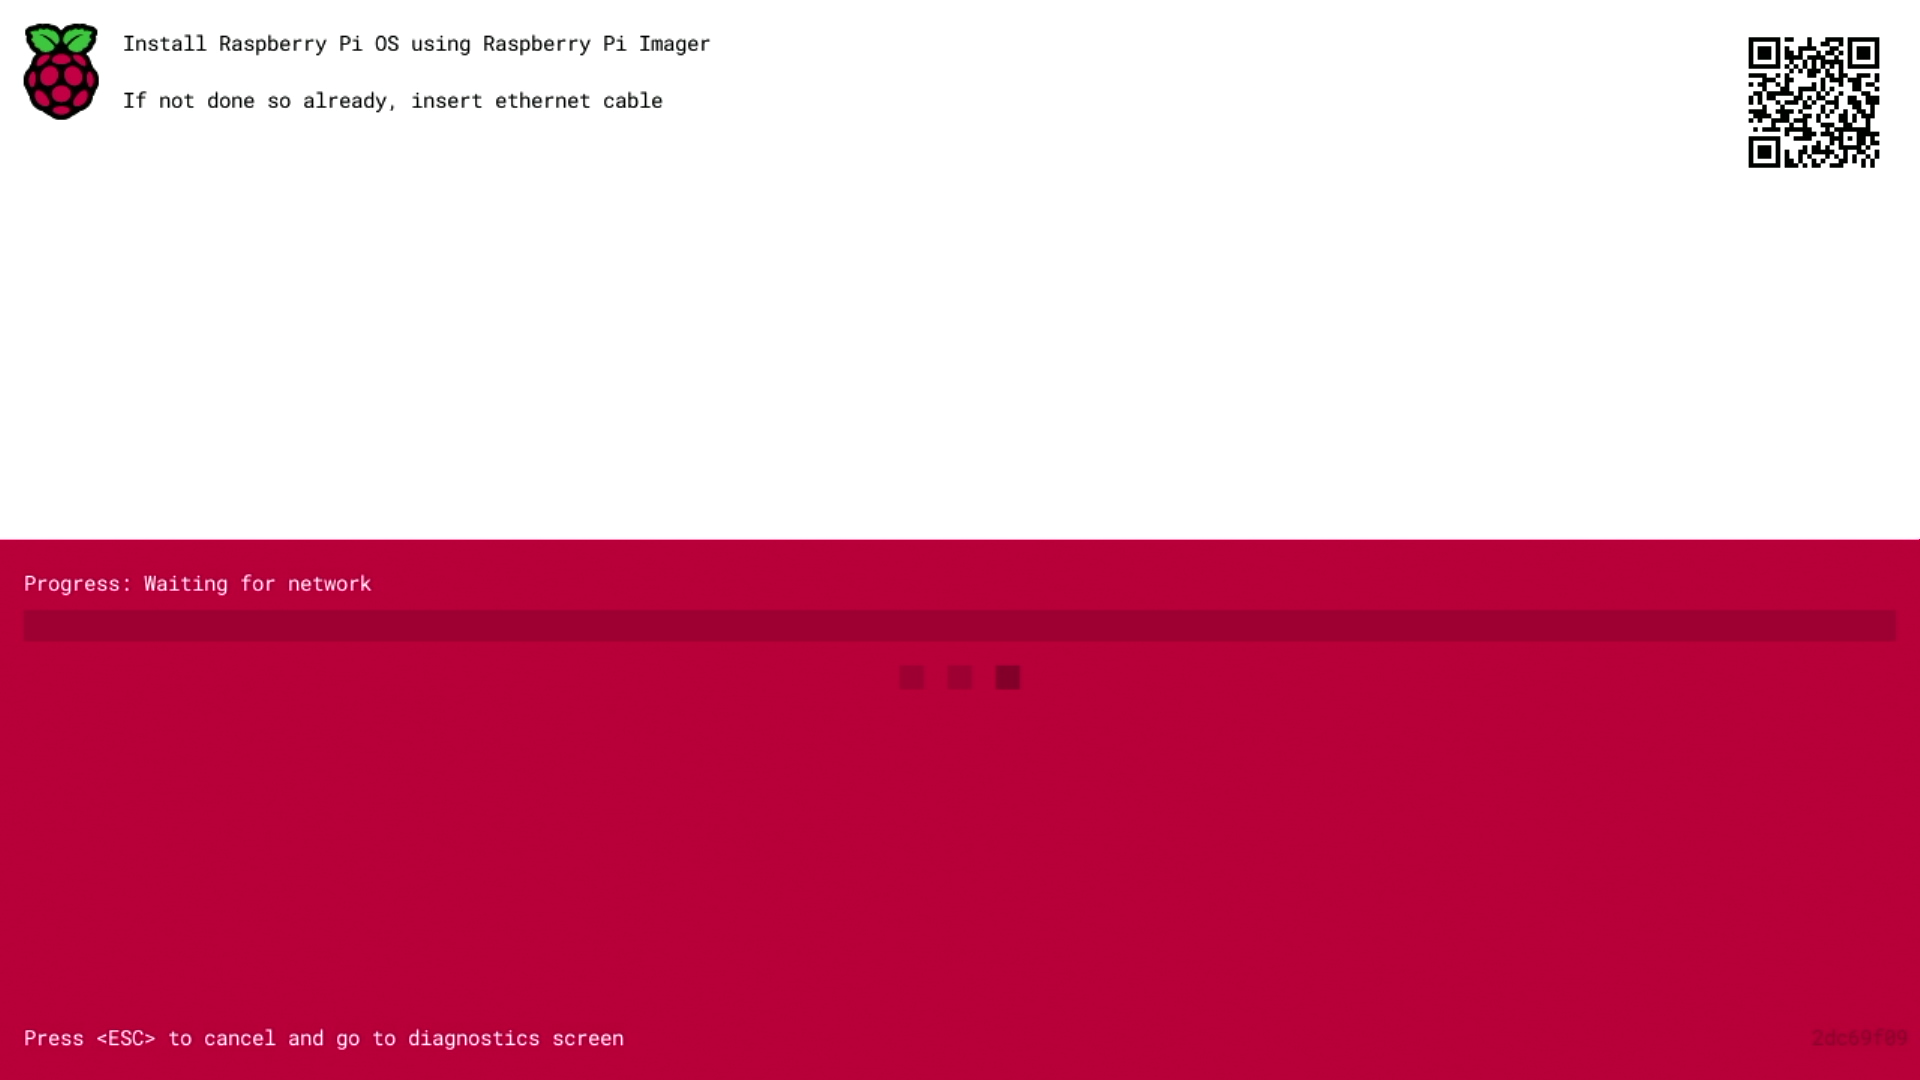
When it detects a cable has been inserted it should start downloading Raspberry Pi Imager. If the download fails, you can repeat the process to try again.

Eventually, it should start the Raspberry Pi Imager application, allowing you to install a full operating system to a new blank SD card or USB stick.

You’ll find more information about how to use the Raspberry Pi Imager in our documentation.
If you haven’t already done so, it’s at this point you should insert another, blank, SD Card into the SD card slot on your Raspberry Pi. Raspberry Pi Imager will allow you to flash the SD card with a copy of the operating system, directly from the internet.
Now you have software installed, you shouldn’t see the network install screen on boot. If you do want to run it, you just need to remove any bootable disks. You can reinsert them later once Raspberry Pi Imager is running. But take care not to overwrite any working disks that you want to keep!
Check out our documentation
You can find out more about our network install beta in our documentation.
Got some feedback?
Post any comments or feedback as a reply to this post, or post something in the Raspberry Pi forums.


88 comments
me
what if i want to erase the sd card first then write an os?
It asked me to quit then reinstall rpi-imager
me
oh – don’t press quit, just the ‘x’ to close that box to go back to the OS list
Liam
Is there a way to download the beta boot loader without having to use the Raspberry Pi Imager programme? It really annoys me that it changes my file allocations such that any file ending .gz will open in Raspberry Pi Imager, rather than my archive software.
TimG
An rpi-eeprom APT release is in the pipeline and the beta pieeprom.bin binaries are on Github in the normal place.
https://github.com/raspberrypi/rpi-eeprom/tree/master/firmware/beta
Supra
Can I used same Raspberry Pi 4 with with 4/8GB that I brought 3 yrs ago?
TimG
Yes
Raspberry Pi Staff Liz Upton
Yes.
R61ZT
Probably needs 16 GB in 2022. For the past six months, I’ve been unable to use my 8 GB cards because the raspbian OS has expanded too much. “full” version is now 9.3 GB when new and soon expands with more updates. I’m here to try to find a workaround for dd becoming less and less reliable.
Stephen Early
How does this interact with the existing network boot support?
TimG
Except for the DHCP stage, network-install is independent of the existing network (TFTP) boot mode. Network install downloads the embedded version of the Raspberry Pi Imager via HTTPS from raspberrypi.com into memory and runs that as a RAM disk.
FM_81
But if you have an already working network-boot (in your home-lan), you can extract the files from ‘https://fw-download-alias1.raspberry.com:443/net_install/boot.img’ and add them somewhere to your TFTP-server and let the RPi4 boot from there. I’ve done no EEPROM-update before!? Just flashed the “64-Bit-lite”-version to my Raspberry-Pi-4 few minutes ago by doing so, and it has worked well …
Raspberry Pi Staff Alasdair Allan
Sorry, not clear where you’re going with this, do you have a problem running Imager on Windows to flash the sd card to update to the beta bootloader?
Gargoyle
I think Burnard is a bot and included a link to what is almost certainly mailware download site.
I would expunge!
John Tetreault
So how DOES one get the beta bootloader with the Raspberry Pi imager…. because I’ve got the v1.7.2 imager, then when I select “Misc Utility Images” and then select “Beta Test Bootloader” I get a dialog box that pops up that says “Error downloading OS list from the internet” Its not a connectivity issue on my end, as I can flash any other image no problem.
David Collantes
If only one could buy a Raspberry Pi to try this on! I had had my four on order since mid-January, scheduled for delivery end of March. Yikes!
Jimbo
Everything worked fine except the screen resolution. Both my computer screen and a small 7″screen could not work out the full screen. I could only see the top left corner about 60% of the total screen as shown in the screenshot here. Any suggestions are welcome. Do I need to go to diagnose screen first maybe?
Raspberry Pi Staff Gordon Hollingworth
Please post issues to the forums as requested in the blog post:
https://forums.raspberrypi.com/viewtopic.php?t=329324
Utkarsh
Is there a way of getting this to work headlessly, without a monitor and keyboard?
FM_81
If you have no keyboard, how should the “hold down SHIFT for three seconds” be done?
Of course the ‘rootfs.cpio.zst’ inside the ‘boot.img’ could be modified in a way, that it includes something like “dropbear” to allowing SSH-access. But then you must make sure, that it net-boots straight into it without “long SHIFT press”. Possible is everything …
Marcin
Is it possible to use a proxy or can I change the default image server?
Marcin
would https://fw-download-alias1.raspberrypi.com:443/net_install/boot.img url be ever replacable?
HelgiW
Will this be able to install to USB, or is this sd card only?
Raspberry Pi Staff Alasdair Allan
You can also install onto a USB disk.
Scott
Does this erase the USB disk or just write a new OS to it? I’m looking to upgrade my system to 64-bit but don’t want to go through the process of moving all of the data back and forth. If this could just write a new OS onto the drive but keep the user data in tact that would be awesome.
James
I just heard about this last night, so I gave it a try. nothing to loose right?
well, donwnloaded rpi-image to my ubuntu laptop. used that to image the sd card i was using. took it over to my pi400 keyboard and powered it up.
Got the green screen, so rebooted. Everything came up and had an old SanDisk cruz 32G usb stick to use.
it booted up and i decided to load up Ubuntu desktop for a change.
Answering this comment from that imaging. :)
Ed
Is the image you pick to write limited by the amount of memory, i.e. does the whole image (+Imager) need to fit in memory completely before it is written? I wonder because the largest images wouldn’t fit in 1 GB. That does seem like a logical limitation but it would be ultra awesome if you found a way to dynamically load+write!
TimG
The OS image is not limited by the RAM size because the download is decompressed on the fly and streamed to disk.
Alan Robertson
Ooh that’s, pretty cool – nice! 👍🤓
Jon Witts
Is it possible to specify a proxy server and port so I can run this in a school / corporate network?
Peter Harper — post author
No, I don’t think so. I’ll have to have a think about whether we can fix that.
Jon Witts
It would be amazing if you could!
default
It’s a cool feature, but does the bootloader verify authenticity of the downloaded OS image? This is an absolute must-have feature in my opinion.
Timg
Yes, it’s exactly the same as the current desktop imager.
default
Do you have any details? As far as I can tell, it only uses basic TLS to download the image, which is a rather weak form of authenticity verification.
Marko73
Would it be possible to add an override shift/key combination that downloads and runs the imager even if the SD card / USB drive etc does contain a bootable OS, without attempting to boot first? As, if your card already contains an OS and you didn’t have another computer to erase it, surely you’re out of luck at present?
Raspberry Pi Staff Alasdair Allan
You can take the card out of the slot, and boot the board into the network installer without a card present in the slot. Once Imager is running you can reinsert the card and overwrite your previous OS installation.
Marko73
Yes, I got that bit, but the microSD card isn’t always all that easy to remove quickly. I’ve needed tweezers to remove the card from most cases I’ve seen, and some cases even cover the slot completely! (not that I would get one of those but still…) I realise size of code is very important here but it could help a lot of people to be able to do this without removing the card.
Job
It is awesome and really needed! Only thing I found is that in the settings while setting up a SSH account the password is white and thus you cannot see how many characters you’re writing. Other than that its just awesome, keep up the good work!
Ivan Malinovski
It’s almost perfect, all we need is to be able to do it headlessly. Like, if it doesn’t detect monitor or something, we’d just be able to SSH into it and do it through there.
sandyol
Just tried it with a 2G Pi 4 (Model b03111) with a 1280 x 1024 monitor and a wireless connected keyboard/mouse.
Everything went smoothly, apart from a short senior moment pressing shift when the screen was clearly telling me to press space to confirm!
Ken L
Great firmware update for recovering usability. Worked well
NS Labs
I can see how this will replace NOOBS.
Pepe
Flawless. Thank you. Handy enhancement.
Please carry on, as it makes a difference at this side of the screen.
P.S.- Congrats for the 64b OS.
Sean Harlow
I would love if this could be extended to an actual provisioning system, where I could boot a new Pi headlessly with a fresh SD card and have it install a specified image with no user interaction required.
Something like how most VoIP phones work where a DHCP parameter can provide a server URL that then contains config files identified by MAC address or serial number would be nice.
TimG
There’s already an automated provisioning system for CM4 – see https://github.com/raspberrypi/cmprovision
Some of the technology (e.g. HTTP download of signed boot images) might get re-used there or be of use to people rolling their own automated setup.
Factory fresh Pi4B/Pi400 require user-interaction (or at least an EEPROM config change) at the moment because there’s no way to determine whether the TFTP server is should be trusted.
Paul
Not directly related to the boot option, but could Pi Imager on PC and Mac be updated to allow backing up an SD card to an image file, removing the free space from the image?
Raspberry Pi Staff Gordon Hollingworth
No that’s impossible, Neither MacOS or Windows OS understand the ext4 filesystem so we can only copy a whole image. But there are issues with copying whole images from card to card because the image contains the size of the SD card and that changes on a per-card basis.
Alan Robertson
Yep I got caught out with that trying to move images between 16GB cards that were notionally the same but in reality fractionally different sizes! I used PiShrink in the end, did a brilliant job – https://github.com/Drewsif/PiShrink
Christopher
This sounds really awesome! Do you have plans to make this accessible for someone who is blind such as myself? I’m not sure how feasible it would be to get Orca running in the live environment, so maybe SSH from another computer would work better, though it defeats the purpose of using the Pi on its own. Still, I like the idea of not needing to do any work on another computer and would be very happy to settle for command line remote control.
Raspberry Pi Staff Gordon Hollingworth
Yes we are looking at this, initially we’ll require some beeps to give feedback when pressing shift/space bar. But once rpi-imager is installed we should be able to install orca (assuming it’s not too large and doesn’t slow down the network download too much!)
John Nicholls
A great concept, just tried this on my RPi4 Model B 1GB RAM model, it downloads the imager OK but when the download appears to be finished it fails to run with the error “An error occurred, please try again, Press and hold key to start install process”
I have tried this five times now, fails at the same point, with the same error message, I removed the blank SD Card on the final test but still have the same failure. This RPi4 is one of the first ones that we could purchase in Australia, the Copyright message on the PCB is 2018 with a IC: 20953-RPI4B
Mark Tomlin
Only issue I’m having is not caused by your software, but by my flaky ISP issued Ethernet MoCA / WiFi Extender that has 2 GbE ports on it. Even on my desktop computer the connection takes a LONG TIME to bring up. Once it’s up it’s fine until the connection resets from a restart or a shutdown. It looks like when the Raspberry Pi completes the download for the Firmware based imager, the connection is reset between the firmware downloader and the imager. That’s causing an issue with my flakey network gear because it means it’s not downloading the available OSs and the Choose OS list for me is blank except for two items. If I wait (2 minutes) before entering that menu, I then get the download list as the connection is reestablished. It would be nice to have a little icon somewhere on the screen denoting if there is a successful ethernet connection established so I know how long to wait. I’m sure this would be helpful for other people too who may have unreliable ethernet.
Nick Osborn
This talks about ethernet but I’m curious if it’s possible to do this over wifi as well. I don’t know much about network booting/installing but I don’t see why it wouldn’t be possible to have it able to search for an ssid and prompt for password
Cheese tester
My guess is that there is a very limited amount of space in the RPi’s eeprom to store the network install code and the WiFi driver stack is simply too big to fit.
Garry
Worked perfectly on CM4 with CM4IO board booted to PCIe SSD, flashed on board emmc. Love it. Can now copy it back to SSD if required. Good work team
Ha taeshik
Hi dear
How are you today ?
we used raspberry-pi4, which is RASPBERRY-PI CM4008032 Raspberry Pi Compute Module 4, BCM2711, ARM Cortex-A72, 8GB RAM, 32GB EMMC with Raspberry Carrier Board
But This is not supported by Driver in Raspberry OS.
Has anyone used the AC-8260 Wifi module in the above environment?
Unfortunately, we cannot use a module Wi-Fi in the Raspberry .
If you have experience using Wi-Fi, please contact us.
[email address redacted]
Wilbur Andrews
Have you tried sharing the internet connection with say a laptop? It sounds like your pi’s are in remote locations but someone must have a desktop or laptop that they can then share the network. I do that between a desktop that does not have wifi and a desktop that does have wifi, the 2nd desktop thinks it’s on a wired connection.
rkteqs
It is great feature. Something I was looking for remote mgmt. So far I do not have access with pikvm remote. My guess is that problem is with “Raspberry Pi now also looks for a connected keyboard”. If someone has success with pikvm please let me know. Continue with testing. If that works, it would be complete remote management :-)
JonH
Would something like meshcentral.com be useful for you?
NS Labs
You could add a feature to the desktop RPi Imager, so it could connect to a network connected, SD Card less pi.
Alec Devlin
Just a few things to say about the latest update to the Raspberry Pi bootloader, I used a Pi P400 to test this out, first time I have tried it, started with two blank SD cards, one for the bootloader update and one for the OS install, (I selected the new 64 bit OS later),
Absolutely fabulous, Flawless, seems so flexible, started at about 9:40pm and the installation was completed and running the 64 bit OS by 10:15pm.
Brilliant, tremendous work. Many Thanks. Alec.
Mark Ziesemer
Can we please, please have an option to only image something like the first 8 GB of an SD card? Allowing for keeping a persistent “data” partition across upgrades and re-images? If not with this network bootloader, via other official means (Raspberry Pi Imager, etc.)?
Kgotiwi
We must duplicate a ton of PI image SD card for Pi 3B+. But this solution not support. Any suggest , please welcome or we have to our hard work as usual. :)
Julian Yon
Worked a treat for installing straight to SSD. Excellent job :-)
Wilbur Andrews
Thank you for posting this, I was wondering if that worked too!! I have a boatload of old standard laptop and ssd laptop drives too, that makes this the way to go for me.
Derry
When will there be wifi availability?
AP41
Worked flawlessly on my RPi 4 4GB. As an added twist, my boot drive is a 500GB M.2 NVMe plugged in via USB in an Argon ONE M.2 case. Left the USB adaptor for the M.2 case-half unplugged until network boot had initiated, plugged it in at the stage where it asked for a network connection, and it detected and overwrite the old Raspberry OS instance on the drive with zero issues.
Awesome work folks!
Hans Slichter
i have the same config, and installing is easy, but i wanted to instaal libre elec kodi , and i cant start that
it seemed like it installed the image but wont come up after rebooting
Any ideas?
Peter
I tried this out om my pi4 which had developed problems booting off an SD made on my PC.
The whole process, including loading-up the 64bit version of PiOS on to an SSD went very smoothly.
ida
everyone went smooth. I would like to see the background where you enter in your network password to show some black dots. Having only white on white was confusing. I don’t see this as a huge security risk to show dots representing the placeholders for your wifi password.
Peter
Will this work on a CM4 Module with or without eMMC?
Muzammal Baig
RPI default servers always give me “connection failed” so i seriously doubt this network install will work
Better idea would be to give rpi a good old fashioned bios.
Besides my rpi 3 model be proved to be too slow for any thing useable.
Ron Grimes
I’m having trouble getting the network boot image to load. I’m using a RPi4 2GB.
The firmware update appears to have been successful, and I do the long shift and space bar bit. However, the download of the boot.img is problematic. It starts but is very slow – a maximum of 20 KBps, and down to 10 KBps. Then at around 9Mb download (or less), the transfer stops and simply reports: “An error occurred, please try again”. There is nothing particularly interesting (to me) on the diagnostics screen. I’ve tried two ethernet cables, and different router ports but the effect is the same.
I did a “curl ” at the command line on another pi, and the 22Mb downloaded in 3seconds (!) which is consistent with our internet speed.
Thanks for any suggestions? (Screen images available – just not sure how to add them to the text here).
Ron Grimes
I tried again a couple of days later and had a successful load, although the boot.img transfer speed was slow (~6KBps) . I blame a transient gremlin on the interwebs for the previous difficulties.
SCOTT
Can’t seem to get registered for the blog so I’ll post here. When configuring image customizations the SSH password field doesn’t fill in with any characters and when booting the new ssd card the password is neither the default or the customized password. Somewhat minor but appears to be a bug.
Pete
What would be really great is if the boot code could download a kernel that was fully network enabled so that it didn’t need local storage at all. Have all the o/s files served across NFS or similar.
Security Guy
I love it!
what also would be a nice option is to LUKS encrypt the sd card!
Keep up the good work :-)
Mike
So this appears (or was suggested) this is doing HTTP boot, which existed in the custom rpi4-uefi firmware, but having that ofc needed the SD always there so having this in the bootloader is awesome.
But will it ever be possible to use other image URLS? I’m assuming this is currently hardcoded, but it would be nice if we could point it to a different http boot host…
And on that not other than tftp I’ve I have a HTTP Boot server setup, would the bootloader now support it too?
Peter Brittain
I would really like to know if it works with the Pi Touchscreen. It would be great for setting up an SD flashing station for our team as the image could be on an SD card and it could be used with the touchscreen to select and flash the image.
David
I skimmed the instructions two weeks ago and thought I had them down. Killed an hour last night trying to get it to work. Every time I tried to boot the firmware image, I got no green LED – just steady red. Tried a bunch of things and was pretty sure I had bricked the Pi.
Then I reread the instructions. Turns out that it’s for the Pi 4 and 400 only. I had been trying on a 3B+. Good news, I burned an OS using RPi Imager on a Win machine and it booted right up so I hadn’t toasted the 3. Whew.
Today, I followed everything carefully, step by step using mSD. Worked a treat. Thanks – looking forward to this becoming a default feature – it will be an interesting addition for my classes.
Miles Raymond
Will there eventually be support for the touchscreen such that no keyboard is required for boot and install when only the touchscreen is present?
George Palacay Jr.
Hi,
Out of topic… Can anyone help me to find a distributor of Raspberry Pi 4 Model B. I have been looking for months now, I want to buy 100 or maybe 200 pieces. Most of the seller is only limited to 1 per person.
Hope you can help me. And by the way, this will be ship to Philippines.
Thanks!
George
Raspberry Pi Staff Liz Upton
I’ve passed your message on to the commercial team; I’m not sure whether they’ll be able to help, but we’ll certainly have a look! Someone should be in touch.
lazywriter
Are there any plans to add support for HTTP(S) boot (besides TFTP)?
Gilbert Detillieux
Finally had some “playtime” on the weekend to try the beta bootloader. Very slick! It’s nice to have the Pi Imager running right on the Pi. A couple suggestions for improvement:
1. Downloads of the imager were quite slow. Would it be possible to use local mirrors, the way package updaters do?
2. Being able to flash the bootloader directly from the imager app, without needing to write to an SD card first, would be very nice. An even bigger bonus would be if you could also edit the bootloader environment before you write it to flash. (OK, I’m probably asking for a lot!)
Thanks for all the great work!
David
When I go use Raspberry Pi Imager and select “Beta Test Bootloader”, I get error “Error downloading OS list from internet” and navigating to https://downloads.raspberrypi.org/net_install/beta/eeprom_recovery_beta.json manually returns 403 error code. This doesn’t appear to be just me because archive.is also gets this error code when it tries to request url. (The normal bootloader json retrieves fine from: https://downloads.raspberrypi.org/eeprom_recovery.json )
Ralf
Worked fine for me!
I am using a Raspberry Pi 4B (4GB). It was very easy to install the beta firmware, but you should write a short text instruction on the blank green screen.
Why do we need an empty FAT32 formatted microSD to install an image from the internet server?
In the first step I started the Raspberry Pi without a microSD. It was nice to see that the Raspberry Pi Imager started automatically from the internet after a while. Good work! In the second step I inserted a microSD that was not empty. In the third step I selected “Erase” from the Imager menu to format the mircoSD to FAT32. And in the fourth step I selected the recommended image “Raspberry Pi OS (32bit)” for installation. The fifth step was to reboot the Raspberry Pi with the new image on the microSD. And nothing more.
Yes, it will take some time if your internet connection is not very fast. But once the new firmware is installed, you really don’t need another computer to format the microSD, load the OS image, or copy the image to the microSD.
Johann
Is it possible to use the bootloader to directly download install a custom pi OS instead of taking the detour via the pi imager? I’ve played with the HOST_PATH (etc …) config but ran into some (size of the OS related) issues.
I’m assuming there would be a size limit due to having to be able to run from memory?
If that’s not possible:
Is there a way (parameters/ config) to tell the network installer which image to flash in a headless setup, without user interaction?
Comments are closed