Light painting with a Raspberry Pi
Before we get to the meat of today’s post, we’ve two bits of news. Just over an hour ago we watched the Soyuz rocket carrying British ESA astronaut Tim Peake, who will be in charge of the two Astro Pis on the ISS, lift off. The Soyuz will dock with the ISS around 17:24 GMT today: please join us following Tim’s progress on Twitter from about 16:45 GMT. (You can also watch live footage at NASA TV.)
In other Raspberry Pi community news, we’re very pleased to announce that Yasmin Bey, a 14-year-old Pi developer from Southend, organiser of school computer clubs, and friend of many at Pi Towers, won the EU Digital Girl of the Year award, which this year was awarded jointly with Niamh Scanlon from Dublin. We’ve been watching Yasmin’s progress over the last year or so: she’s an astonishingly focussed and exceptionally smart girl, and we wish her all the success in the world. Well done Yasmin – we’re really proud of you!
Back to light painting.

LadyAda from New York’s Adafruit dropped me a very short email at the end of last week, saying “You must see this.” As usual, she was right. This is one of the most eye-catching projects we’ve come across this year.
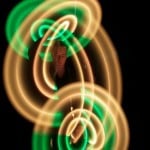
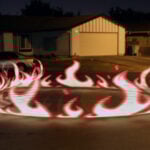
What you’re seeing in the photo above is a persistence of vision (POV) effect, where a slow shutter speed is used to capture a row of LEDs which change as they’re moved across the frame (in this instance by someone carrying and sweeping the LEDs from one side of the picture to the other over a period of a couple of seconds).

It’s a really impressive effect, and it’s a rig you should be able to build yourself at home, using a Raspberry Pi and some additional kit. Adafruit has covered the subject before, but they’ve discovered that their new DotStar LEDs make things much easier and much better looking. DotStar LEDs use generic 2-wire SPI, so you can push data much faster than with the NeoPixels’ 800 KHz protocol, and you don’t need to mess around with specific timing functions. They also have much higher pulse width modulation (PWM), which means that things look a lot smoother and less flickery than in POV projects made with other LEDs. Result: cleaner, more detailed light painting.

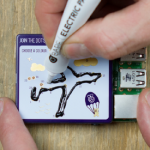
Adafruit have a made a very thorough tutorial which will help you build a 1m light painter which can support most common image formats. They’ve also helpfully included instructions on making your photos taken with this setup as bright and sharp as possible.

We’re wondering if we have enough time to build our own rig for Christmas. If you make your own, please post a link in the comments!


9 comments
Alex Eames – RasPi.TV
Oooh I totally want this for Christmas now. Pi + hacking + photography is a complete win.
dan3008
wow. MUST build. That would be amazing
Lafcadio
This is beautiful. I can’t really afford all the kit until after Christmas (priorities!), but I would love to make one of these.
Ian Nichols
Colour me jealous. I did a more modest one back in the Summer with an A+, but only 144 pixels in the strip. Here it is in action. https://goo.gl/photos/DJSrnVzF8unjQjY49
Liz Upton
Oh, VERY nice!
6by9
6 second exposures are possible off the Pi camera. I wonder if we can do Pi Painter “selfies”. Or optical feedback effects by using the picture just taken as the source for the next Pi Painter display. Hmm….
(It would require a slight tweak to the mode of operation as there is no easy way to exactly control the exposure start time of the Pi camera. It’d need to be some form of signalling from the camera Pi as to roughly when the exposure was starting – we don’t know exactly when this is due to the way the imaging system works)
Robert Wiltshire
Imagine adding one of these to a blade of a wind turbine. The advertising potential would be amazing!
Jim Agniel
We did one with a 60-pixel strip…great fun, low cost, and not too hard!
https://goo.gl/hha5hS
Here’s the code…
https://goo.gl/vdfaPK
Alex Eames – RasPi.TV
I managed to get mine finished just in time for Christmas. A couple of results from my first session in this tweet…
https://twitter.com/RasPiTV/status/680125816970280960/photo/1
Comments are closed