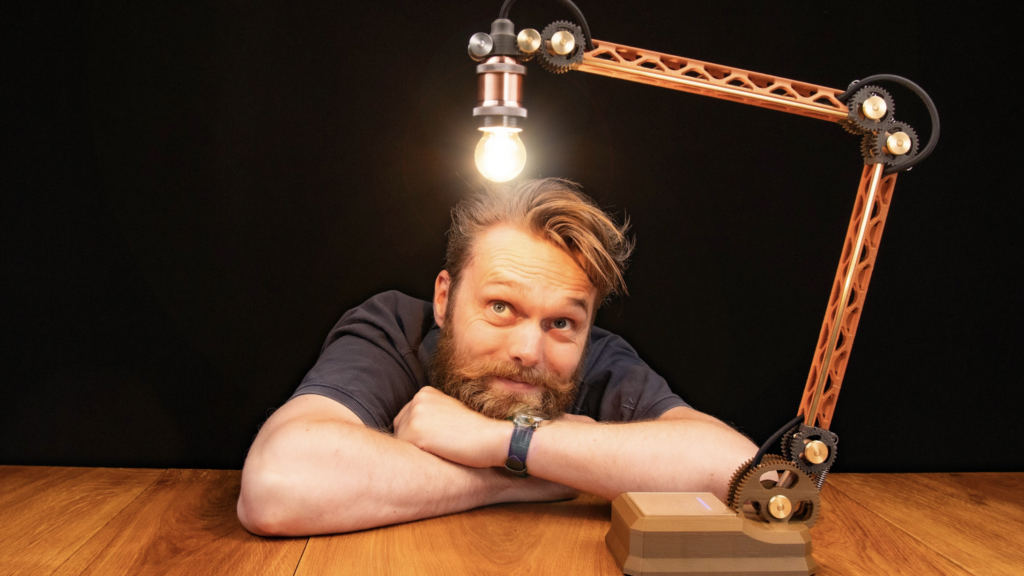
HackSpace magazine meets Jón Schone | HackSpace #79
In the latest issue of HackSpace magazine, out now, Andrew Gregory meets Jón Schone. Beware: this man does weird things with 3D printers.
It’s easy to crack a joke; it’s hard to write a love letter. That’s why we admire Jón Schone so much. While there are a few YouTubers seem to reduce 3D printing to a joke, Jón clearly loves it. Every video he makes, every device he builds, is a genuine attempt to learn something new. He does things with 3D printers that you shouldn’t be able to do, such as printing car wheels. He uses materials that most of us wouldn’t even think of, such as Kevlar. And like the engineer that he is, he gets things wrong until he learns how to do things right. If you’re not aware of his work go right now to properprinting.pro and have a look at some of Jón’s work – then come back here and read what makes him tick.
HackSpace: Morning Jón! One thing that stands out about your videos is that you’re doing proper engineering, which is rare to see – 3D printing can be a joke so much of the time.
Jón Schone: And that’s weird, because 3D printing is such a good fit for doing engineering. To be honest, I do see a lot of actual engineering being done with 3D printing, but not in the consumer space or on YouTube. I’ve seen it a lot when I was still at work. I quit my job almost a year ago, but I had worked for an electronics manufacturer for eight years. We used 3D-printed tools to help with production, and it was always something functional or mechanical. In a professional environment, proper 3D printing is pretty common, but you don’t see it very much on YouTube. That’s something that I want to show.
Are you doing YouTube full-time now?
Yes, since May last year. It was quite a step. But I live alone, I don’t have family, my cost of living is quite low. So I thought, well, this is the moment where I can make the jump. If I need to eat potatoes for a month, it’s only on me. So I went for it.
How did you discover 3D printing?
That was almost ten years ago now, when I worked at Philips. I was there as a test engineer in the shaver department. We got the small PCBs to test during the development process. And we did lots of automated testing.
Back then, they were placing the first UltiMaker machines (the wooden ones), across the whole site just to play around with. At the time everyone was just printing decorative things like an owl or the Eiffel Tower, that sort of thing. And I was working on a test jig with four shavers next to each other. And they had to run charge/discharge cycles in parallel, and we had to measure the RPM and everything. I already had some CAD experience, so I made something quick and dirty, and printed that out. And I think that I’m among the [first few], maybe even the first, at Philips who used 3D printing for the production process.
That’s where it started. It’s awesome that you can have a specific problem and a couple of hours later, you have your physical solution. That was the spark.
And you were a machinist before that?
When I was 15, I went to a school for precision mechanics. I finished that when I was 19. I wanted to go further, so I started a Bachelor of Mechanical Engineering, but that was too broad for me – there was a lot of practical maths on bridges and larger structures and that was not my thing. I ended up at another electronics manufacturer, which offered me a Bachelor of Electrical Engineering. Most of my working hours were as an electronics engineer, but with all my jobs there has always been some element of mechanical engineering there, because we needed some stuff made. So I never lost my passion for mechanical engineering. I don’t like making the calculations, but I do like coming up with the idea and coming up with solutions.
That’s another reason why I like 3D printing so much: you can get away with just trying things out. You aren’t wasting expensive machining hours or expensive materials. You don’t have to make dies for injection moulds and all that stuff, so the risk is quite low. So of course, it depends on the application. But most of the time when I build stuff I just design it and see if it breaks, so I find out in the real world instead of doing all the math. On one hand that makes you a lazy engineer, but on the other hand, you can come up with far more creative ideas much faster.
A background in mechanical engineering makes a lot of sense. The gantry system that you made, with the cable running through a 3D print to provide tension, that looks very much like a bridge. Where do you get your ideas from?
That’s a good one. When I started my YouTube channel, I didn’t have a lot of ideas. But I always try to solve a specific problem. With my first video, I ran into the problem that it wasn’t easy to get
to the hot end of a 3D printer. And I was looking at my tripod, how the camera was connected and disconnected. I thought maybe I could combine the
two and make some kind of tool change system.
That was my very first idea, and that led to different ideas: if I can replace the tool, then maybe I can place a laser cutter on there or a grinder. And that’s what I always tried – just set myself a specific problem, and then see if I can solve that problem. And on my way, I run into different problems. That’s what I try to convey: because I think that quite a lot of people are, not afraid per se, but don’t like making mistakes.
But my motto is that if you make a mistake, then there are two outcomes: you come up with new ideas, or you learn new stuff.
Sometimes it can be something mundane; taking something that already exists and seeing if it can be replicated using 3D printing. That’s where the idea of making a car wheel started. Initially it’s a very simple thought of like, OK, can we make a car wheel using 3D printing? So that’s the initial problem. Then you find yourself a way to get there.
So the first problem is that it’s big, so I need a big printer. The second problem is that because it’s so big, and I want stronger materials that are prone to warping, I have to make some sort of heated environment to print it. But the printer I used was a bed slinger; it was a huge bed slinger with a 500 by 500 millimetre build plate. So, if I want to make an enclosure for it, it should be at least one metre deep, which is way too big.
So then I fixed the build plate and let the portal move back and forth. I didn’t know that I’d end up solving these problems when I set out to make a car wheel, but along the way, I ran into these specific issues and tried to find solutions for them, and that resulted in more and more new ideas. That’s what I try to show on the channel. I show my failures because some ideas are just stupid, but I want to figure out what happens if you try anyway. And if it fails, then I’ve learned something.
Did you ever drive the car with a 3D-printed plastic wheel?
Yes, in the backyard. It was a bit anticlimactic because I had the idea that we would just floor it and the rim would break and you’d see a load of plastic flying around. I thought it would make a hell of a video. But it was anticlimactic because it just held – it was just me and my friend driving around. So it was a success, but on the other hand, sort of a failure because I wanted it to fail.
You use a lot of quite unusual additional materials in your prints. The common ones would be brass rods, say, but you use Kevlar and carbon fibre and stuff. I think of that as being quite high-tech, but am I wrong? Is that sort of stuff available to the everyday maker at home?
Yes, it’s actually surprisingly easy to get your hands on. The Kevlar fibre I got from a Belgian company that I found online. I found the Dyneema wire on Amazon, and the carbon fibre rods from Conrad – those are often used for guides, if I’m not mistaken. But yeah, it’s pretty cool that as an average consumer, you can get your hands on these high-end materials.
I did make the mistake when I started the channel that I was buying stuff from b2b companies, like RS Components and Farnell and all that stuff. And then I found out that people weren’t able to replicate my printer modifications … so now I try to source parts that are also available to the average consumer, because that makes things much easier to replicate… but still, as a consumer, you can get your hands on a whole lot of cool stuff.
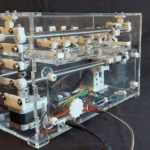
Could you tell us a bit about TIME?
Yes! TIME is True Independent Multiple Extrusion. I came up with the name and realised that the acronym spells TIME – I’m pretty proud of that. The idea started with previous ideas – I don’t think I would have come up with this project if I hadn’t tried to print the wheel for a car. Because with the car wheel, I needed the portal to move back and forth.
And that sparked the idea for this printer to have a moving portal. And then a pretty straightforward
next step would be to add multiple of these portals.
And it sparked with the grill plate project – my mother gave me a teppan-yaki grill plate that she didn’t have any use for, and I thought it might make an interesting heated build plate. So I thought, what the heck, let’s see if I can control it with a 3D printer controller. That was actually pretty simple. And that shape of the grill plate lent itself to adding multiple portals, because it’s long.
What I like about this printer is that I have the full design, so I can try my own experiments with it. My idea with this printer is to experiment with combining weird materials.
So you have, of course, multi-tool machines that can combine multiple colours of filament and, if you have a system like the Prusa XL which can actually switch between tools, you can combine normal materials with TPU, which is already pretty interesting.
But with TIME, I want to combine three main types of materials. One of them is the regular polymers. The second one is liquids and pastes. And the third one is fibres and wires. Regular polymers are just like normal 3D printing. The liquids and pastes are, for instance, resin. I don’t know if you’ve seen my video about FDM resin printing, but I use a non-pulsating peristaltic pump to pump resin through a nozzle and use blue lasers to cure the resin, to see if it’s possible to do FDM printing with resin.
I want to investigate that further, to use pastes like resin and also to see if we can combine this. For example, with pastes and liquids, we should be able to print a regular polymer and place glue between the layers… or maybe add ceramics or concrete as an infill to make parts stronger, maybe even stiffer. I want to try to dissolve polymers in a solvent to see if I can just pump the soft polymer to see if that can improve layer bonding. And I think that with this printer, it would also be possible with other printers, but this printer makes it convenient for me to combine these multiple materials. So there’s a long road ahead still.

Is the TIME printer finished now?
One of the portals is not as good as the other one, because the first one needed some improvement, but it was good enough, and I implemented those improvements on the second one. I just received a new linear rail because the linear rail I used was running terribly. I think the results I got weren’t that great because of the stretch in the timing belts over that whole length, in combination with the linear rails not going smooth. So I have better linear rails. And then, in principle, the mechanics are finished. It’s not finished in a way that it can be a product that can be sold, because it’s just too experimental.
But, in principle, it works. Now I can focus more on the software side of things and do the experiments I want to do. So I’m really looking forward to making a video where you can see a thumbnail of a plastic part with a concrete infill.
It’s going to make it easier to create videos that have a curiosity gap. What happens if we print Loctite between layers, for instance? I’m really looking forward to exploring these use cases. What I like about having a YouTube channel is that I can do this together with my audience. I’ve shown some use cases, now what can you come up with? I think that with the hive mind, we can come up with some crazy stuff.
What are you working on at the moment?
In a few hours, I’m going to publish a video where I upgrade the Creality K1. That’s the flagship printer from Creality that supposedly should have been very fast, and I had some issues with it with severe under extrusion. I modified it in such a way that you can add your own extruder to it.
The reason being is that this printer became a glorified paperweight for me, which was a shame because I want to use this printer to print my prototypes – simple prototypes, just print and see if it fits, usually just using white PLA because you can write on that with a pencil. So if you want to modify things, you have almost like a 3D notepad.
I want to use that printer to print these fast parts for me, and I also saw that a lot of people are experiencing issues like this.
Then I’ve got another fun project: I’m going to make a soundproof cabinet for my computer because I made a mistake. I upgraded my PC, it became a bit too hot and I bought the loudest fans you can possibly get, and it’s driving me crazy. I saw an opportunity where 3D printing could be very interesting. So that would be my video for next month. And then the printer comes back, I’m going to Open Sauce in June – I bought a huge Pelican case. The idea is to bring the TIME printer to San Francisco to Open Sauce and see if we can print something there.
I know already that we will run into problems: they have 150 V electrical outlets over there, and with an 1800 W grill plate, that’s going to be a challenge.
After that, I’m going to 3D-print shoes. If I look at 3D-printed shoes, you have these two standard paradigms: one is very futuristic shoes, and the other group is something like Crocs. But I want to print classy gentleman’s shoes. And I want to use some interesting materials. I am going to use the TIME system for that because the portals can be tilted at a 45-degree angle. And I think that that angle would make it very convenient for the shape of a shoe. It has three requirements: one is that they should look extremely good, so if you go to a job interview, you get the job right away because of the shoes. The second requirement is that if you walk on a hard floor, you should be able to hear that typical clacking sound. And the third one is that they have to be comfortable.
Each of these requirements has its matching material. So the looks I want to achieve with wood – I found a material that’s pretty much flexible wood, so the top will be printed out of that. Also, with that filament, the colour can be darker or lighter depending on the print temperature, so I can create some kind of gradient in the shoe that looks like the patina of leather.
The comfort will be done with an insole printed out of a material that will foam depending on the print temperature. So I can print the sole a bit softer on the front and a bit firmer on the heel by modifying the temperature. So, that’s a very straightforward or convenient technique with the portal being at a 45-degree angle. And the clacking sound – it sounds a bit superficial, but it’s actually a challenge because you don’t want to lose grip. One of my Patreon supporters came up with the idea of using PETG with rubber inside. It’s from a Swedish company, so I reached out and they sent a spool. And that looks very promising. It’s firm, but it looks like it has plenty of grip. So I want to use that material for the outer sole, and hopefully try and match these three things into the shoes.
And the best thing of all is that I’m Dutch, and I’m 3D-printing a wooden shoe, which is very Dutch.
HackSpace magazine issue 79 out NOW!
Each month, HackSpace magazine brings you the best projects, tips, tricks and tutorials from the makersphere. You can get HackSpace from the Raspberry Pi Press online store or your local newsagents.


No comments
Comments are closed