GPIO expander: access a Pi’s GPIO pins on your PC/Mac
Use the GPIO pins of a Raspberry Pi Zero while running Debian Stretch on a PC or Mac with our new GPIO expander software! With this tool, you can easily access a Pi Zero’s GPIO pins from your x86 laptop without using SSH, and you can also take advantage of your x86 computer’s processing power in your physical computing projects.

What is this magic?
Running our x86 Stretch distribution on a PC or Mac, whether installed on the hard drive or as a live image, is a great way of taking advantage of a well controlled and simple Linux distribution without the need for a Raspberry Pi.
The downside of not using a Pi, however, is that there aren’t any GPIO pins with which your Scratch or Python programs could communicate. This is a shame, because it means you are limited in your physical computing projects.
I was thinking about this while playing around with the Pi Zero’s USB booting capabilities, having seen people employ the Linux gadget USB mode to use the Pi Zero as an Ethernet device. It struck me that, using the udev subsystem, we could create a simple GUI application that automatically pops up when you plug a Pi Zero into your computer’s USB port. Then the Pi Zero could be programmed to turn into an Ethernet-connected computer running pigpio to provide you with remote GPIO pins.
So we went ahead and built this GPIO expander application, and your PC or Mac can now have GPIO pins which are accessible through Scratch or the GPIO Zero Python library. Note that you can only use this tool to access the Pi Zero.
You can also install the application on the Raspberry Pi. Theoretically, you could connect a number of Pi Zeros to a single Pi and (without a USB hub) use a maximum of 140 pins! But I’ve not tested this — one for you, I think…
Making the GPIO expander work
If you’re using a PC or Mac and you haven’t set up x86 Debian Stretch yet, you’ll need to do that first. An easy way to do it is to download a copy of the Stretch release from this page and image it onto a USB stick. Boot from the USB stick (on most computers, you just need to press F10 during booting and select the stick when asked), and then run Stretch directly from the USB key. You can also install it to the hard drive, but be aware that installing it will overwrite anything that was on your hard drive before.
Whether on a Mac, PC, or Pi, boot through to the Stretch desktop, open a terminal window, and install the GPIO expander application:
sudo apt install usbbootgui
Next, plug in your Raspberry Pi Zero (don’t insert an SD card), and after a few seconds the GUI will appear.

The Raspberry Pi USB programming GUI
Select GPIO expansion board and click OK. The Pi Zero will now be programmed as a locally connected Ethernet port (if you run ifconfig, you’ll see the new interface usb0 coming up).
What’s really cool about this is that your plugged-in Pi Zero is now running pigpio, which allows you to control its GPIOs through the network interface.
With Scratch 2
To utilise the pins with Scratch 2, just click on the start bar and select Programming > Scratch 2.
In Scratch, click on More Blocks, select Add an Extension, and then click Pi GPIO.
Two new blocks will be added: the first is used to set the output pin, the second is used to get the pin value (it is true if the pin is read high).
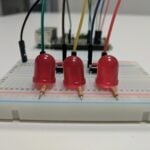
This a simple application using a Pibrella I had hanging around:

With Python
This is a Python example using the GPIO Zero library to flash an LED:
pi@raspberrypi:~ $ export GPIOZERO_PIN_FACTORY=pigpio
pi@raspberrypi:~ $ export PIGPIO_ADDR=fe80::1%usb0
pi@raspberrypi:~ $ python3
>>> from gpiozero import LED
>>> led = LED(17)
>>> led.blink()
The pinout command line tool is your friend
Note that in the code above the IP address of the Pi Zero is an IPv6 address and is shortened to fe80::1%usb0, where usb0 is the network interface created by the first Pi Zero.
With pigs directly
Another option you have is to use the pigpio library and the pigs application and redirect the output to the Pi Zero network port running IPv6. To do this, you’ll first need to set some environment variable for the redirection:
pi@raspberrypi:~ $ export PIGPIO_ADDR=fe80::1%usb0
pi@raspberrypi:~ $ pigs bc2 0x8000
pi@raspberrypi:~ $ pigs bs2 0x8000
With the commands above, you should be able to flash the LED on the Pi Zero.
The secret sauce
I know there’ll be some people out there who would be interested in how we put this together. And I’m sure many people are interested in the ‘buildroot’ we created to run on the Pi Zero — after all, there are lots of things you can create if you’ve got a Pi Zero on the end of a piece of IPv6 string! For a closer look, find the build scripts for the GPIO expander here and the source code for the USB boot GUI here.
And be sure to share your projects built with the GPIO expander by tagging us on social media or posting links in the comments!

77 comments
Hans Otten
Now that is a great accomplishment, making the Zero even more a winner!
Can you run the Debian OS in a virtual machine on the PC and use this GPIO expander magic?
Gordon Hollingworth
I think it’ll depend upon what virtual machine you use, I’ve had trouble in the past with getting USB working properly with the VirtualBox…
But in theory yes it should work…
Gordon
Jonathan Sanderson
This isn’t immediately working for me on (current) VirtualBox : USB issues, I think. Will keep testing.
Still an awesome prospect, however.
ukscone
This is going to be so handy.
Al Buxton
Make those repos public please?
Gordon Hollingworth
Da Dah…
:)
Douglas Gore
Great project! I’ve been thinking of something similar for a while. You might want to check the permissions on the GitHub repos though as they are both returning 404 errors.
Andrew Blank
This is awesome. I have a PC in my basement that runs Ubuntu for a Plex server and a raspberry pi next to it with wires for home door and window switches for home automation.
It would be excellent if I could plug that all directly into the same Linux PC.
I’m going to have to buy a Pi Zero now!
Andrew Oakley
Booting over network over USB? What kind of infernal magic is this? Yes, we all knew it was *theoretically* possible, but actually making it work? Has anyone checked that Liz & Eben haven’t sacrificed their firstborn?
ukscone
I checked earlier today. Their 1st born is safe and well and is the center of attention as is her right
Andrew Pattison
Will this work on a Raspberry Pi A or A+?
Gordon Hollingworth
Yes it should work, although I haven’t tried it yet…
Gordon
Andrew Pattison
?
Ivan Holland
I’ve tried this with an A+, and didn’t manage to get it working. That’s not to say it isn’t possible though; I might just be doing something wrong.
Also tried connecting more than 1 Pi Zero. I’m finding that when the second Pi Zero is connected, the code running the first one seems to freeze. So, at the moment it would appear there might be issues connecting more than 1 Pi Zero. Again though, I might just be doing something wrong; it has been known ;-).
It’s still awesome though, being able to utilise GPIO from a PC. Kudos to all involved for making this happen.
Bonzadog
A great idea…..
I would like to run that for my RPi 3 software!
There is Hardware available where a USB to GPIO can be directly plugged into a PC and one can programme it under Win 10.
https://www.adafruit.com/product/2264 but there is another one as well – but at the moment I cannot find the info.
BD
Michael Horne
Question: Would this work _without_ the x86 Debian Raspbian running on the PC/Mac? i.e. What if you had a Windows machine and you installed GPIO Zero on it and used the PIGPIO stuff. Would that work as well?
Ben Nuttall
In theory, yes, but the software has only been made for x86 RPD at present. It *should* work on other Debian-based systems (e.g. Ubuntu) with the .debs from our repo, and if someone can stick them in a PPA that would make things easier.
Also there’s no reason the tool could not be ported to Windows/Mac.
Floris
While less fancy than USB booting, the gpioexpander software can also be booted from SD card, if you have problems getting usbboot to work on some platform.
Bigger problem may be that the ECM device class (USB Ethernet) standard is currently used for communication by gpioexpander.
And certain operating systems do not excel in their out-of-the-box support for open standards.
You may need to find third-party drivers for that, or change gpioexpander to use Windows specific proprietary stuff like RNDIS.
Think ECM do may work on MACs.
AndrewS
There’s also the problem that an (unfixable) ROM bug in the BCM2835 means that MacOS X can’t usb-boot the PiZero.
https://www.raspberrypi.org/documentation/hardware/computemodule/cm-emmc-flashing.md
Dinu John K
I used to think anyone would make a dedicated gpio board for computer one day but man you made it simpler
Pat Senn
There is a GPIO for the computer.
https://www.kickstarter.com/projects/ryanteckltd/rtkgpio-a-usb-raspberry-pi-compatible-gpio-header
The forum is rtkgpio.xyz
Pat Senn
Whoops…..Looks like RyanTech has closed down and the board is no longer being produced
David Glaude
Ryan reported that ModMyPi has stock and Pi-Supply will be listing stock soon. They also have the possibly make more into the future.
But this is clearly trying to kill this product.
Ryan Walmsley
Indeed, Once ModMyPi sell out another retailer might be also making another batch in the future.
I have to admit it does heavily improve on my idea. That’s the difference between a big company or charity vs one person doing it.
One thing I would say is just to be careful with GPIO. In my board I added in some circuitry to prevent against some issues (such as accidentally short circuiting 5V to GND as on a Pi Zero this shorts the USB Bus).
Winkleink
Is there a need to do an update/upgrade on the Stretch desktop first?
Ben Nuttall
The GPIO expander is included with the x86 Stretch image.
Jazzy
Holy mackerel, 140 pins at my disposal? This is incredible news! It just brought the Pis up another notch into the realm of possibilities. You guys rock! Lol you just hacked your own hardware..
AndrewS
I wonder if this would also work with 4 CM1s connected to a single RPi, giving access to 212 pins in total? ;-)
Jan
Could it work with pi3 as well?
Ben Nuttall
If you mean can you use the Pi 3 GPIOs from a PC, then no. This requires a USB OTG port, so will only work from Pi Zero, Zero W, Model A or A+.
However, if you mean can you use the Pi 3 as the PC, controlling the Pi Zero’s GPIO pins over USB, then yes. Just install the usbbootgui tool and use it the same was you would from x86.
sudo apt install usbbootgui
Gordon Hollingworth
Although you theoretically can do this on a Pi 3 anyway (although you’ll need an SD card) just load up Raspbian, start the pigpiod daemon then get the ipaddress of the Pi 3 and run something like GPIO zero on another computer…
AndrewS
…as documented at https://gpiozero.readthedocs.io/en/stable/remote_gpio.html
Richard Collins
I just so happen to have a cluster hat and four spare zeros on my desk… mwaa haaa haaa
jack burton
everything went as it was supposed too .nice ,I just need a bit newer laptop ,old HP a little slow .
https://www.youtube.com/watch?v=vaAxV6YFn1U&feature=youtu.be
Kevin Hainsworth
Just to save a bit of possible head-scratching: The blog post photo of the traffic light shows the USB cable connected to the connector marked USB on the Pizero. This provides both power and data.
Gordon Hollingworth
That’s correct, sorry should have mentioned you don’t need to power it separately…
Kevin Hainsworth
Wow, awesome etc. Gordon what other treats do you have squirreled away ?
I would love to see other USB gadget modes being added to this application ? Is there a relevant thread in the forum to make such a request ?
The addition of the USB MIDI gadget to this app. would be my favourite so I can connect a Piano HAT on a Pizero to my PiSound and Sonic Pi running on a RPi3.
Getting the camera on a Pizero to work this way is also a very exciting prospect as would be the mass storage gadget.
Gordon Hollingworth
If you create something useful I’m sure we can add it to the gpioexpander installation. But we’re not planning on doing much to it right now
Yangxuan
Very impressive, if it’s possible to use pi zero as sd card reader for PC?
Gordon Hollingworth
Kind of, as long as you don’t write a file to it called ‘bootcode.bin’
Otherwise it’ll boot from the SD card rather than over the USB.
David Glaude
If you boot without a microSD in, then plug the microSD later, I guess even a file like bootcode.bin should not be a problem…
Casper
You can even access it under native Windows, if you install the driver + program that is actually meant for accessing the compute module:
https://www.raspberrypi.org/documentation/hardware/computemodule/cm-emmc-flashing.md
Makes me wonder if this can be manipulated to flash the gpio capable binaries and use it under native Windows instead of the cumbersome VM-route.
rweissg
for usbbootgui
some projects come to mind:
— HDMI/Display adapter
— serial adapter
— openocd JTAG programmer
— wlan-ap/firewall
— UVC Camera
— SPI adapter
— i2c adapter
— booting raspbian diskless/cardless
on an ARMv6 Rapsi
install busybox, nbd-client
add nbd, dwc2 and gadget modules
to /etc/initramfs-tools/modules
mkinitramfs -o rootfs.cpio.gz
on server
setup nbd server
add rootfs.cpio.gz to boot dir
edit cmline.txt,config.txt
and boot raspbian on the Raspi Zero without card
Gordon Hollingworth
Pull requests welcome!
:)
Jeff
Is it any more real time than the standard Linux? Maybe some faster applications would be:
– custom keyboard, or at least a gigantic control panel with switches performing keyboard functions
– 3D printer controller
– ISP, or circuit unit tester
David Glaude
My Raspberry Pi Zero does not appear as usb0 but as … enp0s2f1u4i2 and that break all the default fallback (I guess) such as this:
Can’t connect to pigpio at fe80::1%usb0(8888)
This is a stretch thing with stable predictable interface name, and maybe this is because it is not a fresh install of the Raspbian Desktop, but an upgrade from previous version.
I had exactly the same issue when the first Stretch for Raspberry Pi came out, and that was quickly reverted as it was a $%#!
What trick to I need to apply now?
David Glaude
Does your remote Pi Zero has a DNS name in *.local?
And please, not raspberry.local as this is the name of the host…
David Glaude
It is working for me with:
PIGPIO_ADDR=fe80::1%enp0s2f1u4i2 ; python3 FishDish.py
But that is much less fun than working out of the box…
David Glaude
And now that I plugged that into another USB port… it is usb0 !!! Something is wrong with me. :-)
Jorge
My black MacBook (2008) recognizes the Pi0 and lets me choose GPIO. It does the loading, the lights flash on the zero then nothing. Ifconfig shows nothing.
Carl Monk
Will this work with Scratch 1.4? If so, how?
Ta
Carl Hung
I really want to install expander on my ubuntu linux. any way to install it?
Floris
Try the amd64 (64-bit) or i386 (32-bit) .deb
http://archive.raspberrypi.org/debian/pool/main/u/usbbootgui/
Floris
Also need to install first: http://archive.raspberrypi.org/debian/pool/main/r/rpiboot/
While packages are for Debian, Ubuntu is pretty much binary compatible.
Although you may need to check with ‘ifconfig’ what the network device created by the pi zero will be, as that will likely not be usb0 due to different udev rules.
Serge
You should be able to install it on ubuntu from here:
https://launchpad.net/~rpi-distro/+archive/ubuntu/ppa
Right now it only supports Xenial, but support for other releases will be added later.
MOB
When you say Ubuntu do you mean x86, x64, ARMv7/8? There are Lubuntu for each.
Janghou
Maybe I missed something somewhere, but what is the default login for the terminal.
Welcome to Buildroot:
extzero login:
The default pi : raspberry doesn’t seem to work here.
Floris
If you want to login to the Pi Zero for debugging purposes.
screen /dev/ttyACM0 115200
Username: root
Password: raspberry
Keith Ellis
Nice work, is it possible to use the SenseHat connected to a PiZero in this mode?
MOB
I wonder the same thing.
Joshua Lowe
Will this work on a standard Raspberry Pi running Stretch?
E.g. Plugging a Pi Zero into a Pi running stretch and using that Pi Zero as a second set of GPIO pins?
Raspberry Pi Staff Simon Long
Not out of the box, but it will if you install the usbbootgui package on the Pi – “sudo apt-get install usbbootgui”.
John Murrell
I don’t understand USB OTG technology. There is no mention of the hardware requirements for the cable or laptop ?
Does this require a USB-OTG cable to work ? ( Special USB OTG cables are sold by some suppliers)
Are there any special requirements for the laptop or desktop USB sockets to enable them to work with USB-OTG ?
Gordon Hollingworth
Yes, USB-OTG is very confusing, if you really want to get confused try reading the specification for the host negotiation protocol!
Anyway don’t worry you don’t need anything special at all, the gpioexpander config.txt contains a special line:
https://github.com/raspberrypi/gpioexpander/blob/master/output/config.txt
dtoverlay=dwc2,dr_mode=peripheral
This line enables the dwc2 driver (the one that supports gadget mode) and forces it into peripheral mode (as apposed to host mode) so it just ignores the normal OTG_ID pin on the connector…
Gordon
John Murrell
Thanks Gordon hope that clarifiews things for others as well. I agree that most protocol specs are difficult to understand I remember trying to decode the IEEE488 state diagrams to find out why an interface was not working a long time ago. Not easy to work out what was wrong particually as both ends of the system came from different suppliers.
TheDiveO
Sorry to be nitpicking here, but my understanding is that this isn’t OTG mode (where the Pi acts as an USB host). Instead this is USB slave mode, or more commonly termed “gadget mode”. As a rule of thumb, it’s OTG moden when you need an OTG cable. But in this setup you use the standard USB A-B cable, where the PC is the host and the Pi the slave.
BenSimmo
How would I use the camera (picamera or otherwise) with this?
(on a PiZ).
Just while I wait for a cable for my A+ as that has all the GPIO pins and stuff attached so I can have a go with the sensors. (though gpiozero doesn’t do I2C yet iirc, but pigpio directly should be able to ?)
MOB
I tested in Scratch 2 on Raspberry Pi 3 to do:
when green flag clicked
forever
set gpio (47) to output low
wait (1) secs
set gpio (47) to output high
wait (1) secs
end
When I click the green flag no LED blinks in this rate (or regularly) on either Pi, but this works:
export PIGPIO_ADDR=fe80::1%usb0
pigs bc2 0x8000
pigs bs2 0x8000
I also tried this, but it no LED blinked:
PIGPIO_ADDR=fe80::1%usb0 scratch2
One guess why Scratch 2 can’t use GPIO47 is that it is prevented by Scratch 2. Unfortunately I haven’t soldered a header yet to my Raspberry Pi Zero so I can’t test if it works from Scratch 2 in any other way.
MOB
LED(18) works, but LED(47) leads to PinNonPhysical: no physical pins exist for GPIO47
pigpio.error: ‘GPIO not 0-31’:
>>> from gpiozero import LED
>>> led = LED(47)
I think it should work because it works using `pigs`.
India-boy
i am using “linux deploy app” on my android (asus zenfone 5 t00j)(intel chip – i386) to install linux-debia on my smartphone (otg is supported on the phone). Can i use PiZero gpio from my smartphone.
P.S: i want to make a smart case for my mobile.
P.S: will it work on Nexus 7 (2013) ?
Brian McMillion
I just installed this on an old desktop and added the Pi Zero. I experimenting with Python and was successful following your example for the Led Blink. What can I do to configure the system so I don’t have to type the two “export” lines to and ensure the pigpio daemon loads at boot? I like using “Geany” for programming.
Thanks from a newbie:)
Olav Gullaksen
See the article on page 58 and 50 of the newest MagPi magazine #67 free for download at https://www.raspberrypi.org/magpi/issues/
Ben Nuttall
Put the environment variables in your
.profileand reboot and they’ll be available to your IDEs too.TheDiveO
Someone finally making good (and easy) use of the beautiful power that IPv6 gives, and all this for the masses!
You’ve made my day, thank you!
Olav Gullaksen
I am using the desktop version of Raspbian on an old Dell XPS M1330 and it works like a charm. I have managed to update to Stretch via shell commands to make GPIO extension possible with connecting a Pi Zero v1.3 as described in this article and in MagPi #67. For unknown reasons the IPv6 connection does not show up as usb0 as described when making ifconfig command. I have two USB ports on this laptop and they show up as enp0s29f7u1i2 or enp0s29f7u2i2 when running ifconfig. Using these names instead of usb0 makes everything work fine, and I can use the PiZero board as a GPIO extension. Thank you so much to the people behind making this possible. With the unexpected popularity of the desktop version of Raspbian, this progress has big value to the Make communities.
Gregg Levine
And what happens to the individual who does not run Debian on a laptop, but does run a Linux distribution in general?
I run Slackware64 14.2 on this laptop.
Ben Nuttall
You can build from source: https://fedoramagazine.org/raspberry-pi-zero-gpio-fedora/
Comments are closed