Augmented-reality projection lamp with Raspberry Pi and Android Things
If your day has been a little fraught so far, watch this video. It opens with a tableau of methodically laid-out components and then shows them soldered, screwed, and slotted neatly into place. Everything fits perfectly; nothing needs percussive adjustment. Then it shows us glimpses of an AR future just like the one promised in the less dystopian comics and TV programmes of my 1980s childhood. It is all very soothing, and exactly what I needed.
Creating augmented reality with projection
We’ve seen plenty of Raspberry Pi IoT builds that are smart devices for the home; they add computing power to things like lights, door locks, or toasters to make these objects interact with humans and with their environment in new ways. Nord Projects‘ Lantern takes a different approach. In their words, it:
imagines a future where projections are used to present ambient information, and relevant UI within everyday objects. Point it at a clock to show your appointments, or point to speaker to display the currently playing song. Unlike a screen, when Lantern’s projections are no longer needed, they simply fade away.
Lantern is set up so that you can connect your wireless device to it using Google Nearby. This means there’s no need to create an account before you can dive into augmented reality.
Your own open-source AR lamp
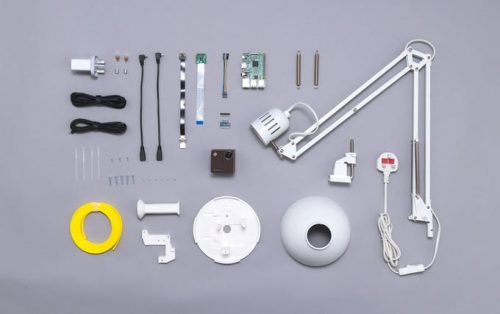
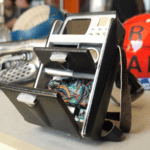
Nord Projects collaborated on Lantern with Google’s Android Things team. They’ve made it fully open-source, so you can find the code on GitHub and also download their parts list, which includes a Pi, an IKEA lamp, an accelerometer, and a laser projector. Build instructions are at hackster.io and on GitHub.
This is a particularly clear tutorial, very well illustrated with photos and GIFs, and once you’ve sourced and 3D-printed all of the components, you shouldn’t need a whole lot of experience to put everything together successfully. Since everything is open-source, though, if you want to adapt it — for example, if you’d like to source a less costly projector than the snazzy one used here — you can do that too.
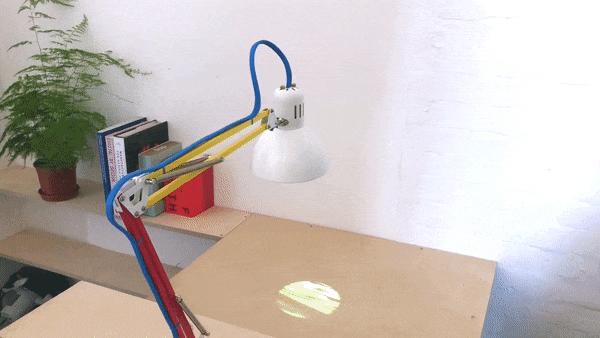
The instructions walk you through the mechanical build and the wiring, as well as installing Android Things and Nord Projects’ custom software on the Raspberry Pi. Once you’ve set everything up, an accelerometer connected to the Pi’s GPIO pins lets the lamp know which surface it is pointing at. A companion app on your mobile device lets you choose from the mini apps that work on that surface to select the projection you want.
The designers are making several mini apps available for Lantern, including the charmingly named Space Porthole: this uses Processing and your local longitude and latitude to project onto your ceiling the stars you’d see if you punched a hole through to the sky, if it were night time, and clear weather. Wouldn’t you rather look at that than deal with the ant problem in your kitchen or tackle your GitHub notifications?
What would you like to project onto your living environment? Let us know in the comments!


13 comments
wyl
Can you provide the code through open source?
Joe
The code’s all open source and available here: http://github.com/nordprojects/lantern :)
James Bundesen
Wow, This is really cool. If the projector didn’t cost so much, I would probably make this. It was very clever to put it into a lamp.
beta-tester
did i missed something…?
i can’t find what laser projector is used.
beta-tester
oops… sorry, i found the information here:
https://www.hackster.io/nord-projects/lantern-9f0c28
UO Smart Beam Projector
http://www.uobeam.com/
beta-tester
up to 150″ screen size !
…really ?!
Jeremy
The full instructions and materials (including the projector) is on the hackster.io link.
https://www.hackster.io/nord-projects/lantern-9f0c28
Steve
How is this augmented reality , can you physically interact with what your projecting. If so how . Either way I like it don’t want to sound negative. Just curious.
Helen Lynn
My understanding of AR is that it doesn’t necessarily need to involve interactivity (although it can do). I think most examples of AR I’ve come across (well, stumbled across really) do just involve augmenting the real environment with extra information.
AndrewS
Using an accelerometer is clever – when I first saw the GIF above I assumed it was using potentiometers / angle-sensors on each of the lamp’s joints :-)
Konstantinos Kagiampakis
The whole project is not very expensive to built, however the effective part, the UO SMART BEAM LASER costs around $329.00 and its the most expensive part to have to complete the kit!
BruceR
Agreed, then I saw this page.
https://www.mickmake.com/post/build-a-pi-zero-w-pocket-projector-project
I have not worked out if you could still run the sensors after using up the GPIOs to connect to the projector.
A Yilksden
Bright! Very bright. I use these in my car because they match the ambient lighting. Work great! I have one to my older mother because she liked them and wanted one to hook up on her nightstand as a pseudo nightlight. Price was great for 5. FYI – no moving or pulsing lights. Just blue LEDs.
Thanks, A Yilksden
Comments are closed