$ ssh <username>@pi-traintimes.localHow to set up a UK train time display
All tutorials
Do you hate to be late? Travel of any kind can be unpredictable, and UK trains in particular are notoriously unreliable. This tutorial helps you keep abreast of local train departures for your area of the UK in real time using a Raspberry Pi and a monitor of your choice.
Behind the scenes, this uses a Raspberry Pi feature called kiosk mode. Kiosk mode boots your Raspberry Pi into a full-screen web page or application without using the desktop environment. It’s the foundation for many different projects dedicated to information display.
Supplies
-
Raspberry Pi
-
suitable Raspberry Pi power supply (see the power supply documentation for details)
-
microSD card (see the SD card documentation for details)
-
adapter to connect your microSD card with your usual computer
-
monitor
-
display cable to connect your Raspberry Pi to your monitor (see the display documentation for details)
For the initial SD card setup, you will need:
-
Another computer connected to your network. We’ll refer to this as your usual computer to distinguish it from the Raspberry Pi computer you are setting up.
Choose a Raspberry Pi
This project can run on any Raspberry Pi computer. For this tutorial, we’ll be using a Raspberry Pi Zero 2 W, which has plenty of power to display train times on a monitor.
Configure your Raspberry Pi
To begin, follow the Getting Started documentation to set up your Raspberry Pi. For your operating system, choose Raspberry Pi OS (32-bit) to run headless (without a mouse and keyboard).
During the OS customisation stage, edit settings as follows:
-
Enter a hostname of your choice (we suggest
pi-traintimesfor this tutorial) -
Enter a username and password; you’ll need these later to authenticate
-
Check the box next to Configure wireless LAN so your Pi can automatically connect to Wi-Fi
-
Enter your network SSID (name) and password; you can find these in your Wi-Fi settings or on a sticker on your router
-
-
Check the box next to Enable SSH so we can connect to the Pi without a mouse and keyboard
Remotely connect to your Raspberry Pi
SSH allows you to wirelessly connect to your Raspberry Pi, eliminating the need for a keyboard and mouse. It’s perfect if your Raspberry Pi is located in a hard-to-reach location, like behind a train times display.
note
To SSH into the Raspberry Pi, you’ll use the hostname you set in Imager. If you have issues connecting using this method, you may want to use the Raspberry Pi’s IP address instead.
For more information about finding your IP address and remote accessing your Raspberry Pi, see the remote access documentation.
Connect via SSH
Open a terminal session on your usual computer. To access your Raspberry Pi via SSH, run the following command, replacing <username> with the username you chose in Imager:
The first time you do this, confirm that you want to connect. When asked, use the password you created in Raspberry Pi Imager:
$ ssh <username>@pi-traintimes.local
The authenticity of host 'pi-traintimes.local (fd81:b8a1:261d:1:acd4:610c:b069:ac16)' can't be established.
ED25519 key fingerprint is SHA256:s6aWAEe8xrbPmJzhctei7/gEQitO9mj2ilXigelBm04.
This key is not known by any other names
Are you sure you want to continue connecting (yes/no/
[fingerprint])? yes
Warning: Permanently added 'pi-traintimes.local' (ED25519) to the list of known hosts.

<username>@pi-traintimes.local's password:
Linux pi-traintimes 6.1.21-v8+ #1642 SMP PREEMPT Mon Apr  3 17:24:16 BST 2023 aarch64

The programs included with the Debian GNU/Linux system are free software;
the exact distribution terms for each program are described in the
individual files in /usr/share/doc/*/copyright.

Debian GNU/Linux comes with ABSOLUTELY NO WARRANTY, to the extent
permitted by applicable law.
Last login: Tue Oct 24 09:41:00 2023
<username>@pi-traintimes:~ $
Now that you’ve connected to your Raspberry Pi, run two commands to make sure that all of your packages are up to date:
$ sudo apt update
$ sudo apt full-upgrade
Once the package update commands finish running, reboot your Raspberry Pi to allow all changes to take effect:
$ sudo rebootRunning this command will disconnect you from the Raspberry Pi SSH session. Wait a few seconds for your Raspberry Pi to reboot, and enter the ssh connection command again to reconnect to your device.
tip
On most terminals, press the Up arrow key, then the Enter key to re-run the most recent command.
Configure your train times display
In the next section, we’ll get your train time display up and running.
Find your local train station
All UK train stations have a unique code. You can find the code for your nearest (or favourite ) station at the National Rail website. For this tutorial we’ll use CBG: Cambridge station.
To find the code for your station, see Wikipedia’s list of UK rail stations.
Then, open a web browser on any device and enter the following URL, replacing the CBG at the end with the code for your station:
http://realtime.nationalrail.co.uk/ldbcis/departures.aspx?u=039B1CD1-14D4-4CB9-83B1-A84CC3AEDF83&crs=CBG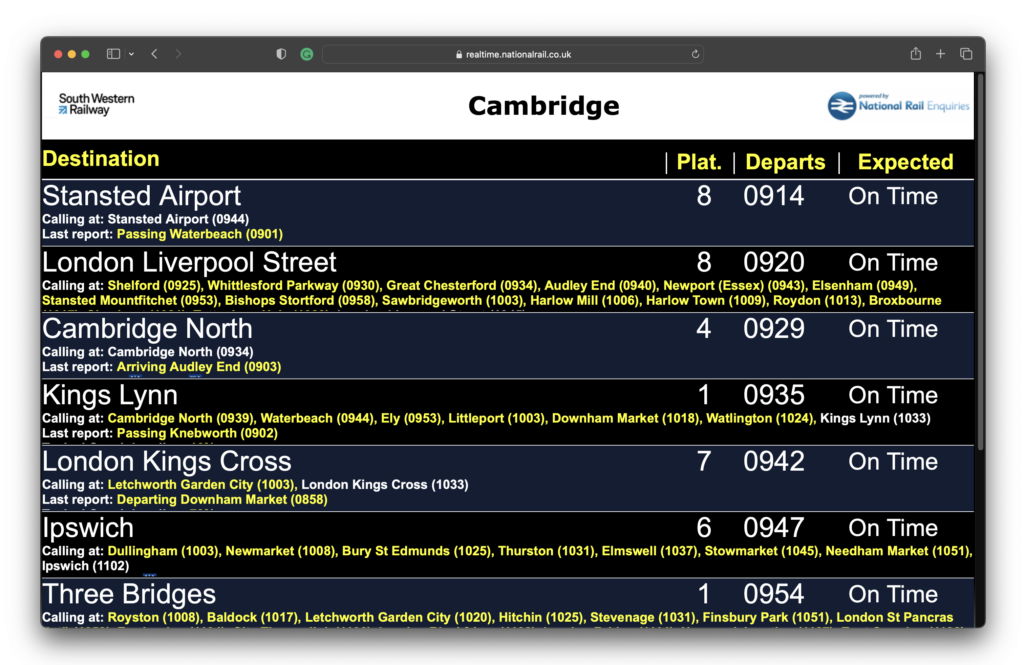
You should now see the real-time departure board for your station. Notice that your browser has added a query parameter, H, at the end of the URL. Look for &H=, followed by a number. This scales the page based on your monitor’s resolution.
Make a note of the H query parameter value — you’ll use it later on to scale the display for your Raspberry Pi’s monitor.
Configure kiosk mode
To make a usable display of train times, we need to configure our Raspberry Pi to start up the train times web page in kiosk mode. Kiosk mode hides the browser chrome to display just the web page on your display. We also need to disable the screensaver and DPMS (Display Power Management Signalling) so the train times display doesn’t turn off on its own without interaction.
Next, we need to write the contents of .config/wayfire.ini. Run the following command to use the nano text editor to make changes to the file:
$ sudo nano .config/wayfire.iniTake a look at the section titled [autostart]. At the moment, it reads like this:
[autostart]
panel = wfrespawn wf-panel-pi
background = wfrespawn pcmanfm --desktop --profile LXDE-pi
xdg-autostart = lxsession-xdg-autostart
Let’s append a few lines to this section to automatically start kiosk mode whenever your Raspberry Pi powers on:
chromium = chromium-browser "https://realtime.nationalrail.co.uk/ldbcis/departures.aspx?u=039B1CD1-14D4-4CB9-83B1-A84CC3AEDF83&crs=CBG&H=1440" --kiosk --noerrdialogs --disable-infobars --no-first-run --ozone-platform=wayland --enable-features=OverlayScrollbar --start-maximized
screensaver = false
dpms = false
Add to the file directly below the existing contents of the [autostart] section. Remember to update the CBG station code to your own station code, and to include the H query parameter value you noted before! When you finish, you should end up with the following:
[autostart]
panel = wfrespawn wf-panel-pi
background = wfrespawn pcmanfm --desktop --profile LXDE-pi
xdg-autostart = lxsession-xdg-autostart
chromium = chromium-browser "https://realtime.nationalrail.co.uk/ldbcis/departures.aspx?u=039B1CD1-14D4-4CB9-83B1-A84CC3AEDF83&crs=CBG&H=1440" --kiosk --noerrdialogs --disable-infobars --no-first-run --ozone-platform=wayland --enable-features=OverlayScrollbar --start-maximized
screensaver = false
dpms = false
Press Ctrl+X, then Y, and finally Enter to save the edited file with nano.
Next, reboot your Raspberry Pi:
$ sudo rebootNow, check the monitor attached to your Raspberry Pi. It should display the train information in full screen mode. Now you’re ready to set your train timetable up wherever it can make your life easier — by your front door, at your desk at work, or possibly at your local train station.
Moving forward
Why not check out our kiosk mode tutorial, which goes into more detail about kiosk mode and keeping your Raspberry Pi secure when left unattended?
Or perhaps try your hand at what might be the ultimate in kiosk mode projects: How to build a super slim smart mirror.