$ ssh <username>@pi-mirror.localHow to build a super-slim smart mirror
All tutorials
Smart mirrors, or magic mirrors as they’re often called, have been around for several years and are nearly always near the top of any maker’s would-love-to-do list. Their popularity and appeal hasn’t declined with time, and the idea of performing your morning ablutions in front of a mirror that displays your day’s schedule, monitors your home’s systems, and offers up a cheeky joke still sounds a bit like a scene out of a sci-fi movie.
Early smart mirrors often removed a bulky computer monitor from its housing, which entailed dealing with power and wiring issues. So a smart mirror required comfort with with high-voltage electricity and DIY skills to make a custom frame.
Happily, display technology has advanced. Now is an excellent time to build a smart mirror with low-voltage, ultra-slim displays. We’ll build one into a frameless modern design using standard-sized parts and materials in order to minimise the DIY requirement. Combine that with the power, size, and form factor of Raspberry Pi 3A+, and you have yourself a magic recipe.
How does it work?

Smart mirrors display an image on a screen mounted behind a two-way mirror that allows a small amount of light to pass through. This allows you to see the display while still retaining the reflective properties of a mirror.
This project uses a Raspberry Pi 3A+ connected to a disassembled ultra-thin 15.6-inch 1080p USB-C-powered monitor. Everything is mounted behind a specially manufactured piece of pre-cut A3-sized acrylic mirror.
Additional tools and craft skills will be kept to an absolute bare minimum to make this project as uncomplicated as possible, but we will still produce a sleek and modern-looking smart mirror.
Supplies
note
Where we haven’t linked to a particular product for an item in this list, we’ve given its specification in such a way that copying and pasting it into the search box of your favourite online retailer should help you locate what you need.
-
suitable Raspberry Pi power supply (see the power supply documentation for details)
-
microSD card
-
adapter to connect your microSD card with your usual computer
-
portable slim 15.6" HDMI USB-C-powered monitor (such as this one)
-
USB-C power supply for the display
-
Mini HDMI male to standard HDMI cable, 15cm (with 90 degree connector for display)
-
8 × M3 15mm + 6mm male-to-female thread nylon hexagon standoff (spacer) pillars
-
8 × M3 10mm Phillips round head nylon machine bolts, black
-
8 × M3 nylon machine nuts, black
-
A3-sized piece of black card
-
VHB double-sided heavy-duty foam tape
-
A3-sized 2mm thick clear acrylic (plexiglass) sheet (such as this one)
-
A3-sized 3mm thick two-way acrylic mirror sheet (such as this one)
-
50mm duct tape
For the initial SD card setup, you will need:
-
Another computer connected to your network. We’ll refer to this as your usual computer to distinguish it from the Raspberry Pi computer you are setting up as a smart mirror.
tip
The nylon spacers, nuts, and bolts listed above often come cheaper in kits, such as the one available here.
Tools required
-
electric drill
-
3mm drill bit
-
craft knife and metal ruler (for cutting card sheet)
-
small Phillips head screwdriver
-
prying tool (used to disassemble monitor)
-
(optional) 3D-printed drill bit alignment jig – STL files available for free at printables.com/344643-3mm-drill-bit-alignment-jig.
Choose the right Raspberry Pi
This project works with all models of Raspberry Pi, but in order to maintain the intended slim look of our mirror we will use a Raspberry Pi 3 Model A+. If you decide to use a Raspberry Pi 4, you’ll need slightly larger M3 20mm standoffs to accommodate the larger board.
Choose the right power supply
This project will require two power supplies: one for your Raspberry Pi, plus a USB-C power supply for the display itself. You can also use a single power supply that splits to provide both micro USB and USB-C connectors such as this one. If you choose this option, ensure that your power supply can provide sufficient power to both devices.
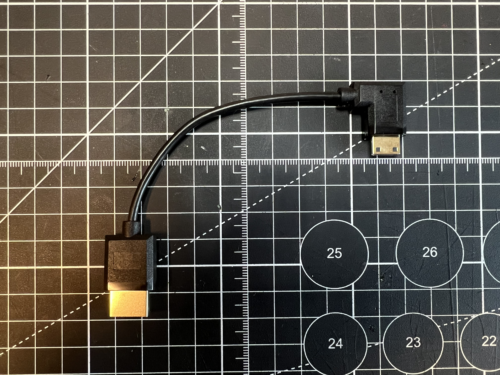
Choose the right HDMI cable
The 90-degree angle in your HDMI cable should lie flat against the monitor when connected, as demonstrated in the photo below:
Choose the right display
The higher the contrast between light and dark, the better your smart mirror will look. When reviewing specifications for a suitable display, pay particular attention to its brightness, which you’ll find specified in units that might be unfamiliar to you: nits and cd/m2. Cd/m2 (candelas per square metre) is a unit that derives from a very old brightness metric based on whale oil candles. Nit derives from the Latin word "nitere", "to shine". Conveniently, 1 nit is equal to 1 cd/m2.
Look for a bright display: no less than 300 nits (or cd/m2).
Configure your Raspberry Pi
To begin, follow the Getting Started documentation to set up your Raspberry Pi. For your operating system, choose Raspberry Pi OS (32-bit) to run headless (without a mouse and keyboard).
During the OS customisation stage, edit settings as follows:
-
Enter a hostname of your choice (we suggest
pi-mirrorfor this tutorial) -
Enter a username and password; you’ll need these later to authenticate
-
Check the box next to Configure wireless LAN so your Pi can automatically connect to Wi-Fi
-
Enter your network SSID (name) and password; you can find these in your Wi-Fi settings or on a sticker on your router
-
-
Check the box next to Enable SSH so we can connect to the Pi without a mouse and keyboard
Remotely connect to your Raspberry Pi
SSH allows you to wirelessly connect to your Raspberry Pi, eliminating the need for a keyboard and mouse. It’s perfect if your Raspberry Pi is located in a hard-to-reach location, like behind a train times display.
note
To SSH into the Raspberry Pi, you’ll use the hostname you set in Imager. If you have issues connecting using this method, you may want to use the Raspberry Pi’s IP address instead.
For more information about finding your IP address and remote accessing your Raspberry Pi, see the remote access documentation.
Connect to your Raspberry Pi via SSH
Open a terminal session on your usual computer and run the following to access your Raspberry Pi via SSH, replacing <username> with the username you chose in Imager:
The first time you do this, confirm that you want to connect. When asked, use the password you created in Raspberry Pi Imager:
$ ssh <username>@pi-mirror.local
The authenticity of host 'pi-mirror.local (2a00:23c8:3880:d801:34e0:2052:bc72:dd67)' can't be established.
ED25519 key fingerprint is SHA256:NjLggsBZzj6N99rABupQCwyhjNnGpeMT6T9jaoRShu8.
This key is not known by any other names
Are you sure you want to continue connecting (yes/no/
[fingerprint])? yes
Warning: Permanently added 'pi-mirror.local' (ED25519) to the list of known hosts.

<username>@pi-mirror.local's password:
Linux pi-mirror 5.15.32-v7l+ #1538 SMP Thu Mar 31 19:39:41 BST 2022 armv7l

The programs included with the Debian GNU/Linux system are free software;
the exact distribution terms for each program are described in the
individual files in /usr/share/doc/*/copyright.

Debian GNU/Linux comes with ABSOLUTELY NO WARRANTY, to the extent
permitted by applicable law.
Last login: Thu Oct 26 09:41:00 2023
<username>@pi-mirror:~ $
Now that you’ve connected to your Raspberry Pi, run two commands to make sure that all of your packages are up to date:
$ sudo apt update
$ sudo apt full-upgrade
Once the package update commands finish running, reboot your Raspberry Pi to allow all changes to take effect:
$ sudo rebootRunning this command will disconnect you from the Raspberry Pi SSH session. Wait a few seconds for your Raspberry Pi to reboot, and enter the ssh connection command again to reconnect to your device.
tip
On most terminals, press the Up arrow key, then the Enter key to re-run the most recent command.
Construct your smart mirror hardware
Disassemble your display

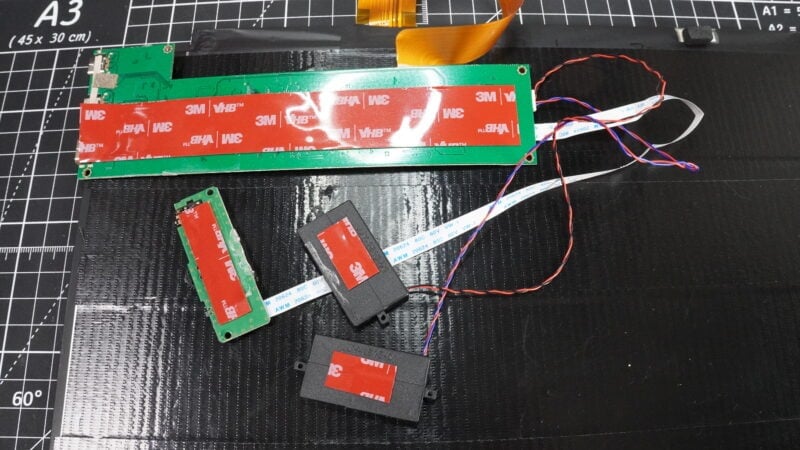
First, prepare your display. Separate it from the housing into component parts. The display we’ve used for this tutorial is fairly generic and is often branded with different names. It comes apart with relative ease and is made up of only a metal front display bezel, a metal rear housing, a driver board, a control board, and two speakers. We need to remove the metal front display bezel which is held in place only by a small amount of glue:
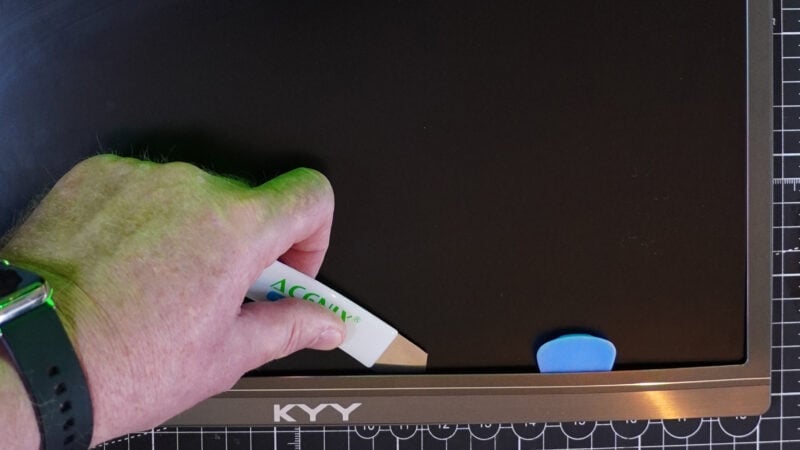
With a prying tool, prise the screen away from the bezel and pull the frame away from the screen. You may find it useful to heat the frame gently with a hairdryer in order to loosen the glue holding it in place:
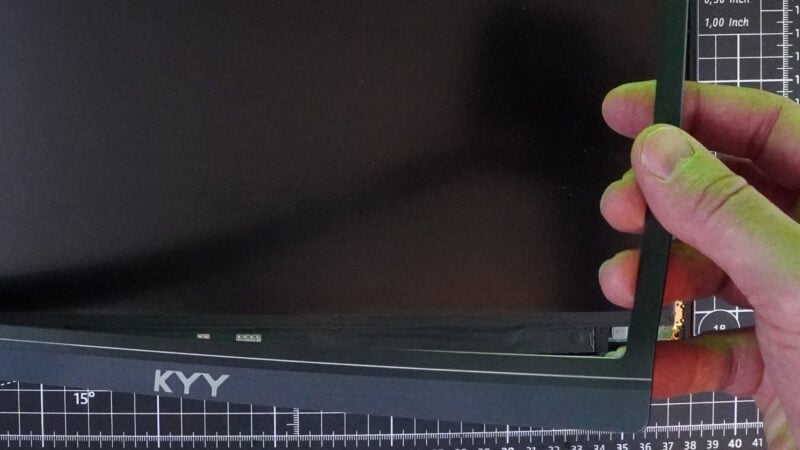
As soon as you have enough space to get between the bezel and the screen, gently pull the bezel away until it is completely separated. You may need to use the hairdryer again to heat the frame to help the process along:
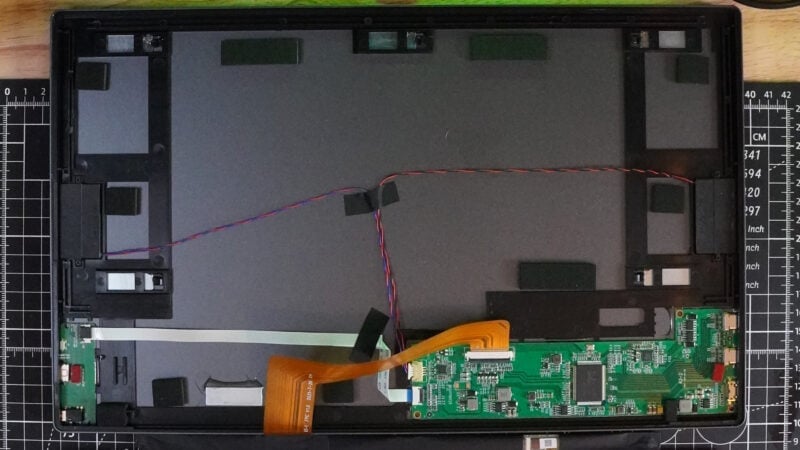
Once you have removed the frame, fold back the screen gently to reveal the contents of the rear housing. You’ll see two circuit boards: a larger driver board and a smaller controller board. Be sure not to pull out any of the wires and flexes connecting everything; take particular care when handling the screen, as it will be connected to the driver board by a delicate ribbon cable. Again, it’s just glue holding the driver and control boards in place. They can be removed from the housing by heating and prying as we did earlier for the front display bezel:

Detach the two flat speakers from the housing by removing two small Phillips head screws from each one. Finally, remove any pieces of tape that are holding cables in place. Set aside your display ready to install into your smart mirror later in the tutorial.
Prepare to assemble your smart mirror

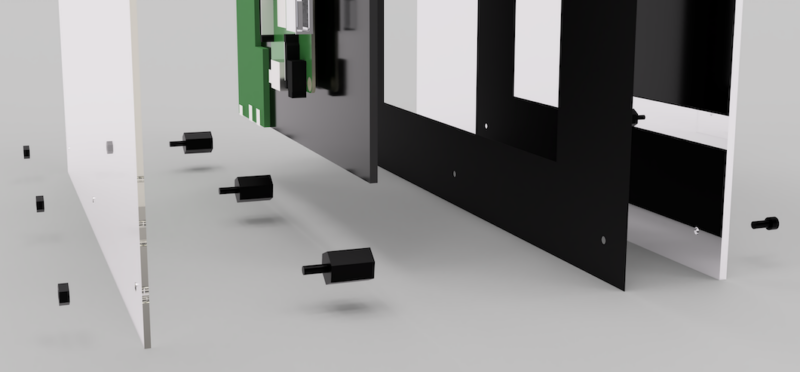
Let’s take a moment to review the final assembly before we begin some of the construction steps. As the illustration above shows from left to right, there are:
-
an A3-sized 2mm thick clear acrylic back plate
-
the disassembled display with the driver, control boards, and Raspberry Pi
-
a piece of A3-sized black card with a display-sized hole cut from its centre
-
an A3-sized 3mm thick acrylic two-way mirror
The nylon nuts, bolts, and spacers hold all of these pieces together to form our smart mirror. The design of this smart mirror does not require any sawing or cutting of acrylic pieces, or even any frame-making skills whatsoever. To assemble the mirror:
-
Drill eight mounting holes.
-
Make a cutout in the middle of the black card for the display.
-
Mount the Raspberry Pi and display components to the back of the display.
-
Secure all the pieces together.
The following sections walk you through these steps in greater detail.
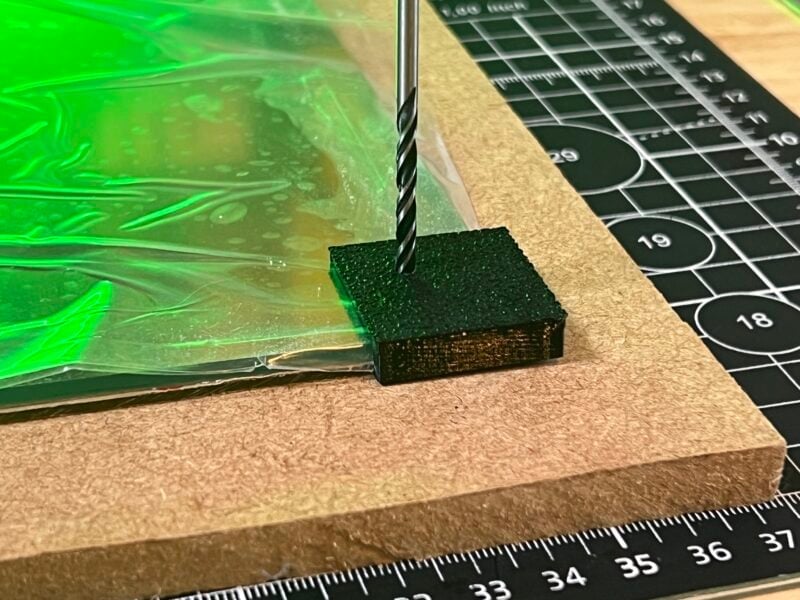
Drill the mounting holes
We need to make eight mounting holes in perfectly matching locations through the A3-sized acrylic and card pieces. The easiest way to do this is to drill through all three pieces at the same time into a suitable flat surface, such as a piece of engineered wood, using a general-purpose drill bit (any drill bit other than a masonry bit should work). Prepare the clear acrylic piece, black card, and two-way mirror for drilling by holding them together in alignment. Drill eight 3mm holes exactly 15mm in from the edges of the pieces, at each of the four corners and at the midway points down each of the sides, as shown in the diagram below:

If you have a 3D printer, you can print our alignment jigs to simplify things. You can also measure with a ruler and mark out where holes should be drilled. In order to avoid unnecessary scratches, we recommend keeping the protective covering on your acrylic pieces throughout the entire process:
Mount the display to the card
The display you are using is very unlikely to be exactly A3 in size, so we will give it a black border. This prevents light from passing through the back of the two-way mirror around the display and spoiling the overall effect. Measure your display area. With a craft knife and a metal ruler, cut out an area 1-2mm smaller than your measurements in the center of your A3 black card:

tip
Make your cut-out a little smaller than the display itself to make it easier to mount the display.
Mount the electronic parts to the display
Cover the back of the display with a single layer of 50mm duct tape. This serves two purposes: firstly providing a protective isolation layer between the printed circuit boards and the display, and secondly improving the appearance of the mirror.
Add pieces of VHB double-sided heavy-duty foam tape to the backs of the driver, control, and Raspberry Pi boards, as well as to the two speakers. Attach each of these to the back of the display such that their ports are still accessible from the edge.
tip
You might need to use the display control board to adjust brightness and contrast in your finished build, so if possible you should mount this board such that its controls remain fairly accessible from the edge too.
Next, attach the display to your black card border using duct tape:

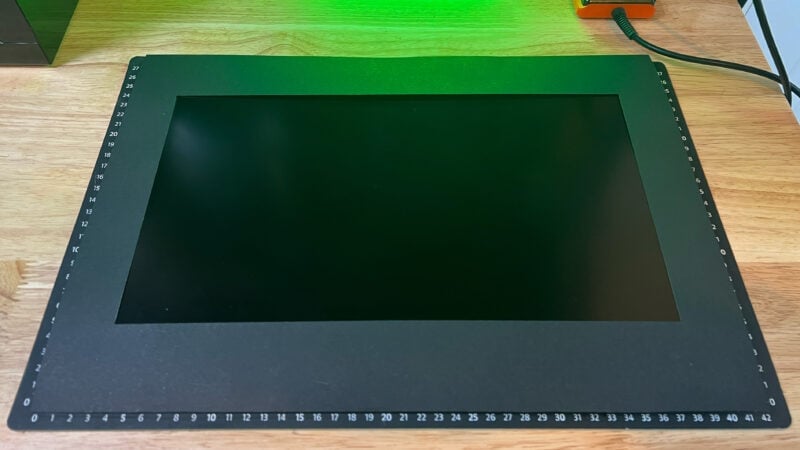
Flip everything over to get a preview of the seamless display effect:
Final hardware assembly
Connect display control board and and your Raspberry Pi with the mini HDMI to HDMI cable.
Connect the power cables (or single split power cable) for the display and Raspberry Pi.
Now we can now assemble the smart mirror using nuts, bolts, and spacers.
note
We suggest nylon rather than metal fasteners to avoid accidental cracking of the acrylic if overtightened.
For each of the eight holes:
-
push a bolt from the front of the mirror and through the black card border
-
screw it into a spacer
-
fit the matching hole in the back panel over the other end of the spacer
-
tighten a nut onto the spacer
Program your smart mirror
To program the smart mirror, we’ll run a form of kiosk mode on your Raspberry Pi. This allows you to boot directly into a full-screen application without interacting with the computer. Kiosk mode is the foundation for a wide variety of projects that display information. Airports, shops, hospitals, cafes, and museums all use kiosk devices to provide information or services like timetables, waiting times, product information, directions, self-check-in machines, and more.
In this tutorial, we’ll set up our smart mirror with Magic Mirror2.
note
The Raspberry Pi community chose this software as the winner of The MagPi magazine’s 50th issue celebration feature.
Power up your Raspberry Pi and display.
You should see the desktop environment on the display through the two-way mirror. For the best possible viewing experience:
-
use the display’s native control panel to adjust the brightness and contrast to their maximum values
-
disable any power-saving mode to prevent the display from dimming
tip
Depending on where you stuck the display control board on the back of the display, you may have to use an implement, such as a pen, to access the controls.
Set the display orientation
Connect with SSH, replacing <username> with the username you chose in Imager:
$ ssh <username>@pi-mirror.localBy default, your desktop will display in landscape orientation. If this is your preference, move on to the installation of Magic Mirror2. To use your mirror in portrait orientation, we can turn the desktop by editing .config/wayfire.inh. Use the following command to open this file in your preferred text editor, in our case nano:
$ sudo nano .config/wayfire.iniAdd the following lines to the end of the file so it reads as follows:
[output]
transform=90
Press Ctrl+X, then Y, and finally Enter to save the edited file with nano.
Reboot the Raspberry Pi to activate your changes:
$ sudo rebootWhen your device reboots, the desktop should display in portrait mode. Connect over SSH again to continue.
Install the Magic Mirror2 software
First, we’ll install Node.js, the open source server environment program used as the basis for this smart mirror project. Run the following two commands to install Node.js:
$ curl -sL https://deb.nodesource.com/setup_18.x | sudo -E bash -
$ sudo apt install -y nodejs
Next, install a package manager for JavaScript. Run the following command to install Node Package Manager, the default for Node.js:
$ sudo apt install npmRun the following commands to download the Magic Mirror repository, enter the directory, and install Magic Mirror:
$ git clone https://github.com/MichMich/MagicMirror
$ cd MagicMirror
$ npm run install-mm
Copy over the sample configuration file to use it as a template for our display:
$ cp config/config.js.sample config/config.jsFinally, start the application with the following command:
$ npm run startWait a minute or so, and you should see the default Magic Mirror display. It should look like this:
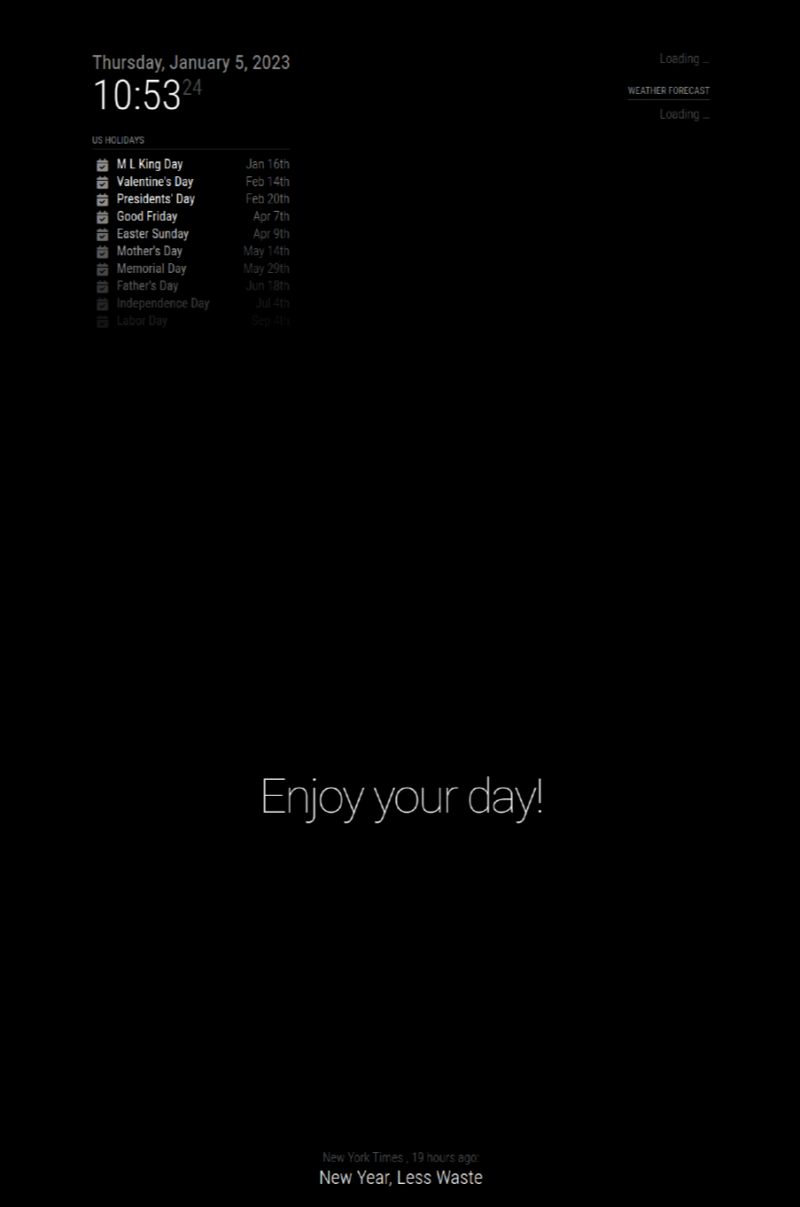
The Magic Mirror software will now display a sample mirror based on the configuration file we copied over a couple of steps earlier. This file specifies what, when, and how to display information on your screen. The default configuration displays a number of modules, including time, date, weather, US holidays, a news feed, and a compliments module. You can adjust, add, and remove modules to your liking.
Since the amazing Michael Teeuw created the original magic mirror, a community of enthusiasts has created hundreds of modules. One lets you know when your local refuse collector is coming. Another keeps you up-to-date on the newest online cat videos. If you can’t find one you like, write your own! The great thing about a project like this is that you can personalise it to suit your specific requirements.
Automatically start your Magic Mirror using PM2
We need to finish one more step before we can customise our mirror. Magic Mirror currently starts and stops manually from the command line over SSH. We’ll add an autostart program that also gives you a few extra features you might find useful.
Before we begin, stop Magic Mirror by pressing Ctrl+C.
PM2 is a process manager for Node.js applications like Magic Mirror. With PM2, we can start, stop, maintain, and interact with Magic Mirror. Install PM2 with the following command:
$ sudo npm install -g pm2To use PM2, we’ll have to start it after every boot. Luckily, there’s built-in help for this. Execute the following command to set up autostart for PM2:
$ pm2 startupAfter a short introduction, this should output a command that will automatically start PM2 after boot.
Copy and run the command provided by the response.
Next, create a small bash script that starts Magic Mirror:
$ sudo nano ~/mm.shType or paste the following code into it:
cd ./MagicMirror
DISPLAY=:0 npm start
Press Ctrl+X, then Y, and finally Enter to save the edited file with nano.
Enter the following command to make the file executable:
$ sudo chmod +x ~/mm.shNow, use PM2 to run your new bash script that start the Magic Mirror application with the following command:
$ pm2 start mm.shThe mirror will display exactly as it did before, but PM2 controls the process now.
PM2 autostarts programs it controls from saved state.
Run the following command to save PM2’s current state:
$ pm2 saveIf your Raspberry Pi loses power, PM2 will autostart when your Raspberry Pi is powered up again. PM2 will restore the most recently saved state. And the smart mirror will automatically start working.
Personalise your Magic Mirror
To begin our journey to a fully customised mirror, we will modify an existing module to meet our needs.
The Magic Mirror configuration file
Since the config.js file is where some of the magic happens, let’s take a closer look at it:
$ sudo nano MagicMirror/config/config.jsThe file is written in JavaScript.
Press CTRL+X to exit nano without making any changes. Whenever you make a successful change to your config.js file, type the following to make a backup:
$ sudo cp MagicMirror/config/config.js MagicMirror/config/config.jsBACKUPSince we’ve given the backup file the made-up filename extension .jsBACKUP, the system will ignore it. But if you make a change to config.js that causes an error and you’re unable to fix it, you can replace your broken config.js file with your functional config.jsBACKUP file with the following command:
$ sudo cp MagicMirror/config/config.jsBACKUP MagicMirror/config/config.jsThese backups can help you keep track of changes to your smart mirror configuration over time. Consider adding a number or a date after "BACKUP" in the commands above to keep multiple backup files as you tweak your configuration over time.
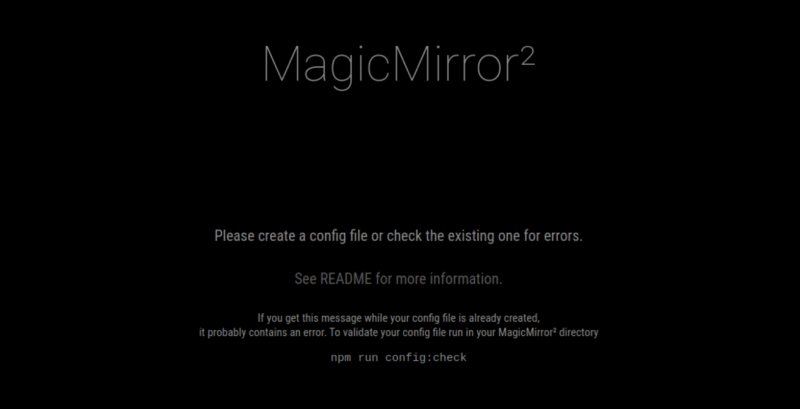
Backups are especially handy when you see this dreaded error screen:
Configure an existing module
Edit your config.js file to modify one of the modules that appear on our mirror.
The last module in the file is the news feed module, which pulls news from an RSS feed — a way of distributing content updates from a website in a concise format.
Open your configuration file in nano:
$ sudo nano ~/MagicMirror/config/config.jsFor this tutorial, we’ll add two feeds: one for Raspberry Pi Tutorials, and one that provides news local to Pi Towers. Once we’ve done that, the bottom of our file will look like this:
    {
      module: "newsfeed",
      position: "bottom_bar",
      config: {
        feeds: [
          {
            title: "Raspberry Pi Tutorials",
            url: "https://www.raspberrypi.com/tutorials/feed"
          },
          {
            title: "Cambridge Independent News",
            url: "https://www.cambridgeindependent.co.uk/_api/rss/cambridge_independent_news_feed.xml"
          }
        ],
        showSourceTitle: true,
        showPublishDate: true,
        broadcastNewsFeeds: true,
        broadcastNewsUpdates: true
      }
    },
  ]
};

/*************** DO NOT EDIT THE LINE BELOW ***************/
if (typeof module !== "undefined") {module.exports = config;}
tip
You can add additional RSS feeds by adding additional entries to the
feeds list. Don’t forget to separate the feed entries with a comma!Once you are happy with the changes you’ve made to the file, press CTRL+X, then Y, then Enter. Then, type the restart command for the Magic Mirror application to see the result:
$ pm2 restart mmRemove modules
Edit your config.js file to remove one of the modules that appear on our mirror.
We’ll remove the weather module, which appears in the top right corner of our screen. It’s made up of two small modules, one for the current weather and one for a forecast. Here at Cambridge UK it’s always sunny, so we don’t need this weather forecast.
Open your configuration file in nano:
$ sudo nano ~/MagicMirror/config/config.jsDelete this entire section from the config file, removing everything from the first open curly bracket to the last closing curly bracket and comma:
{
  module: "weather",
  position: "top_right",
  config: {
    weatherProvider: "openweathermap",
    type: "current",
    location: "New York",
    locationID: "5128581", //ID from http://bulk.openweathermap.org/sample/city.list.json.gz; unzip the gz file and find your c>
    apiKey: "YOUR_OPENWEATHER_API_KEY"
  }
},
{
  module: "weather",
  position: "top_right",
  header: "Weather Forecast",
  config: {
    weatherProvider: "openweathermap",
    type: "forecast",
    location: "New York",
    locationID: "5128581", //ID from http://bulk.openweathermap.org/sample/city.list.json.gz; unzip the gz file and find your c>
    apiKey: "YOUR_OPENWEATHER_API_KEY"
  }
},
tip
You might have noticed that these modules weren’t working properly anyway, due to a requirement for a valid API key and location ID number. An API key is a unique identifier that’s used to authenticate data requests from one computer to another, in this case a request from your Raspberry Pi for a weather forecast from openweathermap.org. Explore that webpage for further information, including location IDs and how to get an API key, if you want to keep this module.
Once you are happy with the changes you’ve made to the file, press CTRL+X, then Y, then Enter. Then, type the restart command for the Magic Mirror application to see the result:
$ pm2 restart mmAdd new modules
Adding a new module involves two steps:
-
Install the module.
-
Modify
config.jsagain use the module.
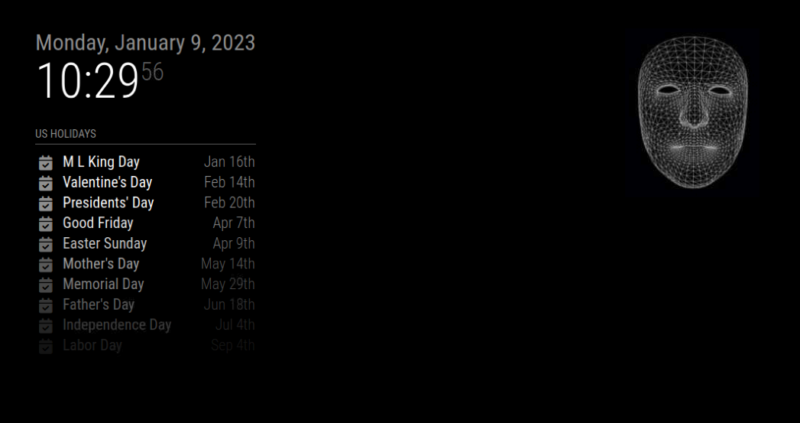
There are plenty of modules to choose from, but we’re going with one that will display an image of our choice where the weather modules used to be. This particular module is called MMM-EasyPix and was made by Mykle.
To begin, download MMM-EasyPix into the modules folder:
$ cd ~/MagicMirror/modules/
$ git clone https://github.com/mykle1/MMM-EasyPix
Next, modify config.js to use the module.
Open your configuration file in nano:
$ sudo nano ~/MagicMirror/config/config.jsPaste the following sample MMM-EasyPix configuration into the list of modules:
{
  module: "MMM-EasyPix",
  position: "top_right",
  config: {
    picName: "grid.jpg",     // Enter the picture file name.
    maxWidth: "100%",        // Size picture precisely. Retains aspect ratio.
  }
},
The code above calls the MMM-EasyPix module and assigns the following parameters:
-
positions the picture in the top right corner of our display where the weather modules used to be
-
names the picture we want to show (in this case
grid.jpg, one of several demo images preloaded with the module and found in the folder~/MagicMirror/modules/MMM-EasyPix/pix) -
sizes the image
Once you are happy with the changes you’ve made to the file, press CTRL+X, then Y, then Enter. Then, type the restart command for the Magic Mirror application to see the result:
$ pm2 restart mmtip
To position a module, select from the following list. Enter the position as a new value for the position field:
-
top_bar -
bottom_bar -
top_left -
bottom_left -
top_center -
bottom_center -
top_right -
bottom_right -
upper_third -
middle_center -
lower_third
You should now see a new image on the display:
Let’s replace that image with the Raspberry Pi logo.
Fetch the image from the internet:
curl https://upload.wikimedia.org/wikipedia/en/c/cb/Raspberry_Pi_Logo.svg -o ~/MagicMirror/modules/MMM-EasyPix/pix/logo.svgFinally, edit the config.js file again to change grid.jpg to our logo.svg image file.
Open your configuration file in nano:
$ sudo nano ~/MagicMirror/config/config.jsPaste the following sample MMM-EasyPix configuration into the list of modules:
{
  module: "MMM-EasyPix",
  position: "top_right",
  config: {
    picName: "logo.svg",     // Enter the picture file name.
    maxWidth: "100%",        // Size picture precisely. Retains aspect ratio.
  }
},
Once you are happy with the changes you’ve made to the file, press CTRL+X, then Y, then Enter. Then, type the restart command for the Magic Mirror application to see the result:
$ pm2 restart mmCongratulations! You’re ready to go off on your own to build the best smart mirror you can imagine.

Extend the project
Start by checking out more of the wide variety of modules made by the community you’re now a part of.
A favourite of ours is MMM-Remote-Control, which allows users to control their mirror via a web browser from any smart phone or tablet. This frees you from SSH on the command line, replacing it with a graphical interface.
Because we have retained the speakers and their connections from the original screen and used the Raspberry Pi HDMI connection, you can play audio. There are plenty of possibilities for audio-related modules, like a smart speaker or an online radio player.
With the addition of a camera and microphone, you could create a voice-activated smart mirror with facial recognition, and integrate it with smart home features you may already have.
Perhaps you have an idea that no one else has considered yet, which may lead you to develop your own module. The chance to make sci-fi a reality awaits you!