USB gadget mode in Raspberry Pi OS: SSH over USB
If you’ve ever tried using a Raspberry Pi — or any single-board computer — while travelling, you probably know how frustrating it can be. Hotel rooms with no spare Ethernet ports, conference Wi-Fi behind captive portals, networks that block local discovery tools, or simply not knowing what IP address your headless board received can all turn a simple task into a hassle.
Last year, I came across a concept that sounded like the ideal solution: Ethernet over USB. The idea is beautifully simple — plug the Raspberry Pi into a laptop and it appears as a USB network adapter, just like when you enable USB tethering on a smartphone. That would mean no Wi-Fi setup, no IP scanning, no captive portal headaches — just plug in, SSH, and start working. Bonus: the host computer could even share its internet connection over that same cable.
At least, that’s the theory.
In reality, getting this to work has traditionally involved a mix of outdated scripts, manual configuration steps, and platform-specific instructions that only reliably supported one host OS at a time — Windows, macOS, or Linux, but rarely all three. Many great community efforts exist, but they often require you to clone repositories, edit system files, or manually switch the Raspberry Pi between Internet Connection Sharing (ICS) and normal local networking — and ICS is typically treated as an optional afterthought, rather than part of a unified workflow.
I wanted to streamline that experience — not to replace community solutions, but to offer a clean, all-in-one option that “just works”, regardless of whether the user is a first-time Raspberry Pi owner or someone deploying a fleet of headless boards.
So I started a project with a clear goal in mind: to make a single Debian package that enables USB gadget networking straight out of the box on all supported Raspberry Pi boards, and across all major host operating systems.
Introducing rpi-usb-gadget
Starting with Raspberry Pi OS Trixie images dated 20.10.2025 and later, a new package called rpi-usb-gadget is included by default. It can be enabled with a single toggle in Raspberry Pi Imager, making USB networking setup drastically simpler.
Once enabled:
- Your Raspberry Pi will present itself as a USB Ethernet device when connected to a PC
- You can SSH directly using the hostname you set in Raspberry Pi Imager — no Wi-Fi or Ethernet setup required
- If your PC has an active internet connection and ICS is enabled, the Raspberry Pi will automatically receive internet access through the same USB cable
- A lightweight background service runs on the Raspberry Pi to detect host connectivity and automatically switch between standalone mode and ICS-backed networking
- In practice, it behaves very similarly to USB tethering on a smartphone — but for Raspberry Pi
The package is supported on all major host systems: Windows, macOS, and Linux.
Important hardware note
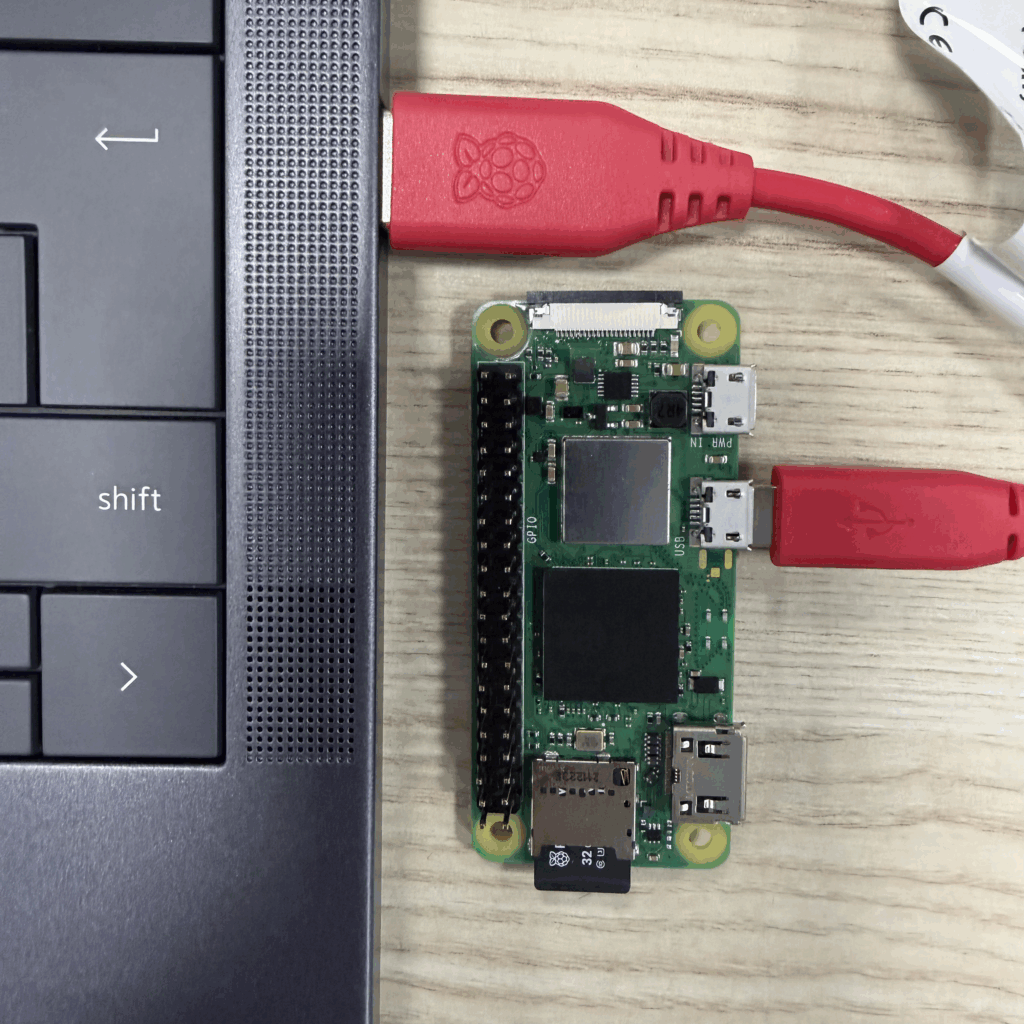
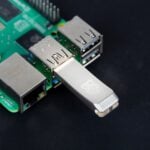
To use USB gadget mode, the Raspberry Pi must be connected to a USB port that supports OTG (device mode):
| Raspberry Pi model | USB port to use |
|---|---|
| Raspberry Pi Zero, Zero W, Zero 2 W | The micro USB port closest to HDMI — not ‘PWR IN’ |
| Raspberry Pi 4, 5, 500, 500+ | The USB-C port directly on the board |
| Compute Module 5 | The USB-C port on the Raspberry Pi CM5 IO Board |
| Compute Module 4 | Requires additional manual setup and is not auto-configured |
⚠ Warning:
Once gadget mode is enabled, the selected port will function exclusively as USB networking + power input; it will no longer operate as a regular USB host port. This means that keyboards, storage devices, or other peripherals cannot be connected to that port while gadget mode is active.
Supported boards:
- Raspberry Pi Zero (W) and Zero 2 W
- Raspberry Pi 3 Model A+
- Raspberry Pi 4 Model B
- Raspberry Pi 5, 500, and 500+
- Compute Module 5
- Compute Module 4 (technically supported, but additional manual setup is required)
For optimal stability — especially on Raspberry Pi 4, 5, and 500/500+ — connect the Raspberry Pi directly to a USB port on your PC. Some laptop USB ports cannot provide sufficient power, which may cause reboots or USB link drops.
Recommended accessory: The Raspberry Pi USB 3 Hub allows you to power the device externally while still passing only data over the USB connection; this is ideal for laptops with weak USB power delivery.
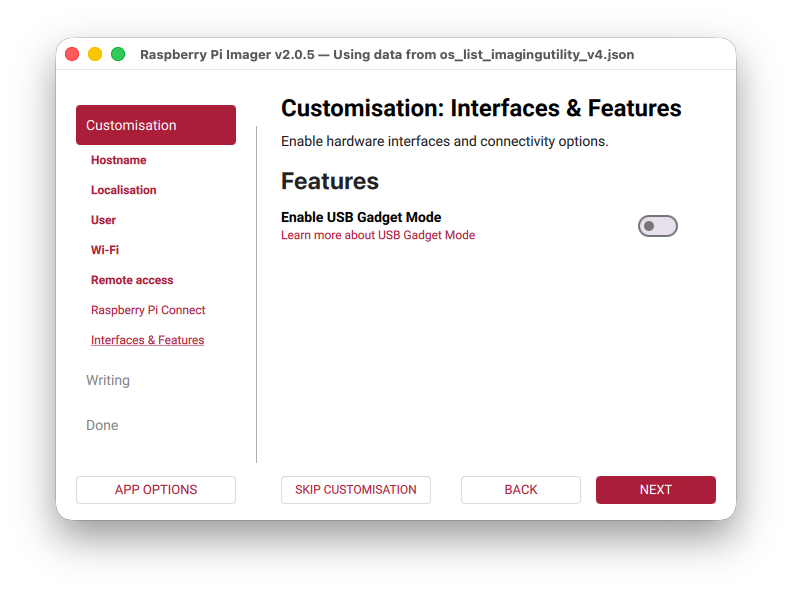
Enabling gadget mode the easy way: Raspberry Pi Imager 2.0
- Generate a capabilities-enhanced manifest
- Double-click the generated os_list_local.rpi-imager-manifest file
- Select a Raspberry Pi OS Trixie image (20.10.2025 or newer)
- In the ‘Customisation’ menu, set a hostname
- This is the name you’ll use to SSH into the Raspberry Pi
- If ICS is disabled on the host, the fallback IP will be
10.12.194.1
- Go to ‘Interfaces & Features’ and toggle ‘Enable USB Gadget Mode’
- Write the image, insert the card into your Raspberry Pi, and connect it to your PC using the correct USB/OTG port (not just the power input)
- Power on the Raspberry Pi (the first boot may take longer than usual and might reboot once — this is expected)
- Once booted, your Raspberry Pi should appear as a new Ethernet adapter on your host machine
- You can now SSH using the hostname you set
Windows driver requirement
Windows does not include a generic driver for USB Ethernet gadget devices. To avoid relying on impersonated vendor IDs or unofficial drivers, a dedicated installer is provided: download and run rpi-usb-gadget-driver-setup.exe from the project’s releases page on GitHub.
This only needs to be done once per Windows machine.
Internet Connection Sharing (ICS)
If you want your Raspberry Pi to access the internet through the USB connection, enable Internet Connection Sharing (ICS) on your host computer.
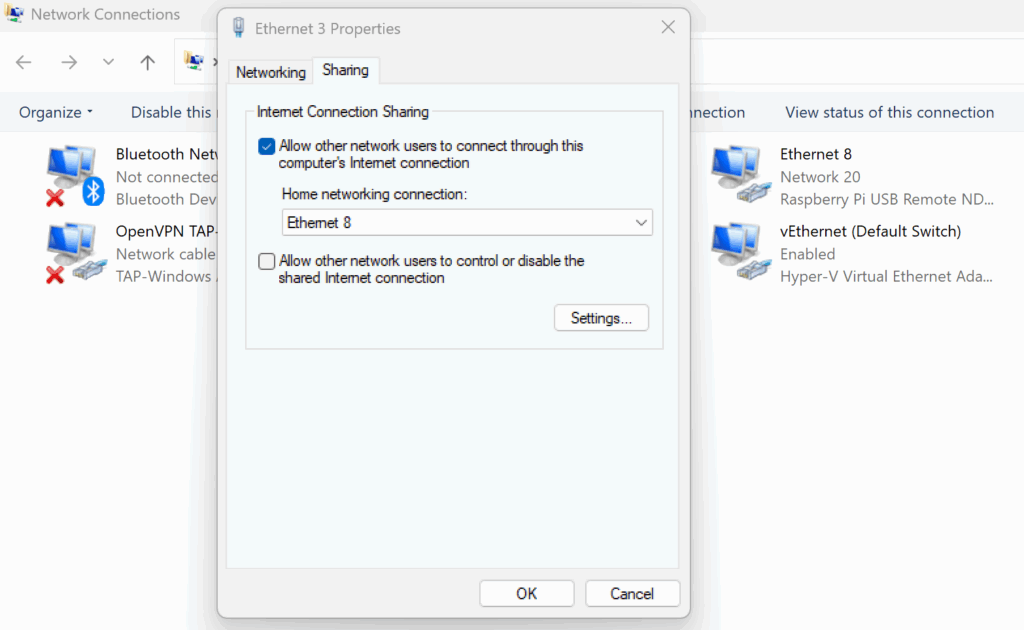
On Windows
- Plug in the Raspberry Pi and confirm it shows up as a new Ethernet adapter
→ It will appear under a name like ‘Ethernet 7 — Raspberry Pi USB Remote NDIS Network Device’ - Open ‘Network Connections’:
→ Control Panel → Network and Internet → Network and Sharing Center → Change adapter settings
→ Or press Win + R and enterncpa.cpl - Identify your primary internet-connected adapter (e.g. Wi-Fi) and open ‘Properties’
- Go to the ‘Sharing’ tab, enable ‘Allow other network users to connect…’, and, in the dropdown, choose the Raspberry Pi USB Ethernet adapter
- Confirm your selection; within around 60 seconds, the Raspberry Pi should obtain an IP address
⚠ Note on Windows ICS behavior:
If ICS is enabled for the Raspberry Pi’s adapter while the Raspberry Pi is not connected, Windows may bind its DHCP service to another interface (such as a Hyper-V adapter). In that case, the Raspberry Pi interface may show as shared but will not receive a DHCP lease. To fix this, fully disable ICS on all adapters you shared the network from, plug in the Raspberry Pi, and then re-enable ICS.
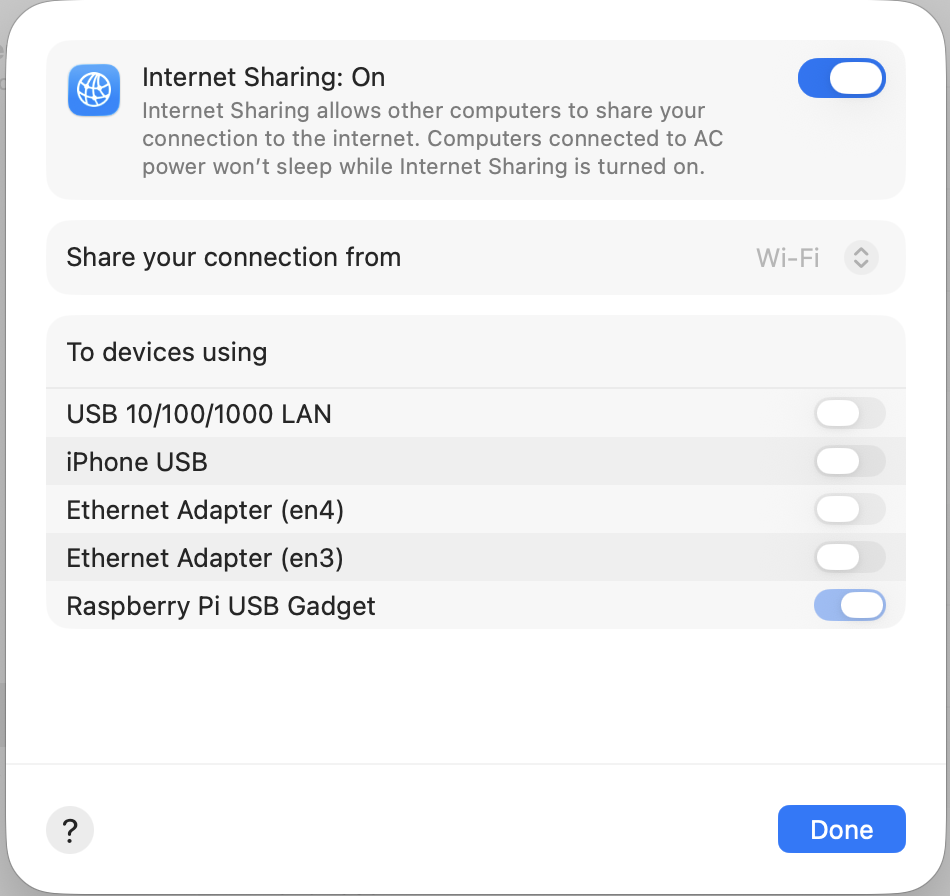
On macOS
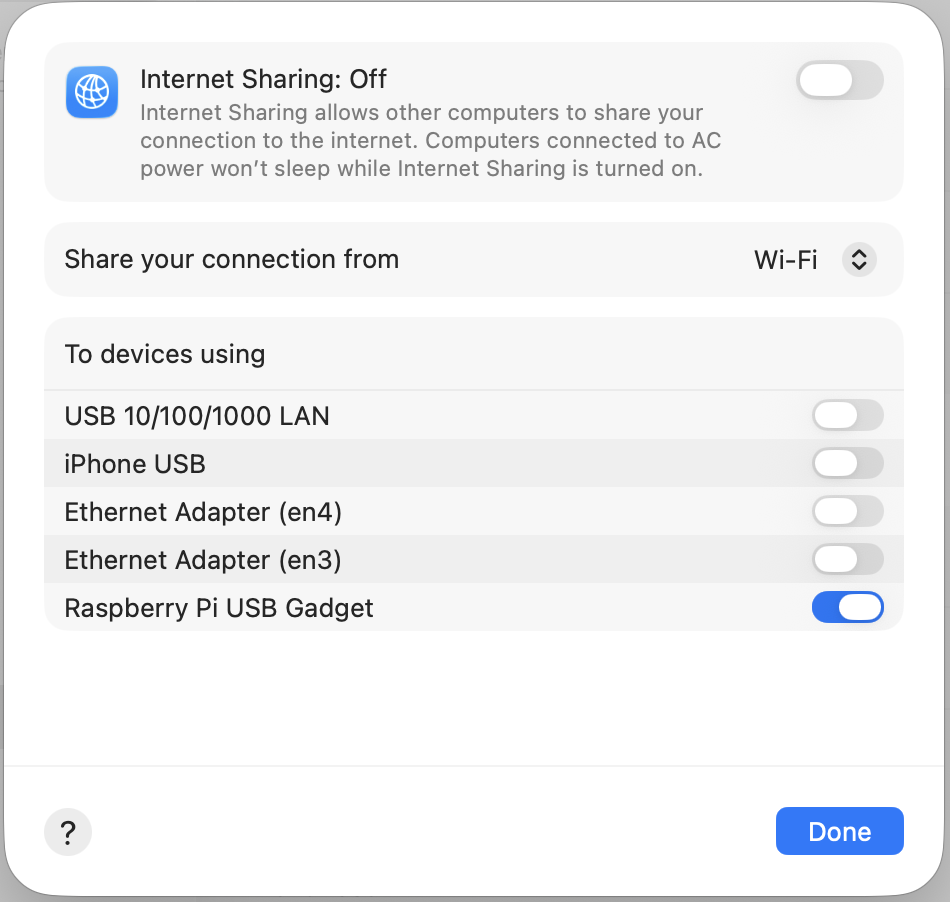
- Connect the Raspberry Pi and wait for it to appear as a new USB Ethernet device
- Open System Settings → General → Sharing → Internet Sharing
- Before enabling, click the info icon to configure:
→ Your internet source (e.g. Wi-Fi)
→ The Raspberry Pi USB Gadget interface as the target to share to - Save and toggle ‘Internet Sharing’ on
On Linux
Enable routing and NAT from your primary internet connection to the Raspberry Pi USB Gadget network interface using your distribution’s NetworkManager or equivalent. Instructions vary depending on the desktop environment or init system.
Enabling USB gadget mode without Imager
This only applies to Raspberry Pi OS Trixie–based images.
Fresh images (before first boot):
Cloud-init can enable USB gadget mode automatically on first boot:
- Mount the
bootpartition - Edit
user-dataand append:
rpi:
  enable_usb_gadget: true
enable_ssh: true  # Optional but recommended when using gadget mode
It’s recommended that you also define a user and an SSH key in the same file, as the setup wizard cannot be used over SSH, and connecting USB peripherals is not possible on Zero boards while gadget mode is active.
Existing installation:
1. Verify that you are running Raspberry Pi OS Trixie:
cat /etc/os-release→ Confirm that VERSION_CODENAME=trixie.
2. Install and enable gadget mode:
sudo apt update
sudo apt install rpi-usb-gadget
sudo rpi-usb-gadget on
sudo reboot
After reboot, the USB port will switch into gadget mode. Any active SSH sessions will temporarily drop and then reconnect once the USB Ethernet interface becomes available. Depending on the host system, give it up to one minute for DHCP/ICS negotiation to settle.
Technical details
The rpi-usb-gadget package configures the g_ether USB gadget kernel module, which exposes a virtual Ethernet interface according to the host OS’ capabilities:
- Windows hosts → RNDIS mode
- macOS/Linux hosts → CDC-ECM mode
The correct mode is automatically selected at runtime based on USB descriptor negotiation — no manual selection is required.
Why no USB serial console?
CDC-ACM (serial over USB) is not included, as Windows cannot bind both RNDIS/ECM and ACM to a single composite USB device using one .inf file without vendor-specific drivers.
A lightweight background service runs on the Raspberry Pi and continuously monitors:
- USB link state
- DHCP/ICS availability on the host
- Routing and DNS status
If ICS is detected on the host, gateway and DNS configurations are automatically applied to provide seamless internet access over USB.
Troubleshooting
If the connection doesn’t work immediately, work through the following checks:
Hardware and cabling
- Ensure you are using the correct USB/OTG port:
→ On Zero models, this must be the port labeledUSB, notPWR IN - Connect directly to a USB port on the host PC — avoid hubs or docks that may block OTG negotiation or limit power
- Only connect one Raspberry Pi at a time in gadget mode to avoid host-side interface conflicts
- If the Raspberry Pi reboots repeatedly or disconnects, it may not be receiving enough power
→ Use a powered USB hub or the Raspberry Pi USB 3 Hub to supply external power while keeping data routed through the host
ICS and DHCP behavior
- After enabling ICS, wait up to one minute for DHCP to issue an IP, and for hostname resolution to begin working
- On Windows, if the gadget adapter shows as ‘Shared’ but no IP is assigned:
→ Disable ICS completely on all interfaces, plug in the Raspberry Pi, then re-enable ICS and reassign the correct adapter - Windows may list multiple ‘Ethernet X’ adapters from previous attempts
→ Consider removing or disabling unused adapters to prevent routing conflicts
Hostname and mDNS
- If
ssh [email protected]does not resolve on Windows, install Bonjour/mDNS support or use the assigned IP address directly (shown inarp -a)
Source code and driver downloads
This feature is now included by default in Raspberry Pi OS Trixie images, but all code and tooling remain open for inspection and contribution. You can find the full source, the documentation, and the Windows driver installer (rpi-usb-gadget-driver-setup.exe) here.
The repository also contains an issue tracker, as well as reports from real-world setups — particularly involving ICS on Windows and macOS — which are extremely valuable. Different host systems behave slightly differently when assigning DHCP, routing, or firewall rules, so community feedback helps make the experience more reliable for everyone.
Wrapping up
USB gadget mode brings a Raspberry Pi much closer to being a plug-and-go development device — no Wi-Fi setup, no IP scanning, no HDMI, and no keyboard required. Just connect a single USB cable, SSH in, and start building.
This feature has been designed to be simple enough for beginners to use, yet robust and scriptable enough for power users and large-scale deployments. Future updates will continue to refine host detection, ICS handling, and diagnostics. If you have ideas or edge cases to share, the GitHub issue tracker and the Raspberry Pi Forums are open.

38 comments
Jump to the comment form
Joseph Alway
This is a very cool feature. While I have yet to get a Pi5, I have the Pi, 1, 2, 3, 4, and Zero 2W. I built my own arcade cabinet using a Pi4, USB 3.0 flash drive for fast booting, and a whole mess of wires, buttons, and a pair of joysticks. I also set it up to run DOSBox which lets me play all of the nostalgic DOS titles that I love. We made a family event of Oregon Trail. Kiddo made it through, sadly, there were a few losses along the way due to the usual suspects.
Raspberry Pi Staff Ashley Whittaker
Dysentery?
Misel
I’m confused. I thought, the 3A+ doesn’t support gadget mode.
Or am I misunderstanding this thread: https://forums.raspberrypi.com/viewtopic.php?f=63&t=227044
I tried to use the 3A+ as a camera device a few years ago only to be pointed to this thread as an explanation that that doesn’t work.
Don’t get me wrong, I’d be happy to be wrong here. But if you could clarify that, that would be nice.
Tom Dewey
That thread is referring to the RPIBOOT (boot from USB) capability, while this post and the Imager feature focus on USB ethernet gadgets running from the Linux userspace.
I don’t have specific data on 3A+’s usb ethernet gadget use, but the forums suggest people other than Paul have seen it working: https://forums.raspberrypi.com/viewtopic.php?t=228267
Note that the rpi-usb-gadget package is designed to automate the configuration mentioned in that thread.
Misel
Thanks, Tom. I guess I’ll just have to give it a try later tonight. :)
thagrol
My experience is that once you set the OTP to allow a 3A+ to boot from a USB drive you can no longer use it as a USB gadget. And, like the name says, once set it cannot be unset.
mark
this is a great to have this as a built-in package. thank you for making this available.
can you provide details related to using another raspberry pi as the host computer? is there a simple script or configuration to set in raspberry pi os (lite) to enable automatic internet connection sharing, so that one pi can act as a router or access point with only wired connections to the other pi’s? right now i use a pi zero as an access point and connect multiple pi’s to it wirelessly but would prefer to do this wired over a single cable. (i don’t necessarily need to access the internet itself in this setup, though also connect a tablet via wifi to the pi access point to control the other pi’s via a web interface)
thagrol
I’ve got some advice on that here: https://forums.raspberrypi.com/viewtopic.php?t=306121
Steven Blackburn
Looks interesting. I wondered if the 3b was accidentally missing from that list, but it would appear that the onboard USB hub prevents gadget mode working, as noted in https://forums.raspberrypi.com/viewtopic.php?t=334138
thagrol
All B[+] models prior to the 4B use a USB hub to provide the four A ports. The presence of the hub prevents the use of device/gadget mode.
Oleksii Shavykin
Why no Raspberry Pi 400? AFAIK, the USB gadget mode should work over the USB Type-C port just fine.
Syni
Really cool.
1) do you think it will work on Radxa Zero 3E? would the package need some modifications?
2) do you think it will work if the board is connected to a router usb port? my router has a usb port and i use it to power the board, so there are usb and ethernet cables between the board and the router, i would like to use only one and not the ethernet.
thagrol
On point 1, this is probably the wrong place to ask about a competitor’s board.
On point 2, personally I doubt it. USB ports on routers are often intended for USB mass storage devices only. Check the router’s manual or just give it a try as it’s unlikely to do any damage.
thagrol
You list of supported models in incomplete. It’s missing A, A+, CM, CM3, CM3+, CM4s, and 400
Doug
This sounds really cool, thanks for adding it. Are there any plans to make this possible without having to build a manifest (or to put a button in the imager that makes the manifest for you) so the process is fully GUI driven? Thanks.
Tom Dewey
Manifests are definitely the direction I’d prefer to go – but I could see space for a GUI-driven manifest creation tool.
If you’ve got a specific vision for how you’d want that to work, I think it would be ideal as a feature request in the rpi-imager repository.
flavelius
A few versions ago, before bookworm, there was a manual path that worked for me, but since then, none of the guides did. This module has the same issues, which i guess must be host-side then. But i’m running a pretty normal ubuntu installation, still, the usb ethernet connection of the gadget never completes connection (in auto (dhcp) mode). In link-local or shared mode, the connection gets an ip assigned, but nothing more (raspberrypi.local is still not available, and the pi doesn’t seem to get any ip that’s accessible (arp -n/-a, ip neigh)). These are the same issues as the manual methods in random guides on the internet. What does this module solve? Or does it have any requirements that are not listed here?
thagrol
The change to Network Manager that happened with Bookworm broke things. IIRC there’s a change required to make NM manage the ubs0 interface. Unfortunately I don’t have the details to hand.
Ian
As the other comment mentioned, the change from dhcpcd to networkmanager with bookworm is what broke earlier approaches. The first steps are still necessary (edits to cmdline.txt & config.txt). But now you need to add an nm connection profile:
#usb0.nmconnection
[connection]
id=USB Ethernet
type=ethernet
interface-name=usb0
autoconnect=true
[ipv4]
method=auto
[ipv6]
method=disabled
[ethernet]
Dale Steele
I’m still considering how I might make use of this cool tool but wanted to check first about the Pi 400? I didn’t see it on the list. Thanks.
Keith Mann
I use USB-C Gadget mode where my M4 iPad Pro powers and provides the UI (Blink & Jump Desktop) for my Raspberry Pi 5 via ethernet over USB-C. An ethernet interface option appears in the iPad settings menu. I originally set this up manually, but I saw this article and thought I would see if using the new USB Gadget mode feature works out of the box with the iPad. But I am confused by this article as there is no “Interfaces & Features” customisation option on the Windows RPI Imager v2.0.6? I use a Windows 11 PC to image my Raspberry Pi MicroSD cards and SSDs.
Keith Mann
I re-read this article plus “How to add your own images to Imager”. I downloaded the “create_local_json.py” program” and run using the specified command line in a Windows “Terminal” app (“./create_local_json.py –online –capabilities usb_otg –device-capabilities usb_otg”). Obviously, you need to have Python 3 installed on your Windows PC for this to work, which is available from python.org.
It creates a cache folder within the folder you are running the above python program from and then creates a “os_list_local.rpi-imager-manifest.json” file in the same folder as the python program. You can either double click on the file .json file in Windows “Finder” file manager app or add via the “add options” / “Edit” buttons and select via “browse file” field in Imager to install the .json file in Imager.
The customised image works out of the box with an iPad Pro USB-C / USB4 port, but the ethernet interface would only come up on my iPad Pro / Pi 5 if I used a USB4 cable as opposed to a USB-C OTG cable I had previously used for a Pi 4 USB-C gadget. The Pi reboots once on first install, I needed reboot the Pi 5 one more time, so I could access it via iPad terminal app “Blink” using CLI “ssh [email protected]“, as the iPad OS dynamically assigned a different network 10.12.194.* address from the default after the next reboot following first install.
Jump Desktop VNC option only works with the new “wayvnc” if you disable the authentication requirement:
Edit the file /etc/wayvnc/config and change
enable_auth=true into enable_auth=false and reboot.
You can create a UFW firewall rule to block VNC / wayvnc access via the Wi-Fi network interface to improve security.
I also created the following file to specify a default GUI resolution that matches the iPad Pro display resolution:
Create file nano ~/.config/wayfire.ini and set contents to:
[output:NOOP-1]
mode = 1600×1200
position = 0,0
transform = normal
The GUI interface feels very responsive with minimal lag as it running over a local cable connection with graphics hardware acceleration enabled. VNC does not support audio, so I use a USB 3 to audio jack adaptor with headphones. Apps, such as Sonic-Pi runs fine this way.
The Pi5 in its Pi 5 fan case with a short USB4 cable is very compact to carry around with your iPad Pro. I prefer to use it with my M2 iPad Pro as this has a 12.9-inch display, which gives a practical Raspberry Pi Desktop display area.
Keith Mann
One further observation. I’ve notice applying the imager manifest .json file is not persistent. After you exit Raspberry Pi Imager app and reload, the “Enable USB-C Gadget Mode” option is lost and you must repeat the activation process to restore. It would be much better if “Enable USB-C Gadget Mode” option was enabled by default in future versions of Raspberry Pi imager.
Tom Dewey
It’s certainly something I’m considering – but while there’s a class of users that understand what this is (and the powerful workflow it unlocks), I’m mindful that the truly new users (Imager’s target audience) are unlikely to know what this is, or make an informed choice on if they want it.
For now, you can have Imager automatically load your manifest through at least 2 mechanisms:
1) Use the –repo argument to the program, for example by creating a new Windows short-cut
2) Just double-click the .rpi-imager-manifest file that is generated
Gregg Levine
Not really regarding setting up a regular Pi Zero to work as a USB Gadget Zero enabled device, when it was first published I was able to set things up as a serial device on one. Setting it up as a Ethernet connected one was a lot harder of course. But it worked after a fashion. Incidentally the standard also supports file storage.
Igor
Hi,
Regarding ICS, is it possible that laptop uses internet from Raspberry p, if it is connected over WIFI to i ternet? I know it can sound strange :)
Pascal Martin
The USB gadget mode worked right away (once i had a proper USB cable) with my RPI Zero, so I am an overall satisfied user, but I still have a few issue. I researched these topics, but i am not too sure how the proposed solutions could clash with rpi-usb-gadget, thus my questions here. The related links found by Google tend to get confused by the fact that there are two Linux systems involved (the RPI and the host). Word statistical techniques can only go so far..
(Note that it can be difficult to use commands like nmcli on the RPI, as the USB gadget mode makes it challenging to attach a keyboard to the RPI..)
1- The host shows a different interface name each time the RPI boots. I guess this is a problem with random MAC address? I found advices to edit file /etc/modprobe.d/g_ether.conf. Would this conflict with how rpi-usb-gadget works?
– If the RPI is connected to the host when the host turns on, then the host apparently fails to initializes its _own_ Ethernet interface. Any experience with preventing this?
– I eventually plan to have multiple RPI hooked to the same host. I could use ICS, but I prefer static IP address for now. What is the preferred method for changing the default IP address set by rpi-usb-gadget?
Thank you for this extremely useful package, it helped me a lot. I am developing my own application (a model railroad control software) that uses a mini PC for the main application, and RPI zero board for GPIO and DCC injection. I am trying not to spend all my time on getting the Linux config up and running.. :-) I will be grateful for any help.
Pascal Martin
I want to share a solution to most of my issues: I added the host_addr and dev_addr options to /usr/lib/modprobe.d/g_ether.conf (I used the current randomly assigned MAC addresses). Now the host’s interface name is stable (it is built from the MAC address), I can assign a static IP address on the host by creating a file in /etc/network/interfaces.d. As a bonus, this also solved the boot issue.
I also use a (clumsy) workaround for rpi-imager: go far enough generating an image with USB Gadget disabled that rpi-imager saves the selection, and then restart rpi-imager without the manifest. That’s ugly like hell, but a least I am not stuck. It would be nice if rpi-imager ignored customization options for which there is no entry in the GUI..
The only issue left is to set the Raspberry PI’s IP address to something different. The rpi-usb-gadget script has the IP address hardcoded, with no planned mechanism to override this:
SHARED_ADDR=”10.12.194.1/28″
It would be good to provide some escape mechanism, but I am not sure how. Used debconf?
Pascal Martin
As a side comments, I am not interested with doing any NAT or firewall on the host PC, which is already in my home network, behind my home firewall. I already have my home routed running a DHCP server with dynamic DNS (OpenWRT). I am not sure how I can integrate the RPI using USB gadget within this environment.. This is th main reason why I am using fixed IP addresses for now. A secondary reason is that I may eventually demo this setup at other places, so being dependent on my OpenWRT router would not be a good idea.
Pascal Martin
I found an issue with rpi-imager: if I use the manifest and enable USB gadget, then it remains enabled whenever I use rpi-imager with the default setup (without the manifest). Then the “Customization” menu does not list USB Gadget and I cannot disable it. This prevents from going back to the normal rpi-imager, with the full OS list. For now this is somewhat minor (I mostly install Raspberry Pi OS), but this makes me nervous (libreelec?).
What is the simplest solution to this conundrum?
Tom Dewey
The simplest solution is to ask the local repository generator to generate a new manifest with the –online option, to fetch current Raspberry Pi OS.
Des Johnston
Nice work! – This is very handy and does what is advertised for me with an RPi 5 on Windows 11, Ubuntu Linux 25.10 and (mostly) MacOS. With MacOS, the Raspberry Pi USB Gadget shows up in the sharing menu for an M1 MacBook Air and an M4 Mac mini, but there is no sign of it after plugging in to an M4 MacBook Air on either of its USB ports. With an RPi 400 keyboard you can install rpi-usb-gadget and switch it on (which gives an unsupported warning), but it doesn’t seem to work.
Gregg Levine
So far the only way to properly make that Python script work properly is to do so, on a Raspberry Pi device, which is already running a normal image from this series.
Des Johnston
Aha – it works with USB C ports on a Mac, but not with the thunderbolt enabled ones. On my Mac mini M4 I was using the front USB C port to plug in.
TT
After seeing this article, A question comes me.
Since I have already moved the “RPI Connect” world from the SSH world , I wonder this ” Enabling gadget mode ” can be usefull or NOT.
If anybody may use this ” Enabling gadget mode ” and enjoy this technology / function-enhance, please let me how you can establish the new world of ” Enabling gadget mode ” @
the “RPI Connect” world.
TT
Misel,I’m confused.
1. The artivcles shows me that it seems Raspberry Pi 5 has USB-C port.
“Important hardware note
To use USB gadget mode, the Raspberry Pi must be connected to a USB port that supports OTG (device mode):
Raspberry Pi model ——- USB port to use
——————- ————————————–*
Raspberry Pi 4, 5, 500, 500+ The USB-C port directly on the board
2. Howver, My Raspobeery Pi 5 (8GB) Really does NOT have USB-C , I can use two USB3-A ports.
How can I understand how I should do ?
Is this the miss-leading USB-A Port ( USB3 ) as USB-C ( USB-3 ) ???
Jeremy Galownia
So it works as needed, I was wondering if with this configuration is there a way to make it so that whatever computer it is connected to will try to use that instead of the wifi it is connected to. I found this an issue for setting up remote ssh development as it needs to be able to download it onto the pi via ssh. If there is a fix for this that just works on all 3 main OSes that would be amazing (config the pi, I do not want to change settings on the computer it is plugged into)
Jeremy Galownia
Revision of question:
It works as needed. But, the host computer (both mac and linux) are trying to use it as wifi instead of the network it is connected to (the host), meaning I cant have both at once. I would also like to do internet sharing as shown above, but thats difficult when it shows up as new interface each time. If possible when remeding this, I would like to not have to set a static MAC address, but if that is the only way that is fine. Thanks, Jeremy