See what sounds look like with Raspberry Pi Pico
Raspberry Pi Pico powers this real-time audio spectrogram visualiser using a digital microphone to pick up the sound and an LCD display to show us what those sounds “look” like.
First things first
First off, let’s make sure we know what all of those words mean, because “audio spectrogram visualiser” is a bit of a mouthful:
- A spectrogram is a way of representing the range of frequencies in a signal and their strength, or “loudness”. For example, a spectrogram could show the mixture of higher and lower frequency sounds that make up the sound of a spoken word.
- The visualiser bit comes in when these frequencies are presented as waveforms that you can see on the screen.
- And the audio part is simply because Sandeep is visualising sounds in this project (rather than, for example, radio frequencies or seismic waves).
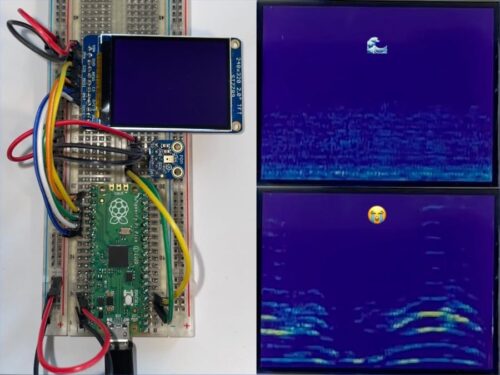
Perfectly portable sound monitor
This pocket-sized device can be carried around with you and lets you see a visual representation of your surrounding audio environment in real time. So, if you wander into a peaceful bird reserve or something, the LCD display will show you something very different to what you’d see if you were in, say, Wembley Stadium during an FA Cup final.
Above, you can see Sandeep’s creation in action in the vicinity of a crying baby.
Hardware
- Raspberry Pi Pico ($4)
- Adafruit 320×240 Color IPS TFT Display with microSD card breakout ($19.95)
- Adafruit PDM MEMS Microphone Breakout ($4.95)
That is a satisfyingly affordable hardware list.
How does it work?
In the video below, you can see there is a direct correlation between the original audio signal’s amplitude (on the left) and the audio spectrogram’s representation of the signal on the right.
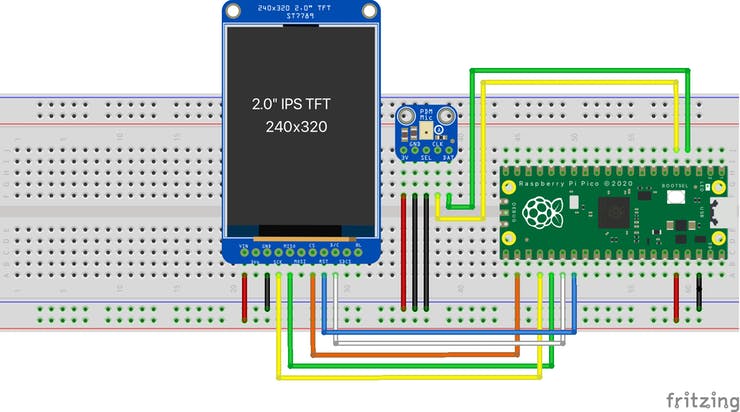
The Microphone Library for Pico captures data from Sandeep’s digital microphone. Arm’s CMSIS-DSP library processes the audio in real-time, then transforms it into spectrograms. These are then displayed one row at a time on the LCD screen, using the ST7789 Library for Pico.
Maker Sandeep Mistry created the original project guide on behalf of the Arm Software Developers team. Check out his other tutorial on how to create a USB Microphone with the Raspberry Pi Pico.


4 comments
thediveo
Could there be a wiring error in the fritzing schematics? The microphone breakout’s left 3V pin (red wire) is connected to what seems to be the GND rail.
gardener
wow, is it possible to run pico with airplay?
Jenni Mint
There seems to be an audio issue, not hearing at all. Could be a pin connected problem? Not sure! Just curious to know what could be the possible solution to this.
Roshan
I am not getting audio i have checked pins too help me out
Comments are closed