Roberts R300 Reinvention
Liz: today’s guest post comes from Gordon at IQAudIO, who makes and sells audio accessories for the Pi, which we really, really like – with one of his DACs you can turn your Pi into a proper audiophile-approved piece of kit. Gordon had made a project we really liked the look (and sound) of when we last saw him, so I asked him to write it up. Over to Gordon:
When my grandmother passed away many years ago I was asked if there was anything of hers I’d like to have in order to remember her by. The choice at the time was pretty easy for me – her bright red Roberts radio. This radio sat on her kitchen worktop, and whenever we visited I was always being told off for touching it, tuning it to some other radio station and spinning the whole thing around on its turntable base far too quickly.

The radio, somewhat the worse for wear.
My grandmother was affectionately called “Granny Hi-Tech”, simply because she was always the first to get hold of gadgets, most of which I assume she bought having seen them being demonstrated at the large department store in Glasgow where she worked during the 1960’s and 70’s.
The original intention on receiving the Roberts radio was to get it working again and keep everything authentic, but I really didn’t know where to start, so it was placed in a box and forgotten about. It’s moved house with us six times since, and was rediscovered, grubby and broken, during our last house move eight months ago.
A bit of a state
I did finally find a spare wet afternoon, but on taking the radio from the box and giving it a good look over, it was obvious I’d been seeing it through rose tinted glasses – it was much worse than expected, and although I may have been able to restore the inner workings, what stations can you pick up on Long and Medium Wave these days?
It was decided that a sympathetic transplant was called for, keeping the aesthetics of the original radio but delivering a modern music playback solution. Some parts of the radio were okay, some terrible and overall it had lost that lovely red colour that I fondly remembered. One of the dials had lost its brass cover, the grill was dented, the Roberts logo was yellow and broken, and the inside had corrosion in places.
A Roberts R300 with Airplay
I could have bought a cheap bluetooth speaker and transplanted the workings into the R300, but I wanted the original radio buttons to work as expected (on/off, volume) and wanted it to have some real musicality to surprise. I also wanted the ability to have synchronous playback across the house with my other HiFi systems. Overall it should look and feel like an original Vintage 1960s radio but in terms of audio performance I wanted it to sound awesome.
Enter the Raspberry Pi
There are several add-on boards for the Raspberry Pi, and we develop and sell a few of these ourselves. For this transplant I used our Pi-DigiAMP+. This Raspberry Pi HAT board takes the digital audio signals (I2S) from the Pi’s 40-way header, and delivers high-quality stereo audio up to 192MHz/24bit resolution – you just need to add speakers and a suitable power input to complete the job. The DigiAMP+ is designed to drive bookshelf or larger speakers – we usually pair it with QAcoustics 2010i or 3020 speakers, and it sounds simply brilliant. We demonstrated this very combination at the recent CamJam and also at the Recursion Computer show in Stratford-Upon-Avon.

The IQaudIO Pi-DigiAMP+ can run from 5v -> 18v, and has on-board circuitry to power the Raspberry Pi too. Here we have used a 15v/3.3amp power brick from XP Power – this will allow the Pi-DigiAMP+ to deliver 2x20watts into 4ohm speakers, with a little less into 8ohm drive units – more than enough for a bedroom or kitchen radio.
Using the Raspberry Pi allows us to take advantage of the many Linux-based music playback solutions available. We could have gone for Volumio, RuneAudio, Moode, PiCorePlayer, Pi MusicBox, Max2Play or others; but for this build we went with Mike Brady’s Shairport Sync. Mike is a computer science lecturer at Trinity College Dublin and has posted his source code on GitHub making it easy to build and modify if needed. We’ve been running Raspberry Pi-based Shairport Sync systems for a while with great reliability and ease of use. Thanks Mike!
Remove the unnecessary and rework the rest
Taking the radio to pieces was pretty simple; there were none of those annoying plastic clips you break when attempting to open a modern device. Here it’s mostly wood screws with the occasional brass nut and bolt. We carefully removed the innards and stripped down the radio to its bare components, unsoldered the 60s electronics and removed protruding and unnecessary metal that would make the overall transition more difficult.

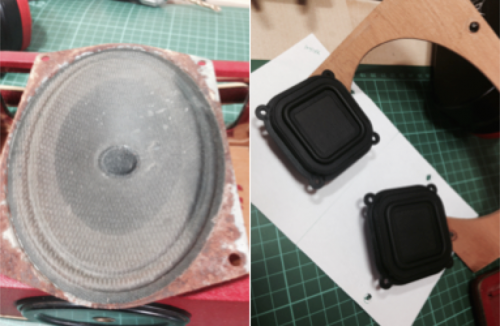
Obviously, a 40-year-old paper mono speaker wasn’t going to cut the mustard, so we removed that too, replacing it with a pair (to give us both left and right channels) of full range Balanced Mode Radiator (BMRs) drive units – not only do these fit in the available space, but they sound good too.
Now left with a bare carcass, it needed a good old clean and polish, but what we didn’t expect was for the carrying handle’s leather strap to disintegrate, which was one of the key aesthetics, along with the base turntable, we really wanted to keep. A quick Google search and subsequent calls to Roberts themselves resulted in some replacement (but modern) parts being received next day, although we ended up only using the new silver “Roberts” logo, as the beautiful replacement red handle was just too big a colour difference.
Rebuilding the radio was just like a Haynes manual (refitting is the reverse sequence to removal). We cut an MDF support panel for the speaker drive units.
The analog volume potentiometer of the original was replaced with a simple 3-pin rotary encoder, wired to the Pi’s GPIO. We used the sample code from the IQaudio GitHub repository to take the Rotary Encoder pulses and convert them into Linux ALSA volume commands.
Adding the Raspberry Pi and Pi-DigiAMP+ was the easiest part. The speakers were connected to the Pi-DigiAMP+ and the Official Raspberry Pi WiFi Dongle was added.

From the outside you wouldn’t know anything had changed, and to keep the functionality of the radio’s Off/Long Wave/Medium Wave selector, we wired it in-line to the positive power from the external power brick. Selecting either Long Wave or Medium Wave powers the Pi-DigiAMP+ and Pi, while selecting Off cuts the power to both – we added a simple power barrel connector onto the back of the radio so it wasn’t always tethered and didn’t have a flying lead.

Finally, we replaced the wooden wedges and measured up the display window (ordering another to be laser-cut from www.podbox.co.uk at the same time). We also added some sound damping from an old speaker we had lying around. The handle was repaired using some similar covered vinyl.

As with all good builds, there were a few extra pieces left over…

How does it sound?
Surprisingly good, way better than expected. It really makes us smile streaming Deezer/Apple Music to radio that’s nearly half a century old. Having the physical volume control just adds an extra retro feel too.
What’s left to do?
Having used the Raspberry Pi/IQaudio Radio for a while now, we’ve decided there are a few additional tweaks to perform when we find the time. These include:
- Tuning Knob: We need to make the tuning dial do something. This may end up driving some RGB LEDs, delivering mood lighting OR capturing the dial’s position (via ADC), and converting that into one of several fixed radio streams, selecting each in turn simply by “re-tuning.”
- Power LED: Although we do tend to leave the radio powered up permanently, it would be good to know if the kids have turned it off rather than the toaster.
- The radio’s handle/strap needs work and this is where we’ll likely take the modern replacement purchased from Roberts Radio and re-colour it to match the original radio’s dulled finish. We’ve even found a shop called RevivedRadios on Etsy who can recover the Roberts radio in your chosen fabric. [Liz interjects – goddammit, I wish I hadn’t clicked that link. I really want one of those now.]
- Better WiFi signal: Although we’ve got good range already with the Official USB dongle placed in the radio’s enclosure, it may be worth exposing the Raspberry Pi’s USB socket on the back of the radio case (for better signal reception) along with the Ethernet socket, allowing for direct network connection in suitable locations.
- EQ/Bass boost: We could look at diving into the Pi-DigiAMP+’s integrated DSP and program it to get the best from the BMR drive units in the Roberts Radio case.
- Battery operation: I’m thinking of adding a battery power source and charging circuit. It’s just too nice a radio to have it tied to a mains socket – it also stops me being able to spin the radio around and around listening to music as I did 40 years ago!
Parts list
- Your Gran’s vintage radio
- 1x Raspberry Pi
- 1x Official Raspberry Pi USB WiFi adapter
- 1x IQaudIO Pi-DigiAMP+
- 1x XP Power 15v power supply (VEH60US15 / VEF50US15 or similar)
- 1x ALPHA 3 pin Rotary Encoder (RE160F-40E3-20A-24P)
- 2x HiWave 2x12w BMR speakers (RS Online stock no: 761-4265)
- 1x 2.5mm / 5.5mm Barrel power socket ( DC-008-B-R)
- SD card with Mike Brady’s Shairport Sync (available pre-configured with rotary encoder volume support from iqaudio.com/downloads)
- Some wire
- Some basic soldering skills

28 comments
Keith Oliver
What an amazing project and thanks for the mention. To paraphrase Will Smith in Independence Day – I’ve got to make me one of those!
Keith
http://www.revivedradios.com
Tzarls
Nice project. About the tuning dial – it would be crazy if you had some pre-recorded samples of radio stations and noise (you know, what sounds when you actually move the dial on a “real radio”) and trigger those samples when moving the knob, before actually changing streams or tracks.
BTW, the specs of the IQaudIO Pi-DigiAMP+ should be “192 KHz”, not “192 MHz”.
Liz Upton
That’s a LOVELY idea.
Haggishunter
To take it a step further, how about “tuning” in to a random episode of a 60s or 70s radio programme, courtesy of the Internet Archive? :)
Stephen
I did my radio training on Roberts (my Mum’s maiden name was Roberts) I have three Roberts Radios, Woo Bap da linga. Or something like that LOL.
Michael Horne
An absolute labour of love. What a wonderful project with some terrific hardware!
PeterO
I’m sorry, but destroying vintage radios like this rather than restoring them properly is not something I would have expected the foundation to support. :-(
Tim Richardson
I agree that if the radio is rescuable, then it MUST be rescued. If not, then why not do something else.
Liz Upton
I saw your similar comment on Twitter – and I wholeheartedly agreed with the guy who replied to you. (I know you disagreed with him.) These really aren’t rare – they’re the sort of thing that a lot of people just throw out – and this one in particular was pretty badly broken (there is no way you’d have been able to resurrect that speaker, for example). This project gives a new purpose to (most of) something that might easily have ended up being trashed.
Keith Oliver
What I love is that the radio is back in use in this guys kitchen, reminding him daily of Granny Hi Tech. I’m sure she would have approved.
Tim Richardson
I’ve got a couple of IQaudIO’s DAC and amp boards, and they are absolutely fantastic! They bring out so much in music that I have not heard before. You do need to match them up with quality speakers – I use Q Acoustic which are around £100 – so not that expensive. Well worth buying.
Mat
I love this. I’ve just made a couple of lo-fi versions of these from slightly more modern (60s – 70s) Roberts radios for friends and family using Pi Musicbox (I like the tunein support) and the original speaker via a tiny 3w amplifier into the original speaker. It sounds surprisingly good, and I can run it all off a 5A phone charger if I want to take it outside.
Great gifts for vintage lovers :)
James Berlucci
This is fantastic! The set looks great and that sound is gorgeous. I never knew you could get that kind of sound out of a raspberry pi! Definitely getting myself some IQAudio merch! Thanks!
pbat
The HiWave BMR speakers are discontinued!
RS has a replacement product, however.
I’m playing with similar projects since before the RPI was invented and I used full range Peerless speakers in the past, they are also good and you can use a relatively small enclosure if you use a vented box design. ( I used a Peerless 830985 Full-range – 2.5-inch)
I did not know about the Pi-DigiAMP+ ! great idea!
I wanted a more flexible design, i.e. an amply that can work with other sources, using the good old line-in jack, so I opted for a Class D Audio Amplifier Board based on a TA2024. Impressive little board! super cheap and versatile, same credit-card size of the RPI.
Gordon
pbat, it looks like HiWave became Tectonic Elements …
RS order number: 876-5294
And, thanks for all the positive comments everyone. I now have a longer list of things to do :-)
Spaker
Very nice work. I’ve been doing this almost exact same thing for a few years now- getting vintage (mostly bakelite type) tabletop radios off eBay and filling them with modern goodies. People love the look of an old radio and love showing them off to friends even more. I’ve put 100 watt RMS amplifiers (a few times more than that) and power supplies in a lot of them; then feed serious speakers off the units with a Pi or a Bluetooth module or both as the audio source. Plenty more audio gadgets are asked for like inputs and USB/ SD card readers, and – weird, I know – but actual TUNERS for AM/FM RADIO! It’s so much more fun to have a custom music machine, especially one that surprises guests and family, and looks COOL!
As far as the vintage “YOU MUST RESTORE, NOT REINVENT!” thing, yeah… I have gotten scolded for that, but the truth is- I look for the coolest LOOKING ones I can find for the least money- and those are usually the broken as all hell / for parts only sales. I’m not going to drop hundreds of dollars on a restored or rare and needs restoration tube specialty find and gut it. I wouldn’t buy anything expensive to gut and put in modern guts, period. And I have wanted to. Some of the coolest looking vintage radios are hundreds of dollars and fully functional. I’m not into ruining- I’m into creating. Just one mans opinion who happens to do this exact same thing.
pbat
I’m on the same line: it really hurts to tear apart the tripe of an old radio if it still works… but the problem is the (low) quality of the speakers! How can you improve it without a complete rip-off? There’s often very little space in those boxes (which is why they are so nice and portable) and you need to match the Vas / Fs / Qtc / Fb / WTF etc… of the new driver… What I try to do is first calculate the volume I have available in the enclosure, with the addition of RPI, USB hub, etc etc, then find a driver that is happy with that volume. But it’s painful! And I stick to full-range drivers as I’m too lazy to deal with crossovers etc.
pbat
Ah! almost forgot: and I still prefer analogue volume control ! I can’t stand the lag I have with my small Barracuda MX-200i when I turn the volume up/down quickly
Call me old-fashioned but I need to feel in power. Even better if the volume knob is big and prominent. :D
Anne Carlill
I love this project because I’ve got a rusty screechy Robert’s Radio in Duck Egg Blue which I love the look of but is next to useless at getting a decent FM sound. The casing’s actually in excellent condition. And, of course, I have a trusty R Pi. Maybe I’ll get clever enough to do something with it. Thanks for the inspiration!
Edward
Nice project!
Have you seen this project? SpotiBear, a Raspberry Pi based Spotify playing 3D printed bear? http://www.3ders.org/articles/20150327-spotibear-a-3d-printed-toy-bear-that-plays-spotify-music-using-a-raspberry-pi.html
At work (Mag+) I am running this little Raspberry Pi A+ as a jukebox. It monitors a public Spotify playlist so anyone in the office can play some music. Not as slick but gets the job done :) https://instagram.com/p/2i3OWNMSOY
Steve Jones
A few comments
A local shoemaker/cobbler/saddler/belt maker… could probably source a leather strap and colour match it.
Why not use the original analogue volume control into an ADC (e.g. MCP3008) to give a better user ‘feel’?
Jim Evans
At the risk of displaying my pedantry, references to 192MHz/24 bit should be 192kHz/24bit but what’s a factor of 1000 between friends since the it won’t affect results.
The IOAudio web site has this wrong in the headline spec as well, though correct in the ‘detail’ spec. I have told them of course :-))
Gordon
Thanks Jim.
Joshua
NOOO that oval speaker is tossed away!? So very much shame. Should have built a small power supply and keep that old speaker running. Would have sounded so great. They don’t make those anymore.
Liz Upton
They’re made of paper, and they really suffer with age; they LOOK great, but they definitely don’t SOUND great!
Gordon
Speaker, not tossed away. Carefully placed (with all other removed items) in a storage container for safe keeping.
G
Phil Atkin
Brilliant. And those IQaudIO DAC hats are deeply excellent – connect up a pair of powered monitors and crank it up loud, they are fabulous.
Steve S
Tuxan cherry red shoe polish will bring both the radio and the strap back to life. Tuxan is a “restoration” shoe polish, it works really well on those red Roberts radios. I have restored a few back to original condition.
If you are old enough you will remember the Ox Blood version of this polish being used on the Doc Martin boots in the late seventies.
I have a couple of Bakelite radios in the shed, too far gone to restore the workings but the cabinets are in good condition. I am planning a very similar project for one of these.
Comments are closed