Remote humidity detector
We know crawl spaces are creepy, sweaty, and confining but, hear us out…
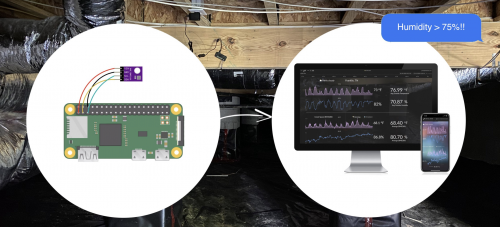
You need to keep an eye on the humidity level in your crawl space, as it can seriously affect the whole house’s overall health. It’s ideal to be able to do this remotely (given the creepy, sweaty atmosphere of the space), and a Raspberry Pi allows this.
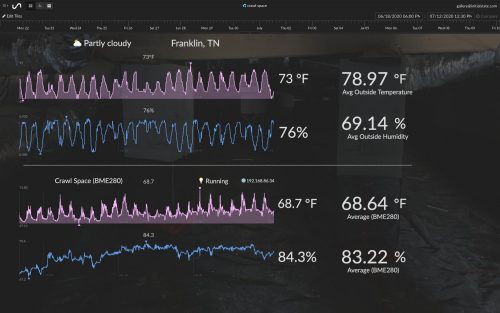
Jamie Bailey took to Medium to share his Raspberry Pi setup that allows him to monitor the humidity of the crawl space in his home from a mobile device and/or laptop. His setup lets you check on the current humidity level and also see the historical data over time. You can also set alarms to be sent to you via text or email whenever the humidity level exceeds a certain threshold.
The hardware you need
- Power outlet or extension cord in your crawl space
- Raspberry Pi (3 or 4) or Raspberry Pi Zero W (or WH)
- BME280 temperature/humidity sensor
- Female-to-female jumper wires
The software you need
- The free Raspberry Pi OS (previously Raspbian)
- A Python script (included in this tutorial)
- Jamie used Initial State for data streaming and visualisations, but you can choose a free alternative
Jamie’s walk-through is extensive and includes all the command line code you’ll need too, so make sure to check it out if you attempt this build.

Assembly
The BME280 sensor has four pins you need to connect to your Raspberry Pi. This will send the humidity data to your Raspberry Pi, which you’ll have already set up to let you know what’s happening remotely.
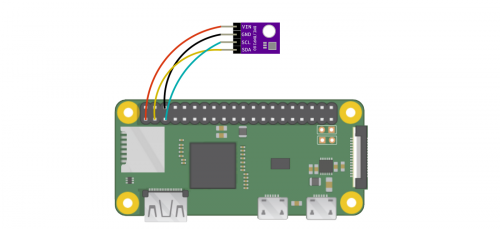
- BME280 VIN pin connects to GPIO pin 1 (3.3V)
- BME280 GND pin connects to GPIO pin 6 (GND)
- BME280 SCL pin connects to GPIO pin 5 (SCL)
- BME280 SDA pin connects to GPIO pin 3 (SDA)
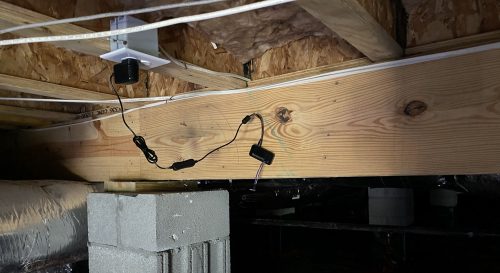
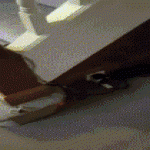
Once you have all your software sorted and your hardware connected, turn your Raspberry Pi off and take it down to your crawl space (monitor, keyboard, and mouse are no longer necessary). Jamie advises hanging your Raspberry Pi from the floor joists instead of letting it touch the ground, to avoid contact with any water. He put a nail in one of the floor joists and draped the power cord over the nail (see above). Turn your tiny computer on, make sure data starts flowing into your dashboard, and you’ve got yourself remote humidity sensor!
PS We’re English so… is a crawl space the same as an attic or what? Asking for a friend!


21 comments
pbat
I admit that I wanted to do the same for the… attic (or loft, as it is called over there…) few years ago, in the age of RPI 1.
The problem was that I wanted to make something battery-powered, with rechargeable batteries lasting at least a year. I looked into turning an Arduino into a low-power device but then I gave up. I converted the loft into a room instead….
Jonathan
Great project, but if it is humidity is higher than 80 percent for prolonged periods of time,the BME 280 sensor will malfunction in a short period of time. Mine lasted 8 months before being stuck at 100 percent or zero permanently.
fnord
If the humidity in your crawl space is over 70% for longer stretches of time, you’re going to have bigger problems, namely mold and microbial growth.
Craig
Worth noting for transparency that Jamie is the founder of Initial State, the product being used in his example for the graphs. Doesn’t take away from the project, but worth pointing out all the same.
Paul
Perfect, just what I need, so I will give this a go.
Puffergas
Gives me ideas for building a lumber kiln dry.
Graham Hughes
Crawl Space – usually it’s the area under the house. In the States I think they often raise up their houses off the ground to make construction a bit easier but also (since a lot of them are timber rather than brick construction) to mitigate against insect (termite) damage. That’s a very rough explanation! :-) Enjoying the posts, thanks for all the inspiration.
gus3
I can’t speak for every area of the States, but I can speak to the construction of my parents’ basement (crawlspace). It’s just south ( < .2km ) of a continental divide, so it has two meteorological challenges: rainfall run-off, and an aquifer 6 ft. (2m) below the soil.
When my father laid out the plans for the foundation, he insisted that it be concrete structure with a 1-foot (32cm) berm all around it, to resist any water-flow into the dwelling. His insight is still valid, 43 years later. The only water in-flow is in the sump, which gets pumped out regularly.
Shahid Iqbal
How can I get data outside the network?
Pete
A raspberry pi of any size is overkill for this kind of thing. Check out esp8266 or esp32 development boards.
Chris
Firstly use an ESP32 board and micropython. Much easier.
Then use one of your RPis and install node red on it. Use mosquitto to transfer the data to the pi and node red ui to display graphs etc. Much easier and free.
The code for shown for this uses bme280 but does not install it. From where did this library come from ?
floxi
Under “Python Setup” in Jamie’s walkthrough: “sudo pip install RPi.bme280”
Milan
Nice little project, I would put the raspberry pi into a air tight box, to protect it from dust and moisture. Contacts on your SD card or GPIO pins can corrode.
Nice project, Thank you.
Kevin
The rpi really isn’t the right tool for this job though… a simple esp8266 would be better for such a simple task
Vlad
Well,if it happens that you have a rpi zero w,than why buy a esp8233 that costs 15?
Chris
Vlad that is good if you do but you can get a D32pro board for $8 or cheaper 8266 units for $4 or $5
Add a large battery at 3.7 volts and micropython has a good sleep mode that would last for months or more if you don’t have power in there. These boards have wifi and are cheap.
Vlad
I will try one off those boards.
Vlad
I will try one of those boards.
Balsey Dean De Witt
I see kits on Amazon with a bunch of sensors. I need the humidity, temp and CO2 sensors. CO2 for plants in a grow tent!
Henrry Bucky
It’s nice to have it, my electronics are very safe when there’s air or water
tipobet mobil
Thanks , I’ve recently been looking for information about
this subject for a long time and yours is the best I’ve came upon till now.
However, what in regards to the bottom line? Are you sure about the source?
Comments are closed