Read floppy disks and CD-ROMs with Raspberry Pi 5 | #MagPiMonday
Play old games from original media, back up your floppies before they die, and image replacement disks.
Raspberry Pi 5 distributes enough power via its Universal Serial Bus to run most modern USB disc drives correctly. This is in contrast to our last attempt, in 2020 with Raspberry Pi 4, when we couldn’t get modern dual-USB DVD and Blu-ray drives to power up correctly. Back then, in our CD-ROM console tutorial, we used a SATA DVD drive and USB adaptor kit. That approach still has its uses, but for most purposes, a modern external disc drive is now more convenient. We’ll also look at the current state of USB floppy drive support and show you how to create a single mount point for disk swapping.

01. Connect your drive
We used an Asus SBC-06D2X-U CD/DVD/Blu-ray writer drive throughout this tutorial, with both of its USB-A connectors hooked up to Raspberry Pi’s USB3 ports. You can find them for around £100, but any similar drive should work. Using a powered USB hub can produce unexpected issues with read speeds, so it’s best to use Raspberry Pi 5’s ports.
02. Standard use cases
We’re shortly going to look at emulation-friendly approaches to disc mounting, but if you’re just using discs to read data, burn a CD, play movies, or install modern software, then you can leave everything to Raspberry Pi OS (Bookworm)’s default automount behaviour, which will mount the disc in a uniquely named, non-permanent folder under /media/YourUserName/. This will happen automatically every time you insert a new disc. You can even use these automatically created mount paths to then mount the disc inside emulators such as DOSBox, as long as you don’t need to swap discs.
03. Disc mounting for emulation
Some emulators, but most notably PCSXR and some of the DOSBox family, can only handle disc swapping if all the discs have the same path, and that’s not something modern automount behaviours were designed for. If you’re interested in emulating games from the late CD-ROM era, every disc in a set being assigned a unique mount point can be a problem.
It’s not always an issue. The DOS emulator, DOSBox-X, has some elegant GUI solutions that make
it easier to mount different paths as the same mounted drive. Alternatively, you could create a static mount point and mount each disc as the superuser.
However, we recommend using pmount for a hassle-free life. This is a wrapper for the mount command that lets any user in the plugdev group create temporary mount points under /media for designated devices without elevated sudo privileges or an fstab entry to go with them.
04. Mounting discs with pmount
Let’s install pmount and mount our first disc. Open a terminal and type:
$ sudo apt install pmount
$ sudo nano /etc/pmount.allow
Add the following to the bottom of the file
/dev/sr0Press CTRL+X, save and reboot.
Now let’s prevent Raspberry Pi from auto-mounting external media. Open the file manager, go to Edit > Preferences > Volume Management and untick all the Auto-mount options, then reboot Raspberry Pi.
You don’t absolutely have to disable automounting, but you’ll otherwise have to use pumount to unmount an inserted disc before you can assign it to your mount point of choice.
Assuming you’ve disabled auto-mounting, insert your disc, open a terminal and type:
$ pmount /dev/sr0 /media/cdromAnd to unmount it:
$ pumount /dev/sr0
05. DOSBox-X and multi-CD gaming
To illustrate disc-swapping, we’ve used 1993’s CD-ROM flagship game, The 7th Guest, and the DOSBox-X emulator, which has a GUI that makes the process easier. You can install DOSBox-X as a Flatpak or from source. We’ll do the latter.
Open a new terminal and type:
$ git clone https://github.com/
joncampbell123/dosbox-x.git
$ cd dosbox-x
$ sudo apt install libtool autogen autoconf
automake libncurses-dev gcc g++ make
libncurses-dev nasm libsdl-net1.2-dev
libsdl2-net-dev libpcap-dev libslirp-dev
fluidsynth libfluidsynth-dev libavformat-dev
libavcodec-dev libavcodec-extra libswscale-dev
libfreetype-dev libxkbfile-dev libxrandr-dev
$ ./build-debug
$ make
$ sudo make install
06. Disc swapping in DOSBox-X
Now open a second terminal and insert your installation disc (CD 2 for our copy of The 7th Guest). Type:
$ pmount /dev/sr0 /media/cdrom…return to your first terminal window and type:
$ cd
$ mkdir dos
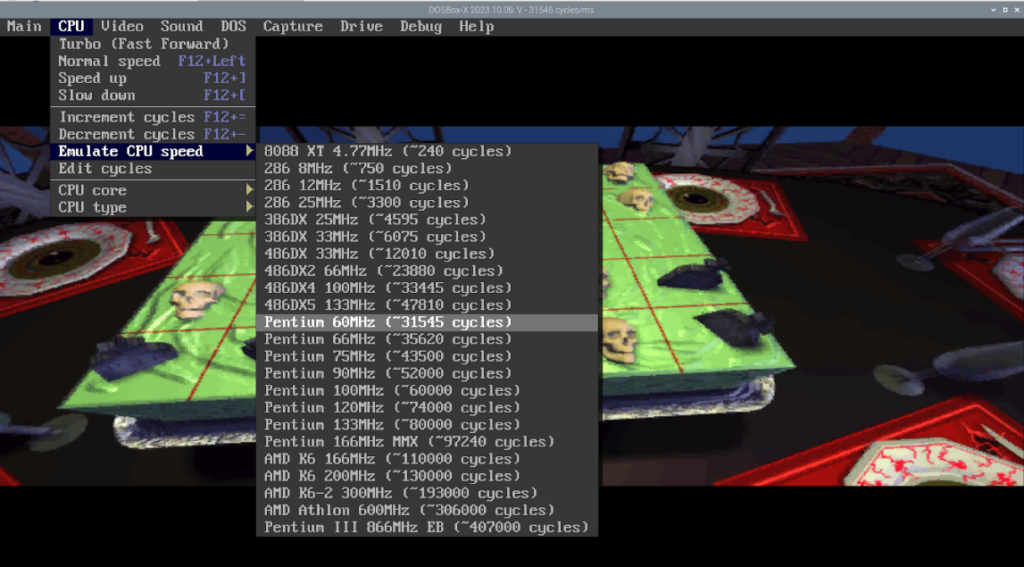
$ dosbox-xWhile you’d normally use dedicated conf files to manage DOSBox-X’s behaviour, you can also configure everything on the fly. For The 7th Guest, you will want to at least enable OpenGL rendering in the Video > Output menu and switch to an emulated 60MHz Pentium in the CPU > Emulate CPU settings. Then, in DOSBox-X’s main window, type the following:
$ mount C ~/dos
$ mount D /media/cdrom -t cdrom -usecd 0 -ioctl
$ D:
$ install
Whenever the game prompts you to insert another CD, it’s best to switch to the other terminal window and type:
$ pumount /dev/sr0Eject the drive, insert the new disc, then type:
$ pmount /dev/sr0 /media/cdromYou can also get away with manually ejecting the disk and simply repeating the pmount command.
After that, in DOSBox-X, tell it that you’ve swapped discs via its GUI by going to Drive > D > Rescan drive, click to tell the game to read the new disc, and carry on playing.

07. Reading floppies
The same pmount method works with floppy disks. You’ll need an external reader that you can connect via USB. We used a Dell MPF82E, a swappable laptop floppy drive that you can also connect via Mini USB. There are quite a few of these around, and they tend to be pretty tough as far as external drives go. Alternatively, you could use an internal floppy to USB adaptor such as a Greaseweazle (magpi.cc/greaseweazle). You’ll need to provide your own vintage drive to use it, but an adaptor of this sort is your only option if you need to read 5.25in floppies on a modern computer.
08. Mounting floppies
The easiest way to set up emulator-agnostic floppy disk swapping is the same method we used for CDs earlier. Like CDs, floppy disks, as are by default mounted with unique paths, which can interfere with disk-swapping in some emulators, so we’ll again use pmount and pumount.
USB floppy drives consistently appear in Raspberry Pi OS (Bookworm) under /dev/sda, but you can use the lsblk command at the terminal to list all block devices and double-check how you should be addressing them.
Add the following to the pmount.allow file we edited earlier:
/dev/sdaYou can now mount and unmount floppy disks thus:
$ pmount /dev/sda /media/floppy
$ pumount /dev/sda
Once again, you’ll probably want to ensure that auto-mounting is disabled in the file manager unless you want to have to manually pumount each floppy.
09. Multi-floppy installs in DOSBox
Launch DOSBox-X from either a fresh terminal or your window manager. Then, in DOSBox-X, type:
$ mount  c ~/dos
$ mount a /media/floppy -t floppy
$ a:
$ install
Wait what might feel like a shockingly long time for the disk to unpack its contents. Read the manual. Make some tea. Installing from floppies was never quick, and installing from 30-year-old floppies is even slower. When you’re finally told to insert disk 2, if you’re using DOSBox-X and a pmount point as discussed, you can just physically swap the disks in your floppy drive and press the specified key to continue, without any need to unmount or remount your floppy drive for each disk. Repeat this process, and carry on until you run out of floppies.

10. Can you copy that floppy?
Many – but by no means all – floppy disk software licences included explicit permission to copy the disks or their contents to other media for strictly personal use. Many installers simply extract and/or copy the full game files to their installation target.
You’ll find these licences apply not only to obviously copyable content such as free software, shareware applications and game demo disks, but sometimes even operating systems such as MS-DOS 5 and games such as Ultima V.
However, if the documentation and licence agreements that accompany a commercial floppy disk do not allow you to copy it, it is safest to assume that you are not allowed to do so.
Those that do not allow you to make copies often include copy protection that will prevent you from doing so, and it is illegal in the UK to circumvent this. While some disks were made for reproduction, unless there’s an obvious licence allowing you to, the old rule holds: don’t copy that floppy.
11: Imaging floppies
Because almost all floppy disks have now reached the end of their useful lifespan, you absolutely should be backing up both software and personal files in the form of disk image files and/or file copies. File copies are easy: just mount the disk and copy everything you find in it over to a backup directory. But images are more useful for preserving data in its original state.
We know Raspberry Pi mounts floppies at /dev/sda, but let’s get more information about the disk. Insert your disk, open a terminal and type:
$ sudo fdisk -lIn our case, fdisk showed us that we had a high density floppy mounted at /dev/sda, packing in a massive 1.44 megabytes of data, so our copy command looks something like:
$ sudo dd bs=512 count=2880 if=/dev/sda
of=my_disk_image.img
12: Restoring your backups
If you’ve made backups and actually own floppy disks, you can reverse this process to copy your backup to a new floppy disk, thus:
$ sudo dd bs=512 count=2880 if=my_disk_image.
img of=/dev/sda
We had to do this to replace a non-functional original floppy during testing, but it’s also a good idea to make sure that any backups you make can actually be restored. If you don’t have spare floppies lying around, you can mount your floppy disk IMG files as a virtual drive with the following command:
$ sudo mount -o loop disk1.img /mntThen just browse to /mnt to examine their contents. Some tools, including DOSBox-X, can also directly mount IMG files.
The MagPi #140 out NOW!
You can grab the brand-new issue right now from Tesco, Sainsbury’s, Asda, WHSmith, and other newsagents, including the Raspberry Pi Stores in Cambridge and Leeds. It’s also available at our online store which ships around the world. You can also get it via our app on Android or iOS.

You can also subscribe to the print version of The MagPi. Not only do we deliver it globally, but people who sign up to the six- or twelve-month print subscription get a FREE Raspberry Pi Pico W!


8 comments
Lutz Fechner
Was hoping to read how to connect old PC floppy drives to the GPIO Pins :-)
The only thing I still have on original disks is Doom 1. Wondering if I can still read them, but don’t want to buy an USB drive for that.
Raspberry Pi Staff Liz Upton
I found a 5.25-in floppy for the BBC Micro when I was over at my parents’ place last weekend with my brother’s and my Chuckie Egg high scores from around 1986 written in marker on the paper envelope.
He was better than me.
John
And now you’ve almost signed handedly changed the world by building, guiding, nurturing a community around a computer that has exposed millions of people to tech that likely wouldn’t have had the chance otherwise–empowering girls, lifting whole nations…
Maybe… maybe your brother was better than you…
Raspberry Pi Staff Liz Upton
<3
Simon
Can it read old Archimedes format floppies?
I’ll just need something to read my Archimedes (20MB?) SCSI Hard Drive then!
Andrew Cole
Would love to know if there is a similar way for me to read all my old Atari ST disks? I even have an external disk drive so would love to know how to make use of that to run my games in an emulator.
Robert Boardman
DOS floppies were formatted 9 sector (1.44MB) Atari ST floppies were formatted 10 sector by default (1.6MB). Can they be copied with the instructions above using a USB floppy drive?
Lopez D.
Does it works with a Macintosh 68030 processor (system 7) emulation ? I have a lot of 3,5 floppy disks to recover.
Thanks
Comments are closed