Raspberry Pi Pico Windows Installer
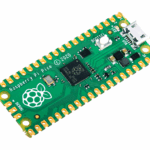
Today we’re introducing a simple solution to install everything you need to develop for Raspberry Pi Pico, and for other RP2040-based boards, using C or C++ on Windows.
If you want to get started with the Raspberry Pi Pico C SDK it can initially seem quite daunting. There are a lot of moving parts to install before you can blink your first LED on, and then off again, especially if you want proper debugging using something like our new Debug Probe. While there has been a “one click” solution to install the toolchain on a Raspberry Pi since launch — see Chapter 1 of the Getting Started guide — installing the toolchain on other platforms like Apple’s macOS, or Microsoft’s Windows, has always been a little more difficult.

When we launched Raspberry Pi Pico and its SDK, our assumption was that people would be happy with a Linux-based toolchain. However, we also documented how to get the toolchain up and working on both Apple’s macOS and Microsoft Windows for folks that wanted to use those platforms. Unfortunately, while installing the SDK on macOS isn’t too different from doing so under Linux, and works almost out of the box, installing things on Windows is much more difficult; it’s just a very different environment.
Fortunately, an enterprising young engineer called Nikhil Dabas decided to see whether he could do better. It turned out, of course, that he could, so I asked him to help us create something even better: a complete integrated installation package that would give people a nice, easy way of building and debugging the Pico-SDK.
Installing the toolchain
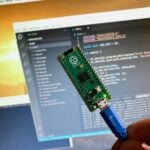
Installing the toolchain is now as simple as downloading, and running, the Pico Installer.
At the end, the installer will offer to clone and build the Pico examples, giving you the option of changing where the examples are installed. Leave that ticked, and the installer will open a command window to do the initial checkout and build of all the Pico repositories. Once done, you can safely close this window.
Starting Visual Studio Code
In your Start Menu, look for the “Pico – Visual Studio Code” shortcut, in the “Raspberry Pi” folder. The shortcut sets the required environment variables and then launches Visual Studio Code.

The first time Visual Studio Code is launched using the Start Menu shortcut, it will open the pico-examples folder. To open the folder later, use the “Open Recent” or “Open Folder” menu options and navigate to your Documents/Pico-v1.5.0/ directory, or wherever you installed the examples.
Building the Hello Serial example
If you previously didn’t have VS Code installed, everything should ‘just work’ after installation. But often we’ve seen problems due to various random settings inserted by other extensions, or by the user, in an existing installation. If this is the case for you, please go to the Pico Installer Wiki for a checklist of known issues and solutions.
Visual Studio Code may ask if you want to configure the pico-examples project when it is first opened; click “Yes” on that prompt to proceed, if you miss the prompt look for the ‘bell icon’ in the bottom right. If it doesn’t ask, you can click on the blue status bar where it says ‘No active kit’ and select Pico ARM GCC.
To build the example, click the CMake button on the sidebar. You should be presented with a tree view of the example projects; expand the ‘hello_world’ and ‘serial’ trees, and click the small ‘build’ icon to build that specific project. You should take a note of the [hello_serial] tag down in the CMake toolbar at the bottom of the screen, you can use this to change the target at any time.
Debugging your example application
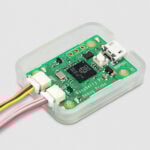
To debug your hello_serial example, you should use the new Raspberry Pi Debug Probe or set up your own PicoProbe using a second Raspberry Pi Pico. If you don’t have a Debug Probe, see Appendix A of the Getting Started guide for instructions on setting up a second Pico as a PicoProbe.

To quickly check you’ve set this up properly, in Visual Studio Code, click on the SERIAL MONITOR tab. When you plug in your Debug Probe (or PicoProbe) you should see an additional COM port in the port drop-down list. You should leave the baud rate set to the default of 115,200 in most cases.
Click ‘Start Monitoring’ to open the serial port.
Let’s start debugging
Assuming you have wired up the Debug Probe to your Pico correctly, press F5 to start debugging or click the Run and Debug button (Ctrl-Shift-D) on the sidebar and then small ‘play’ icon at the top of the debug window.
Your selected target should now be built, uploaded, and started. The debugger interface will load and will pause the execution of the code at the main() entry point. At this point, you can use the usual debugging tools to step, set breakpoints, inspect memory, and so on. Hit “Run”, and you should now be able to switch back to the SERIAL MONITOR tab to see the serial output appear.
Next steps
For more information about creating your own project outside of the pico-examples see the tutorial in the code, or look at Chapter 8 of the Getting Started guide for a full walkthrough.


38 comments
gnom
Nice. But a portable package would be more useful than this multi installer pack.
Raspberry Pi Staff Gordon Hollingworth — post author
What do you mean ‘portable package?’
Do you mean a package that could be ported to different operating systems?
Ed
‘Portable package’ usually means a single archive (zip) that can be put into any folder and run from there, standalone. Not sure there’s a VSCode version that can do that, though. For starters.
Raspberry Pi Staff Alasdair Allan
We’d almost certainly have to build our own versions of almost everything in the installer, and bundle them up ourselves. That would be a huge maintenance burden, and suffer bit rot almost immediately. It’d just not be sustainable, and that’s putting aside things like VSCode that we couldn’t build ourselves.
gnom
Is that really so? There are already portable Git, VS Code and Python releases for windows for example
https://git-scm.com/download/win
https://code.visualstudio.com/docs/editor/portable
https://github.com/winpython/winpython
Alex
VS Code does support portable mode: https://code.visualstudio.com/docs/editor/portable
So, yes, a single archive solution would come pretty handy.
Lars-Gunnar Tengerström
I Try Latest “Easy C/C++ RP2040 Windows Toolchain Installation – Pico-SDK, VSCode & CMake” This does not Work On Windows 11 Home..Why??
Nikhil Dabas
This installer is fairly close to being portable, and isn’t a multi-installer pack. The only installer it runs is Visual Studio Code.
gnom
Ok, so for example if I already have another (older) 3.x version of Python installed this installer will leave that completely untouched? Similarly for Git and everything else? Please clarify such things in the readme.
Fully portable packages enable the use to separate dev environments for different projects and also more easily backup/restore that entire environment later on for reproducible code operations.
Also, consider switching from Microsofts VS Code, which bundles a lot of telemetry, to https://vscodium.com/
Nikhil Dabas
Yes, the installer will not touch the system PATH or any other software you might have installed already. It includes local copies of everything we need for builds, and the PATH and other environment variables are set up when you launch VS Code/Command Prompt/PowerShell using the Pico-specific shortcuts.
Tcginda
Do we have the same for Mac os ?
Raspberry Pi Staff Gordon Hollingworth — post author
No. This is Windows only.
Jack Chaney
Is there a Version that runs on Pi4 32bit?
Raspberry Pi Staff Alasdair Allan
See Chapter 1 of the Getting Started guide. You’re looking for the
pico-setupscript.a Windows User
Awesome news! when upgrades become avaiable, will it happen automatically? Also, does it have included a FreeRTOS port or is it necessary to manually include it?
Nikhil Dabas
Upgrades are not currently automatic. FreeRTOS is not included, you can clone the repo yourself and set FREERTOS_KERNEL_PATH.
Alex
I gave the in installer a try yesterday and it worked pretty well. Like you promised my VS code’s installed plugins conflicted with the new ones, added by the installer. Fortunately, VS Code supports profiles now, so I created a new profile ‘Pico’ and installed recommended plugins there. It worked seamlessly after that, just pressing F5 I was able to debug Pico’s apps using new Pi Debug Probe, which is amazing. Serial output works well as well.
Peter
Would love to see this for Rust!
Isaac
Is it possible to use older versions of the sdk with the new installer?
Raspberry Pi Staff Alasdair Allan
No, sorry. Although once the installer is run you could roll back the git repo I guess to a previous version if that’s what you want?
György Reisch
First of all, many thanks for this Windows based SDK installer, long ago waited for it.
Secondly, a step-by-step guide would be very nice, especially for beginners. I mean, not everyone understands the CMake, VSCode, and how to debug C/C++ codes on the Pico.
I have experiences how to write C/C++ programs on Windows systems using the Visual Studio but I never used CMake or VSCode, and I have very limited experiences on Linux opsyses.
I tried to modify and compile an example (the one which blinks the LED), but I can’t, neither from VSCode, nor from the command prompt.
So actually the start steps takes me so many wasted time, and so many google searches, and I can’t focus to my work, to my project.
Raspberry Pi Staff Alasdair Allan
You’re looking for the getting started guide which walks you through getting started with C on Raspberry Pi Pico.
Michael LeitchDevlin
I did a clean install and it all seemed to work EXCEPT that when I tyry to do anything I get the error.. ‘ The error log is empty but twxs:cmake extension has this message . I am stuck… where do I go from here?
Michael LeitchDevlin
Sorry that got mangled. The error is [cmake] — Configuring incomplete, errors occurred!
and the message is: Cannot register ‘cmake.cmakePath’. This property is already registered.
James Hughes
Hi Michael, please post your question on the forum, you will get a better response there.
Dennis Mabrey
I had a “5 step process” for doing this on Windows that wasn’t all that bad. If 7th-12th graders could follow it successfully I figured it was good enough.
I will give this a try… if it works and I can still debug we’ll switch to this for our future Pico classes.
Dennis Mabrey
The instructions for creating a new project did not exactly work correctly for me. Copying the .vscode folder to the new project folder using the copy command in Power Shell did not copy the files in .vscode… just the directory was copied but there were no files.
Instead I used:
Copy-Item -Path ${env:PICO_EXAMPLES_PATH}\.vscode -Destination “.” -Recurse
Rich Blomseth
I have been developing C/C++ apps for a Pico using VS Code on Windows with PlatformIO, and the Pico target selected in PlatformIO. If I install your new package will there be conflicts with the Pico support in PlatformIO?
Raspberry Pi Staff Liz Upton
It’s possible. If you’ve got a working setup, I wouldn’t mess with it yet; we haven’t tested against PlatformIO, and there will be a lot of similar-looking things installed there.
Paul Kennedy
Sorry that I am a dunce but having a problem with Visual Code pico install, when building the Cmake examples I get this error that I just don’t know what to change. Any ideas?
[{
“resource”: “/C:/Program Files/Raspberry Pi/Pico SDK v1.5.0/pico-sdk/lib/tinyusb/examples/host/msc_file_explorer/CMakeLists.txt”,
“owner”: “cmake-configure-diags”,
“severity”: 8,
“message”: “CMake Error at C:/Program Files/Raspberry Pi/Pico SDK v1.5.0/pico-sdk/lib/tinyusb/examples/host/msc_file_explorer/CMakeLists.txt:13 (add_executable):Cannot find source file:\n\n /lib/fatfs/source/ff.c\n\nTried extensions .c .C .c++ .cc .cpp .cxx .cu .mpp .m .M .mm .ixx .cppm .h\n.hh .h++ .hm .hpp .hxx .in .txx .f .F .for .f77 .f90 .f95 .f03 .hip .ispc”,
“source”: “CMake (add_executable)”,
“startLineNumber”: 13,
“startColumn”: 1,
“endLineNumber”: 13,
“endColumn”: 10000
}]
Raspberry Pi Staff Gordon Hollingworth — post author
Can you please open an issue here:
https://github.com/raspberrypi/pico-setup-windows/issues
Providing a little more information:
What Windows version
Exact steps to reproduce the problem (i.e. which buttons you pressed)
Daniel
Doesn’t work for me at Windows 11. At least, installation of examples failed (no powershell command -> you mean pwsh?)
Pico – vscode does not run anything.
So the only thing left is a worse feeling if my vscode installation still works and what else got destroyed on my machine.
Raspberry Pi Staff Gordon Hollingworth — post author
Can you please open an issue here:
https://github.com/raspberrypi/pico-setup-windows/issues
Providing a little more information:
What Windows version
Exact steps to reproduce the problem (i.e. which buttons you pressed)
I’m guessing this may be due to a powershell version issue or some difference in the way in which your Windows 11 is installed in comparison to our testing.
Joseph Tannenbaum
I must be dumb. Any example I try goes to Blink. How do you close it to open another?
Raspberry Pi Staff Gordon Hollingworth — post author
Joseph,
At the bottom on the screen there should be a little thing that says [blink] if you click on that you should be able to select a different target to build and run.
Or you can press Ctrl-Shift-P (which is the magic VSCode way of opening the command palette) and type cmake then look for the “Set Debug Target” command
Seth
Sadly Bitdefender doesn’t like this. Once installed, if you launch pico-vscode from the start menu, Bitdefender will quarantine explorer.exe.
Mark Gamble
Awesome work! This makes the Pico (itself a great piece of engineering) so much more accessible to students. Thanks so much!
Armin Stamm
Just did a new install on Windows 10. Everything worked, including the building of all examples, Except the ones in the new Pico-W folder. Also, I do not have the build icon at the bottom which should allow me to build the current example I have open. But when I right click and select build on the left file in the tree, the build starts and then stops with a code 0 but states: “[build] ninja: no work to do.” Could this be an issue with the new SDK that now contains the pico-w folder?
Comments are closed