New: Remote updates on Raspberry Pi Connect
Raspberry Pi Connect is a secure and convenient way to access your Raspberry Pi remotely from anywhere in the world. I like it because it works behind firewalls and doesn’t get confused when the device is given a different IP address — a common occurrence here at Pi Towers. The remote desktop functionality is great, but a CLI guy like me secretly prefers the more recent remote shell feature; it’s much snappier and doesn’t take up loads of screen space on your host computer. And best of all, for both kinds of connection, the client software can be whatever browser you have available.
Now it’s time to take the next step in the evolution of Raspberry Pi Connect. For the last six months, we’ve been working away at a brand-new capability: remote updates. The goal is simple enough — to make updating the software on your devices as straightforward and convenient as possible.
An update about updates
Connect users can already update their devices in the same way they update any Raspberry Pi, either by using the ‘Software Updates’ icon in the toolbar or by running one of the update commands (apt upgrade, etc.). Now, with remote, ‘over-the-air’ updates, users can trigger software updates without opening a Connect session. And, because the update is managed through the Connect servers, the device doesn’t even need to be switched on at the time — Connect will pick up the update when it is next online.
Before going any further, here is some terminology we use when talking about the remote update process:
- Artefact: The package that contains the software update or the instruction to perform the update (“artifact” in some varieties of English)
- Deployment: The instruction to install an artefact; the same artefact may be installed repeatedly, but each installation will be considered a unique deployment
Step by step
Follow these steps to perform a remote update via Raspberry Pi Connect (you must be running a Trixie version of Raspberry Pi OS):
1. Install the latest rpi-connect package and the new rpi-connect-ota package:
$ sudo apt update
$ sudo apt install rpi-connect rpi-connect-ota
Or, if you’re using rpi-connect-lite:
$ sudo apt update
$ sudo apt install rpi-connect-lite rpi-connect-ota
2. Enable experimental remote updates using the rpi-connect CLI, entering your password when prompted:
$ rpi-connect ota on3. Create an artefact (or find one created by somebody you trust).
4. Put the artefact somewhere accessible to the device(s), which will install it via a URL (it doesn’t need to be accessible to the Connect servers). For a public artefact, steps 3 and 4 will have already been done for you.
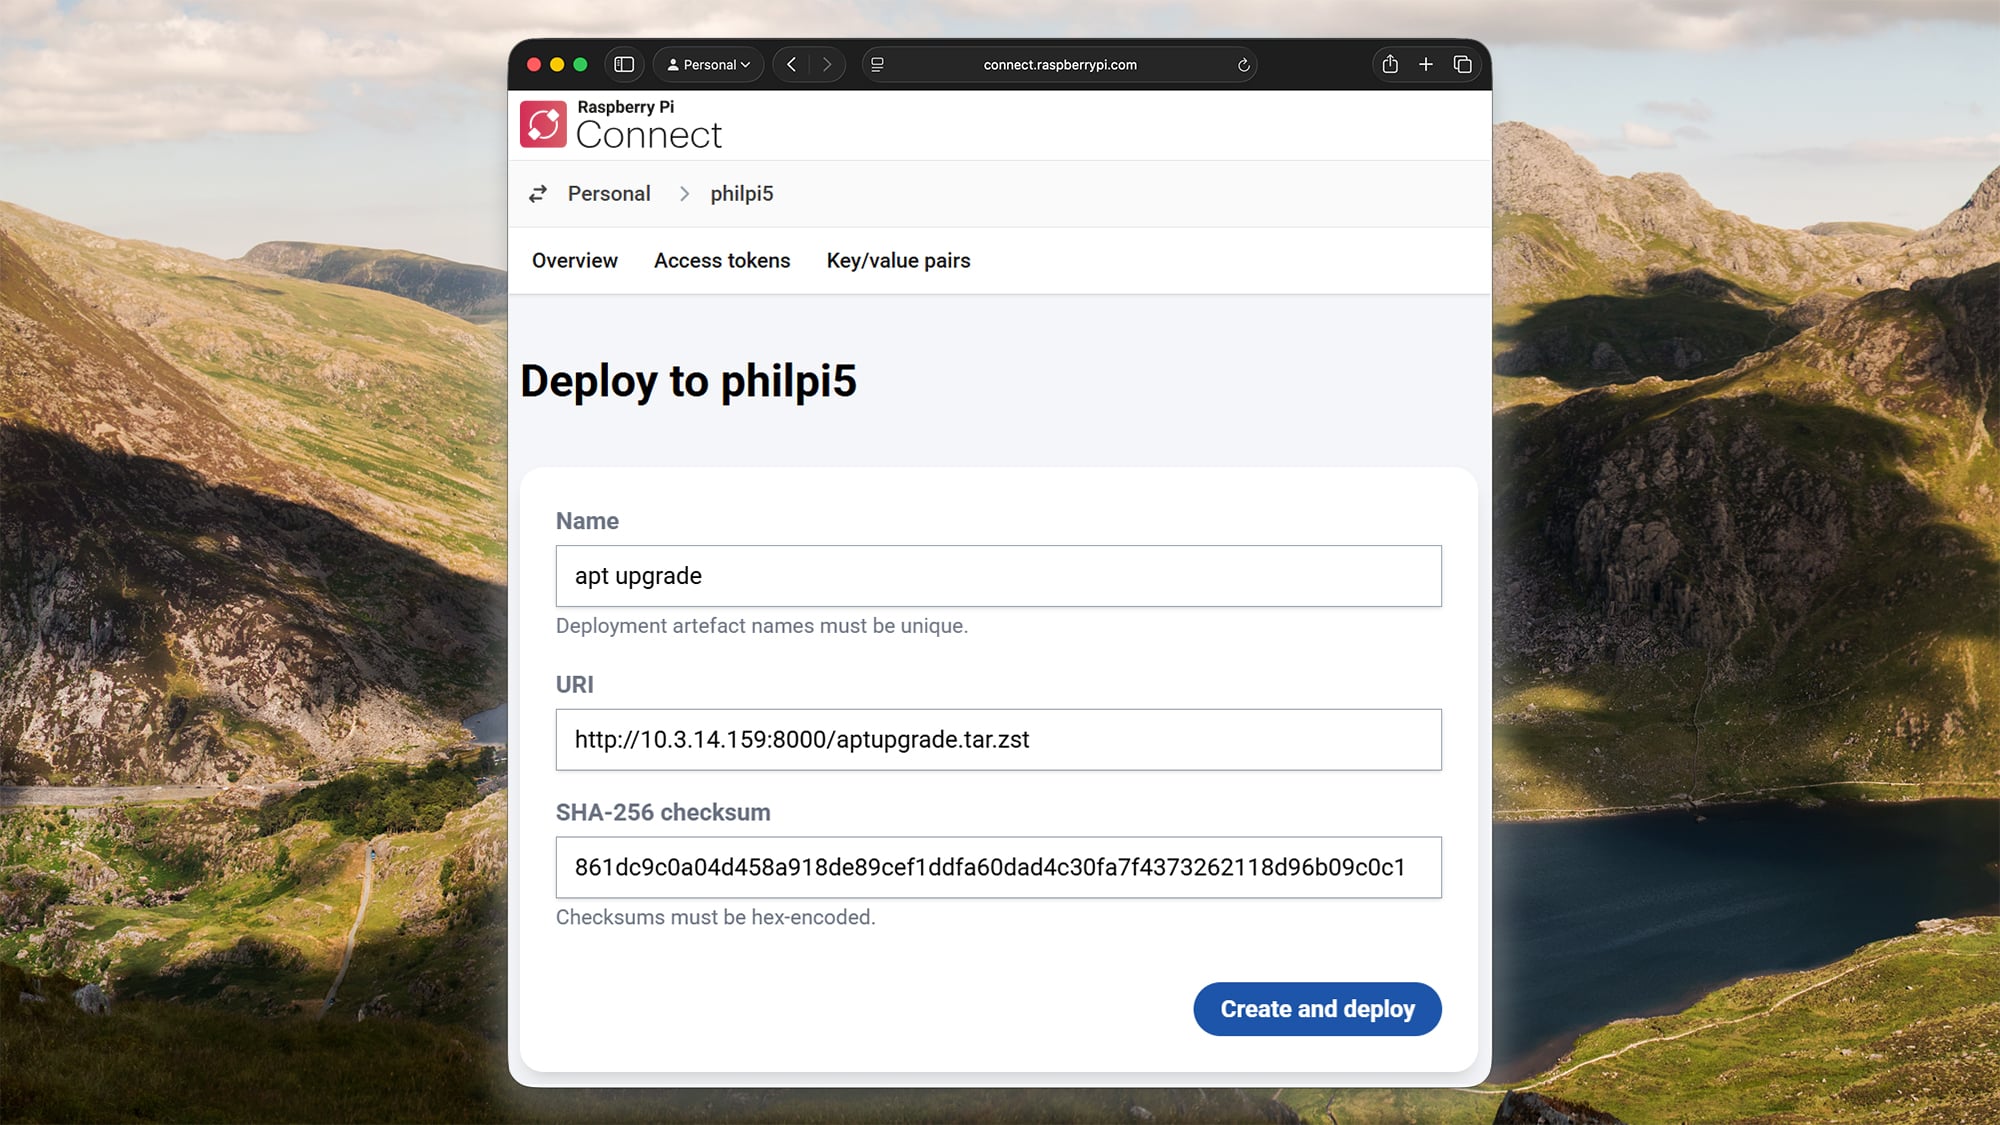
5. Register the artefact on the Connect website, along with its SHA-256 checksum, to ensure that it hasn’t been corrupted or tampered with.
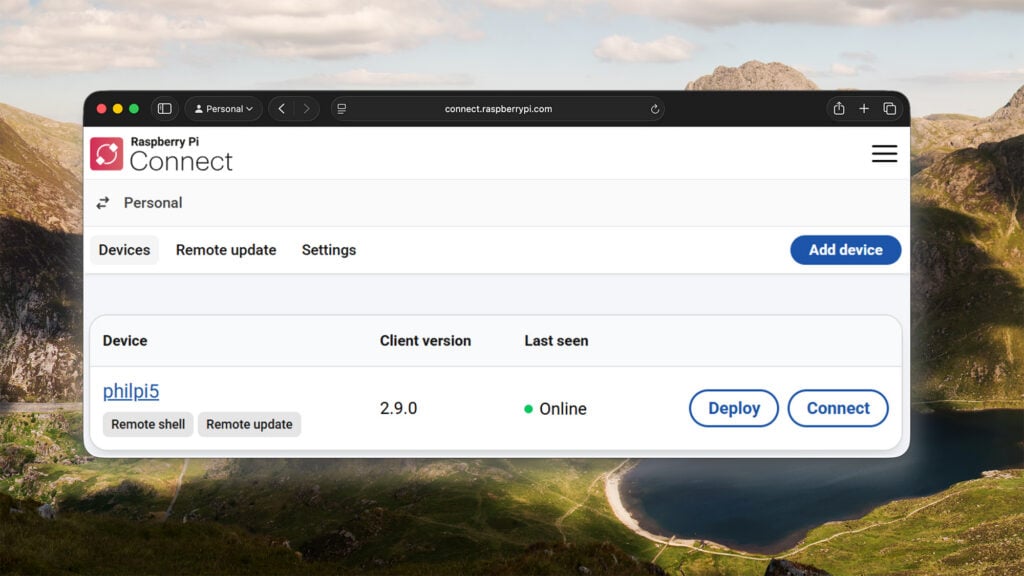
6. Use the ‘Deploy’ button to send a deployment to your device(s); the artefact can be used repeatedly and for multiple devices.
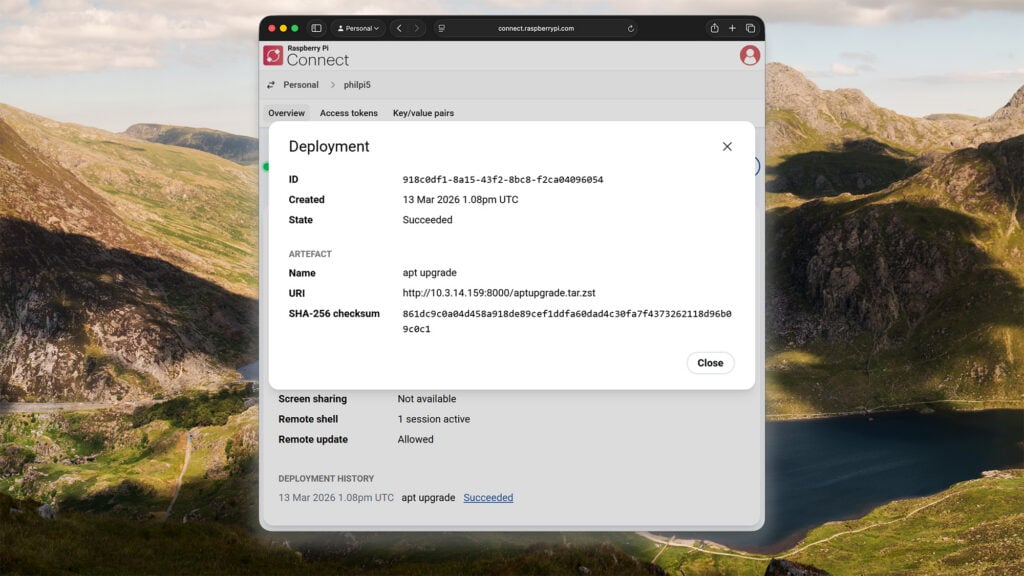
At this point, the deployment will show as ‘Pending’. If the device is online, it will immediately change to ‘In progress’, rebooting at the end if needed. Once completed, the deployment should show as having ‘Succeeded’ (a page refresh may be necessary). In the event that something goes wrong, the status will read ‘Failed’, and clicking on it will reveal an associated error message. Pending deployments can be cancelled manually, or automatically when another deployment is queued up.
From A to B
Some remote devices are more remote than others — sat in the loft, stuck up a tree, or installed at a relative’s house — and the last thing you want is for them to fail to come back online after an update. This is especially true for appliances and other devices with minimal user interfaces, none of which are about being a computer. Scenarios like these call for a means to try an update, as well as a way to automatically retreat back to safety if it doesn’t work out.
The only sure-fire way to do this is to have space for two versions of the software on every device: the active version, and the space (or slot) where the other will go. This is commonly referred to as an A/B scheme, in which every update swaps the roles of the two slots — slot A goes from active to other (or vice versa), and slot B goes in the opposite direction. The clever part of this system, the part that protects against bad updates, is the device’s ability to reboot into the other slot without permanently flipping the switch. If the boot is successful, the device can commit to making the new slot active. If, instead, the software crashes or reboots spontaneously, this can be detected and the swap can be abandoned.
An A/B update scheme relies on some simple hardware features, including a small amount of state that can survive a reboot (but not a power cycle), and a watchdog that can trigger a reboot if the software fails to give it attention. All Raspberry Pi devices have these features. Unfortunately, OS images also need to be created with these slots, and with extra partitions for data that should persist across updates. This has not been the case for any released OS that we know about to date (though Dave Jones at Canonical has discussed his plans for future Ubuntu releases).
For developers basing their products around Raspberry Pi hardware, our rpi-image-gen tool makes it relatively easy to create images with this A/B structure. This forum post, written by our web guru Paul Mucur, describes the process and how to use the result to deploy remote/over-the-air updates on Raspberry Pi Connect.
Just do it
Up until this point, artefacts and deployments have been described in terms of software updates, but they can also include arbitrary tasks to be performed on your devices. An artefact can contain one or more scripts to execute, along with data files that these scripts can use. These scripts are run as root so that they can access all of the file systems. I’ve already referred to running apt upgrade, but for custom software updates, you could create an artefact containing a .zip file and a script to extract its contents. Alternatively, it could just do something simple, like triggering music playback or turning on an LED.
To demonstrate how simple it can be to create your own artefacts, here’s a walkthrough of the process:
1. This is what an apt upgrade artefact might look like:
#!/bin/sh
export DEBIAN_FRONTEND=noninteractive
apt update
if apt -y -o DPKG::Options::="--force-confnew" upgrade > output.txt; then
    if [ -r /var/run/reboot-required ]; then
        echo Rebooting to finish the upgrade
        exit 2 # EXIT_REBOOT
    fi
else
    echo Upgrade failed:
    echo
    cat output.txt
    exit 1 # EXIT_FAILURE
fi
echo Upgrade complete
exit 0 # EXIT_SUCCESS
The main upgrade command needs some persuasion to run non-interactively. Place it in a file called aptupgradescript.
2. Create a YAML control file called aptupgrade.yaml to go with it:
# Run apt upgrade on a remote device
artefact:
  name: aptupgrade
  version: 1.0
  device_type: rpi

payloads:
- name: aptupgradescript
  type: script
3. Run the otamaker utility to turn this into a Zstandard-compressed artefact:
$ otamaker aptupgrade.yaml
Contents:
  _contents_.yaml
  aptupgradescript

Artefact: aptupgrade.tar.zst
SHA256:   861dc9c0a04d458a918de89cef1ddfa60dad4c30fa7f4…
4. Find your host computer’s IP address on your local network:
$ hostname -I5. Run an HTTP server on your host — this wouldn’t normally be the device targeted for update, but it will work if you only have one Raspberry Pi:
$ python3 -m http.server 8000 --directory .6. Press the ‘Create and deploy’ button to create a new artefact on the Connect server, using your own IP address and SHA-256 values:
7. The new artefact will be automatically deployed to your device. Give it some time to run — it may need to reboot at the end.
Just the facts, ma’am
The otamaker utility will ship as part of the rpi-connect-ota package. However, for anyone building artefacts on a non–Raspberry Pi platform, it is also available to download from our ‘utils’ repository on GitHub. There, you will also find some preliminary documentation on the syntax and features of the artefact description files and scripts.
And finally
I hope this has given you a feel for what Raspberry Pi Connect’s remote updates feature can do. It’s still in beta, and there are a number of obvious limitations, the largest being the lack of an easy way to retrieve outputs from any scripts that run. An interim workaround is to use remote shell to log in, and then:
$ journalctl -t rpi-ota-connector… to read the script output.
Ideas for the future include creating and hosting some common public updates, such as an official apt upgrade. There will also be careful integration with Connect for Organisations, along with its device-filtering capabilities; being able to update a fleet of devices in just a few clicks is a superpower I need.


20 comments
Jump to the comment form
Anders
It is not obvious to me why I would choose to do an OS update this way rather than other simpler ways to do achieve the same result, including having it automated.
Raspberry Pi Staff PhilE — post author
Are there any simple ways to do software updates on headless or hard-to-reach devices? Behind a firewall?
Anders
Raspberry Pi Connect?
I can see how this might help if I was managing a large fleet of signage Pis etc if I hadn’t already deployed Ansible.
Ron de Jong
What’s wrong with:
sudo apt install -y unattended-upgrades && sudo dpkg-reconfigure -plow unattended-upgrades
or a simple cronjob with:
apt update && apt upgrade -y && apt autoremove -y
Raspberry Pi Staff PhilE — post author
Nothing at all, if your requirement is just to keep your packages updated. The emphasis here is more on the remote management side, and script execution as a stepping stone to full A/B updates.
bensimmo
Why are people fixated on the other ways to update, surly that is just an example and one that allow people to do it if they want manual update periods but can’t be bothered to log into 5 Pi’s to do it.
Remember this is all over Connect, so no SSH or VNC etc available.
It could be an rpi-update push for beta testing
It could be installing a bit of software on each Pi
It could be a raspi-config setting, say turning on i2c across several device, I don’t know why but it could be.
You have these general ‘artefacts’ and you just pick them and do.
It could be a bulk new user setup along a load of computers, could even be apply restrictions to loads of them too. Especially if you can select an artifact, and then select a bulk of Pi (a batch?)
Of course I’ve not tried it yet, it looks complicated to use and needing to learn bash scripting for the DIY side.
P.S. Anyone updating rpi-connect or installing rpi-connect-ota over Connect itself, remember to use ‘screen’ or similar, you can reconnect with a click of the button easily.
Anders
Nobody is fixated on anything, just trying to understand the use cases. Maybe it’s better sold as remote script execution rather than the first impression as just for updates. If you’ve got 80/443 open for connect and apt then the firewall is no barrier to anything.
g_
I’m confused as to how the connection works. Is there a reverse shell or smth? I’m hit behind CGNAT, don’t need my Pi’s chatting with some random command server. I’ll stick to doing it on my own automatically via custom system services
bensimmo
Look it up
https://www.raspberrypi.com/software/connect/
and many blogs, but was the first I think, changed a little since then https://www.raspberrypi.com/news/raspberry-pi-connect/
Andrew Jorgensen
You said, “the client software can be whatever browser you have available,” which gives me a glimmer of hope for what else it can be. I’d love to have a CLI client for Connect that I could use without a browser, like I have with similar cloud services from AWS and GCE.
Raspberry Pi Staff PhilE — post author
I’ve briefly asked about such a facility – something like ssh but using the Connect mechanism for authentication and getting through firewalls – and the reaction wasn’t an immediate yes. I think there would be a number of challenges, including supporting many different client platforms, but it’s on the list of nice-to-haves.
David Goadby
Can this mechanism also be used to remotely update user applications rather than standard apps?
Raspberry Pi Staff PhilE — post author
The short answer is yes – the scripts can do whatever you want. If it’s simply a case of copying some files than it should be fairly straightforward, and because you aren’t changing the OS or Connect itself you should be able to get yourself out of any trouble.
Stavros
Since you are moving to this yaml-like artifact approach…why not just run Ansible (Jeff Geerling will love this)? Sure, it will be for more advanced users but way, way more powerful than a script.
Raspberry Pi Staff PhilE — post author
Ansible looks powerful, but also complicated. If you are an existing Ansible user then Connect Remote Update may not be of interest, but for a Connect user I think Remote Update is a simpler proposition. It’s also a smaller footprint – 22MB (170kB if Connect is already installed) vs 220MB (plus dependencies).
Anders
If your infrastructure is Raspberry Pi only. If you are managing various different breeds of device then Connect OTA is in addition to likely existing Ansible.
Richard
Nice idea.
Once this tool has ran, then you could run my Remote Linux Administration and manage a whole fleet of Raspberry pi’s in one go with this :-
https://hackaday.io/project/204282-remote-linux-manager
SteveK
Great feature! Are you planning, and if not could you consider to plan, to extend Connect and OTA to Pico W’s? I’d planned to write my own OTA, building on the Pico web server architecture that I’ve developed.
Will
Neat, but what I’d really like to see is multiple monitor support on the screen connect. Only being able to see the primary monitor on a dual monitor setup is, far from ideal. And third party remote control wayland support is abysmal.
Pipuppy
OK, this sounds interesting and I have read the full article and all the comments posted below but still dont’ understand how this is any better than using raspi-connect, opening a terminal window and entering sudo apt-get update etc? I admit to not beiing a computer guru so could someone kindly explain in simple terms how remote-updates-on-raspberry-pi-connect would be advantageous over the sudo apt-get update etc.