Make your own custom LEDs using hot glue!
Tired of using the same old plastic LEDs in your projects? It’s time to grab a hot glue gun and some confectionary moulds to create your own custom LEDs!
Blinky LEDs!
Lighting up an LED is the standard first step into the world of digital making with a Raspberry Pi. For example, at our two-day Picademy training events, budding Raspberry Pi Certified Educators are shown the ropes of classroom digital making by learning how to connect an LED to a Pi and use code to make it blink.
Blinking LED Light @Raspberry_Pi #picademy! pic.twitter.com/zhTODYsBxp
— Anastasia Hanneken (@21stcentlib) June 21, 2018
And while LEDs come in various sizes, they’re all pretty much the same shape: small, coloured domes of plastic with pointy legs that always manage to draw blood when I grab them from the depths of my maker drawer.
So why not do away with the boring and make some new LEDs based on your favourite characters and shapes?
Making custom LEDs with a whole lotta hot glue
The process of creating your own custom LEDs is pretty simple, but it’s not without its risk — namely, burnt fingertips and sizzled LEDs! So be careful when making these, and supervise young children throughout the process.
The moulds
I used flexible ice cube trays, but you could also use chocolate moulds. As long as the mould is flexible, this should work — I haven’t tried hard plastic moulds, so I can’t make any promises for those. Also be sure to test whether your mould will withstand the heat of the hot glue!
Check your LEDs
Before you submerge your LEDs in hot glue, check to make sure they work. The easiest way to do this is to set up a testing station using a Pi, a breadboard, some jumper wires, and a resistor. To save having to write code, I used the 3V3 pin and a ground pin.
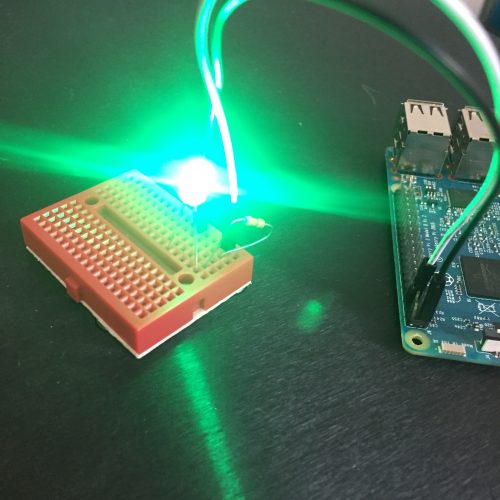
Remember, the shorter of the two legs connects to the ground pin, while the longer goes to 3V3. If you mix this up, you may end up with a fried LED like this poor LEGO man.
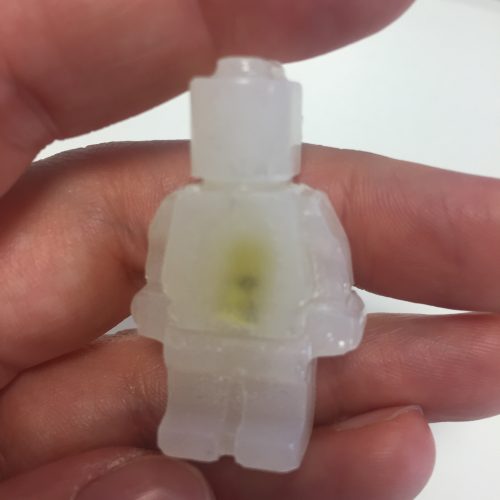
Everything isn’t awesome.
Once you’ve confirmed that your LED works, bend its legs to make it easier to insert it into the glue.
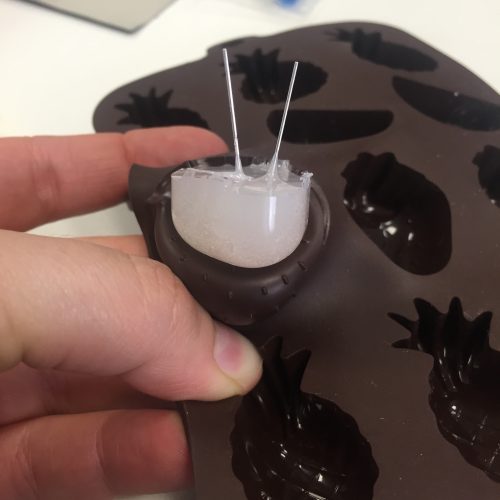
Glue
Next, grab a hot glue gun and fill a mould. The glue will take a while to cool, so you have some time to make sure that all nooks and crannies are filled before you insert an LED.
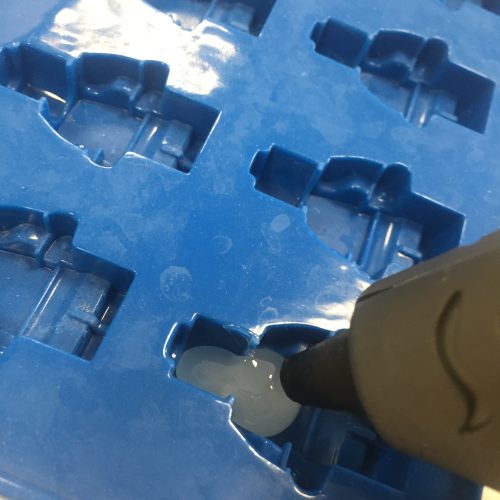
Tip: test a corner of your mould with the tip of your glue gun to check how heat-resistant it is. One of my moulds didn’t enjoy heat and began to bubble.
Once your mould is properly filled, push an LED into the glue, holding on to the legs to keep your fingertips safe. Have a wiggle around to find the bottom and sides of your mould and ensure that your LED is in the centre.
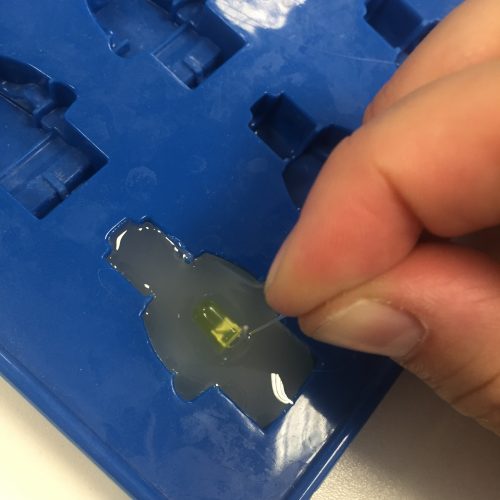
Pick a colour best suited to your mould. You could try using multiple LEDs on larger moulds to introduce more colours!
You may notice that the LED tries to sink a little and the legs begin to drop. Keep an eye out and adjust them if you need to. They’ll stop moving once the glue begins to set.
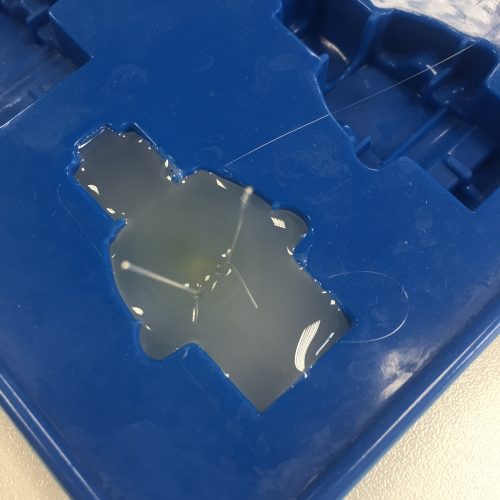
These took about ten minutes to cool down.
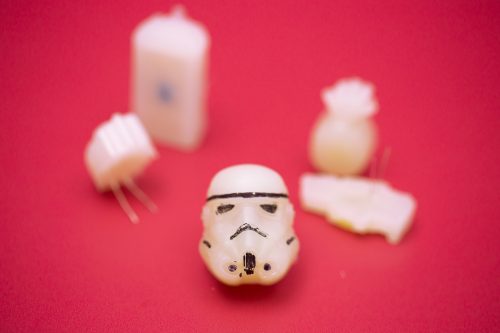
Be patient
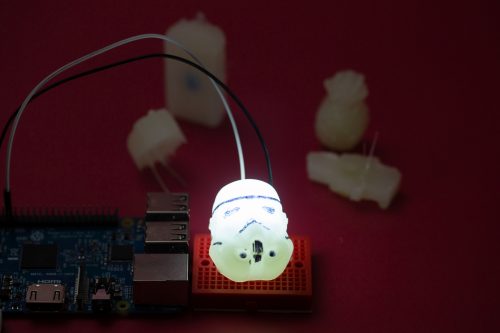
Don’t rush. The hot glue will take time to cool down, especially if you’re using a larger mould like the one for this Stormtrooper helmet.
Here I used a gumdrop LED, which is larger than your standard maker kit LED.
You’ll know that the glue has set when the shape pulls away easily from the mould. It should just pop out when its ready.
Pop!
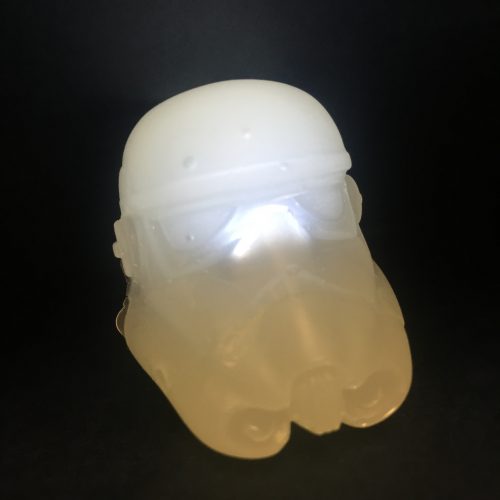
Light it up
Test your new custom LED one more time on your testing rig to ensure you haven’t damaged the connections.
As with all LEDs, they look better in the dark (and terrible when you try to take a photo of them), so try testing them in a dim room or at night. You could also use a box to create a small testing lab if you’re planning to make a lot of these.


Now it’s your turn
What custom LED would you want to make? How would you use it in your next project? And what other fun hacks have you used to augment tech for your builds?


18 comments
Alex Bate
I can’t stop making these. I just made a set of Pac-Man LEDs without a project idea to add them to. HELP!
M Daniels
Alex, cool idea!
Please note the moulds are made from silicone, not silicon. Also, the leg length is not a reliable indicator of polarity, neither is the shape of the legs inside the encapsulation. The only reliable ways to determine LED polarity are:
a) the manufacturer’s data sheet
b) a polarity test with a meter or test setup
You almost certainly will not destroy or damage an LED with a reverse polarised supply of only 3.3 V. Most LEDs will withstand reverse bias of at least 5 volts, usually considerably more.
Now, I’m off to dig out my 550 watt hot glue gun and bag of glue pellets! ;)
Helen Lynn
Honestly, none of us have encountered an LED where leg length doesn’t accurately indicate polarity the conventional way round. I think that if you tried selling LEDs with the longer leg not identifying the positive pin, customers would be pretty unenthusiastic about them, however clear your datasheet.
James Milton
I have, and I wish I knew before that there are some LEDs with difference in leg length the other way round, you spend hours debugging your circuit due to misplaced confidence in led orientation. Rare, but worth knowing it can happen
M Daniels
Helen Lynn, I have been working with LEDs for over 40 years and can assure you that leg length is definitely NOT a reliable indicator of polarity. The internal structure of the LED used to be a more reliable indicator, but when hyperbright LEDs became available the semiconductor was mounted the opposite way round, presumably to aid with heat dissipation.
AndrewS
A raspberry mould, with red and green LEDs embedded inside it? :-)
Alex Bate
I like your thinking! I might have to see what I can make with the 3D printer at Cambridge makespace.
Dale Bartel
I have been thinking along this same line only using casting plastic.
Richard Hall
This is in no way a custom LED, Sally people don’t seem to actually know what an LED is. The LED is the little cool inside the package that actually emits light and takes machines costing hundreds of thousands of dollars to make. You’re putting them in a custom package at best.
Helen Lynn
OK, smarty pants, a customised LED.
Barry
Hahahaa. Love it!
daniel
Off to the 3d printer
I’ve got some ninja flex. I wonder if I could make a raspberry pi shaped mold to embed an LED into :D that would be epic.
AndrewS
I wonder if you could customise these even further by adding glitter etc. before pouring in the hot glue?
AndyW
Yup, you absolutely could (although it would be stuck on the outside of the mould). Now if you were to use Epoxy you could mix it in and have the glitter throughout. @Konichiwakitty(on Twitter) makes awesome LED badges using epoxy!
Raspiham
What a truly brilliant idea! As a radio ham you come across thousands of clever idea’s for “hacks” and customisations but this is one of the most simple, cool and elegant hacks I have seen in ages.
A couple of additional thouts, it’s probably a good idea to do this in a well ventilated area if working with copious amounts of hot melt glue. Also, LED,s with non conforming leg polarity are quite common.
Can’t wait to try this :-) Thanks for sharing.
dinomite59
I like the smell of hot glue
William
Maybe you could make a raspberry Pi case that lights up!
Cameron
I wonder if you could add food dye to the hot glue to give it some colour?
Comments are closed