Get VMware on Raspberry Pi
Hacking apart a sweet, innocent Raspberry Pi – who would do such a thing? Network Chuck, that’s who. But he has a very cool reason for it so, we’ll let him off the hook.
He’s figured out how to install VMware ESXi on Raspberry Pi, and he’s sharing the step-by-step process with you because he loves you. And us. We think. We hope.
Get cutting
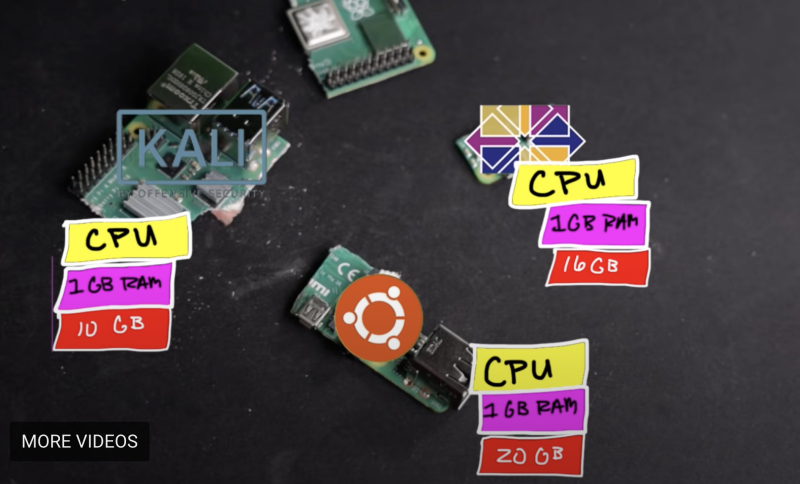
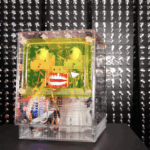
In a nutshell, Chuck “hacks” apart a Raspberry Pi to show you how it can operate as three separate computers, each running different software at the same time. He’s a wizard.
VMware is cool because it’s Virtual Machine software big companies use on huge servers, but you can deploy it on one of our tiny devices and learn how to use it in the comfort of your own home if you follow Chuck’s instructions.
What do you need?
- Raspberry Pi 4 (4GB or 8GB RAM)
- Network Chuck recommends this kit: https://geni.us/BmCeEgp
- Network Chuck recommends this kit: https://geni.us/BmCeEgp
- 2 USB flash drives
- A small one (16GB or smaller): https://geni.us/DJdC
- A big one (64GB or larger): https://geni.us/UAoi3H
Make sure you’re up to date
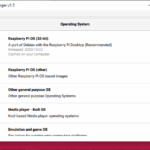
Firstly, you need to make sure you’re running the latest version of Raspberry Pi OS. Chuck uses Raspberry Pi Imager to do this, and the video above shows you how to do the same.
Format your SD card
Then you’ll need to format your SD card ready for VMware ESXi. This can be done with Raspberry Pi Imager too. You’ll need to download these two things:
Chuck is the kind of good egg who walks you through how to do this on screen at this point in the project video.
VMware installation
Then you’ll need to create the VMWare Installer to install the actual software. It’s at this point your USB flash drive takes centre stage. Here’s everything you’ll need:
- VMWare Installer ISO
- Tools to create the VMware Installer:
And this is the point in the video at which Chuck walks you through the process.
Once that’s all done, stick your USB flash drive into your Raspberry Pi and get going. You need to be quick off the mark for this bit – there’s some urgent Escape key pressing required, but don’t worry, Chuck walks you through everything.
Create a VM and expand your storage
Once you’ve followed all those steps, you will be up, running, and ready to go. The installation process only takes up the first 15 minutes of Chuck’s project video, and he spends the rest of his time walking you through creating your first VM and adding more storage.
Top job, Chuck.
Keep up with Chuck

Network Chuck live-streams every Monday on his YouTube channel, and you can follow him on Twitter too.
There’s also the brilliant networkchuck.com.

34 comments
Ross Reedstrom
Please be clear – there is no need to cut a Pi 4 apart, this is a guide to installing virtualization software on the Pi4. Particularly bad, under “Get Cutting” your statement “In a nutshell, Chuck hacks apart a Raspberry Pi, turning it into three separate computers, each running different software at the same time.” is just factually wrong. Adding “virtually” before “hacks apart” seems to be the only way to rescue the sentence.
Raspberry Pi Staff Ashley Whittaker — post author
Gooooood point. Changed it. ?
Mark Daniels
Sorry, the whole post is still just nuts. Your change has not clarified things, as as all the photos and videos still show a Pi being hacked apart. The labelled image titled “More Videos” doesn’t help. This has to be the worst post I’ve seen on this site. I had to re-read it to make any sense out of it whatsoever. I might politely suggest re-writing it completely and getting rid of the chopped up Pi photos and videos.
hermes
Chill, if you didn’t understand the article or that no pi’s need to be harmed in the making of a mini esxi server that’s your problem, not an excuse to bash someone writing an article..
Amin Serajfard
great job. thank you raspberry pi.
Alex Ellis
Thank you, this made the VMW stock bump by a dollar and saves me trying it out! :-)
Btw.. folks who’ve worked there will be familiar with the stylised version of the name: VMware
Joe Lark
So how are the labels “useful” in explaining what each part of the Pi is capable of? They are all just lists of Pi specs.
Loreto Dullebawn
R.I.P that Raspberry Pi
Nik Due
Why is this site making advertising for VMware alone?
Why is there no comment to KVM, PROXMOX, XEN, …. ?
WMware is not OpenSource or did they changed their policy?
Or do they only want settle their standard at the next generation?
Gert
Hi Nik,
It is the only hypervisor with such an easy to use web interface and low footprint.
And if you leave out al special VMware tools, (only esxi) free to use.
Virtual ghetto demonstrates the other way around. Virtual raspberry pi in esxi 7?
Uwe
Proxmox Webinterface is even better but it does not support Raspberry Pi (yet)
Mikael Bonnier
I don’t like the senseless destruction of computers. It’s like killing animals for fun. Equally immoral. If you have a Raspberry Pi you don’t need you should give it to someone who needs it or sell it.
nakwada
Maybe it was already fried.
Dima
Keep cool dude. There is enough pain on this earth, no need to lose it over such a trivial subject.
Joe
Will there ever be a tutorial on QEMU. It can directly translate between arm and x86 with no x86 emulator needed. The only problem it that it is difficult to use.
Fengzi
Thank you for the tutorial! I’ve successfully cutted my pi, what’s next?
fanoush
You put stickers on it and then let it run.
If it doesn’t work then you need to cut cpu and ram better so each piece have some as described.
TapNorX
So U tell me i dont have to cut my RPi into parts?
Steve Michels
I found the article interesting and amusing! Cannot wait to try this out! Thank you! Jolly good job, in my humble opinion.
JBeale
Not to pile onto the alarmist take on this computer “hacking” (sorry) but I was surprised to find recently that old, used Model 3 Pi boards are not just being offered, but actually selling on ebay for $20 to $30. I believe the Pi is holding its value better than most so-called real computers.
Mikael Bonnier
Raspberry Pi 3B, 3B+, or 3A+ are useful for Pi1541 and rpitx.
Ken Mullins
Nice to know the pi can run ESXi. I would say its a little underpowered to run it though, especially running multiples VM’s at the same time. You’d be better off buying an old server at auction, in my case a Dell 720 with an E5-2600 (12 cores, 24 threads) and 12GB of disk for under AU$100 and install ESXI on that. Then run as many VM’s as you can think of. I run 3xUbuntu, Kali, Win10, Plex Server, OpenHab3, 3CX, BlueIris, FreeNas, Eaton Battery Backup, etc.
Ben
Perhaps if your use-case requires lots of VMs, but even then I’d suggest considering power usage. I imagine a server from an auction uses a couple of orders of magnitude more power than a Raspberry Pi…
Bill Tinsley
I can’t believe people actually thought he was cutting up a Raspberry Pi. :o)
Marty
For me it would be more interesting to have Raspberry(Raspbian) on Vmware or Virtualbox
Trey
Neither of those supports emulating ARM hardware on x86 computers yet. But Qemu does https://www.instructables.com/Raspberry-Pi-Emulator-for-Windows-10/
Mike
Coming to the article, I genuinely thought that installing VMware somehow required cutting apart a Raspberry Pi. The first sentence and the first image in this article imply this.
arizona.smith
I have been having an issue with this working. I can get it to work on a Raspi 4 4GB, but on a Raspi 4 8GB I can’t get the esc to work on boot up, so I cannot change any settings on the raspi after making the three disks. Any and all help is much appreciated.
Coffee
Thanks for VMWare ESXi. I’m running a Nextcloud service in my office Raspberry Pi 4 wit ESXi and ubuntu 20.04 as a vm server for Nextcloud service
chris
From the details on Vmware provides about their “technical preview”:
The ESXi-Arm bits will expire 180 days after installation. You will need to reinstall the bits to reset the clock.
Gregory Thompson
Hey Chuck, thanks for the great instructions and YouTube videos. I was able to successfully in VMware vSphere 7 on my Raspberry PI. The issue I have is my 3″ display is not working even after I update updated the firmware. What am I missing?
Gregory Thompson
How do I turn off UEFI after installing ESXi 7 on the Raspberry Pi4 following your instructions? It appears that none of the my VM’s will boot from the ISO. Changing the firmware BIOS from EFI to BIOS keeps switching back to EFI. What’s going on here
Brandon
Worked out great – once I understood I needed to format the thumb drive with rufus as a gpt partition table instead of an mbr. I couldn’t get the escape key to initiate the eufi menu. That was my only hiccup, other than that great job on the video and I like how you cut the pie to show what a vm is.
Khalid Hakim
Really Nice, Please confirm if I can also install windows on my raspberry Pi using Vmware ESXi for ARM ??, if NO, is it possible or NOT??
Thank You in advanced
Comments are closed