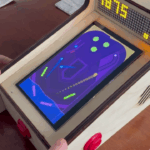
Commodore 64 Raspberry Pi Pico emulator
Despite his job as a software developer, Kevin Vance was new to the world of Raspberry Pi when he began to sketch out plans to revive his old Commodore 64. The retro rebuild of his first ever computer thus became his first Raspberry Pi project. Kevin had been coding since he was young, but only began to immerse himself in the world of digital making as recently as 2020.

Kevin had already started working on making an expansion board for the Commodore when he first learned about Raspberry Pi Pico. “The PIO [Programmable I/O] system sounded really interesting to develop for, and the large flash storage and number of GPIO pins made it ideal for this project, so I started on a new design around it,” he explains. The first iteration of the project had a separate microcontroller, flash memory, and a voltage regulator. Kevin was “pretty excited” when he realised Pico included all of those in one module at a much lower cost.
Moving the goalposts
Originally, Kevin wanted to build a Commodore 64 game cartridge with a microcontroller that the Commodore could offload work to. Having followed Ben Eater’s “excellent” video walkthroughs on creating a 6502 computer on a breadboard, Kevin planned a similar scenario with the 6502 machine code stored on a normal EEPROM. The breadboard he designed for his updated Commodore 64 was only his second ever PCB design. Hand-soldering tiny surface-mount components with a fine-tip soldering iron was “error-prone and required patience,” so investing $16 in a hot plate was “money well spent!”

Kevin wrote brand-new code for his project, with frequent updates since he kept changing how the board worked. As he gained a better understanding of how the Pico’s PIO and DMA controllers could work together, he decided to investigate whether he could use Pico’s RAM instead of an EEPROM. “It worked better than I expected,” he tells us. “The PIO state machine could put data from the Pico’s RAM on the C64’s data bus without involving its CPU, well before the Commodore tried to read it!”
His biggest design challenges were the large number of pins and the Commodore’s signal voltage. “Since this is an old machine with a parallel bus, there are not enough GPIO pins on the Pico to hook them all up. Fortunately, since I’m only emulating a ROM cartridge, I can get away with just 14 address lines, eight data lines, and two control lines”, explains. He added 5V-tolerant buffers to translate the signals for 3.3V so the Commodore 64’s 5V signals would not damage Pico’s GPIO pins.

Pico’s PIO system provided the biggest advantage for this build, allowing him to keep all the complexity off the CPU and run with predictable timing.
He used address decoding to send commands from the Commodore so that reading from a special 256-byte block of memory would send the address as a ‘command’ to Pico’s CPU using the RX FIFO. He cleverly factored in time for the commands to be completed by getting the CPU to signal when it was ready for more commands using the TX FIFO. “This lets the Commodore poll the command status without interrupting the Pico’s CPU,” he explains. “There’s a world of interesting devices that this could allow the Commodore to communicate with” – something he plans to investigate further.

Extension plans
Although Kevin is pleased to have his childhood computer back up and running, he’s still curious about which C64 programs he can use Pico’s CPU for – perhaps games he wrote back when his C64 was new and for which he still maintains code – and what devices he can use from the USB port.

He’s also become a big fan of Raspberry Pi Pico. “It can do so much per clock cycle and, together with the DMA controller, it can function without the CPU at all once it’s been initialised!” He used a second Pico to simulate the C64 bus, speeding up development of the rebuild project. This second Pico may very well become a dedicated microcontroller for automated testing.
If you’re interested in having a deeper look, the project’s GitHub is at https://github.com/cknave/c64-pico-ram-interface – fill yer boots!


8 comments
James Sawle
Great article but no links to Kevin’s project so that we can have a better look, please provide a link.
crisp
Here is the Link to the Project on GitHub:
https://github.com/cknave/c64-pico-ram-interface
K.G.
https://github.com/cknave/c64-pico-ram-interface
Raspberry Pi Staff Liz Upton
Thank you! I’ve updated the post to reflect that.
SolinMark
I am a big fan of Raspberry Pi.
Great Article.
Graham Bartram
Nice. The Raspberry pi has been a great tool for retro fans, not just for running emulators either. This project is a great example, as is the pistorm Amiga project.
ProDigit
I guess you could use the pico, to stream data via the pins, that the 64 cpu just needs to read. That way you probably can introduce continuously variable sprites or background tiles, allowing you to exceed the color and or resolution limitations of the 64.
fanoush
You can’t do that easily as video is done by separate VIC chip but you could emulate VIC or SID to provide better video/audio or do RAM expansion. However there are not enough pins for this and video out on single Pico.
Comments are closed