Code your own top-down Zelda-like | Wireframe #61
Make your own tribute to the land of Hyrule in Python and Pygame Zero. Mark Vanstone has the code in the latest Wireframe magazine, available now.
With 1986’s The Legend of Zelda, Nintendo created an adventure with a level of freedom not seen in its earlier games. As plucky hero Link, players were able to head off in any direction they chose, slashing enemies with their sword and uncovering secrets dotted around the fantastical world of Hyrule. The original game’s success speaks for itself, with an ongoing string of much-loved sequels and spin-offs, while the series, as a whole, has left a lasting impact on game design.

For our Pygame Zero remake, we’re going to focus on the original NES version’s top-down gameplay. We’ll create a map made of blocks that will scroll around as Link explores, and we’ll also add some enemies for him to dispatch with his trusty sword.
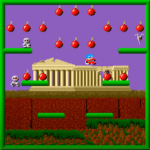
First, let’s generate a Zelda-style map. The screen elements are made up of square blocks arranged in a grid. There are squares for trees, rocks, and other types of terrain, including water. For this example, we’ll stick to a small selection of block types, but you can add extra ones yourself. If you need to find graphics for these sorts of retro projects, spriters-resource.com is worth checking out – the sprites used in our project were created by MisterMike. When designing a map system to represent an area much larger than the screen, we need to store it in a way that isn’t just a huge image, so we break it down into blocks. In this case, we’ll use blocks that are 50 pixels square, and have our visible map area comprising 16 blocks wide and 10 blocks high.
We could hold all our map data in a large two-dimensional list with each block being represented by a number, but that would mean that even for a fairly small map we’d end up with lines and lines of map data which would be boring to type in. A smarter way of storing this data is to represent the whole map in an image 50 times smaller than the actual map, with each pixel representing one block. Our ground is represented by black pixels, our trees by green pixels, while rocks are yellow and boulders are red. Then we can read through the area of the minimap image currently shown on screen and translate that to our map blocks.

When we display our map blocks, we’ll start drawing from 100 pixels down the screen to leave room for a minimap at the top. So all we need to do for our drawMap() function is run through an embedded loop of x and y values to translate the pixel colours (which we read using the image.get_at() function from the Pygame module) into our larger map blocks and blit them to the screen in the correct positions.
The part of the map we’re displaying is controlled by the variables mapx and mapy. If we want to see a different part of the map then we just need to change those values and that area will be displayed on the next draw cycle. To make the map scroll rather than just switch, we have the variables mapScrollx and mapScrolly. If we set the mapScrollx to 16, we can count down with that variable each update cycle and increase the mapx value by one each time. This means that in 16 cycles, the viewing area of the map will have moved 16 blocks to the right. We can use the same process for negative scroll values and for the y axis, but in that case, only scrolling 10 blocks at a time.
Hero time
Now we’re ready to add our hero. Link will be represented by an Actor object which we start with in the first frame of animation and place him somewhere in the middle of the play area. We draw Link each frame in the draw() function, but we’ll want to add some extra code in a function called drawChars(). To get Link to move around the map, we’ll define some keys to move in four directions. We could limit Link so he can only move from one block to the next, but this can make the movement look rather jerky, so we’re going to allow Link to move a couple of pixels each time we detect that a key is held down. This means we need to work out which block he’s moving towards, and if it’s not a ground block (represented on our minimap by black pixels), we cancel the move. If Link does move, we need to cycle his animation frames using a frame counter, and then allocate an image based on that frame counter and the direction he’s facing.

Now we have Link moving around the screen, we need to bring in the scrolling screen function when he reaches the edge. We do this by detecting when he gets to x<0 or x>800 or y>600 or y<100. We can then set our mapScrollx or mapScrolly variables; this will trigger the scrolling mechanism which will take us to the next section of the map. While we’re scrolling, however, we need to make sure other objects on the map also scroll so that they remain in the correct position relative to the map.
Once we have Link moving around from screen to screen, we’ll want some enemies for him to fight. We’ll make some monsters as Actors and dot them around the map. We want them to move around a bit, so we can add some logic in the update cycle to move them towards Link if they’re on the screen at the same time. We can test for block collision the same way we do for Link.
Next, we’ll need to add Link’s sword-fighting ability. We’ll have the sword appear when the SPACE bar is pressed by making the sword as a separate Actor. There are four different images for the four directions, although the same effect could be done by changing the angle of the sword Actor. When this animation’s running, we can test to see if there’s a collision with any of the monsters, and if so, trigger a change of state so they’re dispatched. We change the state of the monster from 10 to 9, which we then use to count down during the update while turning the Actor around, and when that state reaches zero, the enemy’s no longer displayed.
The last part we’ll cover is the minimap in the top left of the screen. This is an indicator of where Link is on the larger map, so all we need to do is translate his coordinates on the large map down to the size of the minimap and plot a square.
And that’s it – we have the basics of a top-down Zelda-like! There are all kinds of elements you could add – potions and other useful items, more enemies, secret paths, and so on – but as always, we’ll leave those for you to dream up.
Get your copy of Wireframe #61
You can read more features like this one in Wireframe issue 61, available directly from Raspberry Pi Press – we deliver worldwide.
We have a brand new subs offer! Subscribe to Wireframe for a year and get a FREE 8BitDo Pro 2 Bluetooth Controller worth £39.

And if you prefer your magazines in digital form, you can also download Wireframe issue 61 as a free PDF!

4 comments
solar3000
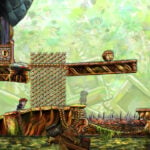
In that first picture, that stuff looks like….errr nevermind.
Buck
Argh…. I can’t unsee it now.
Nish
Nintendo is our childhood love.
Soundcloudtomp3downloader
Just made my first “hello world” in my python class. Guess it’s time to make Zelda now
Comments are closed