Building a Raspberry Pi Pico 2-powered drone from scratch
The summer, and Louis Wood’s internship with our Maker in Residence, was creeping to a close without his final build making it off the ground. But as if by magic, on his very last day, Louis got his handmade drone flying.

3D-printed CAD design
The journey of building a custom drone began with designing in CAD software. My initial design was fully 3D-printed with an enclosed structure and cantilevered arms to support point forces. The honeycomb lid provided cooling, and the enclosure allowed for embedded XT-60 and MR-30 connections, creating a clean and integrated look. Inside, I ensured all electrical components were rigidly mounted to avoid unwanted movement that could destabilise the flight.


Testing quickly revealed that 3D-printed frames were brittle, often breaking during crashes. Moreover, the limitations of my printer’s build area meant that motor placement was cramped. To overcome these issues, I CNC-routed a new frame from 4 mm carbon fibre, increasing the wheelbase for better stability. Using Carveco software, I generated toolpaths and cut the frame on a WorkBee CNC in our Maker Lab. After two hours, I had a sturdy, assembled frame ready for electronics.
Not one, not two, but three Raspberry Pis
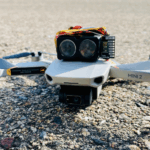
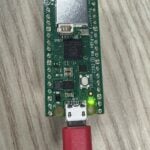
For the drone’s brain, I used a Raspberry Pi Pico 2 connected to an MPU6050 gyroscope for real-time orientation data and an IBUS protocol receiver for streamlined control inputs. Initially, I faced issues with signal processing due to the delay of handling five separate PWM signals. Switching to IBUS sped up the loop frequency by tenfold, which greatly improved flight response. The Pico handled PID (Proportional-Integral-Derivative) calculations for stability, and a 4-in-1 ESC managed the motor signals. The drone also carries a Raspberry Pi Zero with a Camera Module 2 and an analogue VTX for real-time FPV (first-person view) flying.

Programming was based on Tim Hanewich’s Scout flight controller code, implementing a ‘rate’ mode controller that uses PID values to maintain desired angular velocities. Fine-tuning the PID gains was essential; improper settings could lead to instability and dangerous oscillations. I followed a careful tuning process, starting with low values for each parameter and slowly increasing them.
To make the process safer, I constructed a testing rig to isolate each axis and simulate flight conditions. This allowed me to achieve a rough tune before moving on to actual flight tests, ultimately ensuring the drone’s safe and stable performance.
18 comments
Chris
How much did this weigh? What was it’s flight time/battery capacity and range? This is something I’d love to do at home.
Raspberry Pi Staff Toby Roberts
The device weighs approximately 600 grams without the battery. It operates on a 4S battery, and you can select the capacity based on how long you want it to fly. The transmitter uses the ELRS protocol, offering a range that well exceeds the UK’s legal limit of 500 meters.
Steve
Worth knowing that in the UK, this type of drone (as it weighs > 250g, and also because it has a camera) can only be flown by someone registered with the CAA (which you renew annually) and who has completed their test.
https://www.caa.co.uk/drones/rules-and-categories-of-drone-flying/introduction-to-drone-flying-and-the-uk-rules/
Raspberry Pi Staff Toby Roberts
Thanks Steve. You are spot on. 👍
Alex
How did you wire the ELRS to your raspberry pi?
XZROMs
Which electronic speed controllers (ESCs) are compatible with my chosen motors?
David Fruehwald
Could you put the project up on GitHub or something like that? I’d love to make one.
Kevin Kelly
Is there a guide to follow to build this anywhere or something similar?
Cheers
Raspberry Pi Staff Toby Roberts
Hi Kev. Yep, hope so. Louis has now gone back to Uni so concentrating on his studies. But, I suspect that he will return!! Stay tuned.
Ryan
How’s the video latency?
Any chance of source code?
Raspberry Pi Staff Toby Roberts
Hey Ryan. Latency worked out at 50ms. Needs a bit of improvement with the 5v to the Raspberry Pi Zero as it struggled a bit. More work needed ! Code to follow – still a work in progress.
Muhammad Adamu
Very nice project i like
JC
Is there a way to shrink the size (3D printer) to make less than 250g?
Priyansh
What did U use drone kit to make it fly ??
Beyonlo
Hi, amazing project. Do you plan to share the source code? I would also like to mount my drone using Pico2 and MicroPython. Maybe share your project in github so people can use and contribuit it by doing pull requests and so on, building on a big project with a drone with pico2 + MicroPython!!! Love it.
Bob
Wow, this is an amazing project! I would love to replicate it in the UK. What would you say the approximate total cost for the project would be?
ds roms
Which electronic speed controllers (ESCs) are compatible
Jon Rick
The most frustrating part was that the software worked inconsistently, and the data was unreliable. You can’t confront anyone about your findings if the information isn’t accurate.
Comments are closed