An affordable ocular fundus camera
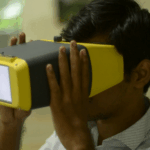
The ocular fundus is the interior surface of the eye, and an ophthalmologist can learn a lot about a patient’s health by examining it. However, there’s a problem: an ocular fundus camera can’t capture a useful image unless the eye is brightly lit, but this makes the pupil constrict, obstructing the camera’s view. Ophthalmologists use pupil-dilating eye drops to block the eye’s response to light, but these are uncomfortable and can cause blurred vision for several hours. Now, researchers at the University of Illinois at Chicago have built a Raspberry Pi-based fundus camera that can take photos of the retina without the need for eye drops.

Dr Bailey Shen and co-author Dr Shizuo Mukai made their camera with a Raspberry Pi 2 and a Pi NoIR Camera Module, a version of the Camera Module that does not have an infrared filter. They used a small LCD touchscreen display and a lithium battery, holding the ensemble together with tape and rubber bands. They also connected a button and a dual infrared/white light LED to the Raspberry Pi’s GPIO pins.

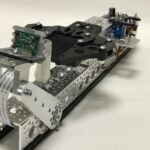
Back of the prototype fundus camera, showing the touchscreen by Bailey Y. Shen and Shizuo Mukai / CC BY 4.0
When the Raspberry Pi boots, a Python script turns on the infrared illumination from the LED and displays the camera view on the screen. The iris does not respond to infrared light, so in a darkened room the operator is able to position the camera and a separate condensing lens to produce a clear image of the patient’s fundus. When they’re satisfied with the image, the operator presses the button. This turns off the infrared light, produces a flash of white light, and captures a colour image of the fundus before the iris can respond and constrict the pupil.

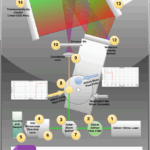
Infrared image of the author’s left fundus taken with the prototype fundus camera, and color image of the same fundus, by Bailey Y. Shen and Shizuo Mukai / CC BY 4.0
This isn’t the first ocular fundus camera to use infrared/white light to focus and obtain images without eye drops, but it is less bulky and distinctly cheaper than existing equipment, which can cost thousands of dollars. The total cost of all the parts is $185, and all but one are available as off-the-shelf components. The exception is the dual infrared/white light LED, a prototype which the researchers explain is a critical part of the equipment. Using an infrared LED and a white LED side by side doesn’t yield consistent results. We’d be glad to see the LED available on the market, both to support this particular application, and because we bet there are plenty of other builds that could use one!
Read more in Science Daily, in an article exploring the background to the project. The article is based on the researchers’ recent paper, presenting the Raspberry Pi ocular fundus camera in the Journal of Ophthalmology. The journal is an open access publication, so if you think this build is as interesting as I do, I encourage you to read the researchers’ presentation of their work, its possibilities and its limitations. They also provide step-by-step instructions and a parts list to help others to replicate and build on their work.
It’s beyond brilliant to see researchers and engineers using the Raspberry Pi to make medical and scientific work cheaper and more accessible. Please tell us about your favourite applications, or the applications you’d develop in your fantasy lab or clinic, in the comments.


12 comments
Richard Sierakowski
Slowly but surely the RasPi Foundation is helping to facilitate solutions that really improve the conditions for all.
Richard
Richard Collins
100% agree :)
Abhi
can we use raspberry pi for commercial purpose?
Helen Lynn
Yes, and many businesses do. They’re widely used in digital signage, to control industrial processes, and so on.
Andy
This is so brilliant! and solves a problem I’ve got with my mother-in-law. She’s 90, and afraid of hospitals and doctors and drops, but needs her eyes checked.
So if the opthalmologist had one of these, he could bring it to her home, no drops, no hospitals.
Dean
You wouldn’t normally need drops anyways, any optometrist with a retinal camera can do it.
Shannon
So, my question would be, how close together do the LED chips have to be? Can you hack on an IR and white LED chip to get them fairly close together to get this to work, or is it that they absolutely have to be on the same die? Charlieplex a couple of SMD LED’s close together? Would it work if a little optical trickery were used to bring the light into a common “plane”, could use make use of separate cheaper elements? Like a light guide, or light tube?
This is cool on so many levels, because it’s Pi, Physics, and ophthalmology. After having so many different pictures and scans of my retina taken over the past year and a half, this really hits close to home. And it’s so feakin’ cool!
Bailey Shen
Hi Shannon,
If you tape a 5 mm infrared and 5 mm white LED flush against each other, they will be coaxial enough to get reasonably consistent pictures. However, I believe using the prototype dual infrared and white LED produces more consistent photos. We are hoping that these dual infrared and white LED will be purchasable soon.
Sajid
This is superb; i am working on a project using imaging for diagnostics for eye issues and considering using Raspberry pi for my doctorate project. This will meet up with this project down the road.
Karim
Hi, I am karim from Algeria,
I am interested for fundus camera,
I want help to make funds camera .
Would you like to give me the steps of making fundus camera from beginning to the end.
Thanks for ur help
Best wishes
Karim
Helen Lynn
If you follow the link to the journal paper that this project’s authors published about their work, you’ll find instructions and a BOM linked under “Supplementary Material”.
bg
Hi,
Is anyone able to successfully get fundus image using the above procedure? I tried creating the fundus camera with the exact hardware. But I was not successful. As mentioned, I had connected 100 ohm resistor to Infrared LED SMT47W/850D. The problem was the light of LED is very little and in absolute darkness nothing is visible at all.
Would be great if someone who has successfully recreated the fundus camera to let me know where I am going wrong.
Thanks.
Comments are closed